background image

– 62 –

AUTO

3

9

5

7

6

1

2

8

4

10

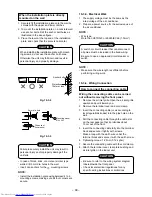
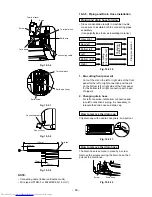
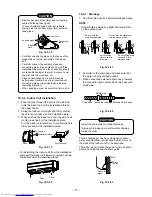
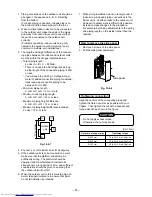
9-5-2. Name and Functions of Indications on Remote Controller

[Display]

All indications, except for the clock time indicator, are displayed by pushing the 

 button.

1

Transmission mark

This transmission mark   indicates when the remote
controller transmits signals to the indoor unit.

2

Mode indicator

Indicates the current operation mode.
(AUTO : Automatic control, A : Auto changeover
control, 

 : Cool, 

 : Dry, 

 : Heat)

3

Temperature indicator

Indicates the temperature setting.
(17°C to 30°C)

4

PURE indicator

Shows that the electrical air purifying operation is in
progress.

5

FAN speed indicator

Indicates the selected fan speed.

AUTO or five fan speed levels
(LOW   , LOW

+


 , MED 

 , MED

+


 ,

HIGH 

 ) can be shown.

Indicates AUTO when the operating mode is either
AUTO or 

 : Dry.

6

TIMER and clock time indicator

The time setting for timer operation or the clock time
is indicated.

The current time is always indicated except during
TIMER operation.

7

Hi POWER indicator

Indicates when the Hi POWER operation starts.

Push the Hi POWER button to start and push it
again to stop the operation.

8

 (MEMORY) indicator

Flashes for 3 seconds when the MEMO button is
pushed during operation.

The 

 mark is shown when holding down the

button for 3 seconds or more while the mark is
flashing.

Push another button to turn off the mark.

9

SLEEP MODE indicator

Indicates when the SLEEP MODE is in activated.

Push the SLEEP MODE button to start and push it
again to stop operation.

10

A, B change indicator remote controller

When the remote controller switching function is
set, “B” appears in the remote controller display.
(When the remote controller setting is “A”, there is
no indication at this position.)

• In the illustration, all indications are shown for

purposes of explanation.

During operation, only the relevant indicators are
shown on the remote controller.

Summary of Contents for RAS-4M23SACV-E

Page 1: ...A FILE NO A06 014 PRINTED IN JAPAN Apr 2007 ToMo SERVICE MANUAL AIR CONDITIONER SPLIT TYPE RAS B10SKVP E RAS B13SKVP E RAS B16SKVP E RAS 4M23SAV E RAS M10SKCVP E RAS M13SKCVP E RAS M16SKCVP E RAS 4M23SACV E ...

Page 2: ...N VIEWS 26 5 WIRING DIAGRAM 28 6 SPECIFICATIONS OF ELECTRICAL PARTS 30 7 REFRIGERANT CYCLE DIAGRAM 31 8 CONTROL BLOCK DIAGRAM 36 9 OPERATION DESCRIPTION 39 10 INSTALLATION PROCEDURE 64 11 HOW TO DIAGNOSE THE TROUBLE 80 12 HOW TO REPLACE THE MAIN PARTS 100 13 EXPLODED VIEWS AND PARTS LIST 116 ...

Page 3: ...unit and installation tools are different from those used for the conventional refrigerant units Accordingly special tools are required for the new refrigerant R410A units For connecting pipes use new and clean piping materials with high pressure fittings made for R410A only so that water and or dust does not enter Moreover do not use the existing piping because there are some problems with pressu...

Page 4: ...a qualified electrician in accordance with the Installation Manual Make sure the air conditioner uses an exclusive circuit An insufficient circuit capacity or inappropriate installation may cause fire When wiring use the specified cables and connect the terminals securely to prevent external forces applied to the cable from affecting the terminals Be sure to provide grounding Do not connect ground...

Page 5: ...utdoor unit RAS 4M23SAV E RAS 4M23SACV E Indoor unit RAS B10SKVP E RAS B13SKVP E RAS B16SKVP E RAS M10SKV E RAS M13SKV E RAS M16SKV E RAS M10GDV E RAS M13GDV E RAS M16GDV E RAS M10SMUV E RAS M13SMUV E RAS M16SMUV E RAS M10SKCVP E RAS M13SKCVP E RAS M16SKCVP E RAS M10SKCV E RAS M13SKCV E RAS M16SKCV E RAS M10GDCV E RAS M13GDCV E RAS M16GDCV E RAS M10SMUCV E RAS M13SMUCV E RAS M16SMUCV E Type Heat p...

Page 6: ... chargeless length m Additional refrigerant Maximum height difference m Name of refrigerant Weight kg Wiring connection Power supply Interconnection Usable temperature range Indoor Cooling Heating C Outdoor Cooling Heating C Installation plate Wireless remote controller Label Remote controller holder Indoor unit Pan head wood screw Purifying filter Accessory Deodorizing filter Batteries Mounting s...

Page 7: ...n Minimum length per unit m Maximum length total m Maximum chargeless length m Additional refrigerant Maximum height difference m Name of refrigerant Weight kg Wiring connection Power supply Interconnection Usable temperature range Indoor Cooling Heating C Outdoor Cooling Heating C Installation plate Wireless remote controller Label Remote controller holder Indoor unit Pan head wood screw Accessor...

Page 8: ... to 6 2 5 6 1 8 to 6 2 6 1 2 2 to 6 8 6 1 2 2 to 6 8 6 3 2 2 to 7 1 6 3 2 2 to 7 1 6 3 2 2 to 7 1 6 3 2 2 to 7 1 6 3 2 2 to 7 1 6 8 3 0 to 7 5 6 8 3 0 to 7 5 6 8 3 0 to 7 5 6 8 3 0 to 7 5 Power consumption W 710 320 to 950 1340 320 to 1750 2180 320 to 2250 1500 360 to 1800 1500 360 to 1800 1790 360 to 1950 1790 360 to 1950 1790 360 to 1950 1840 420 to 1950 1840 420 to 1950 1950 420 to 2200 1950 42...

Page 9: ... 1 2 2 to 6 8 6 3 2 2 to 7 1 6 3 2 2 to 7 1 6 3 2 2 to 7 1 6 3 2 2 to 7 1 6 3 2 2 to 7 1 6 8 3 0 to 7 5 6 8 3 0 to 7 5 6 8 3 0 to 7 5 6 8 3 0 to 7 5 Power consumption W 710 320 to 950 1340 320 to 1750 2180 320 to 2250 1500 360 to 1800 1500 360 to 1800 1790 360 to 1950 1790 360 to 1950 1790 360 to 1950 1840 420 to 1950 1840 420 to 1950 1950 420 to 2200 1950 420 to 2200 1950 420 to 2200 1950 420 to ...

Page 10: ...8 6 1 2 2 to 6 8 6 3 2 2 to 7 1 6 3 2 2 to 7 1 6 3 2 2 to 7 1 6 3 2 2 to 7 1 6 3 2 2 to 7 1 6 8 3 0 to 7 5 6 8 3 0 to 7 5 6 8 3 0 to 7 5 6 8 3 0 to 7 5 Power consumption W 710 320 to 950 1340 320 to 1750 2180 320 to 2250 1500 360 to 1800 1500 360 to 1800 1790 360 to 1950 1790 360 to 1950 1790 360 to 1950 1840 420 to 1950 1840 420 to 1950 1950 420 to 2200 1950 420 to 2200 1950 420 to 2200 1950 420 ...

Page 11: ...2 to 7 8 6 7 2 2 to 8 0 6 7 2 2 to 8 0 6 7 2 2 to 8 0 6 7 2 2 to 8 0 6 7 2 2 to 8 0 7 2 2 0 to 8 4 7 2 2 0 to 8 4 7 2 2 0 to 8 4 7 2 2 0 to 8 4 Power consumption W 1120 320 to 1850 1800 320 to 2050 2260 320 to 2650 1680 360 to 2380 1680 360 to 2380 1790 360 to 2430 1790 360 to 2430 1790 360 to 2430 1650 420 to 2150 1650 420 to 2150 1750 420 to 2200 1750 420 to 2200 1750 420 to 2200 1750 420 to 220...

Page 12: ...2 2 to 7 8 6 7 2 2 to 8 0 6 7 2 2 to 8 0 6 7 2 2 to 8 0 6 7 2 2 to 8 0 6 7 2 2 to 8 0 7 2 2 0 to 8 4 7 2 2 0 to 8 4 7 2 2 0 to 8 4 7 2 2 0 to 8 4 Power consumption W 1120 320 to 1850 1800 320 to 2050 2260 320 to 2650 1680 360 to 2380 1680 360 to 2380 1790 360 to 2430 1790 360 to 2430 1790 360 to 2430 1650 420 to 2150 1650 420 to 2150 1750 420 to 2200 1750 420 to 2200 1750 420 to 2200 1750 420 to 2...

Page 13: ...2 2 to 7 8 6 7 2 2 to 8 0 6 7 2 2 to 8 0 6 7 2 2 to 8 0 6 7 2 2 to 8 0 6 7 2 2 to 8 0 7 2 2 0 to 8 4 7 2 2 0 to 8 4 7 2 2 0 to 8 4 7 2 2 0 to 8 4 Power consumption W 1120 320 to 1850 1800 320 to 2050 2260 320 to 2650 1680 360 to 2380 1680 360 to 2380 1790 360 to 2430 1790 360 to 2430 1790 360 to 2430 1650 420 to 2150 1650 420 to 2150 1750 420 to 2200 1750 420 to 2200 1750 420 to 2200 1750 420 to 2...

Page 14: ... 2 2 to 6 8 6 3 2 2 to 7 1 6 3 2 2 to 7 1 6 3 2 2 to 7 1 6 3 2 2 to 7 1 6 3 2 2 to 7 1 6 8 3 0 to 7 5 6 8 3 0 to 7 5 6 8 3 0 to 7 5 6 8 3 0 to 7 5 Power consumption W 710 320 to 950 1340 320 to 1750 2180 320 to 2250 1500 360 to 1800 1500 360 to 1800 1790 360 to 1950 1790 360 to 1950 1790 360 to 1950 1840 420 to 1950 1840 420 to 1950 1950 420 to 2200 1950 420 to 2200 1950 420 to 2200 1950 420 to 22...

Page 15: ...6 1 2 2 to 6 8 6 3 2 2 to 7 1 6 3 2 2 to 7 1 6 3 2 2 to 7 1 6 3 2 2 to 7 1 6 3 2 2 to 7 1 6 8 3 0 to 7 5 6 8 3 0 to 7 5 6 8 3 0 to 7 5 6 8 3 0 to 7 5 Power consumption W 710 320 to 950 1340 320 to 1750 2180 320 to 2250 1500 360 to 1800 1500 360 to 1800 1790 360 to 1950 1790 360 to 1950 1790 360 to 1950 1840 420 to 1950 1840 420 to 1950 1950 420 to 2200 1950 420 to 2200 1950 420 to 2200 1950 420 to...

Page 16: ...8 6 1 2 2 to 6 8 6 3 2 2 to 7 1 6 3 2 2 to 7 1 6 3 2 2 to 7 1 6 3 2 2 to 7 1 6 3 2 2 to 7 1 6 8 3 0 to 7 5 6 8 3 0 to 7 5 6 8 3 0 to 7 5 6 8 3 0 to 7 5 Power consumption W 710 320 to 950 1340 320 to 1750 2180 320 to 2250 1500 360 to 1800 1500 360 to 1800 1790 360 to 1950 1790 360 to 1950 1790 360 to 1950 1840 420 to 1950 1840 420 to 1950 1950 420 to 2200 1950 420 to 2200 1950 420 to 2200 1950 420 ...

Page 17: ...95 90 85 80 75 70 65 60 55 50 Outdoor temp C Capacity ratio 70 60 50 40 30 20 10 0 110 105 100 95 90 85 80 Total pipe length m 110 100 90 80 70 60 50 40 Outdoor temp C Capacity ratio Conditions Indoor DB27 C WB19 C Outdoor DB35 C WB24 C Indoor air flow High 4 units operating Conditions Indoor DB20 C WB15 C Outdoor DB7 C WB6 C Indoor air flow High Pipe length 5m 4 4 units operating Conditions Indoo...

Page 18: ...se pressure in the refrigeration cycle may become abnormally high so that a rupture or personal injury may be caused 5 After completion of installation work check to make sure that there is no refrigeration gas leakage If the refrigerant gas leaks into the room coming into contact with fire in the fan driven heater space heater etc a poisonous gas may occur 6 When an air conditioning system charge...

Page 19: ...es of socket joints Nominal diameter 1 4 3 8 1 2 5 8 Reference outer diameter of copper pipe jointed mm 6 35 9 52 12 70 15 88 Minimum joint thickness mm 0 50 0 60 0 70 0 80 3 2 2 Processing of Piping Materials When performing the refrigerant piping installation care should be taken to ensure that water or dust does not enter the pipe interior that no other oil than lubricating oils used in the ins...

Page 20: ...ch type 0 to 0 5 0 to 0 5 0 to 0 5 0 to 0 5 Conventional flare tool Clutch type Wing nut type 1 0 to 1 5 1 5 to 2 0 1 0 to 1 5 1 5 to 2 0 1 0 to 1 5 2 0 to 2 5 1 0 to 1 5 2 0 to 2 5 Table 3 2 4 Dimensions related to flare processing for R22 Nominal diameter 1 4 3 8 1 2 5 8 Outer diameter mm 6 35 9 52 12 70 15 88 Thickness mm 0 8 0 8 0 8 1 0 A mm Flare tool for R22 clutch type 0 to 0 5 0 to 0 5 0 t...

Page 21: ...ghtening torque for R410A is the same as that for conventional R22 Incidentally when the torque is weak the gas leakage may occur When it is strong the flare nut may crack and may be made non removable When choosing the tighten ing torque comply with values designated by manufacturers Table 3 2 7 shows reference values NOTE When applying oil to the flare surface be sure to use oil designated by th...

Page 22: ... refrigerant charging Refrigerant cylinder Leakage detector Charging cylinder Usage Pipe flaring Flaring by conventional flare tool Connection of flare nut Evacuating refrigerant charge run check etc Vacuum evacuating Refrigerant charge Refrigerant charge Gas leakage check Refrigerant charge R410A air water heat pump installation Existence of new equipment for R410A Yes Yes Yes Yes Yes Yes Yes Yes...

Page 23: ...and the connecting port of the electronic balance and charge liquid refrigerant Water heat exchanger unit Outdoor unit Opened Opened Refrigerant cylinder with siphon Check valve Open close valve for charging Electronic balance for refrigerant charging Opened Closed Service port 3 4 Recharging of Refrigerant When it is necessary to recharge refrigerant charge the specified amount of new refrigerant...

Page 24: ... composed of silver and copper It is used to join iron copper or copper alloy and is relatively expensive though it excels in solderability 2 Phosphor bronze brazing filler Phosphor bronze brazing filler is generally used to join copper or copper alloy 3 Low temperature brazing filler Low temperature brazing filler is generally called solder and is an alloy of tin and lead Since it is weak in adhe...

Page 25: ...efore use a flux which does not contain chlorine 3 When adding water to the flux use water which does not contain chlorine e g distilled water or ion exchange water 4 Remove the flux after brazing 3 5 3 Brazing As brazing work requires sophisticated techniques experiences based upon a theoretical knowledge it must be performed by a person qualified In order to prevent the oxide film from occurring...

Page 26: ...10 10 10 10 790 Plasma pure filter Air filter Front panel Knockout system Knockout system 55 65 208 790 60 7 250 7 51 5 Indoor heat exchanger 54 5 60 60 54 5 53 53 Installation plate hanging section 290 Installation plate hanging section Drain hose Outside length 0 54m Connecting pipe Outside length 0 4m Flare Ø9 52 B16SKVP E M16SKCVP E Ø12 7 Connecting pipe Outside length 0 45m Flare Ø6 35 47 or ...

Page 27: ... 27 4 2 Outdoor Unit RAS 4M23SAV E RAS 4M23SACV E ...

Page 28: ...or R01 Line Filter Thermo Sensor TA 1 2 1 2 CN62 BLU BLK BLK Heat Exchanger Sensor TC 1 2 1 2 CN63 YEL CN42 WHI CN01 CN02 CN51 BLK BLK Heat Exchanger Sensor TCJ 1 2 1 2 Indoor Terminal Block To outdoor unit Wireless Unit Assembly MCC 5052 3 2 1 WHI YEL YEL 1 2 3 1 2 3 YEL 4 1 2 3 4 4 YEL 5 5 CN22 WHI CN32 WHI CN31 WHI Louver Motor Fan Motor Micro SW 1 2 3 1 2 3 4 4 5 5 RED BLK 1 2 3 1 2 3 WHI 4 4 ...

Page 29: ...o Indoor unit D Power supply 220 240V 50Hz 220 220V 60Hz 2 1 2 1 TE CN604 3 2 1 3 1 TGa 3 2 1 3 1 YEL BLU 2 1 2 1 TS CN603 BLK CN606 TGb 3 2 1 3 1 BRW BLU YEL BZ BY BX EW BW EV BV EU BU CN20 CN22 CN21 CN607 TGc 3 2 1 3 1 GRN CN608 TGd 2 1 2 1 BLU or GRY BLK WHI RED RED Compressor Fan motor 4 way valve coil 3 1 3 1 3 1 3 1 BLU YEL 2 1 2 1 2 1 2 1 2 1 2 1 PUR ORN 2 1 2 1 2 1 2 1 PNK RED 3 3 3 3 BLU ...

Page 30: ...nverter attached Inverter attached Inverter attached Inverter attached Inverter attached Inverter attached Inverter attached For protection of switching power source F04 For protection of power factor converter circuit breakage For protection of inverter input overcurrent For protection of switching power source F300 For protection of power source LLQ2G501KHUATF 6MBI25GS 060 51A DA150A1F 20F US622...

Page 31: ...ence 15m Allowable pipe length Evaporator Cross flow fan To C room To B room P T2 TO Propeller fan Outdoor unit TAa TD Only in heating ON TGa Strainer Packed valve Gas side Ø12 7 Accumulating tank 1500cc Compressor DA150A1F 20F Muffler Ø25 x 160L Muffler Ø25 x 160L Packed valve Liquid side Ø9 52 TGd TGc TGb Per 1 unit Max 25m Min 2m Total Max 60m Chargeless 40m Charge 20g m 41 to 60m Ø6 35 Ø9 52 Ø...

Page 32: ...ht difference 15m Allowable pipe length Evaporator Cross flow fan To C room To B room P T2 TO Propeller fan Outdoor unit TGa Strainer Packed valve Gas side Ø12 7 Compressor DA150A1F 20F Packed valve Liquid side Ø9 52 TGd TGc TGb Ø6 35 Ø9 52 Ø9 52 Ø9 52 Ø9 52 Ø6 35 Ø6 35 Ø6 35 Pulse motor valve at liquid side UKV 18D Refrigerant amount 1 7kg R410A NOTE Gas leak check position Refrigerant flow Temp ...

Page 33: ... 0 0 8 to 1 0 0 8 to 1 0 0 7 to 0 9 0 8 to 1 0 0 8 to 1 0 0 8 to 1 0 0 8 to 1 0 0 8 to 1 0 0 8 to 1 0 0 8 to 1 0 0 9 to 1 1 0 9 to 1 1 0 9 to 1 1 0 9 to 1 1 Heat exchanger pipe temp T1 C T2 C 13 to 15 45 to 47 8 to 10 46 to 48 8 to 10 52 to 54 11 to 13 58 to 60 11 to 13 58 to 60 11 to 13 58 to 60 11 to 13 58 to 60 11 to 13 58 to 60 13 to 15 56 to 58 13 to 15 56 to 58 13 to 15 56 to 58 13 to 15 56 ...

Page 34: ...2 7 to 2 9 2 8 to 3 0 2 8 to 3 0 2 8 to 3 0 2 2 to 2 4 2 2 to 2 4 2 2 to 2 4 2 2 to 2 4 2 2 to 2 4 2 2 to 2 4 2 2 to 2 4 1 9 to 2 1 1 9 to 2 1 1 9 to 2 1 1 9 to 2 1 Heat exchanger pipe temp T1 C T2 C 42 to 44 2 to 4 50 to 52 2 to 4 52 to 54 1 to 3 39 to 41 0 to 2 39 to 41 0 to 2 39 to 41 0 to 2 39 to 41 0 to 2 39 to 41 0 to 2 32 to 34 1 to 1 32 to 34 1 to 1 32 to 34 1 to 1 32 to 34 1 to 1 32 to 34...

Page 35: ... 1 0 0 8 to 1 0 0 7 to 0 9 0 8 to 1 0 0 8 to 1 0 0 8 to 1 0 0 8 to 1 0 0 8 to 1 0 0 8 to 1 0 0 8 to 1 0 0 9 to 1 1 0 9 to 1 1 0 9 to 1 1 0 9 to 1 1 Heat exchanger pipe temp T1 C T2 C 13 to 15 45 to 47 8 to 10 46 to 48 8 to 10 52 to 54 11 to 13 58 to 60 11 to 13 58 to 60 11 to 13 58 to 60 11 to 13 58 to 60 11 to 13 58 to 60 13 to 15 56 to 58 13 to 15 56 to 58 13 to 15 56 to 58 13 to 15 56 to 58 13 ...

Page 36: ...Hz Remote Controller Operation START STOP Thermo Setting Fan Speed Selection ON TIMER Setting OFF TIMER Setting Louver AUTO Swing Louver Direction Setting Hi POWER SLEEP MODE Operation Mode Selection AUTO COOL DRY HEAT REMOTE CONTROLLER Air Purifier Heat Exchanger Sensor Tc Room Temperature Sensor Ta Infrared Rays Signal Receiver and Indication Functions Cold draft preventing Function 3 minute Del...

Page 37: ...rcuit Clock Frequency Oscillator Circuit Power Supply Circuit Infrared Rays 36 7kHz Remote Controller Operation START STOP Thermo Setting Fan Speed Selection ON TIMER Setting OFF TIMER Setting Louver AUTO Swing Louver Direction Setting Hi POWER SLEEP MODE Operation Mode Selection AUTO COOL DRY REMOTE CONTROLLER Air Purifier Heat Exchanger Sensor Tc Room Temperature Sensor Ta Infrared Rays Signal R...

Page 38: ...pipe temp Sensor Suction temp Sensor Evaporator temp Sensor Outdoor air temp Sensor MCC 818 SUB P C B MCC 1438 MAIN P C B 220 240V 50Hz 220V 60Hz Driver circuit of P M V P M V Pulse motor valve PWM Pulse width modulation IGBT Insulated gate bipolar transistor A unit send receive circuit B unit send receive circuit C unit send receive circuit D unit send receive circuit Inverter DC AC Over current ...

Page 39: ...eration control 2 Role of outdoor unit controller Receiving the operation command signal Serial signal from the indoor unit controller the outdoor unit performs its role Compressor operation control Operation control of outdoor fan motor P M V control 4 way valve control Operations followed to judgment of serial signal from indoor side Detection of inverter input current and current release operat...

Page 40: ...10 SLEEP MODE operation 51 Cooling operation 51 Heating operation 51 11 Temporary operation 52 12 Air purifying control 52 Air purifying control Detection of abnormality 53 13 Discharge temperature control 53 14 Pulse motor valve PMV control 54 15 Clean operation 55 16 Clean operation cancel 56 17 Select switch on remote controller 57 18 Set temp correction 58 9 3 Auto Restart Function 59 9 3 1 Ho...

Page 41: ...te controller ON OFF Air conditioner Air purifier Operation select COOL HEAT AUTO DRY Temperature setup Air direction Swing Air volume select AUTO LOW LOW MED MED HIGH Sleep mode ON timer setup OFF timer setup High power Indoor unit control Command signal generating function of indoor unit operation Calculation function temperature calculation Activation compensation function of indoor fan Cold dr...

Page 42: ...ve according to the operation signal sent from the indoor unit 1 The power of 4 way valve is turned on in heating time and turned off in cooling time and defrosting time respectively No 1 2 3 4 5 6 7 8 9 10 11 12 13 14 15 16 Indoor unit Pressed first Pressed last Pressed first Pressed last Pressed first Pressed last Pressed first Pressed last Pressed first Pressed last Pressed first Pressed last P...

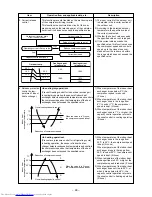
Page 43: ...peration mode COOL HEAT reselect an operation mode 5 DRY operation DRY operation is performed according to the difference between room temperature and the setup temperature as shown below In DRY operation fan speed is controlled in order to prevent lowering of Ta and to avoid air flow from blowing directly to persons 1 Detects the room temperature Ta when the DRY operation started 2 Starts operati...

Page 44: ...to the setup tempera ture room temperature and heat exchanger temperature Fig 1 Fig 2 Table 1 Indoor fan air flow rate 2 5 Ta C 2 0 1 5 1 0 0 5 Tsc a b c d e M WB 3 4 5 L W6 Air volume AUTO L L M M H W6 L M 2 W9 M H 2 WC Indication Fan speed Fan speed setup COOL ON AUTO MANUAL 3 Fan speed M L x 3 4 L 4 Fan speed M L x 2 4 L 5 Fan speed M L x 1 4 L Linear approximation from M and L Fan speed level ...

Page 45: ...tes passed after operation start and room temp is 3 C or lower than set temp Room temp Set temp 4 C In stability When 12 to 25 minutes passed after operation start and room temp is higher than set temp 3 C When 25 minutes or more passed after operation start Room temp Set temp 3 5 C Fan speed AUTO Basic fan control No limitation while fan speed MANUAL mode is in stability A When Tsc 24 A is 24 and...

Page 46: ...eration command sent from the remote controller is processed by the indoor unit controller and transferred to the controller of the outdoor unit 2 When strong wind blows at outdoor side the outdoor fan is not activated 3 The operation of air conditioner stops and an alarm is displayed if the fan is locked 4 The outdoor fan is controlled by Operation mode Outdoor temperature To Compressor revolutio...

Page 47: ...20 seconds to the MIN revolutions When Zone A operation continues for 5 minutes the compressor is stopped and then restarted Zone C Decreased by 50 rpm every 20 seconds to the MIN revolutions Zone D Maintained at the current revolutions Zone E Increased by 50 rpm every 20 seconds to the MAX revolutions Zone B Decreased by 100 rpm every 20 seconds to the MIN revolutions TE 24 C 21 C 18 C 15 C Zone ...

Page 48: ...fied value In heating operation Prevent overpressure control for refrigerating cycle In heating operation the sensor of indoor heat ex changer detects condensation temperature and controls the compressor speed so that temperature of the heat exchanger does not exceed the specified value 6 Release protective control by tem perature of indoor heat exchanger 1 When temperature of the indoor heat exch...

Page 49: ...s 2 Invert OFF 4 way valve 10 seconds after stop of the compressor 3 The outdoor fan stops at the same time when the compressor stops 4 When temperature of the indoor heat exchanger becomes 28 C or lower stop the indoor fan Finish of defrost operation Returning conditions from defrost operation to heating operation 1 Temperature of outdoor heat exchanger rises to 8 C or higher 2 Temperature of out...

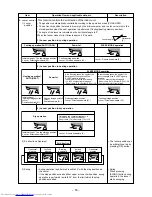
Page 50: ... Directs downward 23 Louver Directs downward 8 Louver angle Horizontal 0 Horizontal blowing Inclined blowing Blowing downward Air direction Inclined blowing Horizontal blowing Item 9 Louver control 1 Louver position Operation flow and applicable data etc This function controls the air direction of the indoor unit Description Swing operation is performed in width 35 with the stop position as the ce...

Page 51: ... MODE operation 3 The louver position is set horizontally Standard cooling position When the room temperature comes close to the Set temperature Or When 25 minutes passed after starting SLEEP MODE operation Time correction 1 zone 0 1 zone min 1 Fan speed rpm L W6 L W5 UL W4 SUL W3 Compressor speed rps Zone 12 11 10 9 8 7 6 5 4 3 2 1 0 10 31 27 24 20 17 14 11 OFF 13 31 27 24 20 17 14 11 OFF 16 31 2...

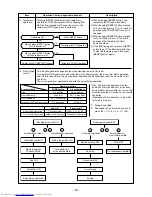
Page 52: ...tion of air conditioner air purifier an operation of air conditioner air purifier starts by pushing AC button on the remote controller Operation of air conditioner air purifier is stored in memory 1 Swing is available 2 Fan speed is Fan Auto mode varies in order M 1 L L SL Filter lamp ON Press RESET button Did you press RESET button for 3 to 9 seconds Did you press RESET button for 10 seconds or m...

Page 53: ...e the error and turn on the Filter lamp 13 Discharge temperature control Reset by RESET button Reset by RESET button or by the stop direction from the remote controller When the breaker is turned ON or RESET button is pushed while the FILTER indicator is turned on the air purifier is not turned on until the integrated operation time of the indoor fan exceeds 1 hour after operation start It is the ...

Page 54: ...o that it is in the range of set tempera ture Discharge temp control 4 When defrost operation is performed the open degree of valve is adjusted accord ing to each setup conditions during preparation for defrost and during defrost operation 4 way valve is inversed 5 To turn off the compressor while the air conditioner stops by control of the thermostat or by remote controller adjust the open degree...

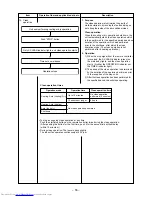
Page 55: ...ed prior to the shutdown after which the clean operation stops The clean operation is not performed after a heating operation 2 Operation 1 When the stop signal from the remote controller is received the S CLEAN indicator green on the main body lights and the clean operation starts Neither the OPERATION indicator nor the TIMER indicator light 2 The period of the clean operation is determined by th...

Page 56: ...RATION indicator flashes at 5 Hz intervals This completes the clean operation setting Item 16 Clean operation cancel Operation flow and applicable data etc Setting the clean operation cancel Description NOTE Once J201 is added the RESET button on the unit is designated for CLEAN OPERATION Set Cancel therefore the RESET button can not be used for the selection Set Cancel of AUTO RESTART function Pa...

Page 57: ...ote controller selection has been set to B receives the signal of the remote control ler also set to B At the factory the remote controller selection is set to A on all the indoor units There is no A setting display 1 Setting the remote controller Slide and open the remote controller cover and remove the batteries Cut the jumper wire inside the battery compartment using nippers The jumper wire sho...

Page 58: ...ide due to the installation condition etc the set temp is corrected HEAT operation only 2 Description The set temp received from the remote controller is corrected The correct value from 2 C to 4 C is changed by the jumper wire on P C board of the indoor microcomputer J umper wire setup J 801 J 802 HEAT shift value 2 4 2 0 Jumper wire J801 J802 J803 J804 In HEAT operation At shipment With Jumper w...

Page 59: ...ntally shut down When the unit is standby Not operating Operation Push RESET button for more than three seconds Less than 10 seconds Motions The unit is on standby The unit starts to operate The green indicator is on After approx three seconds The unit beeps three times The green indicator flashes and continues to operate for 5 seconds If the unit is not required to operate at this time push RESET...

Page 60: ...is in operation The green indicator is on The unit stops operating The green indicator is turned off After approx three seconds The unit beeps three times If the unit is required to operate at this time push RESET button once more or use the remote controller to turn it on 9 3 3 Power Failure During Timer Operation When the unit is turned off because of power failure during timer operation the tim...

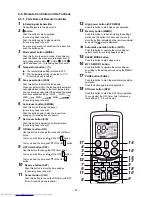
Page 61: ... adjust the air flow direction A receiving beep is heard 8 ON timer button ON Use this button to change the clock and ON timer times To move up the time push of the ON ON button To move down the time push of the ON ON button 9 OFF timer button OFF Use this button to change the OFF timer times To move up the time push of the OFF OFF button To move down the time push of the OFF OFF button 10 Reserve...

Page 62: ...ing for timer operation or the clock time is indicated The current time is always indicated except during TIMER operation 7 Hi POWER indicator Indicates when the Hi POWER operation starts Push the Hi POWER button to start and push it again to stop the operation 8 MEMORY indicator Flashes for 3 seconds when the MEMO button is pushed during operation The mark is shown when holding down the button fo...

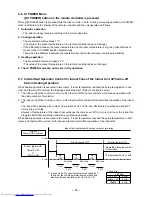
Page 63: ...nd thermo off occurred the following operations start Refer to the figure below 1 The indoor unit of the room A room in which thermo off did not occur starts a continuous operation with the setup number of revolution 2 The indoor unit of the room B room in which thermo off occurred starts intermittent operation of the indoor fan The indoor fan operates with number of revolution of UL or SUL Fan ON...

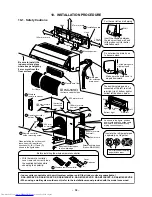
Page 64: ...together When installing the outdoor unit leave open in at least two of directions A B C and D shown in the figure below Ensure sufficient space to allow drainage Y Wall Bottom right Rear right Right Left Bottom left Rear left As shown in the figure position power cord and connecting cable downward and lead out along piping connection port Before installing the wireless remote controller With the ...

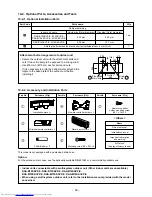
Page 65: ...13SKCVP E RAS M16SKCVP E When using a multi system outdoor unit refer to the installation manual provided with the model concerned Part Code Y Z Parts name Refrigerant piping Indoor unit name Liquid side Outer diameter Gas side Outer diameter RAS B10SKVP E B13SKVP E 6 35 mm 9 52 mm RAS M10SKCVP E M13SKCVP E RAS B16SKVP E M16SKCVP E 6 35 mm 12 7 mm Shield pipe for extension drain hose polyethylene ...

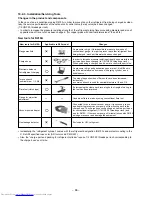
Page 66: ... pump adapter Gas leakage detector Applicable to R22 model Changes As pressure is high it is impossible to measure by means of conventional gauge In order to prevent any other refrigerant from being charged each port diameter has been changed In order to increase pressure resisting strength hose materials and port size have been changed to 1 2 UNF 20 threads per inch When purchasing a charge hose ...

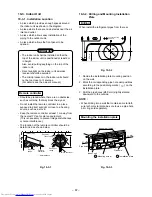
Page 67: ...source such as a stove Keep the remote controller at least 1 m away from the nearest TV set or stereo equipment This is necessary to prevent image disturbances or noise interference The location of the remote controller should be determined as shown below Fig 10 3 1 10 3 2 Drilling and Mounting Installation Plate Drilling When install the refrigerant pipes from the rear Fig 10 3 2 1 Decide the ins...

Page 68: ... a power source for the exclusive use of the air conditioner NOTE Wire type More than H07RN F or 60245IEC66 1 0mm CAUTION A switch or circuit breaker that can disconnect all poles must be included in the fixed wiring Be sure to use an approved circuit breaker or switch NOTE Make sure the wire length is sufficient before performing wiring work 10 3 4 Wiring Connection How to connect the connecting ...

Page 69: ...el slit Cut out the slit on the left or right side of the front panel for the left or right connection and the slit on the bottom left or right side of the front panel for the bottom left or right connection with a pair of nippers 2 Changing drain hose For left connection left bottom connection and rear left connection s piping it is necessary to relocate the drain hose and drain cap How to remove...

Page 70: ...hey are posi tioned within 43 mm above the wall surface If the connecting pipes are positioned more than 43 mm above the wall surface the indoor unit may be unstable When bending the connecting pipe make sure to use a spring bender to avoid crushing the pipe Refer to the table below for the bending radius of each connection pipe Fig 10 3 17 NOTE If the pipe is incorrectly bent the indoor unit may ...

Page 71: ...firmly hooked on the installation plate Installation plate Indoor unit Connecting cable Auxiliary pipes 10 3 7 Drainage 1 Run the drain hose at a downward sloped angle NOTE Hole should be made at a slight downward slant on the outdoor side Fig 10 3 21 2 Put water in the drain pan and make sure that the water is being drained outside 3 When connecting extension drain hose insulate the connection pa...

Page 72: ...disturb your neighbors A place which is not exposed to a strong wind A place which does not block a passageway When the outdoor unit is to be installed in an elevated position be sure to secure its feet There must be sufficient spaces for carrying the unit into and out of the site A place where the drain water does not raise any problem A place which can bear the weight of the outdoor unit and doe...

Page 73: ...5 0 5 to 1 0 Outer dia of copper pipe 6 35 9 52 12 7 R410A R22 1 5 to 2 0 1 0 to 1 5 1 5 to 2 0 1 0 to 1 5 2 0 to 2 5 1 5 to 2 0 Flaring size A Unit mm Fig 10 4 4 Outer dia of copper pipe 6 35 9 52 12 7 A R410A R22 9 1 9 0 13 2 13 0 16 6 16 2 0 0 4 In the case of flaring for R410A with the conven tional flare tool pull out it approx 0 5 mm more than that for R22 to adjust to the specified flare si...

Page 74: ... Connect 2 or more indoor units for heat pump 5 If the outdoor units is to be mounted on a wall make sure that the platform supporting it is sufficiently strong The platform should be designed and manufactured to maintain its strength over a long period of time and sufficient consideration should be given to ensuring that the outdoor unit will not fall 6 When the outdoor unit is to be mounted high...

Page 75: ...low prevention function so that inside oil of the pump does not flow backward into pipes of the air condi tioner when the pump stops If inside oil of the vacuum pump enters into the air conditioner which adopts R410A a trouble of the refrigeration cycle may be caused 1 Connect the charge hose from the manifold valve to the service port of the gas side packed valve 2 Connect the charge hose to the ...

Page 76: ...utdoor unit 3 Insert the power cord and the connecting cable fully into the terminal block and secure it tightly with screws 4 Insulate the unused cords conductors from water entering in the outdoor unit Locate them so that they do not touch any electrical or metal parts 5 Secure the power cord and the connecting cable with the cord clamp 6 Attach the side panel on the outdoor unit 4 units A B C D...

Page 77: ...ring Mispiping Check Make sure that the wiring and piping for each room have the same alphabetical codes A B C D Connect and secure the power cord Use the power cord cables with thickness type and protective devices specified in this manual Insulate the unused cords conductors with PVC tape 1 Turn on the power breaker 2 Open side panel of the outdoor unit 3 Set the all indoor units to COOL mode It...

Page 78: ... Yellow 4 Red LEDs D800 to D804 are provided on P C board of the inverter 1 If a trouble occurs LED goes on according to the contents of trouble as shown in the left table 2 When two or more troubles occur LEDs go on cyclically alternately 3 Usually LEDs Red go off Fig 10 4 18 IGBT Insulated Gate Bipolar Transistor PMV Pulse Motor Valve LED Light Emitting Diode LED ON l LED OFF 1 Heat pump model o...

Page 79: ...t size are changed to 1 2 UNF 20 threads per inch When purchasing a charge hose be sure to confirm the port size As pressure is high and gasification speed is fast it is difficult to read the indicated value by means of charging cylinder as air bubbles occur The size of opposite sides of flare nuts have been increased Incidentally a common wrench is used for nominal diameters 1 4 and 3 8 By increa...

Page 80: ...r is Good or Bad Page 81 81 82 85 90 91 92 93 94 99 NOTE A large capacity electrolytic capacitor is used in the outdoor unit controller inverter Therefore if the power supply is turned off charge charging voltage DC320V remains and discharging takes a lot of time After turning off the power source if touching the charging section before discharging an electri cal shock may be caused Discharge the ...

Page 81: ...ration cannot be performed Description The OPERATION lamp of the indoor unit flashes when power source is turned on If START STOP button is operated once flashing stops Flashes also in power failure The compressor does not operate while compressor restart delay timer 3 minutes timer operates The same phenomenon is found after power source has been turned on because 3 minutes timer operates The air...

Page 82: ...ush ON or OFF button If there is no fault with a code the indoor unit will beep once Beep and the display of the remote controller will change as follows The TIMER indicator of the indoor unit flashes continuously 5 times per 1 sec Check the unit with all 52 check codes to as shown in Table 11 4 1 Push ON or OFF button to change the check code backward If there is a fault the indoor unit will beep...

Page 83: ...ion started 1 Defective wiring of connecting cable 2 Operation of compres sor thermo Gas shortage Gas leak Air conditioner status Operation continues Operation continues Operation continues All off Operation continues Operation continues Remarks Displayed when error is detected Displayed when error is detected Displayed when error is detected Displayed when error is detected Displayed when error i...

Page 84: ...Displayed when error is detected Displayed when error is detected Flashes when trouble is detected on return serial signal and normal status when signal is reset Displayed when error is detected Displayed when error is detected Displayed when error is detected Judgment and action Even if trying operation again all operations stop immediately Replace P C board 1 Even if connecting lead wire of comp...

Page 85: ...rect wiring NO Turn off power supply once and 5 second later turn it on again Is OPERATION indicator flashing Is it possible to turn on power supply by pushing START STOP button on remote controller Is voltage DC12V or 5V indicated on rear of indoor control board normal Does transmission mark on remote controller flash normally and is its signal transmitted properly Is DC310 340V supplied between ...

Page 86: ...ect DC 1V or more between 5 and 3 of motor connector CN31 Start to operate the indoor unit in except heating operation At this time is it possible to detect DC 1V or more between 5 and 3 of motor connector CN31 Check this condition within 15 seconds after starting unit Start to operate the indoor unit in except heating operation At this time is it possible to detect DC 1V or more between 5 and 3 o...

Page 87: ...he cover of the fan motor lead wires 3 Check DC voltage with CN31 connector while the fan motor is rotating NOTE Do not disconnect the connector while the fan motor is rotating Use a thin test rod Indoor fan starts rotating when power supply is turned on Check output DC voltage of fan motor on P C board Measure voltage between 3 GND BLACK and 5 V line YELLOW of motor connector CN31 while indoor fa...

Page 88: ...ent light nearby Keep indoor unit away from thyristor fluorescent light Does indoor unit operate when moving remote controller near receiver or indoor unit Batteries are exhausted Does radio sound is affected by remote controller when a signal is transmitted at distance of 5 cm from radio Is transmission mark indicated P C board is defective Replace P C board Replace batteries Replace remote contr...

Page 89: ...outdoor unit stops 10 to 20 minutes after operation started and 10 minutes or more are required to restart the unit 2 If the unit stops once it does not operate until the power will be turned on again 3 The outdoor unit stops 10 minutes to 1 hour after operation started and an alarm is displayed Discharge temp error check code 03 1E Sensor temp error check code 02 1C Red White Terminal block S5277...

Page 90: ...ort Valve drive check Check the operating pressure from service port and add gas if pressure is low Is connecter of coil connected to inverter Is coil of the pulse motor valve P M V correctly set Existence of condensation at outlet of P M V If there is condensation at outlet 1 4 inch Ø6 35mm valve side the valve is clogged Are temp sensors of indoor outdoor units correctly set to the holder NOTE T...

Page 91: ...l l l l l l Indoor check code 14 16 17 1C 19 1A 1B 1D 1E 1F 18 18 1C 1C 1C 1C 1C 1C 1C 1C Description During normal operation IGBT short circuit compressor motor rare short Position detect circuit error Current detect circuit error Compressor system error Discharge temp sensor TD error Outdoor fan error Outside temp sensor TO error Compressor lock Discharge temp sensor error gas leakage Compressor...

Page 92: ... the high voltage generator Is DC12V applied between and of CN42 of the main P C board MCC5045 Micro switch is stuck Micro switch malfunction To item Power supply is not turned on Replace the main P C board MCC5045 Replace micro switch Does the PURE indicator go off within 2 seconds after it was ON and does the FILTER indicator Orange go on Are the electric dust collector and ionizer dried Electro...

Page 93: ...with or Summary If fuse was blown be sure to check the electrolytic capacitor and diode block Connect discharge resistance approx 100Ω 40W or soldering iron plug between terminals of the electro lytic capacitor 500µF of C14 with printed CAU TION HIGH VOLTAGE on P C board OK if 500µF DC280 to 380V Remove CN300 while pushing the part indicated by an arrow because CN300 is a connector with lock Resis...

Page 94: ...ing precautions 1 When removing the front panel or the P C board be sure to shut off the power supply breaker 2 When removing the P C board hold the edge of the P C board and do not apply force to the parts 3 When connecting or disconnecting the connectors on the P C board hold the whole housing Do not pull at the lead wire 2 Inspection procedures 1 When a P C board is judged to be defective check...

Page 95: ... 60V Check whether or not all indicators OPERATION TIMER FILTER PURE are lit for 3 seconds and they return to normal 3 seconds later 1 Check whether or not the com pressor operates 2 Check whether or not the OP ERATION indicator flashes 1 Check whether or not the com pressor operates 2 Check whether or not the OP ERATION indicator flashes 1 Check it is impossible to detect the voltage DC 15V betwe...

Page 96: ...r TA Room temp sensor TC Heat exchanger temp sensor TO Outdoor temp sensor TE Outdoor heat exchanger temp sensor TS Suction temp sensor TGa A room Gas side temp sensor TGb B room Gas side temp sensor TGc C room Gas side temp sensor TGd D room Gas side temp sensor TA TC TO TGa TGb TGc TGd TE TS TD 1 Sensor characteristic table GND 5V 12V ...

Page 97: ...ter Under normal temp 25 C Refer to 11 4 1 3 and 4 2 3 Remote controller Louver motor MP24Z3N 4 Indoor fan motor Under 20 C Position Yellow Pink Resistance value 5 to 20 kΩ 2 3 4 Outdoor fan motor Model ICF 140 63 2R Compressor thermo Bimetal type Model US622KXTMQO Outdoor temperature sensor TO pipe temperature sensor TGa TGb TGc TGd discharge tempera ture sensor TD suction temperature sensor TS e...

Page 98: ...al charging characteristics are shown in continuity test by the tester Case that product is good Pointer swings once and returns slowly When performing test once again under another polarity the pointer should return C10 C11 C12 C13 500µF 400V 2 IGBT module 1 Turn OFF the power supply switch 2 Discharge all four electrolytic capacitors completely 3 Execute continuity test with a tester MCC 1438 So...

Page 99: ...r of the outdoor P C board 3 How to simply judge whether outdoor fan motor is good or bad NOTE However GND circuit error inside of the motor may be accepted in some cases when the above check is performed When the fan motor does not become normal even if P C board is replaced replace the outdoor fan motor CN300 Turn OFF the breaker Fan motor is normal Disconnect two connectors CN300 and CN301 of t...

Page 100: ...may ignite any oil mixed with the refrigerant gas 2 Do not use welding equipment in an airtight room Carbon monoxide poisoning may result if the room is not properly ventilated 3 Do not bring welding equipment near flammable objects Flames from the equipment may cause the flammable objects to catch fire If keeping the power on is absolutely unavoidable while doing a job such as inspecting the circ...

Page 101: ...ric parts box with the right thumb while pulling the both sides of the front panel toward you How to assemble the front panel 1 Push three center positions and two lower center positions of the air outlet and then hang the hanging hooks 4 pcs at the top side of the front panel to the rear plate 2 Insert the electric dust collector and left and right air filters Push in the electric dust collector ...

Page 102: ... generator and disconnect the four leads from where they are fitted into the other components 3 Remove the fixing screw which secures the high voltage generator and remove the high voltage generator from the evaporator How to assemble the high voltage generator 1 Put the high voltage generator on the evaporator and then fix it with two screws 2 Pass the leads of the high voltage generator through ...

Page 103: ...tor 5P for the louver motor from the electric parts box assembly 4 Pull out TC and TCJ sensors from sensor holder of the evaporator 5 Disengage the two claws at the top of the display unit They can be easily disengaged by pushing the drain pan above the claws and at the same time pulling the display unit toward you 6 Remove the fixing screw that secures the electric parts box assembly and remove t...

Page 104: ...remove other shafts while sliding the horizontal louver leftward 1 Follow to the procedure in the item S 2 Remove the pipe holder from the rear side of the main unit 3 Remove two fixing screws at the left side of the end plate of the heat exchanger 4 Remove the heat exchanger fixing holder by removing the two fixing screws used to secure it 5 Remove right side of the end plate from two fixing ribs...

Page 105: ...used to secure the left edge panel of the heat exchanger and remove the two screws used to secure the bearing base 3 Raise the left side of the heat exchanger slightly and remove the bearing base Caution at assembling If the bearing is out from the housing push it into the specified position and then incorporate it in the main body After assembling the bearing base check that it is fitted into the...

Page 106: ...ng work install the fan motor as follows When assembling the fan motor the fan motor must be installed in such a way that the fan motor leads will be taken out is positioned at the bottom front After assembling the two hooking claws of the motor band right into the main body position the fan motor insert it and then secure the motor band right using the two fixing screws 1 Follow to the procedure ...

Page 107: ... so that the right end of the 1st joint from the right of the cross flow fan is set keeping 70 5 mm from wall of rear plate of the main unit Holding the set screw install the cross flow fan so that U groove of the fan motor comes to the mounting hole of the set screw Perform positioning of the fan motor as follows When assembling the fan motor the fan motor must be installed in such a way that the...

Page 108: ...1 J201 T101 C03 DB01 No Q Part name Common procedure Procedure 1 Turn the power supply off to stop the operation of air conditioner 2 Remove the front panel Remove the 2 fixing screws 3 Remove the electrical part base Remarks Replace terminal block microcomputer ass y and the P C board ass y ...

Page 109: ...rt of the upper cabinet perform work from 6 to 7 of 1 and remove the partition fixing plate ST1T Ø4 10L 1 pc Be careful to check the inverter because high voltage circuit is incorporated in it 3 Perform discharging by connecting the dis charging resistance approx 100Ω 40W or plug of soldering iron to terminals of the C15 printed CAUTION HIGH VOLTAGE is attached electrolytic capacitor 500µF on P C ...

Page 110: ...ite CN06 Connecting cable 5P Red CN13 Connecting cable 5P Red Sub control board assembly side CN302 Connecting cable 3P White CN303 Connecting cable 2P White CN800 Connecting cable 5P Red CN501 Connecting cable 3P Red 3 The connecting cable connecting compressor and P C board base and that connecting reactor and P C board base are fixed to the inverter box with bundling band Cut off bundling band ...

Page 111: ...board Take care that the reactor and the partition fixing plate remain Ø4 10L 3 pcs 4 Remove the sound insulation materials 5 Remove terminal cover of the compressor and disconnect lead wires of the compressor and the compressor thermo assembly from the terminal 6 Remove pipes connected to the compressor with a burner 7 Remove the fixing screws of the bottom plate and heat exchanger Ø4 10L 2 pcs 8...

Page 112: ...take out port ID mark ID mark Positioning bracket at coil side Positioning concavity at PMV unit side 72 pitch PMV unit Mounting Method of Pulse Motor Valve PMV Coil Set the positioning bracket on the PMV coil to a concavity at PMV unit side and fix PMV coil In this time match color of ID mark at the coil side with that of ID mark at the PMV unit side Make sure also that pipes do not deform when i...

Page 113: ...e dryer and constring them 9 Wind the attached color tape round the both terminals of the protective tube when colored protective tube is used 10 Fix the sensor again Remarks 1 2 3 4 5 6 Parts name Sensor Sensor Spring A Sensor Spring B Thermal constringent tube Color tape Terminal Q ty 1 1 1 3 1 3 Cutting here Cutting here Cutting here Soldered part Dryer Winding the color tape 100 200 Connector ...

Page 114: ... 114 MCC 1438 ...

Page 115: ... 115 MCC 818 ...

Page 116: ...g 217 4301V028 Holder Pipe 218 43049701 Pipe Shield B16SKVP E M16SKCVP E 219 43049698 Pipe Shield B10SKVP E B13SKVP E M10SKCVP E M13SKCVP E 221 43047671 Pipe Ass y Connecting Gas B10SKVP E B13SKVP E M10SKCVP E M13SKCVP E 222 43047672 Pipe Ass y Connecting Gas B16SKVP E M16SKCVP E Location Part Description No No 223 43049674 Spring B16SKVP E M16SKCVP E 224 43047673 Pipe Ass y Connecting Liquid 225 ...

Page 117: ...ption No No 401 4306A132 Terminal Block 3P 402 43062263 Cover E Parts 403 43050425 Sensor TC Ø6 TCJ Ø6 404 43050426 Sensor TA 405 4306S936 P C Board Ass y WRS LED 406 43051350 Switch Ass y Micro Location Part Description No No 407 4306S937 P C Board Ass y B10SKVP E B10SKCVP E 408 4306S938 P C Board Ass y B13SKVP E B13SKCVP E 409 4306S939 P C Board Ass y B16SKVP E B16SKCVP E 410 43067115 Clamp Cord...

Page 118: ... 118 13 2 Outdoor Unit RAS 4M23SAV E RAS 4M23SACV E 7 5 8 37 38 39 40 6 41 14 43 47 46 12 52 53 10 3 9 45 44 13 49 48 35 36 16 28 30 17 29 30 18 21 24 19 22 25 1 11 51 2 31 32 33 34 42 4 ...

Page 119: ... 25 43047686 Nut Flare 3 8 IN 28 43047680 Cap Valve Packed 9 52 29 43047659 Cap Valve Packed 12 7 30 43047674 Cap Charge Port 31 43046449 Body PMV UKV 18D064 R410A RoHS Location Part Description No No 32 43046448 Coil PMV UKV U061E R410A RoHS 33 43046445 Valve 4 Way STF 0213Z 4M23SAV E 34 43046443 Coil Solenoid VHV 01AJ503C1 4M23SAV E 35 43050407 Thermostat Bimetal 36 43063317 Holder Thermostat 37...

Page 120: ...ock 3P AC250V 20A 702 43160566 Terminal Block 6P AC250V 20A 703 4316V192 Plate 704 43050424 Sensor TD F4 Location Part Description No No 705 43050425 Sensor TC F6 Ass y Service 706 43050446 Sensor TG F6 Ass y Service 4M23SAV E 707 4306S966 P C board Ass y MCC 818 4M 708 4306V020 P C board Ass y IPDU MCC 1438 703 708 700 702 701 707 704 705 4M23SACV E 706 4M23SAV E TGa Sensor TGb Sensor TGc Sensor ...

Page 121: ...TOSHIBA CARRIER CORPORATION 2 CHOME 12 32 KONAN MINATOKU TOKYO 108 0075 JAPAN Copyright 1999 to 2007 TOSHIBA CARRIER CORPORATION ALL Rights Reserved ...

Reviews: