background image

14

Connections

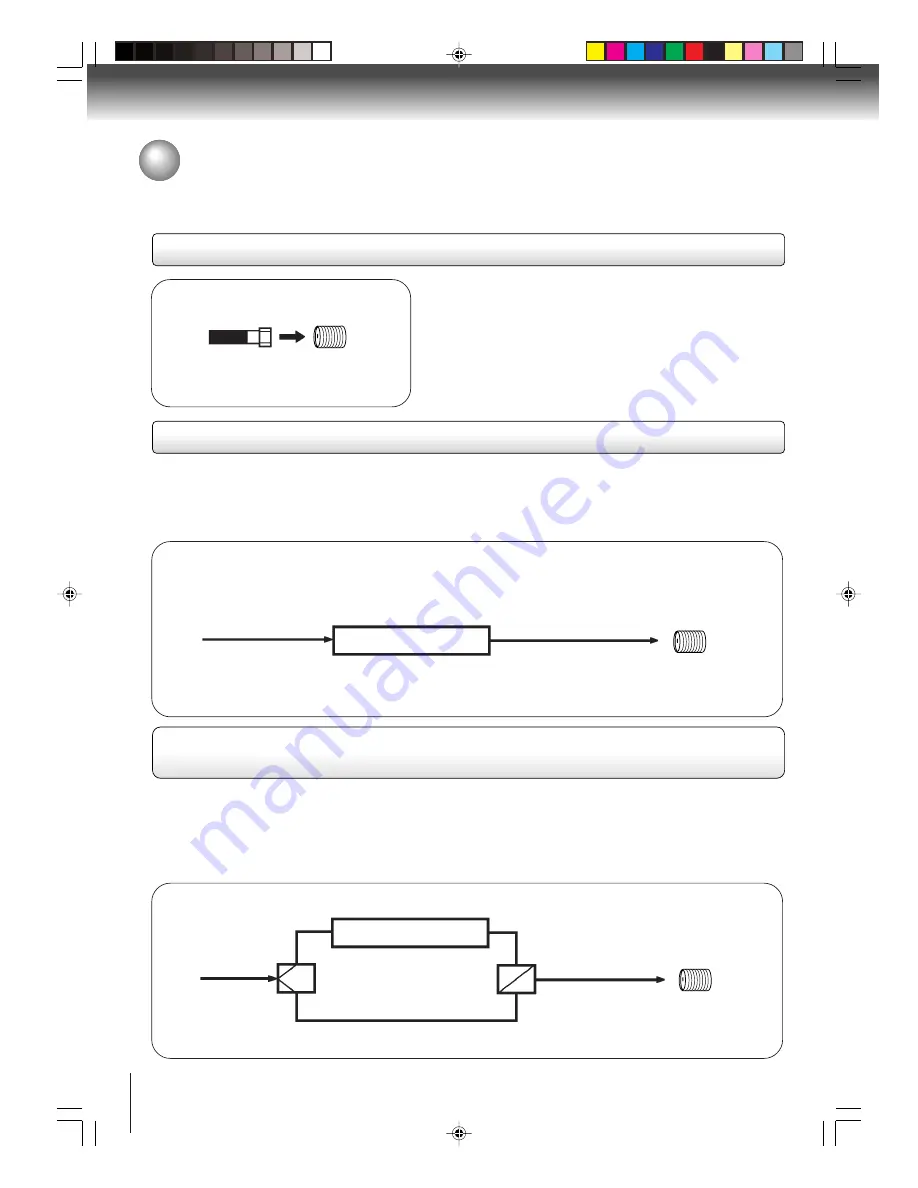
For basic cable TV service not requiring a converter/
descrambler box, connect the cable TV 75 ohm coaxial cable
directly to the Antenna jack on the back of the unit.

75 ohm
coaxial cable

If you subscribe to a cable TV service in which basic channels are unscrambled and premium channels require the
use of a converter/descrambler box, you may wish to use a signal splitter and an A/B switch box (available from the
cable TV company or an electronics supply store). Follow the connections shown below. With the switch in the “B”
position, you can directly tune any nonscrambled channels on your unit. With the switch in the “A” position, tune your
unit to the output of the converter/descrambler box (usually channel 3 or 4) and use the converter/descrambler box
to tune scrambled channels.

Incoming
75 ohm
cable TV

75 ohm cable to
the unit

Antenna

jack

Antenna

jack

Converter/

descrambler

If you subscribe to a cable TV service which requires the use of a converter/descrambler box, connect the
incoming 75 ohm coaxial cable to the converter/descrambler box. Using another 75 ohm coaxial cable, connect
the output jack of the converter/descrambler box to the antenna jack on the unit. Follow the connections shown
below. Set the unit to the output channel of the converter/descrambler box (usually channel 3 or 4) and use the
converter/descrambler box to select channels.

For subscribers to basic cable TV service

For subscribers to scrambled cable TV service

For subscribers to unscrambled basic cable TV service with scrambled
premium channels

Splitter

B

A

Incoming
75 ohm
cable TV

A/B switch

75 ohm cable to
the unit

Converter/

descrambler

Antenna

jack

Cable TV connections

This unit has an extended tuning range and can tune most cable channels without using a cable TV converter box.
Some cable companies offer “premium pay channels” in which the signal is scrambled. Descrambling these signals for
normal viewing requires the use of a descrambler device which is generally provided by the cable TV company.

 5V90101A [E]p13-19

8/4/06, 5:43 PM

14

Summary of Contents for MW26H82

Page 1: ...rporation This device does not tape record copy protected DVD video discs 2 13 20 46 51 55 Introduction Connections Basic setup Playback VCR Recording VCR Other functions VCR 57 60 72 78 Basic playback DVD Advanced playback DVD Function setup DVD Others 25 TV operation OWNER S MANUAL 5V90101A E Cover 8 4 06 5 42 PM 1 ...

Page 2: ... trend and larger TVs are popular purchases however they are not always supported on the proper TV stands Sometimes TVs are improperly secured or inappropriately situated on dressers bookcases shelves desks audio speakers chests or carts As a result TVs may fall over causing unnecessary injury Toshiba Cares The consumer electronics industry is committed to making home entertainment enjoyable and s...

Page 3: ...openings Install in accordance with the manufacturer s instructions 8 Do not install near any heat sources such as radiators heat registers stoves or other apparatus including amplifiers that produce heat 9 Do not defeat the safety purpose of the polarized or grounding type plug A polarized plug has two blades with one wider than the other A grounding type plug has two blades and a third grounding...

Page 4: ...of time 33 During normal use the TV may make occasional snapping or popping sounds This is normal especially when the unit is being turned on or off If these sounds become frequent or continuous unplug the power cord and contact a Toshiba Authorized Service Center 34 Possible Adverse Effects on TV Picture Display If a fixed non moving pattern or image remains on the TV screen for extended periods ...

Page 5: ... following measures Reorient or relocate the receiving antenna Increase the distance between the equipment and receiver Connect the equipment into an outlet on a circuit different from that to which the receiver is connected Consult the dealer or an experienced radio TV technician for help CAUTION Changes or modifications not expressly approved by the party responsible for compliance with the FCC ...

Page 6: ...any type of solvent such as thinner and benzine as they may damage the surface of the unit If you use a chemical saturated cloth to clean the unit follow that product s instructions Notes on moisture condensation Moisture condensation damages the unit Please read the following carefully Moisture condensation occurs for example when you pour a cold drink into a glass on a warm day Drops of water fo...

Page 7: ... 6 Contents 7 Notes and Information 8 Identification of controls 10 Connections Antenna connections 13 Cable TV connections 14 Connecting to optional equipment 15 Connecting to a USB Storage Device 19 Basic setup Starting setup 20 Clock setting 21 Setting the language 23 TV VCR operation status 24 TV operation TV operation 25 To memorize channels 27 Closed captions 28 Programming your favorite cha...

Page 8: ... or disassembly is prohibited On handling discs Do not touch the playback side of the disc Do not attach paper or tape to discs On cleaning discs Fingerprints and dust on the disc cause picture and sound deterioration Wipe the disc from the center outwards with a soft cloth Always keep the disc clean Do not use any type of solvent such as thinner benzine commercially available cleaners or antistat...

Page 9: ...es MP3 and WMA music players and certain cameras with USB connectivity that comply with the standards for the USB Mass Storage Class of USB compatible equipment Because there are a broad variety of such devices some functions of your storage device may not operate properly with the TV or it may not operate at all with the TV From the USB port this TV is designed to display compatible JPEG WMA MP3 ...

Page 10: ...en connecting the optical digital cable remove the cap and fit the connector into the jack firmly If the jack is not used keep the cap inserted to protect it from dust intrusion USB port 19 HDMI IN jack 16 HDMI AUDIO L R IN jacks 16 AC power cord 5 OPTICAL DIGITAL AUDIO OUT jack 17 18 COMPONENT VIDEO AUDIO L R IN jacks 15 S VIDEO IN LINE IN 1 jack 15 COAXIAL DIGITAL AUDIO OUT jack 17 18 RF IN jack...

Page 11: ...n 20 20 32 47 59 CLOSED CAPTION button 29 59 47 59 48 59 53 PIC SIZE button 40 61 PROGRAM button 54 51 RETURN button 23 SKIP button Direct channel Selection buttons 0 9 Number buttons 0 9 48 PLAY MODE button button 61 72 MENU button 23 30 57 PLAY button 47 26 58 PAUSE STILL button 48 59 49 ANGLE button 63 59 REV button 47 51 48 TOP MENU button 63 OPEN CLOSE button 57 EJECT button 46 DVD USB button...

Page 12: ...n buttons 1 2 3 Remote control basics Inserting batteries Approx 5 meters Caution Never throw batteries into a fire Notes Be sure to use AAA size batteries Dispose of batteries in a designated disposal area Batteries should always be disposed of with the environment in mind Always dispose of batteries in accord ance with applicable laws and regulations If the remote control does not operate correc...

Page 13: ...n lead wire to the combiner not supplied Connect the VHF 300 ohm twin lead wire to the 300 75 ohm matching transformer Attachthetransformertothecombiner then attach the combiner to the antenna jack Connect the VHF 75 ohm cable and UHF 300 ohm twin lead wire to the combiner not supplied Attach the combiner to the antenna jack Combination VHF UHF antenna Separate VHF and UHF 300 ohm twin lead wires ...

Page 14: ...V service which requires the use of a converter descrambler box connect the incoming 75 ohm coaxial cable to the converter descrambler box Using another 75 ohm coaxial cable connect the output jack of the converter descrambler box to the antenna jack on the unit Follow the connections shown below Set the unit to the output channel of the converter descrambler box usually channel 3 or 4 and use the...

Page 15: ... 2 VIDEO2 3 ColorStream HD 4 HDMI 0 4 SELECT To Audio Video out red white yellow Audio Video cable not supplied To S Video out S Video cable not supplied To S Video IN To Video IN yellow To AUDIO L R IN white red Notes If your camcorder has S video you can use an S video cable plus the standard audio cables instead of a standard video cable for better picture quality Do not connect both a standard...

Page 16: ... as possible You should not encounter difficulty if you use an HDMI cable that is shorter than 16 4 ft 5m You must set the HDMI audio input setting to HDMI in the AUDIO menu 44 HDMI cable type A connector not supplied HDMI device Rear of the unit Connecting a DVI device to the HDMI input An HDMI to DVI adapter cable transfers only video Separate analog audio cables are required see illustration be...

Page 17: ...able for home use on DVD video discs or audio CDs If you have a DTS decoder or processor you can obtain the full benefit of 5 1 channel DTS encoded sound tracks on DVD video discs or audio CDs Amplifier equipped with a DTS decoder To COAXIAL type digital audio input 75 Ω coaxial cable not supplied Amplifier equipped with a Dolby Digital decoder To COAXIAL type digital audio input 75 Ω coaxial cabl...

Page 18: ...rocessor Refer to the owner s manual of the connected equipment as well When you connect the unit to other equipment be sure to turn off the power and unplug all of the equipment from the wall outlet before making any connections The output sound of the unit has a wide dynamic range Be sure to adjust the receiver s volume to a moderate listening level Otherwise the speakers may be damaged by a sud...

Page 19: ...mory card from any memory reader music player or camera connected to the USB port of the TV unless the TV is off or in DISC mode 67 Do not connect or disconnect the TV s power cord while any USB storage device is connected to the TV This restriction applies no matter what the operating mode of the TV Review the instructions for your USB storage device and comply with them in using the device with ...

Page 20: ...u select CANCEL and press ENTER the STARTING SETUP stops and changes to the TV screen 1 2 3 Now the CH PROGRAM starts After the starting setup is com pleted the TV channel appears on the screen 4 Notes The starting setup function will work only when you press POWER for the first time The process of CH PROGRAM may take 15 30 minutes to complete depending on your regional cable service If you press ...

Page 21: ...ty minutes The POWER indicator will light 1 Wait at least three minutes and press POWER 2 3 Auto clock adjustment To set auto clock to OFF When shipped from factory the AUTO CLOCK is set to ON But if you do not want auto clock set Adjustment Press MENU in the TV mode then press or to select TV SETUP menu 1 Press or to select AUTO CLOCK 2 Press or to select OFF 3 Press MENU repeatedly until the men...

Page 22: ... AUTO for manual setting forward one hour for manual setting back one hour for automatic setting read EDS in the signal ATLANTIC GMT 4hours EASTERN GMT 5hours CENTRAL GMT 6hours MOUNTAIN GMT 7hours PACIFIC GMT 8hours ALASKA GMT 9hours HAWAII GMT 10hours AUTO AUTO SET GMT Greenwich Mean Time To set daylight saving time You can set the daylight saving time automatically or manually To set standard t...

Page 23: ...D RETURN END TV SETUP LANGUAGE CLOCK SET AUTO CLOCK STANDARD TIME DAYLIGHT SAVING TIME ON AUTO Press or to select the desired language English ENGLISH French FRANÇAIS or Spanish ESPAÑOL 4 Press RETURN to clear the menu screen 5 Notes After a power failure or disconnection of the power the timer settings will be lost In this case reset the present time When you set the minute you can change in 10 m...

Page 24: ...ay While operating a tape Press DISPLAY to display the information on the screen To cancel the display press DISPLAY again Clock V Chip Closed Caption Content rating Channel number TV VCR Clock ON Timer OFF Timer Sleep Timer Picture Size STEREO SAP second audio program VCR operation Recording Rec Pause Play Fast forward Rewind Stop Eject Tape speed Tape in Auto repeat Channel number Station name P...

Page 25: ...ot a malfunction To turn on the unit press POWER The Power indicator will light Every time you turn on the TV the unit starts from TV mode When you use TV after DVD operation press TV VCR TV VHF UHF channels CABLE Cable TV channels TO SELECT ANALOG CHANNELS When the TV CABLE selection is in the CABLE position channels can be selected as follows TO SELECT CABLE TV CHANNELS 1 9 Press 0 twice then 1 ...

Page 26: ...e screen The sound can be switched back on by pressing this button again or one of VOL SLEEP To set the unit to turn off after a preset amount of time press SLEEP on the remote control The clock will count down 10 minutes for each press of SLEEP 2h00m 1h50m 0h10m 0h00m After the sleep time is programmed the display will appear briefly every 10 minutes to remind you that the sleep timer is operatin...

Page 27: ...you want to add or erase 4 RETURN TV SETUP TV CABLE CH PROGRAM ADD ERASE CLOSED CAPTION TV CABLE OFF SELECT ADJUST RETURN END RETURN END 1 Press RETURN to clear the menu screen 4 Press The ADD ERASE menu will appear Press or to select ADD ERASE then press 2 1 2 3 4 5 5 001 5 002 ADD ERASE ADDING CHANNEL ADD ERASE CH SIGNAL ANALOG ERASE ANALOG ADD ANALOG ERASE ANALOG ERASE ANALOG ADD DIGITAL ADD DI...

Page 28: ...eceived again If the channels are changed the captions will be delayed approximately 10 seconds The captions will appear in places on the screen where they will least interfere with the picture usually on the bottom of the screen News programs will usually show three line closed captions which scroll onto the screen Most other shows provide two or three lined captions placed near the character who...

Page 29: ...L STANDARD LARGE TEXT TYPE AUTO DEFAULT MONO W SERIF PROP W SERIF MONO W O SERIF PROP W O SERIF CASUAL CURSIVE SMALL CAPITALS TEXT COLOR AUTO BLACK WHITE RED GREEN BLUE YELLOW MAGENTA CYAN TEXT EDGE AUTO NONE RAISED DEPRESSED UNIFORM LEFT DROP SHADOW RIGHT DROP SHADOW BACKGROUND COLOR AUTO BLACK WHITE RED GREEN BLUE YELLOW MAGENTA CYAN 4 Press RETURN to clear the menu screen Using the CC Advanced ...

Page 30: ...on the remote control to select your favorite channels 6 7 Notes You can still use CH to scan through all the channels you programmed in the TV s memory The FAV will not work until you have programmed your favorite channels To clear your favorite channels Follow steps 1 3 on the left then press or to select CLEAR Press ENTER until 0 replaces the channel number you want to erase Press RETURN to cle...

Page 31: ...n that space Press RETURN to clear the menu screen Repeat steps 1 6 for other channels You can assign a label to each channel To erase channel labels Follow left steps 1 2 then select CLEAR in the step 3 Then press ENTER Repeat this procedure for all channel labels which you want to erase ENTER 0 9 CH C D B A MENU 6 7 RETURN Labeling the video input sources Press MENU in the TV mode then press or ...

Page 32: ...ess ENTER 2 In the LOCKS menu press or to select NEW PASSWORD then press 1 Enter the same password again using Number buttons 0 9 for safety then press ENTER 3 Press RETURN to clear the menu screen 4 ENTER 0 9 C D B A MENU CANCEL RETURN LOCKS V CHIP SET FRONT PANEL LOCK NEW PASSWORD SELECT ADJUST RETURN END LOCKS NEW PASSWORD 0 9 SELECT CANCEL CLEAR ENTER SET RETURN END LOCKS CONFIRM PASSWORD 0 9 ...

Page 33: ...ss the block Note The V Chip function is activated only on programs that have the rating signal RETURN DISPLAY ENTER In the LOCKS menu press or to select V CHIP SET then press 1 Press or to select MOVIE RATING then press 3 Press or to select desired rating then press or to select ON or OFF Press ENTER twice 4 G All ages PG Parental guidance PG 13 Parental guidance less than 13 years old R Under 17...

Page 34: ...3 Press or to select FRONT PANEL LOCK and press or to select ON If a button on the front panel is pressed the message NOT AVAILABLE appears 3 3 3 3 3 To unlock the front panel Press and hold the VOLUME button on the front panel for about 10 seconds until the message FRONT PANEL LOCK OFF appears on screen You also can unlock the front panel using the menus Select OFF in the step 3 Press RETURN to c...

Page 35: ...TIMER press or to select OFF TIMER and press Then follow the steps 2 6 on page 36 If you want to correct the digits while setting press or until the item you want to correct then press or to correct the desired setting To display the ON OFF timer settings press DISPLAY see TV operation status on page 24 Press MENU in the TV mode then press or to select OPTION menu Press or to select ON OFF TIMER P...

Page 36: ... function To cancel OFF TIMER select CLEAR in step 5 above then press RETURN to clear the menu screen MENU 1 Press MENU in the TV mode then press or to select OPTION menu Press or to select ON OFF TIMER Press or to select SET then press ENTER The ON OFF TIMER menu will appear ENTER RETURN OPTION ON OFF TIMER FAVORITE CH CH LABEL VIDEO LABEL ON OFF SET SELECT ADJUST RETURN END RETURN END TIMER ON T...

Page 37: ...esired picture mode 1 2 Press MENU in the TV mode then press or to select PICTURE menu Mode Picture quality SPORTS Bright and dynamic picture factory set STANDARD Standard picture quality factory set MOVIE Movie like picture setting factory set MEMORY Your personal preferences set by you see Picture control adjustment on left MENU Selection Pressing BRIGHTNESS darker lighter CONTRAST lower higher ...

Page 38: ...en press or to select PICTURE menu 1 Using the CableClear feature Press or to select CableClear 2 Press or to select ON or OFF 3 Press RETURN to clear the menu screen 4 MENU RETURN PICTURE MODE BRIGHTNESS CONTRAST COLOR TINT SHARPNESS SPORTS 25 50 25 0 25 SELECT ADJUST RETURN END PICTURE MODE BRIGHTNESS CONTRAST COLOR TINT SHARPNESS SPORTS 25 50 25 0 25 SELECT ADJUST RETURN END PICTURE CableClear ...

Page 39: ... 3 Press or to select the mode you prefer Note SVM is not required when viewing some high quality video material If you are watching high quality video material you may want to set SVM to OFF MENU RETURN Press or to select DISPLAY FORMAT 2 Press RETURN to clear the menu screen 4 PICTURE MODE BRIGHTNESS CONTRAST COLOR TINT SHARPNESS SPORTS 25 50 25 0 25 SELECT ADJUST RETURN END PICTURE MODE BRIGHTN...

Page 40: ...ed picture size as described on page 41 Notes You also can display the PICTURE SIZE menu screen by pressing PIC SIZE on the remote control The PICTURE SIZE feature is not available for some program formats such as 1080i or 720p Such formats will display in Natural picture size If you select TheaterWide 2 or 3 the top and bottom edges of the picture may be hidden To see the hidden edges either scro...

Page 41: ...nventional TV screen The picture is stretched wider to fill the width of the screen but only slightly stretched taller The top and bottom edges of the picture may be hidden however this mode cannot be scrolled 3 3 3 3 3 TheaterWide 1 picture size for 4 3 format programs NOTICE OF POSSIBLE ADVERSE EFFECTS ON TV PICTURE DISPLAY Avoid displaying stationary images on your TV screen for extended period...

Page 42: ... or to select TV SETUP menu MENU PIC SIZE Note You can scroll the picture in TheaterWide 2 and TheaterWide 3 only The scroll amounts are as follows 480i 480p signal source Wide 1 Not adjustable Wide 2 10 to 20 Wide 3 10 to 10 SCROLL ADJUSTMENT 0 ADJUST ENTER SET TV SETUP CC ADVANCED PICTURE SIZE PICTURE SCROLL CINEMA MODE SIGNAL METER FILM SELECT ADJUST RETURN END Press or to select CINEMA MODE Pr...

Page 43: ... and sound created offers a thoroughly enjoyable listening experience OFF Normal sound To select desired sound Listening to stereo sound Press AUDIO SELECT to select the desired sound When the TV is turned on or a channel selection is made the STEREO will appear on the screen This means that Stereo broadcasting is available You can enjoy stereo sound from the left and right speakers When mono broa...

Page 44: ...o select AUDIO menu 1 Selecting the HDMI audio input source Press or to select HDMI 2 Press or to select HDMI or DVI 3 MENU Press RETURN to clear the menu screen 4 RETURN Press MENU in the TV mode then press or to select AUDIO menu 1 Press RETURN to clear the menu screen 4 2 Press or to select AUDIO LANGUAGE then press When two or more audio languages are included in a digital signal you can selec...

Page 45: ... factory settings Bass center 25 Treble center 25 Balance center 0 Press RETURN to clear the menu screen 3 Selecting the digital output Resetting your audio adjustments Checking the digital signal strength Checking the digital signal strength Press MENU in the TV mode then press or to select TV SETUP menu Press or to select SIGNAL METER then press SIGNAL METER CHANNEL DIGITAL 1 001 80 You can chec...

Page 46: ...t be inserted Automatic playback When loading a cassette tape without an erase prevention tab playback will start automatically Automatic power ON When you insert a cassette tape the unit power will turn ON automatically 2 Erase prevention tab Adhesive tape Remove the cassette tape Erase prevention tab Unloading To prevent accidental erasure To prevent accidental erasure Tape speed and maximum rec...

Page 47: ...corded tape after the DVD playback you must set the unit to TV VCR mode using the TV VCR button This unit selects the playback tape speed SP or SLP auto matically When you select the TV VCR mode during DVD playback DVD playback will change to the still mode and after 5 minutes it will change to the resuming playback mode automatically 2To start playback Playback Rewind or forward the tape To rewin...

Page 48: ... twice during the playback Forward picture search function Press FF once or twice during the playback To return to playback press PLAY Press PAUSE STILL during playback To resume normal playback press PLAY or PAUSE STILL If the still picture jitters excessively press TRK to stabilize the still picture During playback press SLOW To return to playback press PLAY Slow tracking and vertical lock adjus...

Page 49: ... its end The tape will automatically rewind to the beginning and the playback will be repeated Press MENU then press or to select VCR SETUP menu 1 Using the real time tape counter Press DISPLAY 1 Press COUNTER RESET to set the counter to 00 00 00 2 Begin Playback or Recording to start the tape the counter will display the elapsed time 3 When you wish to make the counter disappear press DISPLAY onc...

Page 50: ... the playback picture becomes unclear This signifies that the heads are getting dirty and can occur when playing poor quality or damaged tapes If the heads require cleaning use a equivalent high quality chemical non abrasive wet head cleaning tape or have them cleaned professionally If playing a head cleaning tape in the unit once does not improve the picture play it several times before requestin...

Page 51: ...lect the desired tape speed SP or SLP The tape counter and SP or SLP will appear on the screen for about 4 seconds 2 Select TV or CABLE to the appropriate position 3 TV VHF UHF channels CABLE Cable TV channels Press Direct channel selection 0 9 or CH to select the channel to be recorded 4 Press REC will appear on the screen for about 4 seconds and the REC OTR indicator on the front panel will ligh...

Page 52: ...tion 3 Press Direct channel selection 0 9 or CH to select the channel to be recorded 4 Press REC to begin recording Press the button again to stop recording after 30 minutes Each additional press of REC will increase recording time as shown below up to a maximum of 6 hours OTR will appear on the screen 5 Press STOP will appear on screen for about 4 seconds Notes If you wish to watch the DVD playba...

Page 53: ...s ENTER To set the timer for another program repeat steps 3 to 5 to set another program Press TIMER REC The TIMER REC indicator will light The Timer is programed when the programed time is reached the recording is automatically started To cancel timer recording press the button again and TIMER REC indicator will go out TIMER REC 1 3 4 5 6 7 2 Notes The VCR section cannot be used while the TIMER RE...

Page 54: ...uring timer recording the automatic rewinding mechanism does not function You can correct or cancel the programed setting in program confirm mode Press PROGRAM once The TV screen displays the timer program list Press PROGRAM again The TV screen displays the ON OFF timer setting Press PROGRAM 3 times The menu screen is cleared Press PROGRAM once The TV screen displays the timer program list Press o...

Page 55: ...n the playback VCR or camcorder 3 Press REC 4 Press STOP when you finish after duplicating 5 VIDEO1 on the rear panel VIDEO2 on the front panel Preparation Press TV VCR to select the TV VCR mode Load a cassette tape with the erase prevention tab intact Load a previously recorded tape into the playback VCR or Camcorder To VIDEO IN To AUDIO L IN Connection with second video recorder Select VIDEO1 on...

Page 56: ...5 Notes You may not record the beginning of the disc so start to playback the disc then start to record You cannot record the disc with copy guard function DISC IS COPY PROTECTED will show up on the TV screen for approx 4 seconds Do not insert the media card during the duplicating In this case a card material is duplicated onto a video tape Recording a DVD CD disc You can record disc material in D...

Page 57: ... appear on the screen Reading display will change to No Disc If DVD disc has already loaded play back will start automati cally 3 Press OPEN CLOSE The disc tray opens 4 Place a disc on the disc tray Basic playback There are two different disc sizes Place the disc in the correct guide on the disc tray If the disc is out of the guide it may damage the disc and cause the unit to malfunction Do not pl...

Page 58: ...CLOSE to open and close the disc tray Do not push the disc tray while it is moving Doing so may cause the unit to malfunction Do not push up on the disc tray or put any objects other than discs on the disc tray Doing so may cause the unit to malfunction In many instances a menu screen will appear after playback of a movie is completed Prolonged display of an on screen menu may damage your televisi...

Page 59: ...d chapter or track To locate succeeding chapters or tracks Playback starts from the beginning of the current chapter or track When you press twice in quick successions playback starts from the beginning of the preceding chapter or track A prohibition symbol may appear at the upper right of the screen This symbol means either the feature you tried is not available on the disc or the unit cannot acc...

Page 60: ...ack The center part of the image will be zoomed in Each press of ZOOM will change the ZOOM 1 x 1 3 2 x 1 5 and 3 x 2 0 This unit will allow you to zoom in on the frame image You can then make selections by switching the position of the frame Notes You can select the Pause Slow or Search playback in the zoom mode Some discs may not respond to zoom feature Use the title chapter and time recorded on ...

Page 61: ...ve DVD A B Repeat is prohibited when PBC is on To resume normal playback Press REPEAT A B again Off appears on the screen Repeat playback A B Repeat playback PLAY MODE REPEAT A B Repeat playback A B Repeat playback 1PressPLAYMODEduringplaybackorstopmode Press PLAY MODE again to clear the screen 3 2 Notes Some discs may not work with the repeat operation In case of Video CD with PBC Repeat function...

Page 62: ...press C D to select the track number you want to change then press CANCEL 2 Press Number buttons 0 9 to overwrite the new track number To clear the program one by one Select Mode to Program press B A to select the right column then press C D to select the track number Then press CANCEL To clear all the programs In the left column press C D to select Clear Program Then press ENTER Notes In playing ...

Page 63: ...lected title will start 3 Note Depending on the DVD you may not be able to select the title Depending on the DVD a title menu may simply be called a menu or title in the instructions supplied with the disc 2 Press DVD MENU during playback The DVD menu appears on the screen Press DVD MENU again to resume playback at the scene when you pressed DVD MENU Press to select the desired item Some DVDs allo...

Page 64: ...isc no sound will be heard from the unit s speakers In case of Video CD playback Audio type changes as follows each time you press AUDIO SELECT AUDIO SELECT When playing back a disc recorded with subtitles you can select the subtitle language or turn the subtitle off To turn off the subtitle press SUBTITLE until Off appears The on screen display will disappear after a few seconds 1 Notes Depending...

Page 65: ...s ENTER repeatedly until PBC appear Note You can also turn off the PBC by pressing number button 1 and ENTER in the stop mode To turn on the PBC 1 DISPLAY ENTER PLAY MODE 1 2 3 Play Mode Repeat Off Program Playback Mode Off CHAPTER NO DVD 00 15 25 01 41 39 Title 1 3 Chapter 2 24 1 1 Eng Dolby Digital 1 2 Eng 1 1 ELAPSED TIME ANGLE NO DISC OPERATION TITLE NO TOTAL TIME AUDIO LANGUAGE A KIND OF AUDI...

Page 66: ...Mass Storage in the recorded order 1 Use MP3 WMA JPEG DivX software that records data alphabetically or numerically 2 Insert two or three digit number in the head of file name ex 01 02 or 001 002 3 Refrain from making too many sub folders CAUTION Some MP3 WMA JPEG DivX CDs USB Mass Storage cannot be played back depending on the recording conditions The CD R RW or USB Mass Storage that has no music...

Page 67: ...ve the setting Press DVD USB to display the media selection window Press B or A to select the DISC mode or the USB mode then press ENTER You cannot select the mode if DISC USBmediaisnotinserted In the file browser press to select the desired file When PLAY is pressed after the file browser displayed or when the disc tray is closed by pressing PLAY playback begins automatically starting from the fi...

Page 68: ... PAUSE during the slide show the slide show stops temporary 4 appears briefly on the screen If the picture appears upside down or sideways press ANGLE repeatedly until it s right side up Press PLAY or SKIP again to resume the slide show When the slide show playback finished the file list ap pears To stop the slide show press STOP The file list ap pears Slide show playback 1 When PLAY is pressed af...

Page 69: ...playback CD USB Playing DivX VOD content DivX VOD content is protected by DRM Digital Rights Management system This restricts playback of content to specific registered devices If the incorrect DRM file is loaded Authorization Error This player is not authorized to play this video will appear on the screen When you attempt to play DivX VOD the number of plays is limited and the right message will ...

Page 70: ...ess ENTER to select Random Press PLAY The Random playback will start To resume normal playback Select Mode Off in step 2 Notes The program is canceled when you open the disc tray or turn the power off In case of Audio CD the function of A B Repeat also can be used See A B Repeat playback 61 Track repeat function is canceled whenever SKIP or is pressed 1 2 3 1 2 3 Folder 1 Folder 2 MP3 1 MP3 2 MP3 ...

Page 71: ... A or C D to select Add To Program Then press ENTER All marked files are added into the program list When you finish storing all the files you want into the Program list select Edit Mode again and press ENTER to release edit mode Press C D to select Program View then press ENTER Program View shows only the programed files that you have added in Step 2 Browser View In the Program View press PLAY Th...

Page 72: ... other settings To select another operation go back to step 2 by pressing B repeatedly Press C or D to select the desired section then press B or A First option will be highlighted Press C or D to select the desired option 4 Then press A or ENTER The selectable setting will appear SETUP DVD VCD CD RETURN To clear SETUP screen press SETUP or RETURN 6 Parental Off Set Password Output Interlace DivX ...

Page 73: ... the aspect ratio of your TV To turn On or Off the operational status display on the screen To select a preferred picture mode from Video Film or Auto To select a preferred setting for the slide show play back To select On or Off for DRC Dynamic Range Con trol To select a preferred parental level for the parental setting Input 4 digit password to set the parental level To display your 8 character ...

Page 74: ...y TV MENU see page 23 TV Screen You have the following screen sizes to choose from 4 3 Letter box Select this mode when connecting to a conven tional TV When playing back a wide screen DVD disc it displays the wide picture with black bands at the top and bottom of screen 4 3 Pan scan It displays the wide picture on the whole screen with left and right edges automatically cut off 16 9 Wide A wide s...

Page 75: ...yback of video content pic tures Note Depending on the disc pictures may be cut off or doubled In this case select Video On Loud sound such as explosion is toned down slightly when played back This is suitable when it is connected to a stereo Off It plays back at the recording level on the disc Notes This function works only during playback of Dolby Digital recorded discs The level of Dynamic Rang...

Page 76: ...than U S are included for future use Check the appropriate parental control level when you buy a DVD video disc equipped with the parental control feature in the future Depending on the discs the unit cannot limit playback Some discs may not be encoded with specific rating level information though its disc jacket says adult For those discs the age restriction will not work The password is required...

Page 77: ...D disc Depending on the DVD disc the disc may try to temporarily cancel the rating level that you have set It is up to you to decide whether to cancel the rating level or not Note This temporary cancellation of rating level will be kept until the disc is ejected When the disc is ejected the original rating level will be set again automatically 1 Enter the password with Number buttons 0 9 Then pres...

Page 78: ...grinya 3019 Bulgarian 1217 Indonesian 1924 Pashto Pushto 2629 Tonga 3025 Burmese 2335 Interlingua 1911 Persian 1611 Turkish 3028 Byelorussian 1215 Irish 1711 Polish 2622 Turkmen 3021 Cambodian 2123 Italian 1930 Portuguese 2630 Twi 3033 Catalan 1311 Japanese 2011 Quechua 2731 Ukrainian 3121 Chinese 3618 Javanese 2033 Rhaeto Romance 2823 Urdu 3128 Corsican 1325 Kannada 2124 Romanian 2825 Uzbek 3136 ...

Page 79: ...ances such as drills or hair dryers SNOW If the unit is located far from the TV station in a fringe reception area where the signal is weak small dots may appear in the picture If the signal is extremely weak the installation of a larger external antenna may be necessary RADIO FREQUENCY INTERFERENCE RFI Caused by two way radios this type of interference produces moving ripples or diagonal streaks ...

Page 80: ...Possible local interference The MUTE button is pressed TV station stopped broadcasting Sleep timer is set TV station experiencing problems or program tuned is not closed captions TV signal is weak The CLOSED CAPTION button is not pressed POSSIBLE SOLUTIONS Connect the AC power cord to the AC outlet Insert a disc Try another channel Check picture control adjustments Check for source of reception di...

Page 81: ...the unit or the disc The remote control is not aimed at the sensor Distance is too far or too much light in the room There is an obstacle in the path of the beam The batteries are weak The batteries are not inserted correctly POSSIBLE SOLUTIONS Place a piece of adhesive tape over the hole Reset the present time Reset the start end time Press TIMER REC the TIMER REC indicator is lit Replace the tap...

Page 82: ... Hz to 20 kHz Hi Fi dynamic range More than 90 dB F FWD REW at 25 C 77 F Approx 1 minute and 48 seconds with T 120 cassette tape time Applicable disc DVD 12 cm 8 cm CD 12 cm 8 cm Frequency range DVD 4 Hz 22 kHz CD 4 Hz 20 kHz Operating conditions Temperature 5 C 40 C 41 F 104 F Operating status Horizontal Input Output Video input 1 0 V p p 75 W negative sync pin jack x 2 Audio input 8 dBm 50 kW ne...

Page 83: ...r warrants the picture tube in this TV Combination against defects in materials or workmanship for a period of two 2 years after the date of original retail purchase DURING THIS PERIOD TACP WILL AT TACP S OPTION REPAIR OR REPLACE A DEFECTIVE PICTURE TUBE WITH A NEW OR REFURBISHED PICTURE TUBE WITHOUT CHARGE TO YOU PROVIDED THAT IF A DEFECTIVE PICTURE TUBE IS REPAIRED OR REPLACED AFTER NINETY 90 DA...

Page 84: ... should have discovered the defect This limitation does not apply to implied warranties arising under the law of any state of the U S A THIS WARRANTY GIVES YOU SPECIFIC LEGAL RIGHTS AND YOU MAY ALSO HAVE OTHER RIGHTS WHICH MAY VARY FROM STATE TO STATE IN THE U S A SOME STATES OF THE U S A DO NOT ALLOW LIMITATIONS ON THE DURATION OF AN IMPLIED WARRANTY WHEN AN ACTION MAY BE BROUGHT OR THE EXCLUSION...

Reviews: