background image

COMBINATION FLAT COLOR
TELEVISION AND VIDEO CASSETTE
RECORDER / DVD VIDEO PLAYER

MW20FP3
MW24FP3

OWNER’S MANUAL

2

13

18

33

38

42

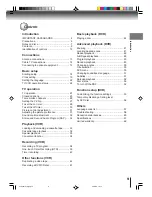
Introduction

Connections

Basic setup

Playback

(VCR)

Recording

(VCR)

Other functions

(VCR)

DIGITAL VIDEO

©2004 Toshiba Corporation

44

47

53

57

Basic playback

(DVD)

Advanced

playback

(DVD)

Function setup

(DVD)

Others

This device does not tape-record copy protected DVD video discs.

23

TV operation

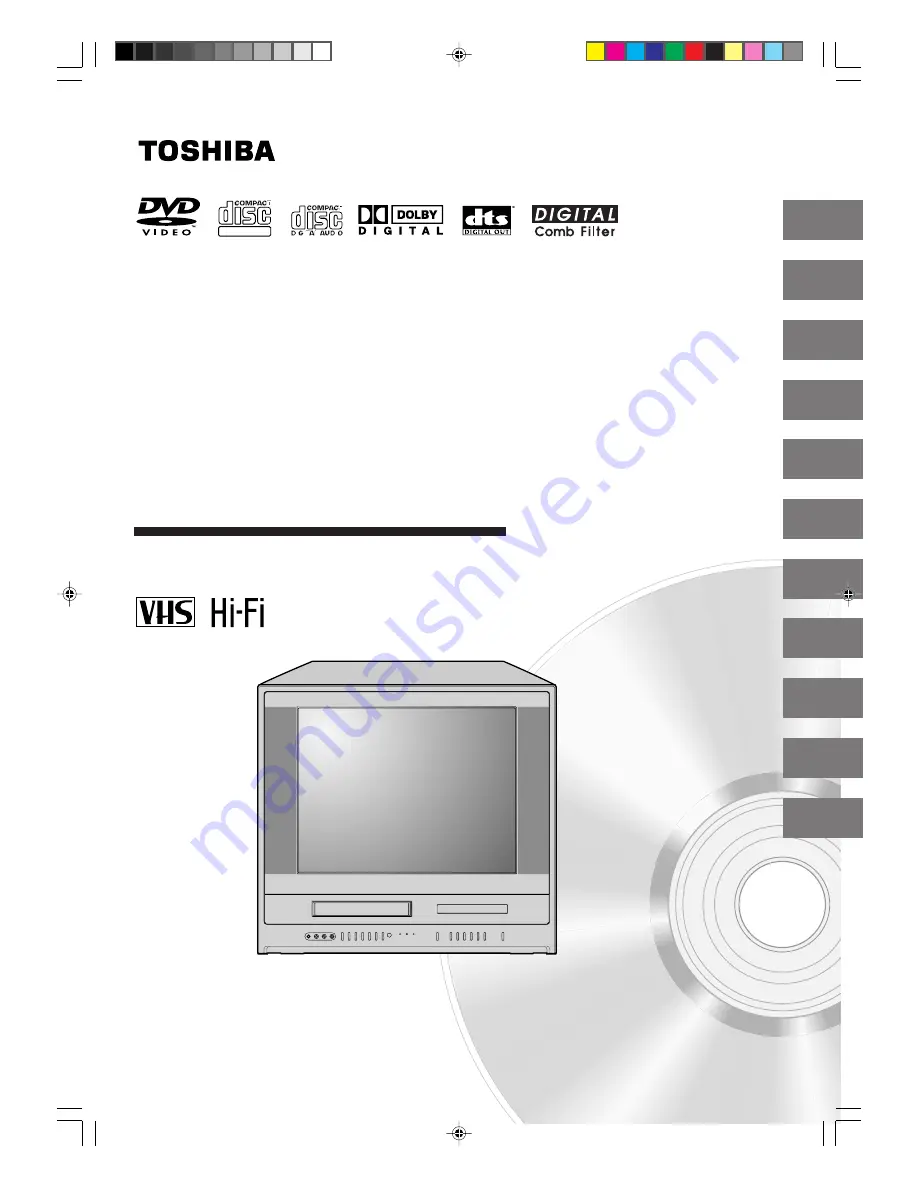
Illustration of MW20FP3

 5L00301C [E]Cover

20/4/04, 16:11

1

Summary of Contents for MW20FP3

Page 1: ...duction Connections Basic setup Playback VCR Recording VCR Other functions VCR DIGITAL VIDEO 2004 Toshiba Corporation 44 47 53 57 Basic playback DVD Advanced playback DVD Function setup DVD Others This device does not tape record copy protected DVD video discs 23 TV operation Illustration of MW20FP3 5L00301C E Cover 20 4 04 16 11 1 ...

Page 2: ...15 of the FCC Rules These limits are designed to provide reasonable protection against harmful interference in a residential installation This equipment generates uses and can radiate radio frequency energy and if not installed and used in accordance with the instructions may cause harmful interference to radio communications However there is no guarantee that interference will not occur in a part...

Page 3: ... or heat source This unit should not be placed in a built in installation such as a bookcase or rack unless proper ventilation is provided or the manufacturer s instructions have been adhered to 10 POWER SOURCE This unit should be operated only from the type of power source indicated on the rating plate If you are not sure of the type of power supply to your home consult your appliance dealer or l...

Page 4: ...it c If the unit has been exposed to rain or water d If the unit does not operate normally by following the operating instructions Adjust only those controls that are covered by the operating instructions as an improper adjustment of other controls may result in damage and will often require extensive work by a qualified technician to restore the unit to its normal operation e If the unit has been...

Page 5: ...es both Cathode Ray Tube CRT and other components that contain lead In your community there might be regulations that require you to dispose these materials properly under environmental considerations Please contact your local authorities or the Electronic Industries Alliance http www eiae org for disposal or recycling information TO USE AC POWER SOURCE Use the AC polarized line cord provided for ...

Page 6: ...gh technology precision device If the video head the head drum the optical pick up lens and disc drive parts are dirty or worn down the picture quality becomes poor To obtain a clear picture we recommend regular inspection and maintenance cleaning or parts replacement every 1 000 hours of use depending on the operating environment For details contact your nearest dealer Notes on moisture condensat...

Page 7: ...horized by Macrovision Corporation and is intended for home and other limited viewing uses only unless otherwise authorized by Macrovision Corporation Reverse engineering or disassembly is prohibited On handling discs Do not touch the playback side of the disc Do not attach paper or tape to discs On cleaning discs Fingerprints and dust on the disc cause picture and sound deterioration Wipe the dis...

Page 8: ...able area are printed on your DVD video disc and you do not find 1 or ALL disc playback will not be allowed by the player In this case the unit will display a message on screen On Video CDs This DVD supports Video CDs equipped with the PBC Version 2 0 function PBC is the abbreviation of Playback Control You can enjoy two playback variations depending on types of discs Video CD not equipped with PB...

Page 9: ... cassette tape 33 Cassette tape playback 34 Special playback 35 Convenient function 36 Recording VCR Recording a TV program 38 One touch Timer Recording OTR 39 Timer recording 40 Other functions VCR Duplicating a video tape 42 Recording a DVD CD disc 43 Basic playback DVD Playing a disc 44 Advanced playback DVD Zooming 47 Locating desired scene 47 Repeat playback 48 A B Repeat playback 48 Program ...

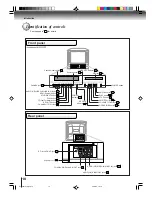
Page 10: ... REC OTR button 38 PLAY button 34 FF Fast Forward button 34 Remote sensor 12 OPEN CLOSE button 44 VOLUME buttons 23 SKIP button 46 STOP button PLAY button 44 SKIP button 46 POWER button AUDIO L R VIDEO IN LINE 1 IN jacks 42 AUDIO L R VIDEO OUT jacks 15 POWER indicator 19 REC OTR indicator 38 TIMER REC indicator 40 Disc tray 44 COAXIAL DIGITAL AUDIO OUT jack 16 RF IN VHF UHF jack 14 AC power cord 5...

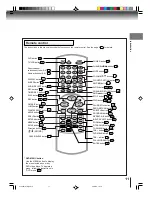
Page 11: ...9 Number buttons 0 9 TV VCR button DVD button DISPLAY button 22 SLEEP button 24 AUDIO SELECT button 32 REC buttons 36 TIMER REC buttons 40 PLAY button 34 REV button 34 COUNTER RESET button 36 ANGLE button 50 SP SLP button 38 RETURN button 53 MENU button 19 SETUP button 53 CANCEL CLEAR button 18 JUMP button 47 CM SKIP button 35 CLOSED CAPTION button 25 SLOW button SKIP button 35 46 CHANNEL RETURN b...

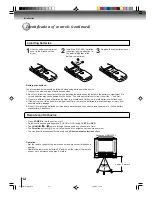
Page 12: ...vice To avoid a potential short circuit insert the end first 3 Do not mix different types of batteries together e g Alkaline and Carbon zinc or old batteries with fresh ones 4 If the device is not to be used for a long period of time remove the batteries to prevent damage or injury from possible battery leakage 5 Do not try to recharge batteries not intended to be recharged they can overheat and r...

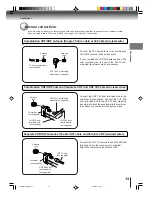
Page 13: ...in lead wire to the combiner not supplied Connect the VHF 300 ohm twin lead wire to the 300 75 ohm matching transformer Attachthetransformertothecombiner then attach the combiner to the antenna jack Connect the VHF 75 ohm cable and UHF 300 ohm twin lead wire to the combiner not supplied Attach the combiner to the antenna jack Combination VHF UHF antenna Separate VHF and UHF 300 ohm twin lead wires...

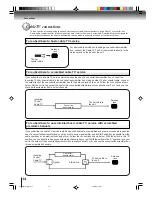
Page 14: ... service which requires the use of a converter descrambler box connect the incoming 75 ohm coaxial cable to the converter descrambler box Using another 75 ohm coaxial cable connect the output jack of the converter descrambler box to the antenna jack on the unit Follow the connections shown below Set the unit to the output channel of the converter descrambler box usually channel 3 or 4 and use the ...

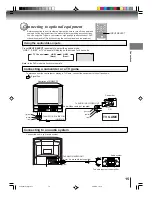
Page 15: ...t as shown Connect the unit to your audio system LINE 1 IN VIDEO AUDIO L MONO R VIDEO AUDIO L R OUT PUT DIGITALAUDIO VHF UHF COAXIAL white red red white To ANALOG AUDIO OUT To audio inputs of the amplifier Audio system To AUDIO L R VIDEO IN LINE IN 2 To AUDIO L R VIDEO OUT red white yellow red white yellow TV GAME Camcorder OR Audio cable not supplied Audio Video cable not supplied INPUT SELECT Us...

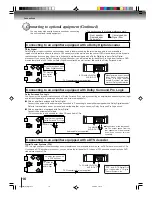
Page 16: ...nnecting an amplifier and speaker system right and left front speakers a center speaker and one or two rear speakers 3 With an amplifier equipped with Dolby Digital Connect the equipment the same way as described in Connecting to an amplifier equipped with a Dolby Digital decoder Refer to that amplifier s owner s manual and set the amplifier so you can enjoy Dolby Surround Pro Logic sound 3 With a...

Page 17: ...nit Connect the COAXIAL DIGITAL AUDIO OUT jack of the unit to the COAXIAL input of a Receiver or Processor Refer to the owner s manual of the connected equipment as well When you connect the unit to other equipment be sure to turn off the power and unplug all of the equipment from the wall outlet before making any connections The output sound of the unit has a wide dynamic range Be sure to adjust ...

Page 18: ...en press ENTER If you select CANCEL and press ENTER the STARTING SETUP stops and changes to the TV screen 1 2 3 Now the AUTO CH MEMORY and AUTO CLOCK starts After the starting setup is completed the TV channel appears on the screen 4 Notes The starting setup function will work only when you press the POWER button for the first time In AUTO CLOCK setting it may take more than 10 minutes to read the...

Page 19: ... be left on The Auto Clock adjustment is not effective when there is a difference of more than 5 minutes exists between the built in clock time and the actual time When shipped from factory the AUTO CLOCK is set to ON But if you do not want auto clock set Adjustment Press MENU then press or to select option 1 Press or to select AUTO CLOCK 2 Press or to select OFF 3 Press MENU repeatedly until the ...

Page 20: ...ght Saving Time manually on the first Sunday in April you set to ON and on the last Sunday in October you set to OFF ON OFF AUTO for manual setting forward one hour for manual setting back one hour for automatic setting read EDS in the signal ATLANTIC GMT 4hours EASTERN GMT 5hours CENTRAL GMT 6hours MOUNTAIN GMT 7hours PACIFIC GMT 8hours ALASKA GMT 9hours HAWAII GMT 10hours AUTO AUTO SET GMT Green...

Page 21: ...After setting the clock date and time starts functioning automatically 5 Press or to select CLOCK SET then press 2 Press or to set the month then press 3 Set the day year and time as in step 4 then press ENTER 4 ENTER SETUP MENU ENTER ENTER ENTER MENU CLOCK SET ON OFF TIMER AUTO CLOCK STANDARD TIME DAYLIGHT SAVING TIME ON CLOCK SET MONTH DAY YEAR TIME ENTER MENU 3 1 MON 2004 12 00AM ENTER MENU CLO...

Page 22: ... MENU ENTER MENU SETUP MENU Press DISPLAY to display the information on the screen To cancel the display press DISPLAY again HI FI TV VCR 00 15 12 SP 8 30AM MON While watching TV While operating a tape CH 125 8 47AM MON TV VCR 00 00 00 SP STEREO SAP Day of the week Channel Tape speed Real time tape counter Clock Stereo and second audio program VCR operation Tape in Auto repeat Hi Fi stereo TV VCR ...

Page 23: ...f off after 15 minutes To turn on the unit press POWER The Power indicator will light Every time you turn on the TV the unit starts from TV VCR mode When you use TV VCR after DVD operation press TV VCR POWER TV VHF UHF channels CABLE Cable TV channels CABLE mode direct channel selection When the TV CABLE selection is in the CABLE position channels can be selected as follows TO SELECT CABLE TV CHAN...

Page 24: ...set the unit to turn off after a preset amount of time press SLEEP on the remote control The clock will count down 10 minutes for each press of SLEEP 120 110 10 0 After the sleep time is programmed the display will appear briefly every ten minutes to remind you that the sleep timer is operating To confirm the sleep timer setting press SLEEP and the remaining time will be displayed for a few second...

Page 25: ...ions look in your TV guide for the closed captions symbol CC TO VIEW CLOSED CAPTIONS Press CLOSED CAPTION to switch between normal TV and the two closed caption modes captions and full screen text Closed captioning will display text on the screen for hearing impaired viewers Closed captions WHAT IS CLOSED CAPTIONING This television has the capability to decode and display closed captioned televisi...

Page 26: ...eive up to 113 cable TV channels To use this unit with an antenna set the TV CABLE selection to the TV position When shipped from the factory this selection is in the CABLE position ADD 0 9 CH 001 MENU To ADD DELETE channels Press or to select the AUTO CH MEMORY then press The TV will begin memorizing all the channels available in your area Automatic memory tuning Press or to select ADD DELETE the...

Page 27: ...ograms according to TV RATING and MOVIE RATING level set To use the V Chip function you must register a password To change password Enter the new password using Number buttons 0 9 then press ENTER 2 In the V CHIP menu press or to select CHANGE PASSWORD then press 1 Enter the same password again using Number buttons 0 9 for safety then press ENTER 3 Press MENU repeatedly until the menu screen is cl...

Page 28: ... less than 13 years old R Under 17 years old Parental guidance suggested NC 17 17 years old and above X Adult only Press or to display ON Now your settings were set into the memory 6 Press MENU repeatedly until the menu screen is cleared 7 To use after the TV is protected When the program applied to the V Chip setting is received enter the password then press ENTER Protection can be canceled Note ...

Page 29: ...tomatic shut off To cancel ON TIMER follow above steps 1 5 then press or to select CANCEL Press the MENU button repeatedly until the menu screen is cleared After setting the ON TIMER OFF TIMER will be highlighted If you wish to set the OFF TIMER press then follow the steps 4 6 on page 30 If you want to correct the digits while setting press or until the item you want to correct then press or to co...

Page 30: ...o cancel OFF TIMER follow above steps 1 5 then press or button to select CANCEL Press the MENU button repeatedly until the menu screen is cleared To confirm the ON OFF TIMER Press the PROGRAM button twice to indicate the programs on the screen Press MENU repeatedly until the menu screen is cleared 7 PROGRAM MENU ENTER SETUP MENU ENTER SETUP MENU ENTER ENTER ENTER ENTER CLOCK SET ON OFF TIMER AUTO ...

Page 31: ... greenish SHARPNESS softer sharper 3 3 3 3 3 To return all adjustments to the factory preset levels Press CANCEL while making picture adjustments Picture control adjustment Adjusting the picture preference Press or to select PICTURE PREFERENCE then press 1 2 Press MENU then press or to select option Mode Picture quality STANDARD Standard picture quality factory set SPORTS Bright and dynamic pictur...

Page 32: ...rs on the screen This means that the Second Audio Program broad casting is available Sound control adjustment Press or to select AUDIO then press 1 2 After your desired setting press MENU repeatedly until the menu screen is cleared 4 Press or to select the item you want to adjust then press or to adjust the setting 3 3 3 3 3 3 To return BASS TREBLE BALANCE control adjustments to the factory preset...

Page 33: ...ed at your left An inverted cassette tape cannot be inserted Automatic playback When loading a cassette tape without an erase prevention tab playback will start automatically Automatic power ON When you insert a cassette tape the unit power will turn ON automatically 1 2 Erase prevention tab Adhesive tape Remove the cassette tape Erase prevention tab Unloading To prevent accidental erasure To prev...

Page 34: ...VD playback you must set the unit to TV VCR mode using the TV VCR button This unit selects the playback tape speed SP or SLP auto matically When you select the TV VCR mode during DVD playback DVD playback will change to the still mode and after 5 minutes it will change to the resuming playback mode automatically 2To start playback Playback Rewind or forward the tape To rewind the tape PressREWonth...

Page 35: ...econds on the screen Press PAUSE STILL during playback Press SLOW one by one The picture advances frame by frame To return to playback press PLAY or PAUSE STILL SPEED SEARCH TIMES Digital tracking controls Still picture Slow motion Frame by frame picture Notes SP ismoreappropriateaslessnoiseappearedduringsearch and still playback for tape recorded in SP The audio output is muted during SPEED SEARC...

Page 36: ... the beginning and the playback will be repeated Using the real time tape counter ENTER ENTER SETUP MENU PLAY Press DISPLAY 1 Press COUNTER RESET to set the counter to 00 00 00 2 Begin Playback or Recording to start the tape the counter will display the elapsed time 3 When you wish to make the counter disappear press DISPLAY once again 4 The on screen real time tape counter shows the tape running ...

Page 37: ...come dirty enough to be clogged no picture will be played back This can easily be deter mined if during playback of a known good tape there is good sound but no picture picture is extremely snowy If this is the case have the unit checked by qualified service personnel Notes DO NOT ATTEMPT TO CLEAN THE VIDEO HEADS OR SERVICE THE UNIT BY REMOVING THE REAR COVER Video heads may eventually wear out an...

Page 38: ... with the erase prevention tab intact The unit will automatically turn on 1 00 00 00 SP CH 110 CH 110 Press SP SLP to select the desired tape speed SP or SLP The tape counter and SP or SLP will appear on the screen for about 4 seconds 2 Select TV or CABLE to the appropriate position 26 3 TV VHF UHF channels CABLE Cable TV channels Press Direct channel selection 0 9 or CHANNEL to select the channel...

Page 39: ...nds 2 Set TV or CABLE option to the appropriate position 26 3 00 00 00 SP CH 110 CH 110 OTR 0 30 TV VHF UHF channels CABLE Cable TV channels Press Direct channel selection 0 9 or CHANNEL to select the channel to be recorded 4 Press both REC at the same time to begin recording Press the buttons again to stop recording after 30 minutes Each additional press of REC will increase recording time as sho...

Page 40: ...erase prevention tab is in the unit the tape will be ejected Press MENU then press or to select option Preparation Press TV VCR to select the TV VCR mode Load a cassette tape with the erase prevention tab intact Check the time and date are correct 21 Example Program a timer recording for 23rd day channel 125 Cable TV 7 00 9 30 PM Tape speed SLP 1 Press or to select one of the program line then pre...

Page 41: ...he timer program list Press PROGRAM again The TV screen displays the ON OFF timer setting Press PROGRAM 3 times The menu screen is cleared To confirm the settings Press PROGRAM once The TV screen displays the timer program list Press or to select the unnecessary program and press CANCEL to cancel the program twice once To cancel a program ON TIMER 12 00AM CH 001 SUN SAT OFF TIMER 12 00AM CANCEL CA...

Page 42: ...ired tape speed SP or SLP It is recommended that you set the Speed to the SP mode on the recording VCR for best results 1 Press INPUT SELECT once or twice to select AUDIO VIDEO input position LINE1 or LINE2 will appear on the screen 2 Press PLAY on the playback VCR or camcorder 3 Press both REC at the same time 4 Press STOP after duplicating a video tape 5 LINE1 on the rear panel LINE2 on the fron...

Page 43: ...ode automatically and the playback picture or sound will be duplicated on the video cassette tape 4 Press STOP if you finish recording If you wish to stop a DVD CD disc press DVD to change the DVD mode then press STOP 5 Notes You may not record the beginning of the disc so start to playback the disc then start to record You cannot record the disc with copy guard function DISC IS COPY PROTECTED wil...

Page 44: ...l start automati cally 3 Press OPEN CLOSE The disc tray opens 4 Place the disc on the disc tray Basic playback There are two different disc sizes Place the disc in the correct guide on the disc tray If the disc is out of the guide it may damage the disc and cause the unit to malfunction Do not place a disc which is unplayable on the disc tray A menu screen will appear on the TV screen if the disc ...

Page 45: ... playback Doing so may damage the disc Use the OPEN CLOSE button to open and close the disc tray Do not push the disc tray while it is moving Doing so may cause the unit to malfunction Do not push up on the disc tray or put any objects other than discs on the disc tray Doing so may cause the unit to malfunction In many instances a menu screen will appear after playback of a movie is completed Prol...

Page 46: ...u want Playback starts from the selected chapter or track To locate succeeding chapters or tracks Playback starts from the beginning of the current chapter or track When you press twice in quick successions playback starts from the beginning of the preceding chapter or track A Prohibition symbol may appear at the upper left of the screen This symbol means either the feature you tried is not availa...

Page 47: ...e numbers Press ENTER Playback starts When you change the title playback starts from Chapter 1 of the selected title Some discs may not work in the above operation 4 2 3 Note In case of the Video CD playback with PBC the JUMP does not work To turn off PBC see page 52 DVD VCD CD Locating desired scene Jump Time Title Chapter Enter 0 9 Cancel Jump Time Title Chapter Jump Enter 0 9 Cancel Jump Time T...

Page 48: ...epeat playback A B Repeat playback Repeat playback A B Repeat playback 1Press PLAY MODE during playback or stop mode Press PLAY MODE again to make the screen disappear 3 2 Notes Some discs may not work with the repeat operation In case of Video CD with PBC repeat functions are prohib ited during playback DVD Press or ENTER once or twice to select Chapter or Title The unit automatically starts repe...

Page 49: ...0 9 to select the track number to be replaced To clear the program one by one In the program mode press to select the track number Then press CANCEL To clear all the programs In the program mode press to select Clear Then press ENTER Repeat 1 2 3 4 5 6 7 8 9 10 11 12 Clear Program Playback Play Mode Program Off Enter 0 9 Cancel Play Mode Play Mode Repeat Off Enter Play Mode Off Program Playback 2 ...

Page 50: ...e titles are recorded on some discs If the title menu is recorded on the disc you can select the desired title 1 Press ENTER or PLAY The playback of the selected title will start 3 Note Depending on the DVD you may not be able to select the title Depending on the DVD a title menu may simply be called a menu or title in the instructions supplied with the disc 2 Some DVDs allow you to select the dis...

Page 51: ...e language will be heard if the disc is played back again If you select DTS in playing DTS encoded disc no sound will be heard from the unit s speakers In case of Video CD playback Audio type changes as follows each time you press AUDIO SELECT When playing back a disc recorded with subtitles you can select the subtitle language or turn the subtitle off To turn off the subtitle press SUBTITLE until...

Page 52: ...e PBC You can turn the vocal on or off recorded on the DVD KARAOKE Notes The vocal output feature is used during playback of Dolby Digital multi channel recorded DVD KARAOKE discs This feature allows you to turn off vocal audio tracks or restore them for background accompaniment When playing Karaoke connect appropriate audio equipment such as an amplifier to the unit Karaoke playback On The primar...

Page 53: ...evel To select a preferred parental level for the parental setting To select a preferred language for on screen display Customizing the function settings You can change the default settings to customize performance to your preference Press SETUP during stop mode The following on screen display appears 1 2 3 To make SETUP screen disappear press SETUP or RETURN 5 Repeat step 3 and 4 to change other ...

Page 54: ...ear during playback Off Subtitle Subtitles do not appear Note If the selected language is not recorded on the disc the first priority language is selected Language Picture Tv Screen 4 3 Pan scan It displays the wide picture on the whole screen with left and right edges automatically cut off 16 9 Wide Select this mode when connecting to a wide screen TV A wide screen picture is displayed full size ...

Page 55: ...lways be worked under the same conditions espe cially with DVD discs Each setup will be retained in the memory even if you turn the power off If you forget the password 1 Press OPEN CLOSE to open the disc tray 2 Remove the disc 3 Press OPEN CLOSE again to close the disc tray No Disc appears on the screen 4 While holding STOP down on the front panel press 7 on the remote control PASSWORD CLEAR appe...

Page 56: ...as been set the password entering screen will appear as shown in step 4 Alternatively if the password has not been set playback will commence If you don t know or have forgotten the password select Cancel Picture The setting screen will disappear Press OPEN CLOSE to remove the disc Note This temporary cancellation of rating level will be kept until the disc is ejected When the disc is ejected the ...

Page 57: ...n 2425 Thai 3018 Bihari 1218 Hungarian 1831 Oriya 2528 Tibetan 1225 Breton 1228 Icelandic 1929 Panjabi 2611 Tigrinya 3019 Bulgarian 1217 Indonesian 1924 Pashto Pushto 2629 Tonga 3025 Burmese 2335 Interlingua 1911 Persian 1611 Turkish 3028 Byelorussian 1215 Irish 1711 Polish 2622 Turkmen 3021 Cambodian 2123 Italian 1930 Portuguese 2630 Twi 3033 Catalan 1311 Japanese 2011 Quechua 2731 Ukrainian 3121...

Page 58: ...le local interference TV station experiencing problems Picture control is not adjusted Possible local interference Antenna CABLE connector is not connected or possible local interference TV station experiencing problems Antenna CABLE connector is not connected or possible local interference Cable TV channel is scrambled CABLE connector is not connected TV CABLE selection is set to the TV position ...

Page 59: ...thin 5 m or reduce the light of the room Clear the path of the beam Replace the batteries Insert correctly SYMPTOMS CAUSE POSSIBLE SOLUTIONS PAGE VCR REMOTE CONTROL 35 DVD The playback picture has occasional distortion The disc is dirty It is in fast forward or fast reverse playback No disc is inserted An unplayable disc is inserted The disc is placed upside down The disc is not placed within the ...

Page 60: ...such as drills or hair dryers SNOW If the unit is located far from the TV station in a fringe reception area where the signal is weak small dots may appear in the picture If the signal is extremely weak the installation of a larger external antenna may be necessary RADIO FREQUENCY INTERFERENCE RFI Caused by two way radios this type of interference produces moving ripples or diagonal streaks in the...

Page 61: ...0 508 mm diagonal Type 24 600 mm diagonal 1 13 16 x 3 7 8 inches 46 x 99 mm 8 Ω x 2 1 5 W 1 5 W 59 5 lbs 27 kg 79 4 lbs 36 kg 22 9 16 inches 573 mm 25 13 16 inches 655 mm 20 3 8 inches 517 mm 22 13 16 inches 580 mm 18 15 16 inches 481 mm 18 5 8 inches 472 5 mm 181 channel freq synthesized VHF 2 13 UHF 14 69 CATV 125 Channels UHF VHF 75 Ω coaxial NTSC 4 Rotary heads Hi Fi sound 2 Tracks MONO sound ...

Page 62: ...olved in the replacement You are responsible for all transportation and insurance charges for the set to and from the Service Station Rental Units The warranty for rental units begins with the first rental or thirty 30 days from the date of shipment to the rental firm whichever comes first Commercial Units Products sold and used for commercial use have a limited ninety 90 day warranty for all part...

Page 63: ...arranty lasts when an action may be brought or the exclusion or limitation of incidental or consequential damages so the above provisions may not apply to you ATTENTION CANADIAN CONSUMERS Canadian consumers are requested to complete the special Canadian Warranty Registration Form enclosed and forward this completed form with a copy of bill of sale to TOSHIBA OF CANADA to Register and Validate thei...

Page 64: ...04 04 U Printed in Thailand 5L00301C E p62 Back 20 4 04 16 17 64 ...

Reviews: