background image

– 1 –

1-EN

2-EN

Thank you very much for purchasing TOSHIBA/Carrier Air Conditioner.
Please read this owner’s manual carefully before using your Air Conditioner.

• 

Obtain the “Owner’s manual” from contractor (or dealer).

We would appreciate your understanding of the Owner’s manual and we kindly ask for your long and 
continued use.

ADOPTION OF NEW REFRIGERANT

This Air Conditioner adopts a new refrigerant HFC (R410A) instead of the conventional refrigerant R22 in 
order to prevent destruction of the ozone layer.

Contents

1  Precautions for safety . . . . . . . . . . . . . . . . . . . . . . . . . . . . . . . . . . . . . . . . . . . . . . . . . . 1

2  Part names  . . . . . . . . . . . . . . . . . . . . . . . . . . . . . . . . . . . . . . . . . . . . . . . . . . . . . . . . . . . 3

3  Wired remote control . . . . . . . . . . . . . . . . . . . . . . . . . . . . . . . . . . . . . . . . . . . . . . . . . . . 5

4  Correct usage . . . . . . . . . . . . . . . . . . . . . . . . . . . . . . . . . . . . . . . . . . . . . . . . . . . . . . . .  . 6

5  Timer operation  . . . . . . . . . . . . . . . . . . . . . . . . . . . . . . . . . . . . . . . . . . . . . . . . . . . . . . . 7

6  Installation. . . . . . . . . . . . . . . . . . . . . . . . . . . . . . . . . . . . . . . . . . . . . . . . . . . . . . . . . . . . 8

7  Air conditioner operations . . . . . . . . . . . . . . . . . . . . . . . . . . . . . . . . . . . . . . . . . . . . . . . 8

8  Louver direction . . . . . . . . . . . . . . . . . . . . . . . . . . . . . . . . . . . . . . . . . . . . . . . . . . . . . . . 9

9  Power saving mode . . . . . . . . . . . . . . . . . . . . . . . . . . . . . . . . . . . . . . . . . . . . . . . . . . . 13

10 Performance . . . . . . . . . . . . . . . . . . . . . . . . . . . . . . . . . . . . . . . . . . . . . . . . . . . . . . . . . 13

11 Maintenance . . . . . . . . . . . . . . . . . . . . . . . . . . . . . . . . . . . . . . . . . . . . . . . . . . . . . . . . . 14

12 Troubleshooting . . . . . . . . . . . . . . . . . . . . . . . . . . . . . . . . . . . . . . . . . . . . . . . . . . . . . . 17

1

  Precautions for safety

Installing, starting up, and servicing air conditioning equipment can be hazardous due to system pressures, 
electrical components, and equipment location (roofs, elevated structures, etc.).
Only trained, qualified installers and service mechanics should install, start up, and service this equipment.
Untrained personnel can perform basic maintenance functions such as cleaning indoor unit air filter. All other 
operations should be performed by trained service personnel.
Before working on the equipment, observe precautions in the literature and on tags, stickers, and labels attached 
to the equipment.
Follow all safety codes. Wear safety glasses and work gloves. Use care in handling, rigging, and setting bulky 
equipment.
Read these instructions thoroughly and follow all warnings or cautions included in literature and attached to 
the unit. Consult local building codes and National Electrical Code (NEC) for special requirements. Recognize 
safety information. This is the safety alert symbol 

. When you see this symbol on the unit and in instructions or 

manuals, be alert to the potential for personal injury. Understand these signal words: DANGER, WARNING, and 
CAUTION. These words are used with the safety alert symbol.
DANGER identifies the most serious hazards which will result in severe personal injury or death. WARNING 
signifies hazards which could result in personal injury or death. CAUTION is used to identify unsafe practices 
which may result in minor personal injury or product and property damage. NOTE is used to highlight suggestions 
which will result in enhanced installation, reliability, or operation.
The manufacturer shall not assume any liability for the damage caused by not observing the description of this 
manual.

 WARNING

General

• 

Carefully read Owner’s Manual before starting the air conditioner. There are many important things to keep in mind for daily 
operation.

• 

Ask for installation to be performed by the dealer or a professional. Only a quali

fi

 ed installer is able to install an air 

conditioner. If a non-quali

fi

 ed person installs an air conditioner, it may result in problems such as 

fi

 re, electric shock, injury, 

water leakage, noise and vibration.

• 

Do not use any refrigerant different from the one speci

fi

 ed for complement or replacement.

Otherwise, abnormally high pressure may be generated in the refrigeration cycle, which may result in a failure or explosion 
of the product or an injury to your body.

• 

Do not install outdoor units where the operation sound may cause a disturbance. (Especially at the boundary line with a 
neighbor, install the air conditioner while considering the noise.)

Installation

• 

Only a quali

fi

 ed installer or quali

fi

 ed service person is allowed to carry out the electrical work of the air conditioner. Under 

no circumstances must this work be done by an unquali

fi

 ed individual since failure to carry out the work properly may result 

in electric shocks and/or electrical leaks.

• 

After the installation work has been completed, have the installer explain about the circuit breaker positions. In the event 
that trouble has occurred in the air conditioner, set the circuit breaker to the OFF position, and contact a service person.

• 

If the unit is installed in a small room, take appropriate measures to prevent the refrigerant from exceeding the limit 
concentration even if it leaks. Consult the dealer from whom you purchased the air conditioner when you implement the 
measures. Accumulation of highly concentrated refrigerant may cause an oxygen de

fi

 ciency accident.

• 

Do not install the air conditioner in a location that may be subject to a risk of exposure to a combustible gas. If a 
combustible gas leaks and becomes concentrated around the unit, a 

fi

 re may occur.

• 

If separately sold products are used, use TOSHIBA/Carrier speci

fi

 ed products only. Using unspeci

fi

 ed products may cause 

fi

 re, electric shock, water leak or other failure.

• 

Connect ground wire. (grounding work) Incomplete grounding may cause an electric shock.

1117907101 EN FR.indb   1

1117907101 EN FR.indb   1

3/21/16   11:43 AM

3/21/16   11:43 AM

Summary of Contents for MMY-MAP0726HT6P-UL

Page 1: ... MMY MAP0966HT9P UL MMY MAP1206HT9P UL MMY MAP1446HT9P UL MMY MAP1686HT9P UL AIR CONDITIONER MULTI TYPE Owner s Manual For OUTDOOR USE only Pour une UTILISATION EN EXTÉRIEUR uniquement 1117907101 English Owner s Manual 1 English Portuguê Français Manuel du propriétaire 18 1117907101 EN FR indb 1 1117907101 EN FR indb 1 3 21 16 11 44 AM 3 21 16 11 44 AM ...

Page 2: ...ight suggestions which will result in enhanced installation reliability or operation The manufacturer shall not assume any liability for the damage caused by not observing the description of this manual WARNING General Carefully read Owner s Manual before starting the air conditioner There are many important things to keep in mind for daily operation Ask for installation to be performed by the dea...

Page 3: ... status may cause mechanical problems to escalate or result in electric shocks or other failure If the fan grille is damaged do not approach the outdoor unit but set the circuit breaker to the OFF position and contact a qualified service person to have the repairs done Do not set the circuit breaker to the ON position until the repairs are completed If there is a danger of the indoor unit s fallin...

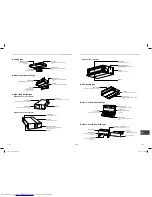
Page 4: ...n through here Discharge louver Controls discharge air directions Information on the transportation handling and storage of the carton Examples of indication on the carton Symbol Description Symbol Description Keep dry Do not lay down Fragile This side up Do not step Handle with care Do not drop Connectable indoor units Model type Model Name 4 way cassette type MMU AP H Compact 4 way cassette type...

Page 5: ... a discharge duct Air intake Connect a suction duct Drain pan MMD AP0726H to AP0966H Air discharge Connect a discharge duct Air intake Connect a suction duct Electrical control box The ground screw is provided in the electrical control box Drain pan Slim ducted type Air discharge The air discharge duct is connected Air intake The air suction duct is connected Ground screw Equipped on the electrica...

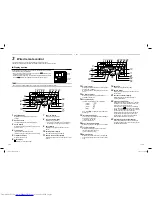
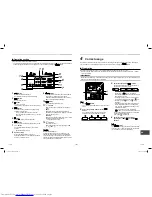
Page 6: ...eat display Displayed when the heating mode is energized or defrost cycle is initiated While this indication is displayed the indoor fan stops 13No function display Displayed when the function requested is not available on that model 14Fan speed display The selected fan speed mode is displayed AUTO HIGH MED LOW Only HIGH is displayed for the high static ducted type 15Louver Number display Louvers ...

Page 7: ...ntact the dealer from which you have purchased the air conditioner 4 Correct usage When the air conditioner is used for the first time or the setting is changed follow the steps below Settings are saved in memory and are displayed anytime the unit is turned on by pushing the button Preparation When the circuit breaker is turned on the partition lines are displayed on the remote control After the c...

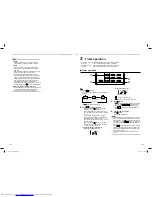
Page 8: ... F F O Repeat OFF timer No display OFF OFF ON and timer display flashes 2 Push to select set time With every push of button the set time increases by 0 5 hr 30 minutes When setting a time more than 24 hours for timer operation timer can be set in increments of 1 hr The maximum set time is 168hr 7 days The remote control displays the set time with time between 0 5 and 23 5 hours 1 or number of days...

Page 9: ...ir discharge of the outdoor unit 7 Air conditioner operations Check before operation Turn on the power switch at least 12 hours before starting operation Connect the ground wire securely Attach the air filter to the indoor unit Heating performance A heat pump system which gathers outside heat and emits it into a room is used for heating When the outside air temperature falls the heating capacity o...

Page 10: ...ts The characteristics of air Cool air falls and warm air rises CAUTION Point the louver horizontally during cooling If pointing downward for cooling dew may form on the surface of the air discharge or louver and may drop down NOTE If pointing horizontally for cooling dew may form on the surface of the cabinet or louver and may drop down If pointing horizontally for heating the room temperature ma...

Page 11: ...s each time the button is pushed No display Unit No 1 1 Unit No 1 2 Unit No 1 3 Unit No 1 4 When no unit number is displayed all units are selected 2 Push the button right side of the button to select a louver Each time the button is pushed the indicator on the left of the remote control changes as follows No display When no louver number is displayed all 4 louvers are selected Louver No 03 01 02 ...

Page 12: ...n the remote control This indicates that the louver 01 shown in the following figure is selected NOTE Even in louver lock mode the louver temporarily moves in the following cases When the air conditioner is stopped When heating starts When defrosting When thermostat Releasing the louver lock Set 0000 in Step 4 of Setting the louver lock The mark disappears Steps 1 3 and 5 6 of Setting the louver l...

Page 13: ...them individually To set louver direction individually push the button left side of the button to display an indoor unit number in the control group Then set the louver direction of the displayed indoor unit When no indoor unit number is displayed all indoor units in the control group can be controlled simultaneously Each time the left side of the button is pushed the indication changes as follows...

Page 14: ...re with handicapped old people and children Do not cool down too much Cool Heat the room evenly Adjust the air direction with the louver Exposing yourself to blowing air directly for a long time is bad for your health Air conditioner operating conditions For proper performance operate the air conditioner under the following temperature conditions Cooling operation Outdoor temperature 14 F 1 to 122...

Page 15: ...TE The high static ducted type and slim ducted type are not equipped with an air filter when shipped from the factory The type of air filter locally procured installation position and maintenance method vary depending on the local duct design For details contact the contractor or dealer from whom you purchased the product 4 way cassette type REQUIREMENT Clean the heat exchanger with pressurized wa...

Page 16: ...aning Unit Grille and Frame To clean the grille and the frame wipe the outside with a soft dry cloth If necessary a mild liquid detergent can be applied and wiped off with a dry cloth Cleaning The Louvers 1 Remove the discharge louver by holding it at both ends and pulling downwards towards the center 2 Clean the louvers with water or mild detergent 3 Mount the discharge louver by inserting one en...

Page 17: ...nd set the air filter locally procured in it Filter rack Air filter locally procured 3 Push the filter rack in fully and reattach the cover plate Screws x 2 Air filter locally procured 3 Turn on the circuit breaker then push the button on the remote control to start the operation 4 After cleaning push display disappears CAUTION Do not start the air conditioner while leaving air filter removed Push...

Page 18: ...e outdoor unit obstructed Are any door or window open Is the air filter clogged with dust Is discharge louver of the indoor unit set at appropriate position Is air selection set to LOW MED and is the operation mode set to FAN Is the setup temp the appropriate temperature Are COOL and HEAT selected simultaneously indication is lit on the display of the remote control Is outdoor temperature out of o...

Page 19: ...e meilleure installation une plus grande fiabilité ou un fonctionnement plus sûr Le fabricant ne peut être tenu responsable pour tout dommage causé par le non respect des instructions et descriptions de ce manuel AVERTISSEMENT Généralités Veuillez lire attentivement le manuel du propriétaire avant de mettre le climatiseur en marche Plusieurs aspects doivent être pris en compte pour son fonctionnem...

Page 20: ...chocs électriques et autres dommages Si la grille du ventilateur est endommagée n approchez pas de l unité extérieure et réglez le disjoncteur sur la position OFF ensuite contactez une personne d entretien qualifiée pour effectuer les réparations Ne réglez pas le disjoncteur en position ON jusqu à ce que les réparations soient terminées S il existe un danger que l unité intérieure tombe ne vous ap...

Page 21: ...our d air L air de la pièce est entrée par ici Volet de sortie d air Contrôle les directions de sortie du flux d air Informations concernant le transport la manipulation et l entreposage du carton Exemples d indication sur le carton Symbole Description Symbole Description Gardez au sec Ne pas le coucher Fragile Cette face vers le haut Ne pas faire un pas Manipuler avec soin Ne le laissez pas tombe...

Page 22: ...sse est fournie dans le boîtier de commandes électriques Evacuation d air Raccordez une bride de refoulement Entrée d air Raccordez une gaine d aspiration Bac d évacuation Type gainable fin Evacuation d air La gaine de sortie de l air est connectée Grille de retour d air La gaine d aspiration de l air est connectée Vis de masse Équipé sur le boîtier de commande électrique Type console exposée au p...

Page 23: ...14Affichage de vitesse du ventilateur La vitesse sélectionnée est affichée AUTO HIGH MED LOW Seul HIGH est affiché pour le type gainable à pression statique élevée 15Affichage du numéro du volet d air Les volets d air peuvent être contrôlés individuellement Affiche le volet d air qui est en cours de réglage par exemple 01 02 03 04 cassette 4 voies uniquement 16Mode d économie d énergie Affiché qua...

Page 24: ...ectée Pour de plus amples détails consultez le distributeur 4 Bonne utilisation du climatiseur Quand le climatiseur est utilisez pour la première fois ou que le réglage est changé procédez comme suit Les réglages sont mis en mémoire et sont affichés à chaque fois que l unité est mise sous tension en appuyant sur la touche Préparation Lorsque le disjoncteur est fermé la ligne de séparation apparaît...

Page 25: ... t F F O Repeat OFF timer No display OFF OFF ON Pas d affichage Minuterie OFF Minuterie ON Minuterie OFF quotidienne et l affichage de la minuterie clignotent 2 Appuyez sur pour sélectionner heure définie A chaque pression sur la touche l heure définie augmente de 0 5 hr 30 minutes Si l heure configurée dépasse 24 heures la minuterie peut être préréglée par incréments de 1 heure L heure définie ma...

Page 26: ...provenant de la sortir d aire de l unité extérieure 7 Utilisation du climatiseur Vérifications avant de commencer Mettez l interrupteur d alimentation sous tension au moins 12 heures avant le début du démarrage Raccordez correctement le fil de mise à la terre Fixez le filtre à air à l unité intérieure Performances de chauffage Un système de pompe à chaleur qui rassemble al chaleur et extérieure et...

Page 27: ...froidissement Si vous les dirigez vers le bas pour le refroidissement de la condensation peut se former sur la surface de la sortie d air ou des volets et des gouttes peuvent tomber REMARQUE Si vous les dirigez horizontalement pour le refroidissement de la condensation peut se former sur la surface du climatiseur et des volets et des gouttes peuvent tomber Si vous les dirigez horizontalement pour ...

Page 28: ...1 2 N d unité 1 3 N d unité 1 4 Lorsqu aucun numéro d unité s affiche toutes les unités sont sélectionnées 2 Appuyez sur la touche côté droit de la touche pour sélectionner un volet Chaque pression sur cette touche modifie l indicateur sur la gauche de la télécommande change comme suit No display Pas d affichage Lorsqu aucun numéro d unité s affiche les 4 unités intérieures sont sélectionnées Louv...

Page 29: ...on du volet N de volet d air F1 apparaît dans la section CODE No sur la télécommande Cela indique que le volet 01 montré sur la figure suivante est sélectionné REMARQUE Même en mode de verrouillage de volets le volet bouge temporairement dans les cas suivants Lorsque le climatiseur est arrêté Quand le chauffage démarre Pendant le dégivrage Lors d un arrêt par disjoncteur thermique Annulation du ve...

Page 30: ...nité intérieure en la sélectionnant individuellement Pour régler la direction des volets pour une unité d intérieure appuyez sur la touche côté gauche de la touche pour afficher un numéro d unité intérieure du groupe de commande Puis réglez la direction des volets de l unité intérieure affichée Si aucun numéro d unité n est affiché le réglage concerne alors simultanément toutes les unités du monta...

Page 31: ...la santé Faites particulièrement attention avec les personnes handicapées les personnes âgées et les enfants Do not cool down too much Ne refroidissez pas trop la pièce Refroidissez chauffez la pièce uniformément Ajustez la direction de l air avec les volets Vous exposer pendant longtemps directement au flux d air est mauvais pour la santé Conditions de fonctionnement du climatiseur Pour un bon fo...

Page 32: ...n statique et le type gainable fin ne sont pas munis d un filtre à air lors de l expédition de l usine Le type de filtre à air vendu séparément la position de l installation et la méthode d entretien varient en fonction de la gaine locale Pour les détails contactez le l installateur ou le revendeur où vous avez acheté ce produit Type cassette 4 voies CARACTÉRISTIQUES REQUISES Nettoyez l échangeur ...

Page 33: ...essuyez avec un chiffon sec Nettoyage des volets d air 1 Retirez le volet de sortie d air en le saisissant par ses deux extrémités tandis que vous exercez une pression vers le bas pour fléchir son centre 2 Nettoyez les volets d air en utilisant de l eau ou un détergent doux 3 Replacez le volet de sortie d air en insérant une de ses extrémités tandis que vous le fléchissez vers l extérieur pour per...

Page 34: ...rément à l intérieur Filter rack Air filter locally procured Support de filtre vendue séparément Filtre à air 3 Poussez le support de filtre complètement et remettez en place la plaque de fermeture Vis x 2 Air filter locally procured Support de filtre vendue séparément 3 Mettez le disjoncteur sous tension puis appuyez sur la touche de la télécommande pour mettre l appareil en marche 4 Après le net...

Page 35: ...age de fonctionnement L air n est pas suffisamment froid ou chaud Est ce que l entrée ou la sortie d air de l unité extérieure est bloquée Est ce qu une porte ou une fenêtre est ouverte Est ce que le filtre à aire est bouché par la poussière Est ce que le volet de sortie de l unité intérieure est dans la position correcte Est ce que la sélection d air est réglée sur LOW MED et que mode de fonction...

Page 36: ...HIBA CARRIER THAILAND CO LTD 144 9 MOO 5 BANGKADI INDUSTRIAL PARK TIVANON ROAD TAMBOL BANGKADI AMPHUR MUANG PATHUMTHANI 12000 THAILAND 1117907101 EN FR indb 2 1117907101 EN FR indb 2 3 21 16 11 44 AM 3 21 16 11 44 AM ...

Reviews: