background image

 6F8A0917 

- 82 - 

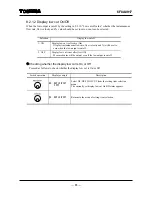
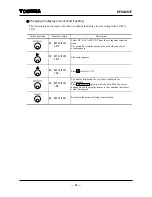
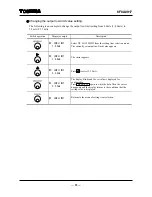
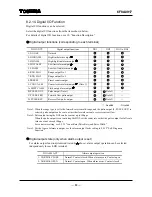
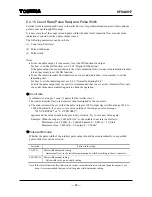
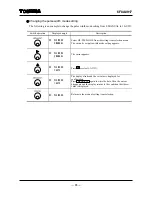
Changing the low cutoff value 

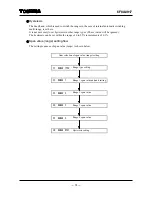
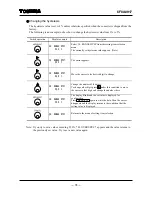
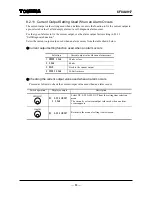
The following is an example to show how to change the low cutoff value from 1.0% to 3.0%. 


Switch operation 

Display example 

Description 


D2: LOW CUT 
        01.0 % 

Select D2: LOW CUT from the setting item selection menu. 
The currently set low cutoff value (1.0 % in this example) 
appears. 


D2: LOW CUT 
        01.0 % 

The cursor appears. 
Press

further to move the cursor to the desired digit to 

change. 


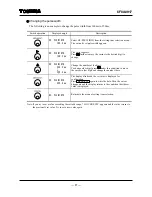
D2: LOW CUT 
        03.0% 

Change the number of the digit. 
To change another digit, press

under this condition to move 

the cursor to that digit and change the number there. 


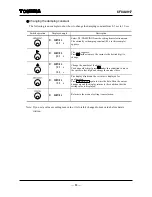
D2: LOW CUT 
        03.0 % 

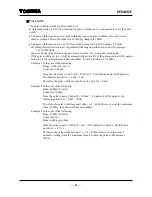
The display brinks and the set value is displayed for 

confirmation. 

Press

MENU/ENT

again to write the data. Then the cursor 

disappears and the display returns to the condition that the 

setting value is displayed. 


D2: LOW CUT 

Returns to the menu of setting item selection. 


Note: If you try to set a value exceeding 10.0%, *H. OVER SPEC.* appears and the value returns to 

the previously set value. In that case, try to set a new value again. 


Summary of Contents for L5232

Page 1: ...attempt to operate the equipment in any ways that are not described in this instruction manual After reading this manual store it with care in a place where it can be referred to whenever needed Please be sure that this manual is delivered to the personnel who will use this product Electromagnetic Flowmeter Converter LF232 Type INSTRUCTION MANUAL ...

Page 2: ...e instruction manual of the relevant detector About Safety Precautions Read the Safety Precautions described at the front carefully and understand the contents before using this product The Safely symbols used in the Safety Precautions are shown in a location such as in the margin to the left of the corresponding commentary in the main text This product does not conform to standards for overseas s...

Page 3: ...igh temperature or low temperature electric shock bone fracture and poisoning and the after effect of the injury remains or the injury requires hospitalization or long periods of outpatient treatment 2 Minor to moderate injuries refers to burns electric shocks and so on that do not require the injured person to be hospitalized or go to a hospital for a long period of time for medical treatment Pro...

Page 4: ...s power before conducting wiring work Ground the LF232 independently from power equipment Type D 100 ohm or less ground resistance DO Wiring while power is applied can cause electric shock DO Operating this product without grounding can cause electric shock or malfunction Turn off mains power before working on pipes Use crimped terminal lugs for the terminal board and GND terminal DO Working on pi...

Page 5: ...ec 100Vac or partially filled pipes spec 100Vac Dimensions Diameter 5 2 mm 20 mm Melting time characteristic Normal blow Usage limitation 1 This product is not manufactured for applying to a system requiring safety directly involved human life as follows Please contact your nearest Toshiba reprehensive if there is a possibility of using this product for such use Main control systems of nuclear pow...

Page 6: ...N OFF of lighting Dense smoke or steam near the control panel Those attached on the control panel such as rain dew drop snow ice mud and oil and haze due to their attachment Light reflecting object near the control panel or reflecting object such as metal plate placed opposing to the control panel When any of above factors is considered take a measure for the proper operation of infrared switch su...

Page 7: ...on site Observe the following precautions when using them Close a transmitter cover before using a transceiver Do not use a transceiver whose output power is more than 5 W Move the antenna of a transceiver or a cellular phone at least 50 cm away from the flowmeter and signal cables when using it Do not use a radio transmitter or a cellular phone near the flowmeter while it is operating online The ...

Page 8: ... 4 Wiring Method 23 5 4 1 Terminal Treatment of Cable 23 5 4 2 Cable Connection 25 5 4 3 Grounding 27 5 5 Digital I O Connections 29 5 6 Cautionary Notes on Replacing Converter 30 5 6 1 Replacing the LF230 Converter 30 5 6 2 Combination with an Existing Detector for Large Meter Size 31 5 6 3 Replacement of partially filled pipes type 32 6 Operation 34 7 Display and Controls 36 7 1 Names and Functi...

Page 9: ... 2 16 Preset Counter 98 8 2 17 Flow Rate High Low limit Alarm 101 8 2 18 Fluid Empty Alarm 105 8 2 19 Self Diagnosis Function 107 8 2 20 Rate of Change Limit Value and Control Time 110 8 3 Initial Settings When Shipped from the Factory 112 8 4 Fixed Value Output Loop Check 114 8 5 Zero Adjustment 118 8 5 1 Still Water Zero Adjustment 118 8 5 2 Zero Offset Adjustment 120 9 Mag Prover Calibration 12...

Page 10: ...49 11 2 Procedure for Communication with HHT 151 11 3 Cautionary Notes on Communications 152 12 Diagnosis and Alarms 153 12 1 Diagnostic messages 153 12 2 Output When an Error or Alarm Occurs 156 13 Maintenance and Inspection 157 13 1 Maintenance 157 13 2 Troubleshooting 159 13 2 1 Flow rate is not indicated 159 13 2 2 Flow rate indication is not correct 160 13 2 3 Flow rate indication is not stab...

Page 11: ...ld type detector This capacitor is usually not used For details see 5 3 1 Cautionary Notes on Wiring between Detector and Converter 1 2 Storage Regarding the storage after the flowmeter is delivered and before starting installation work be careful about the following items Do not leave the flowmeter in a place such as outdoors where direct sunlight hits or a place exposed to rain and wind Avoid pl...

Page 12: ...surement of 0 5 of rate can be obtained in the velocity range of 1 0ft s to 32 8ft s 0 3m s to 10m s Measurement range and accuracy are different by detector 2 Stable measurement can be made even with fluids containing solids sludge and slurry The unique Noise Sentry filter circuit and arithmetic logic unit ALU enables you to obtain a stable output 3 The converter is equipped with various display ...

Page 13: ...l cable Cable connection for power cable Ground terminal Cable connection for excitation cable Cable connection for output cable Cable connection for digital I O cable Appropriate cable outer diameter 11 to 13mm Material Nylon resin Housing side connection G PF 1 2 thread Cable connection Cap nuts 5 pieces Material Nylon resin Cable connection for output cable Converter cover mounting screw ...

Page 14: ...6F8A0917 13 Internal structure with converter cover opened Display section LCD Operation switch Infrared switch Fuse holder Power switch Terminal block Protection cover ...

Page 15: ...nals Digital I O terminals Power supply terminals Power switch Protection cover Internal ground terminal Fuse holders The label shown left is placed near the terminal board for power supply on the converter Be alert to electric shock 4 20mADC current output terminals ...

Page 16: ...isassemble the LF232 unnecessarily Ground the LF232 independently from power equipment Type D 100 ohm or less ground resistance DON T Modifying or disassembling this product can cause electric shock malfunction of or damage to this product DO Operating this product without grounding can cause electric shock or malfunction Do not work on piping and wiring with wet hands DON T Wet hands may result i...

Page 17: ... switch operation may not work correctly Be careful about the installation location and angle or take measures such as providing a sunshade or shield plate so that disturbance light does not hit the operation section directly 8 Places where there is following factors Factors to impede infrared switch to operate properly Intense light such as direct sunlight and reflected sunlight by window glass o...

Page 18: ...ly straight and the cable ports of the converter stay at the bottom Figure 4 1 shows an example of panel and wall mounting installation and Figure 4 2 shows an example of pipe stand installation Figure 4 1 Example of Panel and Wall Mounting 2 91 74 14 57 370 14 57 370 2 91 74 M10 bolt etc Wall surface etc Mounting Hole Dimensions φ0 43 φ12 hole φ0 43 φ12 M10 mounting holes Unit inch mm ...

Page 19: ...6F8A0917 18 Figure 4 2 Example of Pipe Mounting 14 57 370 M10 U bolt etc 2 50A PIPE Unit inch mm 2 91 74 ...

Page 20: ...Modifying or disassembling this product can cause electric shock malfunction of or damage to this product The label shown left is placed near the terminal board for power input A black border and symbol on yellow triangle Be alert to electric shock Flowmeter performance may be affected by the way wiring is carried out Proceed with correct wiring by observing the following items 1 For cable route a...

Page 21: ...le 5 1 to connect to the converter Table 5 1 Installation Cables Name Cable name Nominal cross sectional area Overall diameter Description Flow rate signal cable 2 core shielded chloroprene cabtyre cable Rubber covered cable 0 75mm2 0 433 0 512 inch 11 13mm JIS C 3327 or equivalent Excitation cable 3 core chloroprene cabtyre cable Rubber covered cable 2mm2 1 25mm2 0 433 0 512 inch 11 13mm JIS C 33...

Page 22: ...tance 100 or less Thick steel conduit Flow rate signal cable 2 core shielded cabtyre cable Connected detector Excitation cable 3 core cabtyre cable Output cable CVV S Power cable CVV Power supply Current output 4 20mADC Digital input 2 option Digital input 1 option 20 30VDC Digital output 4 option Digital output 3 option Digital output 2 option Digital output 1 Input Output cable CVV S 5 1 Externa...

Page 23: ...ble connection port is G PF 1 2 female thread The detector side of the attached cable is already connected when shipped from the factory In addition since the terminal box of the detector has airtight structure avoid removing the wired cable from the detector To replace the flow rate signal cable and excitation cable refer also to the Instruction Manual of the detector Before you replace these cab...

Page 24: ...t these cables to the terminal block Use appropriate cables referring to 5 1 Installation Cables Attach and crimp a round type M4 insulated crimping terminal to the end of each cable Excitation cable Strip the sheath from the end of each wire as shown in Figure 5 2 and attach and crimp an M4 crimping terminal with insulated sleeve to the end of each wire and then connect the crimped terminals to X...

Page 25: ...ore wires Then attach and crimp an M4 crimping terminal with insulated sleeve to the end of the twisted shields Connect the crimped terminal to the G terminal of the detector and the converter A Black G Sealed B White Thermal contraction tube or vinyl tube 25 to 45mm M4 crimped terminal Figure 5 3 Terminal Treatment of Flow Rate Signal Cable Cautionary notes on terminal treatment for shields of th...

Page 26: ...ed terminal 25 to 45mm Figure 5 5 Terminal Treatment of Power Cable Current Output Cable and Digital I O Cables 5 4 2 Cable Connection Connect and install the terminal treated cables to the terminal block in the procedure below Connect the cables to the terminal block securely A loose connection may cause incorrect measurement After connecting each cable try to pull it to check whether it has been...

Page 27: ...appropriate torque for tightening the terminal block screw is 1 2 N m Figure 5 7 Connection to Terminal Block After connecting the cables to the terminal block take up the slack of the cables and tighten the cap nut At this time be careful that if the sheath removed portion of the cable comes to the packing area air tightness may not be kept Cable connection Cap nut for tightening Cable Packing Co...

Page 28: ...g work at the detector side due to a pit installation or other reasons use a 3 core cable for the excitation cable and connect the E terminal of the detector to the E terminal or other reasons as shown in Figure 5 9 b of the converter The E terminal of the converter is internally connected to the FG terminal and the converter housing A B X G Y E Converter terminal block External ground terminal Tw...

Page 29: ...for detector is difficult Ground terminal Conductive material pipe Example Metal etc Non conductive material pipe Example Resin pipe or metal pipe which is internally coated with resin Grounding wire Ground terminal Grounding wire When piping material is non conductive Carry out class D grounding work grounding resistance 100 or less Class D ground Ground resistance 100 or less When piping materia...

Page 30: ...gnetic counter using a digital output connect a surge absorbing diode into the input circuit of the relay or the counter Figure 5 11 shows a connection example CI DI DO2 to DO4 DO1 CO2 CO1 Photo coupler Option Solid state contact Option Transistor open collector Standard Resistor Option Converter inside DC power supply 24VDC Note 1 Surge absorbing diode Electromagnetic counter Note 1 Use a surge a...

Page 31: ...y Wiring The positions of the LF232 cable ports are the same as those of the LF230 The specifications of the cable ports differ as shown in the table below Table 5 2 Comparison of Cable Port Specifications LF230 LF232 Ports on the housing M27 fine pitch thread Depth 0 433 inch 11mm G1 2 Depth 0 433 inch 11mm Material Stainless steel Nylon resin Attached cable connection specifications Waterproof g...

Page 32: ...not be read The zero point of flow rate at the time of still water measurement is not stable If this happens connect an adjusting capacitor provided for the detector only for large meter size between the terminals X and Y of the terminal block for converter cable as shown below This capacitor is not needed if you combine with a detector of square wave excitation method guideline date manufacture d...

Page 33: ...nel Those attached on the control panel such as rain dew drop snow ice mud and oil and haze due to their attachment Light reflecting object near the control panel or reflecting object such as metal plate placed opposing to the control panel When any of above factors is considered take a measure for the proper operation of infrared switch such as to place a cover or to secure a space for at least a...

Page 34: ...aterproofing IP67 IP67 IP67 Diameter of conformity cable Excitation optional cable φ0 433 0 512 inch φ11 13mm Others φ0 394 0 472 inch φ10 12mm Excitation DI DO cable φ0 433 0 512 inch φ11 13mm Others φ0 394 0 472 inch φ10 12mm φ0 433 0 512 inch φ11 13mm Joint of conduit Rc PT 3 4 male screw R PT 1 2 male screw None specifications of attached cable ground Blind Attached waterproofing blind Attache...

Page 35: ...items above Introducing water Let the fluid go through and fill the detector pipe Note When the detector pipe is filled with fluid stop the fluid and keep it still In the case of the flowmeter which is partially filled pipes type please let a fluid stand still at water level high as possible more than water level 30 Applying power supply Is the power supply as specified Checking the converter sett...

Page 36: ... in the detector pipe When detector is partially filled pipes type water level is not enough flow rate becomes inconsistent and measurement cannot be performed correctly Be sure to use the flowmeter while the fluid to be measured is filled in the detector pipe ...

Page 37: ...erter cover Do not allow the converter exposed to rain and wind Adjustment in the rain may cause damage to the parts and may cause electric shock and it is very dangerous In addition if wind blown dust enters the electronic circuits in the converter this may cause malfunction of the converter Do not open the converter cover under high humidity condition Opening the converter cover under high humid...

Page 38: ...ith backlight is used Instantaneous flow rate and total flow and various constants such as parameters can be displayed In addition the backlight is always lit and data can be read clearly even in a dark place Operation switch infrared switch Operation switches are infrared switches and the operation can be carried out without opening the housing cover and operable also with the cover opened ...

Page 39: ...to operate the EMF converter or wear gloves in light color When there is a reflecting object placed opposing to the control panel stand in between the reflecting object and the control panel to block the light Following are considered as the factors to impede infrared switch to operate properly Intense light such as direct sunlight and reflected sunlight by window glass or metal plate Place where ...

Page 40: ...m s C2 RANGE 1 03 000 m s Data 0 2000m s Data 0 3000m s Starts or stops the totalizer total value and pulse output in the totalizer control mode COUNT CTRL F 1000 m3 COUNT CTRL F 1000 m3 C Count stops Count starts Enables the converter to change the setting value in the setting or calibration mode and the cursor appears D1 DAMPING 00 5 S D1 DAMPING 00 5 S Setting mode Enabled to change the setting...

Page 41: ...nt mode appears If MENU ENT is pressed under that condition the mode returns to the measurement mode 7 2 Display Format In the measurement mode the measured data is displayed in the unit set by UNIT 1 and UNIT 2 in the setting mode To set the unit see 8 2 6 Normal Indicating Unit Displayed in the unit set by UNIT 1 In the case of total count display C appears while counting is in progress Displaye...

Page 42: ...ding a decimal point Total valve is displayed up to 99999999 and when the total count exceeds the maximum value of 99999999 the total valve will be reset to 0 and will be counted again In the case of forward flow count F is displayed In the case of reverse flow count R is displayed 4 Total difference flow value display Displayed to the least significant digit of the set pulse rate 9 9 9 9 9 m l C ...

Page 43: ...t to 0 and the count continues Example When the forward direction value returns to zero after it reaches the maximum value Forward direction 1000 Reverse direction 100 Flow difference 900 Forward direction 99999999 Reverse direction 100 Flow difference 99999999 Forward direction 0 Reverse direction 100 Flow difference 100 In an example shown above if the forward direction flow value is reset to ze...

Page 44: ...arious parameters Parameters can be selected from function menu Though various parameters are shown on the display the process value is output in the same way as in the measurement mode For details see 8 2 Parameter Check Change The following mode can also be selected using menu in the setting mode Fixed value output mode loop check This is the mode in which 4 to 20mA output and the totalizer puls...

Page 45: ...g arrow Æ 1 SET 2 CNT CTRL 10 00 m s 100 0 COUNT CTRL F 1000 m3 M1 MANUAL ZERO A1 EX CURRENT A0 MEAS MODE A1 EX CURRENT A2 METER SIZE Measurement mode Press longer for 3 seconds Note 2 Mode Selection Screen Note 1 Set 0 to the 1st digit of the function code and press MENU ENT Note 2 Setting mode Menu display Totalizer operation mode Point the cursor to SET Point the cursor to CNT CNTRL ENTER111 00...

Page 46: ...te 2 If no operation is performed for one minute while the mode selection screen or the setting mode menu screen is displayed the screen returns to the measurement screen Note 3 There is not this screen to the converter before serial No 072320999 There is not software version V to the converter before version V0109 ...

Page 47: ...ellation cord 111 by pressing and Pressing CANCEL in the mode selection screen the mode returns to the measurement mode 1 SET 2 CNT CTRL Pressing MENU ENT in the measurement mode for 3 seconds or more the screen moves to the mode selection screen A1 EX CURRENT Select 1 SET in the mode selection screen and press MENU ENT Then the menu screen appears Pressing CANCEL in the mode selection screen the ...

Page 48: ... set to any letter 10 00 m s 100 0 The mode returns to the measurement mode measured value display screen Note1 There is not this screen to the converter before serial No 072320999 There is not software version V to the converter before version V0109 Note2 Pressing CANCEL changes the digit of number to 0 0 MEAS MODE Then pressing MENU ENT under that condition brings you back to the measurement mod...

Page 49: ...screen C2 RANGE 1 3 00000 m s Setting value changeable condition Pressing the setting value increases If the cursor is positioned at the unit pressing moves the unit to the next unit C2 RANGE 1 3 0000 m s Pressing the cursor moves to the next digit C2 RANGE 1 5 00000 m s Press and to change the setting value In this example set the value to 5 000m s C2 RANGE 1 5 00000 m s Pressing MENU ENT changes...

Page 50: ...assword is set If password is set when the mode moves from the measurement mode to the menu screen the password input screen appears Note1 There is not this screen to the converter before serial No 072320999 There is not software version V to the converter before version V0109 1 SET 2 CNT CTRL 10 00 m s 100 0 INPUT PASSWORD 000 Input 111 Password input A1 EX CURRENT COUNT CTRL F 1000 m3 Setting th...

Page 51: ...hange the number To change the number of other digit press to move the cursor to that digit and press to change the number there Repeat this operation until 123 appears on the screen INPUT PASSWORD 123 The display blinks and the set value is displayed for conformation Pressing MENU ENT again the password will be written 1 SET 2 CNT CTRL Regardless of whether the password input is correct or not th...

Page 52: ...d and reset If password is set if password input does not match the totalizer can be started or stopped but it cannot be reset Note To operate the totalizer it is necessary to set necessary settings for the totalizer For details of how to set necessary settings for the totalizer see 10 Function Description ...

Page 53: ... seconds 1 SET 2 CNT CTRL Select CANCEL in the mode selection screen COUNT CTRL F 1000 m3 The totalizer operation screen appears COUNT CTRL F 1000 m3 C Pressing when the totalizer is stopped the totalizer starts C mark appears indicating that the totalizer has started COUNT CTRL F 1000 m3 Pressing while the totalizer is in operation the totalizer stops C mark disappears COUNT CTRL F 0 m3 Pressing ...

Page 54: ... menu lock cancellation screen Pressing CANCEL in the mode selection screen the mode returns to the measurement mode ENTER111 111 V Set the menu lock cancellation cord 111 by pressing and Pressing CANCEL in the mode selection screen the mode returns to the measurement mode 1 SET 2 CNT CTRL Pressing MENU ENT for 3 seconds or more in the measurement mode the screen moves to the mode selection screen...

Page 55: ...1 alarm output state 1 DO2 alarm output state 1 DO3 alarm output state 1 DO4 alarm output state 1 G Digital input 1 1 Digital input 2 1 DI1 control signal level setting 1 DI2 control signal level setting 1 H Count rate 1 Pulse width setting mode 1 Pulse width 1 I Preset count value 1 Preset output setting 1 J High limit alarm On Off 1 High limit value setting 1 Low limit alarm On Off 1 Low limit v...

Page 56: ...om unit setting B3 CUSTOM DATA B4 CUSTOM UNIT 12340 00 TEST123 8 2 8 Range type Span value Hysteresis C1 RANGE TYPE C2 RANGE 1 C6 RANGE HYST 1 SINGLE 01 000 m3 h 05 0 8 2 9 Damping constant D1 DAMPING 05 0 s 8 2 10 Low cutoff value D2 LOW CUT 05 0 8 2 11 Current output setting for alarm D3 ALM mA SET 2 4 0mA 8 2 12 Display low cut On Off D4 DSP LOW CUT 1 ON 8 2 13 Output low limit setting D5 LOW L...

Page 57: ...MIT RATE M2 LIMIT TIME 05 5 01 s 8 4 Fixed value output Loop check N1 FIXED OUT N2 FIXED CURR N3 FIXED PULSE OFF 20 0 mA 1000 pps 8 5 2 Zero offset adjustment O1 MANUAL ZERO 000 1 8 2 Parameters Check Change 8 2 1 Exciting Current Value The exciting current value is already adjusted when the product is shipped from the factory Normally the exciting current value is set to the same value as describ...

Page 58: ...ed digit A1 EX CURR 0 2900A 0 2100A 0 2150A Change the number of the digit To change the number of other digit press to move the cursor to that digit and change the number there Repeat this operation until 0 2150A appears on the display A1 EX CURR 0 2150A The display blinks and the set value is displayed for confirmation Press MENU ENT again to write the data Then the cursor disappears and the dis...

Page 59: ...s to check or change the meter size of the detector Switch operation Display example Description A2 METER SIZE 50 mm Select A2 METER SIZE from the setting item selection menu The currently set meter size of the detector appears A2 METER SIZE Returns to the menu of setting item selection ...

Page 60: ...for confirmation Press MENU ENT again to write the data Then the cursor disappears and the display returns to the condition that the setting value is displayed A2 METER SIZE Returns to the menu of setting item selection Note 1 The meter size is displayed cyclically as shown below For partially filled pipes detectors LF232 F 6 24inch 150 600mm Note 2 If the setting value for meter value is changed ...

Page 61: ...is shown below Corresponding exciting frequency Detector combined Meter size 6Hz 12Hz 24Hz LF470 1 10 1 6 1 4 2 5 to 6 mm LF150 26 to 120 500 to 3000 mm 335 All sizes Partially filled pipes type LF232 F Useable only 6Hz Factory setting Combination allowed Combination not allowed Checking the exciting frequency Proceed as follows to check or change the setting value for exciting frequency Switch op...

Page 62: ...pears A3 EX FREQ 12 Hz Change the exciting frequency to 12Hz The exciting frequency appears cyclically between 6Hz 12Hz and 24Hz Note 1 A3 EX FREQ 12 Hz The display blinks and the set value is displayed for confirmation Press MENU ENT again to write the data Then the cursor disappears and the display returns to the condition that the setting value is displayed A3 EX FREQ Returns to the menu of set...

Page 63: ... the detector 2 SWITCH The flow is a direct flow when the fluid flows in the reverse direction of the arrow on the detector Checking the flow direction Proceed as follows to check or change the setting value for direction flow Switch operation Display example Description A4 FLOW DIRCTN 1 NORMAL Select A4 FLOW DIRCTN from the setting item selection menu The currently set flow direction appears A4 F...

Page 64: ...The currently set flow direction NORMAL in this example appears A4 FLOW DIRCTN 1 NORMAL The cursor appears A4 FLOW DIRCTN 2 SWITCH Change the flow direction to SWITCH A4 FLOW DIRCTN 2 SWITCH The display blinks and the set value is displayed for confirmation Press MENU ENT again to write the data Then the cursor disappears and the display returns to the condition that the setting value is displayed...

Page 65: ...d If 000 is set there is no limitation such as setting is prohibition by password Checking the password Proceed as follows to check the password However if other than 000 is set for password you cannot check the password when you move to the setting mode unless you enter the correct password If you enter a wrong password appears for password Switch operation Display example Description A5 PASSWORD...

Page 66: ...h to change the number of the 2nd digit of the password to 5 A5 PASSWORD 453 The display blinks and the set value is displayed for conformation Press MENU ENT again to writer the data Then the cursor disappears and the display returns to the condition that the setting value is displayed A5 PASSWORD Returns to the menu of setting item selection Note If password is set be sure so manage the system s...

Page 67: ...e number of the range in operation when multi range is selected CUSTOM Indicates the flow rate value in the unit defined in 8 2 7 Custom Unit If the unit is set to volumetric flow or COUNT the flow direction for total flow can be set If the indicting unit is set to volumetric flow or COUNT the flow direction for total flow can also be set Volumetric flow direction F Forward direction R Reverse dir...

Page 68: ...B Change the volumetric unit to ml Note 1 B1 UNIT 1 ml B Move the cursor to the position of time unit B1 UNIT 1 ml s Change the time unit to s Note 2 B1 UNIT 1 ml s The display blinks and the set value is displayed for confirmation Press MENU ENT again to write the data Then the cursor disappears and the display returns to the condition that the setting value is displayed B1 UNIT 1 Returns to the ...

Page 69: ...1 m3 F The cursor appears B1 UNIT 1 m3 F Move the cursor to the position of time unit B1 UNIT 1 m3 F Move the cursor to the position of flow direction for total flow B1 UNIT 1 m3 B Change the flow direction for total flow to B forward reverse automatic switching Note 1 B1 UNIT 1 m3 B The display blinks and the set value is displayed for conformation Press MENU ENT again to write the data Then the ...

Page 70: ...cation by custom unit The indicated value is calculated in the following equation Custom unit indication numeric value Measured value in m3 min Custom coefficient The custom coefficient can be set in a numeric value of 6 digits including a decimal point Unit string of custom unit The unit to be used for indication by custom unit A string of up to 7 characters using the following codes can be set A...

Page 71: ...ATA 1 000000 Select B3 CUSTOM DATA from the setting item selection menu The currently set coefficient appears B3 CUSTOM DATA 1 000000 The cursor appears Press further to move the cursor to the desired digit to change B3 CUSTOM DATA 1 200000 1 250000 Change the number of the digit To change other digit press to move the cursor to that digit and change the number there Repeat this operation until 1 ...

Page 72: ...The currently set unit appears B4 CUSTOM UNIT AAA BBB The cursor appears Press further to move the cursor to the desired digit to change B4 CUSTOM UNIT XAA BBB XXX ZZZ Change the character of the digit Note 1 To change other digit press to move the cursor to that digit and change the character there Repeat this operation until XXX ZZZ appears on the display B4 CUSTOM UNIT XXX ZZZ The display blink...

Page 73: ... range 2 4F 0R Single direction 4 ranges Internal automatic switching 3 2F 2R Forward reverse direction 2 ranges Internal automatic switching 4 EXT 2F 0R Single direction 2 ranges External signal switching 5 EXT 2F 2R Forward reverse direction 2 ranges External signal switching 6 EXT 4F 0R Single direction 4 ranges External signal switching Note To use the multi range function the following DO and...

Page 74: ...ge 2 Range 3 Range 4 in the case of forward reverse direction multiple ranges If you try to set the ranges not conforming to the above condition the following message appears MULTI RNG ERR Try to set the ranges again In addition set 0 for the ranges not used 3 Influence on count rate pulse rate If the range is changed when the count rate pulse rate is already set pulse output at the time of 100 ou...

Page 75: ... be ignored The hysteresis can be set within the range of 0 to 25 in increments of 0 1 Span value range setting flow The setting sequence of span value range is shown below Item selection of span value range setting C1 RANGE TYPE Range type setting C2 RANGE 1 Range 1 span value and unit setting C3 RANGE 2 Range 2 span value C4 RANGE 3 Range 3 span value C5 RANGE 4 Range 4 span value C6 RANGE HYST ...

Page 76: ... C1 RANGE TYPE Range 2 span value C3 RANGE 2 Range 3 span value C4 RANGE 3 Range 4 span value C5 RANGE 4 Hysteresis C6 RANGE HYST Switch operation Display example Description C2 RANGE 1 02 000 m s Select C2 RANGE 1 from the setting item selection menu The currently set Range 1 span value appears C2 RANGE 1 Returns to the menu of setting item selection ...

Page 77: ...E TYPE 1 SINGLE Select C1 RANGE TYPE from the setting item selection menu The currently set range type 1 SINGLE appears C1 RANGE TYPE 1 SINGLE The cursor appears C1 RANGE TYPE 3 2F 2R Select the range type 3 2F 2R C1 RANGE TYPE 3 2F 2R The display blinks and the set value is displayed for confirmation Press MENU ENT again to write the data Then the cursor disappears and the display returns to the ...

Page 78: ...change the unit to min Note The span value will be automatically changed as this unit is changed C2 RANGE 1 33 333 l min Move the cursor to the desired digit to change C2 RANGE 1 13 333 l min 100 00 l min Change the number of the digit To change other digit press under this condition to move the cursor to that digit and change the number there C2 RANGE 1 100 00 l min The display blinks and the set...

Page 79: ...T 03 0 Move the cursor to the desired digit to change C6 RANGE HYST 05 0 Change the number of the digit To change other digit press under this condition to move the cursor to that digit and change the number there C6 RANGE HYST 05 0 The display blinks and the set value is displayed for confirmation Press MENU ENT again to write the data Then the cursor disappears and the display returns to the con...

Page 80: ...s type the damping constant can be set from 0 0sec 5sec and 10 to 600sec 1sec each Note If 0 0 sec is set the damping constant becomes a value equivalent to 0 1 sec If you set a value exceeding 60s it is forcibly changed to 60s before data is written Checking the damping constant Proceed as follows to check the damping constant Switch operation Display example Description D1 DAMPING 02 0 s Select ...

Page 81: ...or to the desired digit to change D1 DAMPING 10 5 s 10 0 s Change the number of the digit To change other digit press under this condition to move the cursor to that digit and change the number these D1 DAMPING 10 0 s The display blinks and the set value is displayed for confirmation Press MENU ENT again to write the data Then the cursor disappears and the display returns to the condition that the...

Page 82: ...value can be set from 0 to 10 and in increments of 0 1 If 0 is set the low cutoff function does not work Checking the low cutoff value Proceed as follows to check the low cutoff value Switch operation Display example Description D2 LOW CUT 01 0 Select D2 LOW CUT from the setting item selection menu The currently set low cutoff value appears D2 LOW CUT Returns to the menu of setting item selection ...

Page 83: ...ange D2 LOW CUT 03 0 Change the number of the digit To change another digit press under this condition to move the cursor to that digit and change the number there D2 LOW CUT 03 0 The display brinks and the set value is displayed for confirmation Press MENU ENT again to write the data Then the cursor disappears and the display returns to the condition that the setting value is displayed D2 LOW CUT...

Page 84: ...table shown below Current output setting function used when an alarm occurs Selection Current output value when an alarm occurs 1 UNDER 3 0mA 3 0mA or less 2 4 0mA 4 0mA 3 HOLD Fixed to the current output 4 OVER 24 0mA 24 0mA or more Checking the current output value used when an alarm occurs Proceed as follows to check the current output value used when an alarm occurs Switch operation Display ex...

Page 85: ...LM OUT from the setting item selection menu The currently set alarm output value used when an alarm occurs appears D3 4 20 ALM OUT 2 4 0mA The cursor appears D3 4 20 ALM OUT 4 OVER 24 0mA Press to select 4 OVER 24 0mA D3 4 20 ALM OUT 4 OVER 24 0mA The display blinks and the set value is displayed for confirmation Press MENU ENT again to write the data Then the cursor disappears and the display ret...

Page 86: ...ocity and will be set to zero when the low output is cutoff 2 OFF Display low cut is not effective Off Measured value will be output even if the low output is cutoff Checking whether the display low cut is On or Off Proceed as follows to check whether the display low cut is On or Off Switch operation Display example Description D4 DSP LOW CUT 2 OFF Select D4 DSP LOW CUT from the setting item selec...

Page 87: ... item selection menu The currently set alarm output value used when an alarm occurs appears D4 DSP LOW CUT 2 OFF The cursor appears D4 DSP LOW CUT 1 ON Press to select 1 ON D4 DSP LOW CUT 1 ON The display blinks and the set value is displayed for confirmation Press MENU ENT again to write the data Then the cursor disappears and the display returns to the condition that the set value is displayed D...

Page 88: ... 2 4mA 10 To set the output low limit to other than 4 0mA set the low cutoff value to 0 in 8 2 10 Low Cutoff Value If the low cutoff value is set to other than 0 the output low limit value becomes 4 0mA fixed regardless of the value of the output low limit setting Checking the output low limit value setting Proceed as follows to check the output low limit value Switch operation Display example Des...

Page 89: ...e setting item selection menu The currently set output low limit value appears D5 LOW LIMIT 1 4 0mA The cursor appears D5 LOW LIMIT 2 3 2mA Press to select 2 3 2mA D5 LOW LIMIT 2 3 2mA The display blinks and the set value is displayed for confirmation Press MENU ENT again to write the data Then the cursor disappears and the display returns to the condition that the setting value is displayed D5 LO...

Page 90: ... pulse output Note 2 Enabled Disabled Note 1 When the range type is set to the forward reverse multi range and the pulse output 8 PULSE OUT is selected pulse output can be sent out in either forward current or reverse current flow Note 2 Pulse output using the DO2 can be sent out up to 100pps When the pulse output is sent out using the DO2 set the count rate so that the pulse output for full scale...

Page 91: ...vel active level for input control signal can be selected for each DI terminal DI DET LEVEL Control signal level 1 L LEVEL Low level active 2 H LEVEL High level active The operation for control signal input is shown below depending on the active level setting Digital input function setting Control signal level setting Operation when control signal is input L LEVEL High signal Totalization Stop Low...

Page 92: ...te 1 F5 DO1 ALM STS Digital Output alarm state 2 F6 DO2 ALM STS Digital Output alarm state 3 F7 DO3 ALM STS Digital Output alarm state 4 F8 DO4 ALM STS Digital Input 1 G1 DI1 FNCTN Digital Input 2 G2 DI2 FNCTN Digital Input control signal level 1 G3 DI1 DET LEV Digital Input control signal level 2 G4 DI2 DET LEV Switch operation Display example Description F1 DO1 FNCTN 1 HIGH ALM Select F1 DO1 FNC...

Page 93: ...4 F8 DO4 ALM STS Digital Input 1 G1 DI1 FNCTN Digital Input 2 G2 DI2 FNCTN Digital Input control signal level 1 G3 DI1 DET LEV Digital Input control signal level 2 G4 DI2 DET LEV Switch operation Display example Description F1 DO1 FNCTN 1 HIGH ALM Select F1 DO1 FNCTN from the setting item selection menu The currently set function of Digital Output 1 appears F1 DO1 FNCTN 1 HIGH ALM The cursor appea...

Page 94: ... as indicating unit to check the operation Count rate A volumetric value per 1 count 1 pulse for the totalizer is set The total volumetric flow is the totalizer count multiplied by the count rate The count rate must be set so that the pulse output at 100 output stays within a range of 3 6 to 3 600 000 pulses h If you try to set a value outside of this range an error message H OVER SPEC or L OVER S...

Page 95: ...xceeds 100ms it will be forcibly set to 100ms Example 1 In the case of the following Range 3 600m3 h 1m3 s Count rate 0 001m3 Since the count rate is 3 600 m3 h 0 001 m3 3 600 000 pulses h 1000 pulses s the full scale period is 1s 1000 1ms Therefore the pulse width can only be set to 1ms x 0 4 0 4ms Example 2 In the case of the following Rage 3 600m3 h 1m3 s Count rate 1000m3 Since the pulse count...

Page 96: ...UNT RATE 1 00000 m3 Select H1 COUNT RATE from the setting item selection menu The currently set count rate appears H1 COUNT RATE 1 00000 m3 The cursor appears Press further to move the cursor to the digit of unit H1 COUNT RATE 1000 00 l 200 000 l Change the unit to l Then press to move the cursor to the desired digit to change and change the number there Repeat this operation until 200 l appears o...

Page 97: ...ting item selection menu The currently set pulse width mode setting appears H2 PLS MODE 2 MANUAL The cursor appears H2 PLS MODE 1 AUTO Press to select 1 AUTO H2 PLS MODE 1 AUTO The display blinks and the set value is displayed for confirmation Press MENU ENT again to write the data Then the cursor disappears and the display returns to the condition that the set value is displayed H2 PLS MODE Retur...

Page 98: ...ms 250 0 ms Change the number of the digit To change other digit press under this condition to move the cursor to that digit and change the number there H3 PLS WIDTH 250 0 ms The display blinks and the set value is displayed for confirmation Press MENU ENT again to write the data Then the cursor disappears and the display returns to the condition that the set value is displayed H3 PLS WIDTH Return...

Page 99: ...heck the operating condition For how to set the indicating unit see 8 2 6 Normal Indicating Unit Preset count value Preset value for preset counter is set Preset count value can be set within the range of 0 to 99999999 Preset output function The operation of DO output when the preset counter reaches the preset value can be selected You can select the operation of DO output from the items shown in ...

Page 100: ...eration Display example Description I1 PRESET 00000500 Select I1 PRESET from the setting item selection menu The currently set preset count value 500 counts in this example appears I1 PRESET 00000500 The cursor appears Press further to move the cursor to the desire digit to change I1 PRESET 00001500 00001000 Change the number of the digit To change other digit press under this condition to move th...

Page 101: ...m selection menu The currently set preset count output function HOLD in this example appears I2 PRESET FNC 1 HOLD The cursor appears I2 PRESET FNC 2 50ms PULSE Press to select the setting code 1 50ms PULSE I2 PRESET FNC 2 50ms PULSE The display blinks and the set value is displayed for confirmation Press MENU ENT again to write the data Then the cursor disappears and the display returns to the con...

Page 102: ...e 5 High high limit alarm On Off 6 High high limit value 7 Low low limit alarm value On Off 8 Low low limit value Note To output a high low limit alarm through DO it is necessary to set the DO function for output For how to set the DO function see 8 2 14 Digital I O Function High low limit alarm On Off Whether the high low limit alarm is used or not can be selected Selection Alarm operation 1 ON A...

Page 103: ...mit value J2 H ALM VAL Low limit alarm On Off J3 L ALM SET Low limit value J4 L ALM VAL High high limit alarm On Off K1 HH ALM SET High high limit alarm K2 HH ALM VAL Low low limit alarm On Off K3 LL ALM SET Low low limit value K4 LL ALM VAL Switch operation Display example Description J1 H ALM SET 1 ON Select J1 H ALM SET from the setting item selection menu The currently set high limit alarm On ...

Page 104: ...ff K3 LL ALM SET Switch operation Display example Description J1 H ALM SET 2 OFF Select J1 H ALM SET from the setting item selection menu The currently set On Off setting for high limit alarm appears J1 H ALM SET 2 OFF The cursor appears J1 H ALM SET 1 ON Change the setting J1 H ALM SET 1 ON The display blinks and the set value is displayed for confirmation Press MENU ENT again to write the data T...

Page 105: ... appears Press further to move the cursor to the digit to change J2 H ALM VAL 103 0 Change the number of the digit To change other digit press under this condition to move the cursor to that digit and change the number there J2 H ALM VAL 103 0 The display blinks and the set value is displayed for conformation Press MENU ENT again to write the data Then the cursor disappears and the display returns...

Page 106: ... is not detected 2 NORMAL Sensitivity Standard Detection sensitivity is set to the standard level 3 SENSITIVE Sensitivity High Detection sensitivity is set to high sensitivity level 4 SENSITIVE H Fluid empty alarm used If a fluid empty condition is detected an alarm will be output Sensitivity Higher Detection sensitivity is set to higher sensitivity level To use the fluid empty alarm normally sele...

Page 107: ...setting item selection menu Then the fluid empty alarm On Off setting appears L1 EMPTY ALM 1 NORMAL The cursor appears L1 EMPTY ALM 2 OFF Press to select the fluid empty alarm Off L1 EMPTY ALM 2 OFF The display blinks and the set value is displayed for confirmation Press MENU ENT again to write the data Then the cursor disappears and the display returns to the condition that the setting value is d...

Page 108: ...iagnosis alarm On Off 2 DO alarm output factor setting NOTE To output a self diagnosis alarm through DO it is necessary to set the DO function for output For how to set the DO function see 8 2 14 Digital I O Function Self diagnosis function On Off setting Whether or not to use the self diagnosis function can be selected Selection Self diagnosis alarm is used or not 1 ON Self diagnosis function is ...

Page 109: ... broken ADC error flow measurement circuit error Parameter error Fluid empty alarm Diagnosis alarm is output through DO when an error is detected Diagnosis alarm is not output through DO even if an error is detected However an error message is displayed Checking the self diagnosis alarm setting Proceed as follows to check the self diagnosis function setting The following is how to check whether th...

Page 110: ...F CHECK 1 ON Select L2 SELF CHEK from the setting item selection menu Whether the self diagnosis function is used On or not Off appears L2 SELF CHECK 1 ON The cursor appears L2 SELF CHECK 2 OFF Press to set the self diagnosis function to OFF L2 SELF CHECK 2 OFF The display blinks and the set value is displayed for confirmation Press MENU ENT again to write the data Then the cursor disappears and t...

Page 111: ...ox 40ms will be controlled to within the limit value in percent of span The rate of change limit value can be set within the range of 0 to 30 in increments of 0 1 In the case of multi range setting the value is indicated in percent of the range in operation If 0 is set the rate of change limit function does not work Rate of change control time If the time used to control the indication against var...

Page 112: ...the desired digit to change M1 LIMIT RATE 1 5 Change the number of the digit To change other digit press under this condition to move the cursor to that digit and change the number there M1 LIMIT RATE 1 5 The display blinks and the set value is displayed for confirmation Press MENU ENT again to write the data Then the cursor disappears and the display returns to the condition that the setting valu...

Page 113: ...unt rate B3 Custom coefficient 0 B4 Custom unit 7 blank spaces C1 Range type Range type specified when ordered If multi range is not specified Single range is set C2 to 4 Ranges 1 to 4 Values specified when ordered described in the Test Record If not specified Range 1 is the Toshiba standard range and Ranges 2 to 4 are zeros C5 Hysteresis 3 0 Range of 1m s or more 1 0s Meter size 16 400mm or less ...

Page 114: ...tting OFF J2 High limit alarm value 0 0 J3 Low limit alarm setting OFF J4 Low limit alarm value 0 0 K1 High high limit alarm setting OFF K2 High high limit alarm value 0 0 K3 Low low limit alarm setting OFF K4 Low low limit alarm value 0 0 L1 Fluid empty alarm ON Detection level NORMAL In the case of LF232 F OFF L2 Self diagnosis function ON L3 Alarm output factor setting WITHOUT EMP fluid empty a...

Page 115: ...g Fixed output mode can be selected by the setting as follows Selection Mode 1 ON Fixed value output mode On Current output and pulse output become fixed output values 2 OFF Fixed value output mode Off Fixed output mode will be turned off and the mode goes to the normal measurement mode When the fixed value output is set to ON the main indicating unit only is displayed and the current output set v...

Page 116: ...can be output Checking the fixed output function setting Proceed as follows to check the fixed output function How to check the fixed value out On Off setting is shown here To check other settings select the following functions Fixed current output value N2 FIX CURR Fixed pulse output value N3 FIX PULSE Switch operation Display example Description N1 FIXED OUT 1 ON Select N1 FIXED OUT from the set...

Page 117: ...NT again to write the data The cursor disappears and then the current output set value can be changed N2 FIX CURR 10 0 mA Move the cursor to the desired digit to change N2 FIX CURR 20 0 mA Change the number of the digit To change other digit press under this condition to move the cursor to the desired digit and change the number there N3 FIX PULSE 100 PPS The display blinks and the set value is di...

Page 118: ... cursor to the desired digit to change L3 FIX PULSE 0150 pps 0100 pps Change the number of the digit To change other digit press under this condition to move the cursor to that digit and change the number there L3 FIX PULSE 0100 pps The display blinks and the set value is displayed for confirmation Pres MENU ENT again to write the data Then the cursor disappears and the display returns to the cond...

Page 119: ...ET 2 CNT CTRL Press MENU ENT for 3 seconds or more in the measurement mode and then the mode changes to the mode selection screen A1 EX CURRENT Select 1 SET in the mode selection screen and then the menu screen appears E1 ZERO ADJUST Press and so that the function number becomes E1 ZERO ADJUST E1 ZERO ADJUST 01 0 The current flow rate measured value in unit appears Check that the fluid to be measu...

Page 120: ...lue is outside of the range of 1 25 m s the adjustment result will not be reflected on the flow rate measured value Note1 If the flow rate value is outside of the range of 1 25 m s the adjustment result will not be reflected on the flow rate measured value Note2 There is not this screen to the converter before serial No 072320999 ...

Page 121: ...percent of the set span Actual flow rate obtained from other process value 10 0 m3 min 50 0 LF232 measured value 10 5 m3 min 52 5 Zero offset adjustment value 2 5 If zero offset adjustment value is set to 2 5 the output of LF232 is shifted by 2 5 and 50 0 output can be obtained The zero offset adjustment value can be set within the range of 0 410ft s 0 125 m s 1 25 of the maximum range 32 8ft s 10...

Page 122: ... MANUAL ZERO 001 0 002 5 Change the number of the digit To change other digit press under this condition to move the cursor to that digit and change the number there O1 MANUAL ZERO 002 5 The display blinks and the set value is displayed for confirmation Press MENU ENT again to write the data Then the cursor disappears and the display returns to the condition that the setting value is displayed O1 ...

Page 123: ...cedure on the following pages is used to check or perform zero and span calibration of the converter and check the exciting current However these values are already checked and calibrated when shipped from the factory Do not change these settings unless it is necessary to calibrate in the field etc No Setting item Display example 9 2 1 0 flow rate calibration P1 FLOW CAL 0 0 0 9 2 2 50 flow rate c...

Page 124: ...ion P1 FLOW CAL 0 0 1 Select P1 FLOW CAL 0 from the calibration item selection menu Zero point using the simulation input appears ADJUST READY 0 1 Press Then the display shown left appears and the system is ready for zero calibration Note 1 P1 FLOW CAL 0 CAL 0 ADJ The display shown left appears and zero calibration starts P1 FLOW CAL 0 0 0 About 3 to 6 seconds later Note 2 the zero calibration end...

Page 125: ...flow rate value can be checked only Checking the 50 flow rate value Switch operation Display example Description P2 FLOW SIG 50 50 1 Select P2 FLOW SIG 50 from the calibration item selection menu 50 flow rate value using the simulation input appears ...

Page 126: ... 100 1 Select P3 FLOW CAL 100 from the calibration item selection menu Span value using the simulation input appears ADJUST READY 100 1 Press Then the display shown left appears and the system is ready for span calibration Note 1 P3 FLOW CAL100 CAL 100 ADJ The display shown left appears and the span calibration starts P3 FLOW SCAL100 100 0 About 3 to 6 seconds later Note 2 the span calibration end...

Page 127: ... Display example Description P4 EX CURR DSP 0 2100 A Select P4 EX CURR DSP from the calibration item selection menu Span value using the simulation input appears P4 EX CURR DSP Returns to the menu of calibration item selection The exciting current value is adjusted when shipped from the factory Contact your nearest Toshiba representative if any change is necessary ...

Page 128: ...d reverse ranges can be combined with multiple ranges Flow rate High Low limit High high limit Low low limit alarms If the flow rate exceeds or lowers below the preset value an alarm will be output 2 high limit alarm outputs and 2 low limit alarm outputs 4 alarm outputs in total can be sent out Fluid empty alarm If the fluid to be measured flows out from the measuring pipe of the detector an alarm...

Page 129: ...0 to 30 VDC Low input level 2 VDC maximum Input resistance Approx 2 7 kΩ Number of inputs 2 Each terminal can be set to select each function Terminal CO2 is the common terminal of DO2 to DO4 and CI is the common terminal of DI1 and DI2 Each terminal is isolated from internal circuit Output terminals are not isolated between them In the case of the standard specification without digital I O specifi...

Page 130: ... pulse output is not used pulse width setting is not needed DO Setting Follow the procedure in 8 2 14 Digital I O Function and set the Digital Output 1 DO1 or Digital Output 2 DO2 for pulse output If the pulse output is not used DO setting is not needed DI Setting Follow the procedure in 8 2 14 Digital I O Function and set the Digital Input DI function In the case of the converter without Digital ...

Page 131: ...Note 3 Example of pulse width setting range in the case of manual setting Pulse width can be set within the range of 0 3ms to 500ms in increments of 0 1ms However the pulse width must be 40 or less of the full scale period Example 1 In the case of the following Range 3600m3 h 1m3 s Count rate 0 001m3 Since the count rate is 3 600 m3 h 0 001 m3 3 600 000 pulses h 1000 pulse s the full scale period ...

Page 132: ...igh level Clears resets the totalizer and stops Totalizer Reset Start Low level Outputs It is possible to reverse the DI control signal levels by setting the digital input control signal levels When high level 1 H LEVEL is selected The operation with the signal level is the same as the standard product shown in the above table When low level 0 L LEVEL is selected The operation with the signal leve...

Page 133: ... To use the multi range function proceed as follows to set Range Setting Follow the procedure in 8 2 8 Span Value Range and set the range in the following order 1 Select the Range Type 2 Set the span for Ranges 1 to 4 3 Set the hysteresis value DO DI Setting Follow the procedure in 8 2 14 Digital I O Function and set the DO for Range output When using the multi range switching with external signal...

Page 134: ...2 ON OFF ON OFF ON OFF Range 4 Range 3 Range 2 Range 1 Hysteresis 0 to 25 Reverse direction Forward direction Flow rate Current output is 4mA as standard when fluid flows in reverse direction When the low cutoff function is not used low cutoff setting is 0 it is possible to output the current output signal in linear scale up to 3 2mA or 2 4mA when fluid flows in reverse direction ...

Page 135: ...ection Low cutoff 1 25 Low cutoff From reverse direction range to forward direction range Low cutoff 1 25 4mA 0 OFF ON 0 Range output No 2 Reverse direction Forward direction Flow rate Output Low cutoff 1 25 Low cutoff From forward direction range to reverse direction range Low cutoff 1 25 20mA 4mA 0 100 125 0 Output Range 4 Range 3 Range 2 Range 1 Range output No 1 Range output No 2 OFF ON ON OFF...

Page 136: ...t No 1 H level input External range switching signal L level input Current output is 4mA as standard when fluid flows in reverse direction When the low cutoff function is not used low cutoff setting is 0 it is possible to output the current output signal in linear scale up to 3 2mA or 2 4mA when fluid flows in reverse direction Works even if the range output is not used ...

Page 137: ...FF Works even if the range output is not used Output when switched from Reverse to Forward direction Output when switched from Forward to Reverse direction OFF ON Range output No 2 Reverse direction Flow rate 4mA 0 0 Output Forward direction Low cutoff 1 25 Low cutoff From reverse direction range to forward direction range Low cutoff 1 25 4mA 0 OFF ON 0 Range output No 2 Reverse direction Forward ...

Page 138: ... L level input H level input H level input H level input L level input L level input Range output No 1 Range output No 2 ON OFF ON ON OFF OFF Current output is 4mA as standard when fluid flows in reverse direction When the low cutoff function is not used low cutoff setting is 0 it is possible to output the current output signal in linear scale up to 3 2mA or 2 4mA when fluid flows in reverse direc...

Page 139: ...al I O Function and set the Digital Output DO for high limit output high high limit alarm output low limit alarm output or low low limit alarm output In addition for alarm output state select Normally Open or Normally Closed Flow rate high low limit alarm output performance In the case of Single range Output High limit set point value Hysteresis 2 5 Low limit set point value Low limit alarm genera...

Page 140: ...s 2 5 Hysteresis 2 5 Low limit alarm generated High limit alarm generated Low limit alarm generated Time High low limit alarm set point value is a value indicated in percent of the Range 1 The output state when an alarm occurs becomes the state set for alarm output of digital output When the power supply of the converter is turned off the contact is open ...

Page 141: ...High high limit set point High limit set point Hysteresis 2 5 High limit alarm generated High high limit alarm generated Time The output state when an alarm occurs becomes the state set for alarm output of digital output When the power supply of the converter is turned off the contact is open ...

Page 142: ...ction is used and external contact output is not used DO setting is not needed Output when an alarm is generated 4 to 20mA output 4mA standard Current output value when an alarm is generated can be set by referring to 8 2 11 Current Output Setting Used When an Alarm Occurs Totalizer pulse output Totalizing operation and pulse output stopped Measured value display Instantaneous flow rate is zero Co...

Page 143: ...t Counter and set the preset count value and output function DO DI Setting Follow the procedure in 8 2 14 Digital I O Function and set the digital output DO for use as a preset counter output In addition if you want to reset the totalizer by an external signal set the DI for the totalizer counter Reset Start signal Set F3 DI FUNCTN to 2 C RES STA Operation for the totalizer control signal can be s...

Page 144: ...r reset Counter start H level input L level input Preset count set point value Counter reset Input Output Timing Chart When the Reset Start signal is in H level DI counter control signal level H the totalizer is reset to zero and stops counting When the Reset Start signal goes to L level the totalizer starts counting The preset output goes ON when the totalizer count exceeds the preset value and t...

Page 145: ...et Preset output is OFF because Counter is reset Preset output OFF because pulse width is reached Input Output Timing Chart When the Reset Start signal is in L level DI counter control signal level L the totalizer is reset to zero and stops counting When the Reset Start signal goes to H level the totalizer starts counting The preset output goes ON when the totalizer count exceeds the preset value ...

Page 146: ...et value of 200 and the preset output goes OFF when its width reaches the set pulse width When the preset value exceeds 200 the preset value is changed to 300 adding the preset count of 100 to the current preset value of 200 Note When the one shot pulse output function is selected if its pulse width is large compared with the update interval of the preset value the output stays ON To make sure to ...

Page 147: ...ustment start signal Signal input condition Zero adjustment signal 10 seconds 20 seconds Zero adjustment start H level signal L level signal The signal must be set to H level first and then it must go to L level 10 seconds later but not more than 20 seconds and then zero adjustment starts at the falling edge of the signal If the signal stays in H level less than 10 seconds or more than 20 seconds ...

Page 148: ... current output value and pulse output value to be used at the time of fixed output Set OFF for fixed output switching If the pulse output is not used it is not necessary to set the pulse output value DI Setting Follow the procedure in 8 2 14 Digital I O Function to set the Digital Input DI to use it as fixed output mode control signal Signal input condition External signal input 4 to 20mA and pul...

Page 149: ...tting Follow the procedure in 8 2 19 Self Diagnosis Function and set whether the self diagnosis function is On or Off and set the alarm output factors For alarm output factors set whether the fluid empty alarm should be included WITH EMP or not included WITHOUT EMP for alarm output DO Setting To use the converter error alarm output follow the procedure in 8 2 14 Digital I O Function and set the Di...

Page 150: ...protocol for industry sensors that is recommended by HCF HART Communication Foundation 11 1 Connection with the HHT terminal Connect the probe cable of the HHT terminal in parallel with the load resistor which is wired from the current output terminals and of the flowmeter Since the tip end of the probe cable is a pair of clips use a junction terminal or a terminal block etc to connect with the cl...

Page 151: ...6F8A0917 150 Converter terminal block HHT Figure 11 2 Connection to the Converter Main Unit ...

Page 152: ... hand held terminal 2 Connect the HART interface cable and serial interface card supplied with AF900 to each other Connect the HHT Connect the alligator clips at the end of the HART interface cable to the current output line of the converter via a load resistor Start the HHT Turn on the power supply of the PDA to start the AF900 application software Preliminary communication Execute sensor communi...

Page 153: ...ed cable CVV S etc for wiring Interference on 4 to 20mA current signal To communicate with the flowmeter a digital signal amplitude 0 4 to 0 8 V in the case of 500Ω load resistance with a frequency of 1 2 to 2 2 kHz is superimposed on the 4 to 20mA current signal If a receiving instrument with fast response time is connected to the analog current output line the superimposed communications signal ...

Page 154: ... settable range Try to set a value within the settable range again MULTI RNG ERR Span value setting does not satisfy the multi range requirements Try to set a span value that satisfies the requirements High low limit alarm An alarm message appears if the flow rate indication goes out of the set range If the alarm is set to OFF this function does not work For how to set this function see 8 2 Parame...

Page 155: ...ll the pipe with fluid Precautionary notes when using the fluid empty alarm 1 Since the fluid empty alarm is detected using the impedance between the signal wires connected to a pair of electrodes in the detector as well as the input signal level a false alarm may be detected by the following factors Signal wire is broken or loose connection exists A large amount of air bubbles are mixed in the fl...

Page 156: ...t 6 ADC ERROR An error occurred in the ADC circuit Internal parts or printed circuit board must be repaired or replaced Contact your nearest Toshiba representative 7 INVALID TOTAL Totalized data in the memory was destroyed caused by the entry of noise No message appears if the data is not displayed in an indicating unit of totalization The error message disappears if you press the reset key to cle...

Page 157: ...ssage disappears if you clear reset the totalizer HIGH ALARM Measured value Measured value Measured value H HIGH ALARM Measured value Measured value Measured value L ALARM Measured value Measured value Measured value L LOW ALARM Measured value Measured value Measured value Note 1 The display and output may be uncertain depending on the nature of the ROM error Note 2 If a parameter failure relating...

Page 158: ...lacement of fuse Fuse can be taken out by turning the top of the fuse holder counterclockwise Check that the fuse is not damaged In addition fuse has its own life and it must to be replaced periodically Recommended replacement cycle is about 3 years Type of fuse used Glass tube fuse normal blow type Rating In the case of power supply 100 to 240 VAC and 110VDC 1A 250V 2 pieces In the case of power ...

Page 159: ...meter inspection or unit replacement Product disposal The main body or parts of the converter must be disposed of according to the rules and regulations of your local government Especially if you dispose of electrolytic capacitors to replace parts have it done by an agency which is licensed to handle industry waste materials Operative life The operative life of this flowmeter is 10 years from the ...

Page 160: ...one NO Set the velocity range correctly according to 8 Parameter Settings YES Does the flow direction agree with the arrow mark on the detector NO Install the detector correctly according to 4 Installation In addition set the direction of flow correctly according to 8 Parameter Settings Contact your nearest Toshiba representative Is the velocity range set correctly Isn t the fuse blown Are cables ...

Page 161: ... zero point correctly set Is the velocity range correctly set YES NO YES NO START Set the exciting current correctly according to 8 Parameter Settings Clean the inside wall of the detector pipe to remove the deposits Isn t the inside wall of detector pipe or electrode contaminated Is the exciting current correct NO YES YES NO Design the output circuit so that the output load resistance is less tha...

Page 162: ...large current or high voltage cable or equipment near the flowmeter YES Install the flowmeter away from the equipment producing electromagnetic or electrostatic interference Contact your nearest Toshiba representative Isn t the fluid in the detector pipe carrying bubbles Is the detector pipe filled with fluid Are converter and detector grounded with Class D ground 100 or less ground resistance Is ...

Page 163: ...he control panel to protect from rain and operate the EMF converter NO YES Is the control panel attached with dewdrop snow ice mud or oil Is the control panel hazed by steam Clean the attached or haze and operate the EMF converter Further place a cover to prevent from attaching NO YES Are you wearing dark color gloves Or are your finger or gloves stained Clean the stain on fingers or gloves or wea...

Page 164: ...rage fluid velocity V and this voltage signal is detected The following expression is applicable to the voltage E K B D V V Eq 14 1 E Electromotive force signal V K Constant B Magnetic flux density T D Meter pipe inner diameter m V Fluid velocity m s Volumetric flow rate Q m3 s of fluid is π D2 Q 4 V Eq 14 2 Thus we can obtain the equation below using Eq 14 1 and Eq 14 2 4 E K B D π D2 Q 4 K B E π...

Page 165: ... h 8 200mm 0 484 GPM std to 0 2420 GPM 0 110 m3 h to 0 550 m3 h 10 250mm 0 770 GPM std to 0 3850 GPM 0 175 m3 h to 0 875 m3 h 12 300mm 0 1100 GPM std to 0 5500 GPM 0 250 m3 h to 0 1250 m3 h 14 350mm 0 1540 GPM std to 0 7700 GPM 0 350 m3 h to 0 1750 m3 h 16 400mm 0 1980 GPM std to 0 9900 GPM 0 450 m3 h to 0 2250 m3 h 20 500mm 0 3124 GPM std to 0 15620 GPM 0 710 m3 h to 0 3550 m3 h 24 600mm 0 4400 G...

Page 166: ... pulse output results calibrated under standard operating conditions at Toshiba s flow calibration facility Individual meter s measurement error mayvary up to 0 8 of Rate at 3 28 ft s 1 0 m s or more and 0 4 of Rate 0 157 inch s 4mm s at 3 28 ft s or less Refer to individual calibration data for each meter s measurement error For partially filled pipes detectors Combined detector is LF502 2 FS Not...

Page 167: ... Note State to be filled with water is water level 100 Necessary straight pipe length Upstream side 10D or more Downstream side 5D or more Note D is meter size Converter specifications 1 Input signal Flow rate proportional signal from the detector 2 Output signal 4 to 20mADC current signal load resistance 0 to 1kΩ 3 Digital Input Output Digital Output Digital Output 1 Output type Transistor open c...

Page 168: ... signal of 20 to 30 VDC H level 20 to 30 VDC L level 2 VDC or less Input resistance About 2 7 kΩ For digital input function either of the following functions can be selected Digital Input function Range switching input One Digital Input is used switching between large and small ranges of forward reverse 2 range measurement Two Digital Inputs are used switching between ranges of single direction 4 ...

Page 169: ...g values are stored in non volatile memory Current output 0mA Digital Output OFF contact open Display Unlit 6 Other items Mass Approx 18 lb 8kg including a mounting fitting Ambient temperature 4 to 140 F 20 to 60 C storage temperature 13 to 149 F 25 to 65 C Arrester Included in the power supply circuit current signal output circuit and digital I O circuit Terminal block structure 21 pole screw con...

Page 170: ...t Communication function 1 HART communication Power supply 1 100 to 240VAC 50 60Hz Note 2 2 24VDC Note 3 A Standard Note 1 For applicable detector code select one from the following table To combine with an existing detector select one depending on the type of replaceable converters For combination with detectors not listed below contact Toshiba Applicable detector code Applicable detector Applica...

Page 171: ...tible detector F For Partially filled pipes Meter size 6 to 24 150mm to 600mm Mounting nuts and bolts C Panel wall mounting BNP material SUS304 E Pipe mounting BNP material SUS304 Digital input output 1 Current output Digital outputs points 1 point 3 Current output Digital outputs points 4 point Digital nputs points 2 point Communication function 1 HART communication Power supply 1 100 to 120VAC 5...

Page 172: ...te Figure 16 1 Outline of Electromagnetic Flowmeter Converter 232 Type 2 94 74 8 74 222 9 33 237 6 10 155 15 75 400 φ0 47 φ12 hole 4 places 2 99 76 2 99 76 2 99 76 Signal cable connection Output cable connection Power cable connection Ground terminal Excitation cable connection Digital I O cable connection Unit inch mm 14 14 57 37 ...

Page 173: ...F8A0917 172 Write down the address and phone number of the distributor from which you purchased this product the product code SER NO and so on Distributor Address Name Phone number Product code LF SER NO ...

Page 174: ...FCF50017 ...

Reviews: