background image

Step

Tool

23

22

21

27

26

25

24

Disassemnling Procedures

Photo

Description

Note

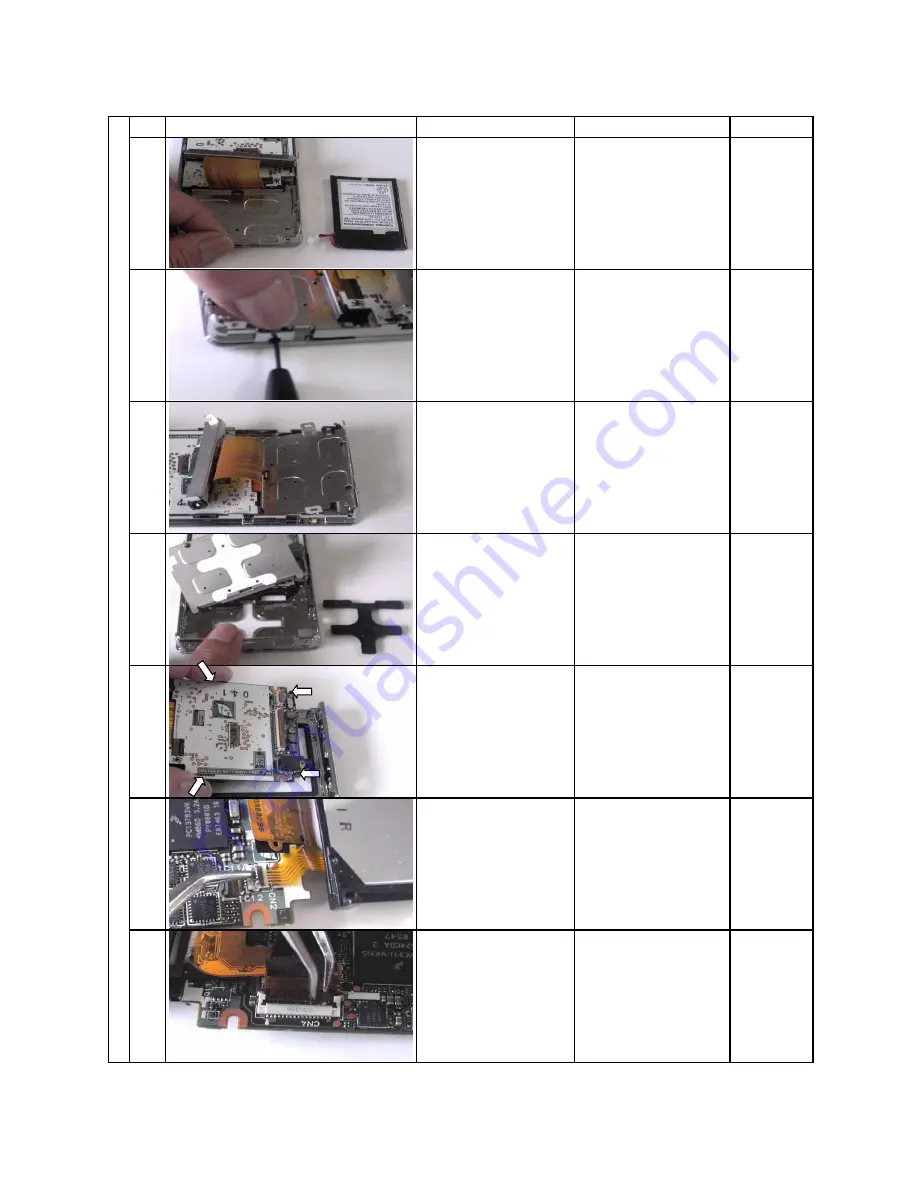
The battery is removed. Release the lock, lifting

up the lock lever of
CN1.

The SW sheet bracket
is removed.

Remove the LCD block
and then LCD frame,
unlocking four claws.

Remove the SW sheet
bracket and then the
SW button.

Release the lock with
the flathead screwdriver
inserted through the
gap at the side and
remove it.

Flathead
screwdriver

Remove the SW sheet
bracket and then the
SW button.

Philips
screwdriver

Release  the lock of
CN4 and remove the
FFC cable.

Tweezers

Release  the lock of
CN2 and remove the
FFC cable.

Tweezers

28

Summary of Contents for Gigabeat S MES30V

Page 1: ...O 400 200603GR Jun 2006 Series Theabovemodelsareclassifiedasgreenproducts 1 ThisServiceManualdescribesreplacementpartsforthegreenproducts Whenrepairingthesegreen product s use the part s described in this manual and lead free solder 2 For 1 and 2 see the next page ...

Page 2: ...nt of parts is not only confined to manufacture The same green parts used in manufacture must also be used as replacement parts 2 LEAD FREE SOLDER This product is manufactured using lead free solder as a part of a movement within the CE industry at large to be environmentally responsible Lead free solder must be used in the servicing and repair of this product WARNING This product is manufactured ...

Page 3: ... parts of the product for replacement Since some parts have safety characteristics fire resistance withstand voltage etc use replacement parts with same characteristics For safety sensitive parts specified by marking in circuit diagrams or parts lists use specified parts After repair work is completed properly reassemble disassembled parts and securely reconnect cables as they were For safety reas...

Page 4: ...it in fire or water Doing so may cause an explosion ignition or heat generation resulting in fire or serious injury DANGER Do not place the built in battery near fire or in the heat of the sun Doing so may result in fire explosion or heat generation DANGER Do not bring the built in battery near heating equipment Doing so may result in fire explosion or heat generation DANGER Wrap the connector of ...

Page 5: ...BOARD 12 3 4 1 UPDATING THE FIRMWARE 12 3 5 WHEN REPLACING THE LCD AND LCD BACKLIGHT UNIT 16 3 5 1 INCORPORATING THEM INTO THE LCD FRAME 16 4 TROUBLESHOOTING 17 4 1 ANTICIPATED DEFECTS 17 4 2 DEFECT ANALYSIS PROCEDURE AS A MAINTENANCE SERVICE 18 4 2 1 THE UNIT WILL NOT TURN ON 18 4 2 2 NO SOUND COMES OUT 20 4 2 3 FM CANNOT BE RECEIVED 20 4 2 4 THE SOUND IS ODD 21 4 2 5 THE LCD DISPLAY IS ODD 21 4 ...

Page 6: ...ents Main board A part of firmware is stored in the flash ROM on the main board HDD The HDD is partitioned into two partitions One is for data and the other is for system The firmware is stored in the system partition Contents such as music data are stored in the data partition Data other than music data such as Word files can be stored in the external HDD But files cannot be directly opened TFT c...

Page 7: ...ection Using the Windows Media DRM10 the contents are protected Using the Windows standard application Windows Media Player 10 transfer copy the music data WMA MP3 WAV format video data WMV stored in a PC to the HDD so that the transferred content can be played back Transferring the data via USB is also possible When the content which is once transferred to a PC by the Explorer is transferred to o...

Page 8: ...ts it to PCM data If the data in the SDRAM is video the CPU restores it to bit map data The music data restored to the PCM is sent from the SDRAM to the DAC by the CPU In case of video data the CPU sends the bit map data to the LCD The DAC converts the PCM music data to the analog signal which is then outputted to headphones The CPU sets the volume control and equalizer levels in the DAC which con...

Page 9: ...5 2 Block diagram 2 1 Logic circuit block diagram ...

Page 10: ...6 2 2 Power circuit block diagram ...

Page 11: ... 2 Remove the AC adaptor and set the BATTERY switch to OFF Before disassembling ensure to remove the AC adaptor and set the BATTERY switch to OFF When the gigabeat S series is powered by the AC adaptor or the battery even if the power switch is turned off the power is supplied to the LCD and almost all ICs Therefore before repairing the AC adaptor or the battery must be removed By setting the BATT...

Page 12: ...act Note that the HDD is vulnerable to impact Merely falling the HDD from a vertical position would give an impact exceeding the specifications 3 3 2 Holding the HDD When holding the HDD hold it at the following position Do not hold it at the following position ...

Page 13: ... D Transfer 4 Start up Transfer Program Ottoman exe on the PC and select the scenario file ini in which files to be transferred are described Ottoman exe and the scenario file are provided on the CD ROM Material No 360058245 Names for the destination wise stored folder and file are different depending on the destination The relationship between destination and folder is shown on the table below Ta...

Page 14: ...nt be careful not to touch the POWER button By removing the USB cable OK on the PC disappears 7 The unit is automatically started up Transfer of FW for factory setting 8 Transfer the FW for factory setting in the same manner as in step 4 Terminate Ottoman exe once And start up newly the Transfer Program Ottomam exe on the PC and select the scenario file ini in which files to be transferred are des...

Page 15: ...s automatically started up Transfer of supplied data for factory setting 12 Transfer the supplied data for factory setting in the same manner as in step 4 Terminate Ottoman exe once Then start up newly the Transfer Program Ottoman exe on the PC and select the scenario file ini in which files to be transferred are described Ottoman exe and the scenario file are provided on the CD ROM Material No 36...

Page 16: ...ter replacing the main board update the firmware in the procedure below As explained in 1 1 3 Location to store the firmware the firmware is stored in both the flash ROM on the main board and on the HDD Unless the versions of firmware at two locations are matched the malfunction will occur Therefore whenever the main board is replaced update the firmware in the procedure below to match the version...

Page 17: ...ation and Folder Destination Folder name Scenario file name Japan OTTOMAN_T D_FW_JP OTTOMAN_T D_FW_JP ini U S A OTTOMAN_T D_FW_US OTTOMAN_T D_FW_US ini Start up the Ottoman exe and select the scenario file Then the menu below appears Fig Menu display on the PC T D Transfer Check two points of A and B on the above menu These are different depending on the destination A is same The display for every...

Page 18: ...ng according to the instruction the LCD becomes entirely black white check visually f When Connect Controller appears connect the remote controller to the Headphone jack and operate the button on the remote controller according to the instruction displayed on the LCD g When Disconnect Controller appears plug out the remote controller h If the unit has no TV out jump to step k If the unit has the T...

Page 19: ...play for every destination is as shown below Table Differences of display by destination Differences are underlined Destination A B Japan version 0 9 9 10 FILE DEL TRANS PROG JP Ver 6423A U S A version 0 9 9 10 FILE DEL TRANS PROG US Ver 6423A 10 Wait for a while Then OK appears on the PC 11 Remove the USB cable At this moment be careful not to touch the POWER button By removing the USB cable OK o...

Page 20: ... underlined Destination A B Japan version 0 9 9 10 TRANS SAMPLE COMTENTS JP Ver 6423A U S A version 0 9 9 10 TRANS SAMPLE COMTENTS US Ver 6423A 14 Wait for a while Then OK appears on the PC 15 Remove the USB cable At this moment be careful not to touch the POWER button of gigabeat S By removing USB cable OK on the PC disappears 16 Hold down the Power key to suspend Power OFF Plug out the AC adapte...

Page 21: ...d defects 1 The unit will not turn on 2 No sound comes out 3 FM cannot be received 4 The sound is odd 5 The LCD display is odd 6 Operating the buttons on the unit does not work 7 Remote control does not work 8 A USB connection cannot be established 9 The battery cannot be recharged When battery powered the unit plays back only for a short time 10 The HDD is not recognized ...

Page 22: ... Connect the wired remote controller MEGWRC12 to the unit release the HOLD switch of wired remote controller and turn on the unit by operating the wired remote controller Hold down the Play Pause button for at least 2 seconds Does the unit turn on N Replace the main PCB assembly A Continued on the next page Turn off the unit by operating the wired remote controller Hold down the Play Pause button ...

Page 23: ...rged Therefore leave recharge the battery at least four hours as is Then remove the AC adaptor and try to turn on the unit Does the unit turn on N Y Explain the BATTERY switch and the recharge method to the owner Replace either of the main PCB assembly or the lithium ion battery A Continued from the previous page ...

Page 24: ... Press repeatedly the VOL VOL button Confirm that the beep is audible from headphones Is the beep heard N Y Replace the main PCB assembly headphones or wired remote controller MEGWRC12 The sound level Volume may be set to low Check the sound level setting and confirm sound Connect the AC adaptor Set the BATTERY switch to OFF See Charging the built in battery in the Owner s Manual ...

Page 25: ... in the unit Replace the main PCB assembly headphones or wired remote controller MEGWRC12 Replace the main PCB assembly LCD or backlight unit Or re connect the connectors of LCD backlight unit In case of buttons at the side of unit Replace either the switch side assembly or the main PCB assembly Or cable is reconnected In case of buttons on the front of unit Replace either of the SW top assembly o...

Page 26: ...well In all cases other than this repair in the procedure mentioned below Set the BATTERY switch to ON See Charging the built in battery in the Owner s Manual Connect the AC adaptor Start up the unit Is the charging icon displayed Confirm that the charging icon appears on the LCD N Y Replace the AC cord AC adaptor lithium ion battery or the main PCB assembly In case of indicating the charging icon...

Page 27: ...yed Check the error message In case of 5 display Replace either of the HDD flexible cable or the main PCB assembly Or re plug in Does the unit display an error message N Y Replace the HDD The repair is completed Without replacing the HDD implement 3 3 3 Process at HDD replacement Transfer of F W In case of 1 display ...

Page 28: ...on Portable Media Center from the start menu 3 Confirm the version displayed Concretely confirm that the version displayed is as follows Confirm X XXX YYY in Version X XX YYY The display for Japan is Version X XX YYY Confirm MMMM NNNNNN in Platform Version MMMM NNNNNN The display for Japan is Platform Version MMMM NNNNNN 4 Hold down the POWER button The unit will turn off ...

Page 29: ...n Note Disassemnling Procedures Turn off the battery switch of unit indicated by arrow Remove the strap holder Remove the screw at the side Rear of unit Philips screwdriver Remove the screw at the side Philipps scredriver Philips screwdriver Remove the screw at the bottom Philips screwdriver 2 1 6 5 4 3 25 ...

Page 30: ...ing from the side switch Release the lock of connector lifting the lever upward Tweezers Philips screwdriver Remove the back cover Fix the back cover and slide the top cover in the arrow direction Photo Description Note Disassemnling Procedures Remove the screw at the bottom The back cover and the top cover are removed The cable and the rear cover are removed 26 ...

Page 31: ...t the side Remove the HDD flexible cable Release the lock lifting the connector lock upward Tweezers Remove the terminal board Remove the screw at the bottom The terminal board is fixed with the fixing bracket and two screws Philips screwdriver Remove the battery connector and battery Philips screwdriver Slide in the arrow direction and remove the board lifting up 14 20 19 18 15 16 17 27 ...

Page 32: ...ock and then LCD frame unlocking four claws Remove the SW sheet bracket and then the SW button Release the lock with the flathead screwdriver inserted through the gap at the side and remove it Flathead screwdriver Remove the SW sheet bracket and then the SW button Philips screwdriver Release the lock of CN4 and remove the FFC cable Tweezers Release the lock of CN2 and remove the FFC cable Tweezers...

Page 33: ...hoto Description Note The LCD block is removed Remove the FFC cable of terminal board unlocking The board removal is finished Remove the FFC cable leading from SW unlocking Disassemnling Procedures 28 29 30 31 29 ...

Page 34: ...ck 7 Connect the FFC cable of LCD Be sure to lock Building in of LCD block Connect the FFC cable of LCD Be sure to lock Affix the protection tape to the original position Fix the LCD block to the board and build it in the front panel Photo Description Note The board is fixed to the front panel Install the headphones terminal side of it first Connect the FFC cable of terminal board Be sure to lock ...

Page 35: ...button on the original position Philips screwdriver Philips screwdriver Tweezers Install the HDD Insert the FFC cable in the connector Be sure to lock Install the battery SW knob indicated by arrow Fix the terminal board bracket with the screw Fix the terminal board bracket with the screw Photo Description Note Installing the teminal board Sandwich the terminal board fixing bracket as shown and fi...

Page 36: ...9 20 21 Tighten the screw at the bottom 2 pieces Tighten the screw at the bottom 2 pieces Tighten the screw at the side Philips screwdriver Philips screwdriver Philips screwdriver Slide groove Indicated by arrow Photo Description Note Tweezers Philips screwdriver Install the board fixing bracket with two screws Install the flexible cable leading from side switch to the connector 32 ...

Page 37: ...Step Tool Reassembling Procedures 22 23 24 Philips screwdriver Philips screwdriver Photo Description Note Assembling is finished Install the strap holder Tighten the screws at the side 33 ...

Page 38: ...34 7 Exploded View MES60V 28 28 23 24 26 29 17 13 11 16 15 8 26 12 9 7 21 26 22 35 33 34 36 37 38 32 31 30 14 27 10 19 28 20 25 29 18 18 6 2 1 5 4 3 ...

Page 39: ... GDM330000077 LCD BACKLIGHT CBL1759A 16 P000449380 GDM330000072 LCD UNIT LTM024D362 17 P000449300 G5B001592000 HDD FPC FBHMH1 18 P000449530 PM0023127110 HDD RUBBER 19 P000469160 PM0025207110 HDD PLATE 20 P000469210 PM0025204110 HDD SPACER MES60VK 21 P000469180 PM0026063110 IO PLATE 22 P000469190 PM0026064110 INS IO SPACER 23 P000468900 AM0007934110 SW BUTTON SIDE ASSY 24 P000468920 AM0008574110 SW...

Page 40: ...will vary depending on the operating condition ambient operating temperature the number of times the built battery has been recharged etc Even under allowable operating conditions using the gigabeat at low temperature will result in a reduction of the maximum continuous playback time Playback with the Harmonics on WAV audio data and WMA9 Lossless use more battery power for playback than MP3 and WM...

Page 41: ...ty Note This product complies with the above specifications Design and specifications are subject to change without notice This product may not be compatible with features and or specifications that may be added in the future The illustrations and screen displays appearing in this manual may differ somewhat from the actual appearance The display position and other aspects of the icons are subject ...

Page 42: ...dy installed on the PC continue the installation procedure Files necessary to work with the gigabeat will be installed on the PC 3 Follow the on screen instructions Trademarks gigabeat and Plus Touch are trademarks of Toshiba Corporation Microsoft Windows Windows Media and Windows Mobile are either registered trademarks or trademarks of Microsoft Corporation in the United States and or other count...

Page 43: ......

Reviews: