background image

2.SENDING A FAX

Basic Procedures    33

2 SENDING A FAX

SINGLE/2-SIDED SCAN

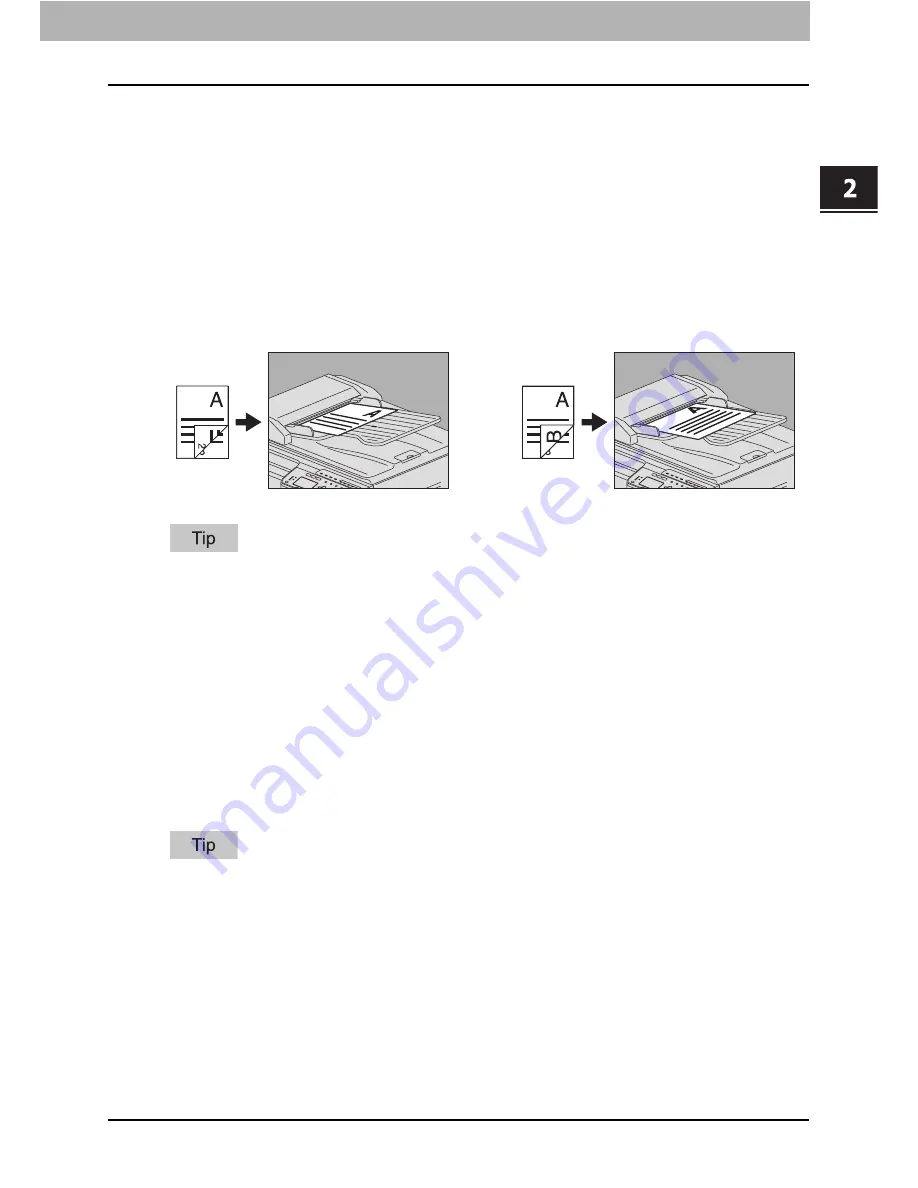
You can send a copy of 2-sided originals by fax using the RADF (Reversing Automatic 
Document Feeder).

When you place a 2-sided original of the LT/A4 size, change the direction of the original 
depending on its bind position as follows:
1. Right-to-left (book-type) original
2. Top-to-bottom (tablet-type) original

Note that each setting will automatically return to its default setting when transmission is 
completed.

ORIGINAL SIZE

Set the scan size of the original.

*

This item is only available for e-STUDIO2507 Series, and e-STUDIO2505F with the ADF installed.
With e-STUDIO2507 Series, if the size of an original placed on the original glass cannot be determined, 
it is set to LD/A3.

If the recipient’s fax machine is not capable of receiving originals of B5 size, this equipment 
may reduce that size before sending it. To avoid this, when the original to be set is B5 size, 
specify LT/A4 size respectively.

SINGLE:

This is suitable for 1-sided originals.

DUPLEX:

This is suitable for 2-sided originals.

AUTO SIZES

*

:

The size of the original is automatically determined before the original is 
scanned.

Specified size:

The original is scanned at the preset size regardless of its actual size.

1

2

Summary of Contents for E-Studio 2007

Page 1: ...MULTIFUNCTIONAL DIGITAL SYSTEMS Fax Guide with GD 1330 ...

Page 2: ... 2013 TOSHIBA TEC CORPORATION All rights reserved Under the copyright laws this manual cannot be reproduced in any form without prior written permission of TTEC ...

Page 3: ...OSHIBA Multifunctional Digital Systems This Fax Guide describes how to use the fax functions troubleshooting and its maintenance etc Be sure to read this manual before using this equipment Keep this manual handy and retain it for future reference ...

Page 4: ... applicable FCC Part 68 rules and requirements adopted by the ACTA A compliant telephone cord and modular plug is provided with this product It is designed to be connected to a compatible modular jack that is also compliant See installation instructions for details The REN is used to determine the number of devices that may be connected to a telephone line Excessive RENs on a telephone line may re...

Page 5: ... order to program this information into your Fax machine you should complete the following steps complete the setup procedures listed for station ID number and name See P 103 Registering the Terminal ID CAUTION To reduce the risk of fire use only No 26 AWG or larger telecommunication line cord TOSHIBA AMERICA BUSINESS SOLUTIONS INC Electronic Imaging Division 9740 Irvine Blvd Irvine CA 92618 For C...

Page 6: ...abonné ne doit pas oublier qu il est possible que la conformité aux conditions énoncées ci dessus n empêche pas la dégradation du service dans certaines situations Les réparations de materiel homologué doivent être coordonnées par un représentant désigné par le fournisseur L entreprise de télécommunications peut demander à l utilisateur de débrancher un appareil à la suite de réparations ou de mod...

Page 7: ...er Telecom customers Not all telephones will respond to incoming ringing when connected to the extension socket This device is equipped with pulse dialling while the Telecom standard is DTMF tone dialling There is no guarantee that Telecom lines will always continue to support pulse dialling Use of pulse dialling when this equipment is connected to the same line as other equipment may give rise to...

Page 8: ...rmat If you use paper in the LT format the display or the order of buttons in the illustrations may differ from that of your equipment Options For the available options refer to Specifications of Options in the User s Guide for your equipment Indicates a potentially hazardous situation which if not avoided could result in death serious injury or serious damage or fire in the equipment or surroundi...

Page 9: ...ipment Description of original paper direction Paper or originals of A4 B5 or LT size can be placed either in a portrait direction or in a landscape direction In this manual R is added to this paper size when this size of paper or original is placed in a landscape direction Example A4 size original on the original glass Paper or originals of A3 B4 LD or LG can only be placed in a landscape directi...

Page 10: ... or displayed in this software may be the trademarks of their respective companies Lineup of our manuals These manuals are provided for the operation of the e STUDIO2505F or e STUDIO2507 Series Select and read the manual best suited to your needs This manual is the Fax Guide Safety Information Printouts This manual describes the necessary precautions for use For your added security be sure to read...

Page 11: ...er driver Scan driver N W Fax driver To read manuals in the PDF file format This manual in the PDF Portable Document Format can be displayed printed using Adobe Reader or Adobe Acrobat Reader If neither is installed in your computer download one of them This can be done via the website of Adobe Systems Incorporated Singapore Portion ...

Page 12: ...utable to either acts omissions events or accidents beyond the reasonable control of TOSHIBA TEC CORPORATION including without limitation acts of God war riot civil commotion malicious or deliberate damage fire flood or storm natural calamity earthquakes abnormal voltage or other disasters additions modifications disassembly transportation or repairs by any person other than service technicians au...

Page 13: ...smission Status log 43 Checking and canceling the reserved transmissions 43 Canceling transmission when an original is being scanned 44 Chapter 3 RECEIVING A FAX Reception Mode 46 AUTO reception 46 Memory reception 46 Remote reception 46 Checking Reception Status log 46 Originals and Paper 47 Acceptable size of paper 47 Default setting for RX printing 47 Paper priority when there is no same size p...

Page 14: ...Setting up the network fax options 72 Sending with extended fax functionality 75 Managing Address Book 78 Opening and creating the address book 78 Managing contacts and groups 81 Cover Sheet Samples 89 Standard cover page 89 Business cover page 90 Professional cover page 91 Chapter 6 SETTING ITEMS Operating the USER FUNCTIONS Menu 94 Character Entry 96 Switching the input mode 96 Entering characte...

Page 15: ...06 Registering or modifying a Group Dial number 108 Registering or modifying a One Touch Dial key number 111 Setting SECURE RECEIVE 113 Chapter 7 TROUBLESHOOTING AND SPECIFICATIONS Troubleshooting 116 Error messages 116 Transmission reception trouble 118 Specifications of Fax 120 INDEX 121 ...

Page 16: ...14 CONTENTS ...

Page 17: ...1 BEFORE USING FAX This chapter describes the basics of this equipment you should know before you start using it Description of Each Component 16 Control panel 16 Fax screen 18 Connecting Cables 19 ...

Page 18: ... button Use this button to change the scanning resolution 2 PAUSE button Use this button to inset a pause of approximately 2 seconds during direct entry 3 FAX button Use this button to display the fax screen to use the fax function This lamp blinks when a fax is received using the SECURE RECEIVE function 4 USER FUNCTIONS button Use this button when you register make settings such as initial settin...

Page 19: ...de 10 FUNCTION CLEAR button Use this button to clear all current selected functions and operations and return to the default settings 11 CLEAR STOP button Press this button to clear the values entered using the digital keys or to abort scanning of documents 12 START button Use this button to start scanning a document for fax transmission 13 Digital keys Use these keys to enter fax numbers etc 14 O...

Page 20: ...or error messages 2 Remaining memory Display the percentage of remaining memory 3 Scroll icon Displays the or button that you can press on the current screen or menu 4 Original mode Displays the original mode 5 Exposure Displays the exposure settings 6 Current date and time Displays the current date and time A4 1 INPUT FAX NUMBER 100 AUTO EXPOSURE TEXT PHOTO 01 01 12 01 M 100 1 6 2 5 4 3 ...

Page 21: ...ecting the cables 1 LINE Connect a telephone line 2 TEL Connect an external telephone Do not connect this equipment and the external telephone to a telephone outlet in parallel When connecting an external telephone to TEL use one without an answerphone or with the function turned off e STUDIO2505F e STUDIO2507 Series 1 2 1 2 ...

Page 22: ......

Page 23: ...tting an original 24 Setting the transmission conditions 31 Specifying the recipient 35 Checking and Canceling the Transmissions 43 Checking Transmission Status log 43 Checking and canceling the reserved transmissions 43 Canceling transmission when an original is being scanned 44 ...

Page 24: ...IO2507 Series in the correct direction The illustration above shows the original placed on the original glass P 24 Setting an original 2 Press FAX The fax screen is displayed If you leave the screen unattended for the period of the auto clear setting time 45 sec by manufacturer default the screen returns to the default one automatically 3 Set the transmission conditions as required Set the transmi...

Page 25: ...tically to send the fax If you want to change the number of times the equipment will redial contact your service technician Sending the next original If an original is placed on the original glass and its scanning is completed the confirmation screen for the next original is displayed To continue scanning the next original set the original select SCAN NEXT PAGE and then press OK Once all originals...

Page 26: ... original glass Do not place any heavy objects 4 kg 9 lb or over on the original glass and do not press on it with force Breaking the glass could injure you 1 Raise the Original Cover ADF or RADF and place the original with its face down on the glass Raise it 60 degrees or more to detect the original size with AUTO SIZES function this function is only available for e STUDIO2507 Series e STUDIO2505...

Page 27: ... figure on the left The original is transmitted so that the pre entered sender information is printed in position A in the figure When an original is placed in the direction shown in the figure on the right The original is transmitted so that the pre entered sender information is printed in position B in the figure if the size of the original is LT A4 and in position A in the figure if the size is...

Page 28: ... sheets 50 to 104 g m2 13 3 to 27 7 lb or 9 5 mm 0 37 in height When an original of any size other than LT A4 is placed in the direction shown in the above left figure transmission to a recipient is carried out so that the pre entered sender information is printed in position A in the figure When an original of LT A4 size is placed in the direction shown in the above right figure transmission to a...

Page 29: ... g m2 13 3 to 27 7 lb or 9 5 mm 0 37 in height 2 sided originals can be set and sent P 33 SINGLE 2 SIDED SCAN When an original of any size other than LT A4 is placed in the direction shown in the above left figure transmission to a recipient is carried out so that the pre entered sender information is printed in position A in the figure When an original of LT A4 size is placed in the direction sho...

Page 30: ...ing originals of mixed sizes but the same width Available combinations of the original size are as follows A B format A3 A4 B4 B5 LT format LD LT LG LT R To send same width originals you need to enable MIXED SIZE ORIGINAL as a transmission condition P 31 Setting the transmission conditions ...

Page 31: ...cut out originals 4 Originals with multiple perforations such as loose leaf paper 5 Clipped or stapled originals 6 Originals with holes or tears 7 Damp originals 8 OHP films or tracing paper 9 Coated paper with wax etc Use the types of originals 10 and 11 shown below with extra care 10 Originals which resist sliding with the fingers or surface treated originals The sheets of such originals may not...

Page 32: ...ng paper booklets and three dimensional objects Only for e STUDIO2507 Series Do not place any heavy objects 4 kg 9 lb or over on the original glass and do not press on it with force If the original is any of the following sizes it is automatically rotated and sent as described below A4 A4 R LT LT R Location Maximum size Paper weight Maximum Numberthat Can be Set Original size Original glass Length...

Page 33: ...he transmission Each default setting of resolution original mode exposure and ECM is adjustable P 98 User Functions Menu Items Making settings An example is explained below for ORIGINAL MODE 1 Press or to highlight the item to set 2 Press to display the items in the lower hierarchies 3 Press or to select the value to set Repeat step 2 and 3 as many times as needed 4 Press OK to confirm the set val...

Page 34: ...higher the resolution is the longer it takes to send an original QUALITY TX Switch Quality TX ON or OFF When this mode is set to ON originals are sent at a slower speed than usual and the chances of errors occurring decrease AUTO This equipment automatically detects the contrast of the original and scans it with the optimum density Manual Press or to set the desired contrast TEXT This is suitable ...

Page 35: ...riginal This item is only available for e STUDIO2507 Series and e STUDIO2505F with the ADF installed With e STUDIO2507 Series if the size of an original placed on the original glass cannot be determined it is set to LD A3 If the recipient s fax machine is not capable of receiving originals of B5 size this equipment may reduce that size before sending it To avoid this when the original to be set is...

Page 36: ...dardized communication mode that automatically corrects errors that occur during fax transmissions With this setting option ON even when the transmitted data have been affected by noise during communication this mode allows good communication without image distortion by automatically resending the parts that have been affected Both the sender and the receiver must have the ECM function to make ECM...

Page 37: ...ital keys Press twice to enter a space Press CLEAR STOP to delete one digit of the entered number Keep pressing CLEAR STOP for a second to clear the number entirely When you are dialing to an outside line via a PBX there may be a pause before the connection is made causing a transmission error To avoid this error press the PAUSE button after the number that designates an outside line to enter a pa...

Page 38: ...t once press CLEAR STOP You can specify multiple recipients to send the same document at once Be sure to press the One Touch Dial key after pressing MULTI each time you add a destination You can also specify the recipients fax numbers by combining with other entry methods The number of recipients you can simultaneously specify is limited to 220 When you are dialing to an outside line via a PBX the...

Page 39: ... MULTI 2 Specify the recipients P 35 Direct entry with digital keys P 36 One Touch key dialing P 39 Specifying the recipient from the address book P 40 Searching the recipient in the address book 3 Press OK e STUDIO2505F e STUDIO2507 Series 4 1 100 ONE TOUCH 1 CONFIRM AND PRESS OK AABBC 0123456789 A4 1 100 01 01 12 01 M 100 AABBC AUTO EXPOSURE TEXT PHOTO 4 1 100 INPUT FAX No OR MULTI 000 PRESS ADD...

Page 40: ...ecified recipients To delete the specified recipient select DELETE and then press then select YES and press OK 5 After you register all the recipients select COMPLETE using or and press OK 6 Once you have entered all recipients press START INPUT FAX No MULTI 000 0123456789_ 1 NEXT MULTI 005 REVIEW LIST COMPLETE 1 012345 DESTINATION 005 AABBCC GROUP 1 1 CHECK GROUP 1 DELETE 1 CHECK GROUP 1 DELETE 1...

Page 41: ...red to register the address book beforehand P 105 Managing the Address Book You can confirm the address book from the dialer list P 56 Dial list 1 Press ADDRESS BOOK 2 Specify the recipient P 40 Searching the recipient in the address book P 41 Speed Dial P 42 Group entry 3 Press Start e STUDIO2505F e STUDIO2507 Series 1 SEARCH ADDRESS BOOK SPEED DIAL GROUP DIAL ...

Page 42: ... keys are displayed in the following order All A Z 0 9 ABC DEF GHI JKL MNO PQR STU VWX YZ SD GD The search key SD means search for an individual Single while GD means search for a group Group 3 Press or to select a recipient and then press OK 4 The registered names and fax numbers are displayed Press OK 1 SEARCH ADDRESS BOOK SPEED DIAL GROUP DIAL 001 ALL 002 555AB A Z 0 9 ABC 001 ALL 002 555AB A Z...

Page 43: ...nter the Speed Dial number using the digital keys 3 Press OK The already registered names are displayed under Speed Dial You can specify multiple recipients to send the same document at once Repeat this operation until all the recipients are specified You can also specify the recipients fax numbers by combining with other entry methods The number of recipients you can simultaneously specify is lim...

Page 44: ...press 2 Enter a group number using the digital keys and then press OK 3 Press OK The already registered group name is displayed You can specify multiple groups to send the same document at once Repeat this operation until all the recipients are specified You can also specify the recipients fax numbers by combining with other entry methods The number of groups you can simultaneously specify is limi...

Page 45: ...ng the reserved transmissions 1 Press JOB STATUS 2 Press or to select JOBS FAX and then press 3 Press or to select CONFIRM and then press You can delete a reserved transmission by selecting DELETE and then pressing Press or to select the reserved transmission you want to delete Select YES and then press OK 1 JOBS JOB STATUS SECURE RX RESERVATION LIST 4 100 PRINT JOBS SCAN FAX 4 100 CONFIRM FAX DEL...

Page 46: ...ansmission when an original is being scanned You can cancel transmission during the scanning of an original 1 Press CLEAR STOP while the original is being scanned 2 Select YES and then press OK The scanning process is aborted TRANSMISSION Sending on the line REDIAL WAITING Communication is in the redial standby queue WAITING Communication is in the standby queue 4 100 0001 ABC_FAX COMFIRM 0005 023...

Page 47: ...eception Mode 46 AUTO reception 46 Checking Reception Status log 46 Originals and Paper 47 Acceptable size of paper 47 Default setting for RX printing 47 Paper priority when there is no same size paper 48 Setting a Fax drawer 50 Printing SECURE RECEIVE Fax Jobs 51 ...

Page 48: ... and reports When paper has run out When a paper misfeed occurs When toner has run out Remote reception Faxes are received by using an external telephone when you have an incoming call For remote reception an external telephone must be installed beforehand If an external telephone is not installed be sure to set RX Mode to Auto P 99 FAX Set Remote RX to Dial P 99 FAX 1 Pick up the external telepho...

Page 49: ... of them are set to ON by manufacturer default are applied This function operates based on the settings made by the administrator and as such no user operations may be necessary For details of the setting operation see the following page P 99 FAX When an original is shorter or the same as the paper printing area It is printed in the original size When an original is longer than the paper printing ...

Page 50: ...MP COMP COMP COMP Letter Letter Reduced to 75 Reduced to 75 Letter Letter Reduced to 75 Reduced to 75 Ledger Ledger Legal Legal Legal Legal Legal Legal COMP COMP Letter Letter Letter Letter Letter Letter Ledger Ledger Ledger Ledger Ledger Ledger COMP COMP COMP COMP Ledger Ledger Ledger Ledger Legal Legal Letter Letter Letter Letter Statement Statement COMP COMP Ledger Ledger Legal Legal Letter Let...

Page 51: ...nt s fax machine this equipment Ex A3 A4 The paper priority varies according to the RXPRINT REDUCTION and RXPRINT DISCARD settings For details contact your service technician Priority Size of Original being Received 1 2 3 4 5 6 7 A3 A3 A4 A4 A5 A5 A4 A4 B4 B4 B5 B5 B4 B4 A4 A4 A4 A4 A4 A4 A4 A4 B5 B5 B5 B5 B4 B4 A4 A4 B4 B4 A3 A3 A4 A4 B4 B4 FOLIO FOLIO FOLIO FOLIO B4 B4 A3 A3 A3 A3 A3 A3 A4 A4 A3...

Page 52: ...ording to the setting of RXPRINT REDUCTION or RXPRINT DISCARD P 47 Default setting for RX printing 1 Press USER FUNCTIONS 2 Press or to select FAX RX PRINT and then press 3 Press or to select FAX DRAWER SETTING and then press 4 Select the desired Fax drawer using or and press OK To clear the setting select OFF default value USER FUNCTIONS GENERAL COPY SCAN FAX TERMINAL ID INITIAL SETUP RX PRINT RX...

Page 53: ...EIVE fax job You can print the fax data by entering your PRINT PASSWORD P 16 Control panel 1 Press JOB STATUS 2 Press or to select SECURE RX and then press 3 Enter the password for printing a received SECURE RECEIVE fax and then press OK to start printing 4 JOBS JOB STATUS SECURE RX RESERVATION LIST 4 100 JOBS JOB STATUS SECURE RX RESERVATION LIST INPUT PASSWORD 12 ...

Page 54: ......

Page 55: ... Manually 54 Journal transmission and reception journal 54 Reservation list 55 Dial list 56 Printing Lists Reports Automatically 57 List Report Samples 58 Activity Report transmission and reception journal 58 Memory Data List reservation list 58 TX Result Report memory transmission report 59 Dial list 60 ...

Page 56: ...are printed from a Fax drawer For details on the Fax drawer see the following page P 50 Setting a Fax drawer In addition to the lists described in this section you can print lists such as the function list manually For details on the operation see the User s Guide Journal transmission and reception journal You can print a list of transmissions and receptions This equipment logs up to the latest 60...

Page 57: ...PORTS Reservation list You can print a list of the reserved transmissions 1 Press JOB STATUS 2 Press or to select RESERVATION LIST 3 Press OK to start printing P 58 Memory Data List reservation list 4 JOBS JOB STATUS SECURE RX RESERVATION LIST 4 JOBS JOB STATUS SECURE RX RESERVATION LIST ...

Page 58: ...ing with or and then press OK Printing will start SPEED DIAL Prints a list of the fax number and telephone number of the registered Speed Dial numbers P 60 Speed Dial number list GROUP DIAL Prints a list of the group names registered numbers and One Touch Dial keys P 60 Group Dial number list ONE TOUCH Prints a list of the Speed Dial numbers and group numbers registered in the One Touch Dial keys ...

Page 59: ...etting operation see the following page P 102 REPORT SETTING The Activity Report and TX Result Report are printed from a Fax drawer For details on the Fax drawer see the following page P 50 Setting a Fax drawer Lists reports that can be printed automatically are as follows Activity Report transmission and reception journal When this equipment completes 60 transmission and reception jobs the journa...

Page 60: ...er Terminal ID Page Number TX or RX File No Date Time Duration Pages Destination TX RX Status 0001 04 05 16 59 02 21 001 Redfield HS TX OK 0002 04 10 17 33 00 50 002 2123456789 Activity Report Date 2013 04 14 20 05 Name Aaabbb L A Fax Number 2131235678 Page 001 Err00B5 RX File No Date Time Pages Destination Unsent Status 0001 04 14 16 59 009 12345678901234567890 OK 17 10 1234567890 Error Memory Da...

Page 61: ... REPORTS TX Result Report memory transmission report File No Date Time Pages Destination Unsent Status 0001 04 14 16 59 009 12345678901234567890 OK TX Result Report Date 2013 04 14 20 05 Name Aaabbb L A Fax Number 0131235678 Page 001 ABCD 17 33 002 2123456789 1st Page Image ...

Page 62: ...04 050 051 052 054 ABCDEFGHIJKLMNOPQRST 1234QRST 3F MFP 4F MFP Recipient s Fax telephone number or e mail address Speed Dial number Recipient s terminal ID Page 001 Date 2013 5 15 11 48 Name ABCDEFGHI Fax Number 01234567890 Group Dial List Group No Name OT SP Number OT SP Name 01 20 ABC GROUP 1234QRST OT OT SP SP 001 004 054 003 OT1 ABC Tokyo ABC MFP 012345678 One Touch Dial key number Speed Dial ...

Page 63: ...ial List 0P00 1234567890 01234567 03456789012345 01234567890123 01 02 03 04 05 ABCDEFGHIJKLMNOPQRST 1234QRST OneTouch4 Page 001 Date 2013 5 15 11 48 Name ABCDEFGHI Fax Number 01234567890 One Touch No Name Number Recipient s terminal ID or type of registration One Touch Dial key number Recipient s Fax telephone number ...

Page 64: ......

Page 65: ...s 65 How to fax using the N W Fax driver 65 Specifying recipients 68 Setting up the network fax options 72 Sending with extended fax functionality 75 Managing Address Book 78 Opening and creating the address book 78 Managing contacts and groups 81 Cover Sheet Samples 89 Standard cover page 89 Business cover page 90 Professional cover page 91 ...

Page 66: ...an be entered manually or can be selected from the address book data In this method you can easily search for the desired addresses throughout the address book Since the image data processing methods for network fax documents and regular fax documents differ the image quality for network fax documents may vary compared with that for regular fax documents Functions The N W Fax driver allows you to ...

Page 67: ...river Select recipients and fax numbers Select a cover page optional Send the fax P 65 Preparing documents for faxing P 65 Faxing from Windows applications Preparing documents for faxing To see how objects such as headers footers or drawing objects will be positioned on a fax page switch to your applications page layout view If the software application you are using provides a Print Preview option...

Page 68: ... W FAX 66 Faxing from Applications 2 Select TOSHIBA e STUDIO2507Series Fax and click Print The Destination Tool dialog box appears 3 Display the Address Book tab and specify the recipients P 68 Specifying recipients ...

Page 69: ...pplications 67 5 SENDING A N W FAX 4 Display the Cover Sheet tab and specify the cover sheet properties if you want to send a document with a fax cover sheet P 74 Setting up the cover sheet properties 5 Click Send to send the document ...

Page 70: ...f Destination field You can specify up to 100 recipients Specifying recipients from address book 1 Click Open in the Address Book tab to open the address book Registered contacts are displayed in the window The Format box enables you to change display format Selecting Contact Name will display individual records Selecting Group will display group record To utilize the address book you must registe...

Page 71: ...ed recipients are listed in the List of Destination field You can also select a recipient by the following operations Selecting a contact by double clicking on it Double click the contact in the contact list to include it in the List of Destination field Removing a recipient Select a recipient in the List of Destination field and click Delete from List ...

Page 72: ... fax number in the Fax Number field and then click Set as Destination The entered fax number is added to the List of Destination list You can enter up to 128 numbers and symbols in the Fax Number field Symbols you can use are T and You can not use as first character in the Fax Number field ...

Page 73: ...1 5 SENDING A N W FAX Removing recipients from the List of Destination field 1 Select the recipient you want to remove from the List of Destination field and then click Delete from List The selected recipient is removed from the List of Destination ...

Page 74: ...rties P 74 Setting up the cover sheet properties You can send a fax with a cover sheet See the following page for details P 75 Sending with extended fax functionality Setting the address book properties In the Address Book tab of the network fax properties dialog box you can specify the recipients To specify the recipients you can select from the address book or enter the fax number manually P 68 ...

Page 75: ...te from List Select a recipient in the List of Destination field and click this button to remove the recipient from the list 5 Address Book box Displays up to three most recently opened address books 6 Format box Enables you to change display format 7 Contact list Displays contacts registered in the address book 8 Fax Number field Enables you to enter a fax number manually 9 List of Destination fi...

Page 76: ...ent information on the cover sheet Selecting Show all Destinations will print all recipients Selecting Show Only One whom Received will print the recipient at the top of the List of Destination field 3 Sender Information Check this to print sender information entered in the Sender Information fields on the cover sheet 4 Date Time Check this to print date and time on the cover sheet 5 With a Messag...

Page 77: ...u can choose to send a cover sheet with your fax transmission The cover sheet is merged with the recipient List of Destination data to create a fax cover sheet You can select what to include on the cover sheet such as sender or recipient information 1 Display the Cover Sheet tab and select the cover sheet type from the drop down menu For samples of the cover sheets see the Appendix at the end of t...

Page 78: ... Information fields if Sender Information box is checked You can enter up to 64 characters in each field 4 Enter the message to appear on the cover sheet if the With a Message box is checked You can enter up to 256 characters for the message 5 Click Send to send the document to this equipment ...

Page 79: ...select Printers and Faxes For Windows 8 or Windows Server 2012 refer to the User s Guide 2 Right click TOSHIBA e STUDIO2507Series Fax and then select Printing Preferences from a shortcut menu When using Windows XP Windows Vista Windows Server 2003 Windows Server 2008 select TOSHIBA e STUDIO2507Series Fax click the File menu and then select Printing Preferences If File menu is not displayed press A...

Page 80: ...x using the N W Fax driver P 78 Opening and creating the address book For instruction on how to manage the contacts and groups in the address book see the following page P 81 Managing contacts and groups Opening and creating the address book The address book file created as a CSV file can be opened in the Edit Address Book window If you do not have an address book you can create a new one For more...

Page 81: ...ess book from a CSV file 1 Click New Open The Open dialog box appears 2 Locate the folder where the CSV file is stored and select the file type in the Files of types box Then select the file and click Open You can enter the name of the file in File name to create a new address book ...

Page 82: ...DING A N W FAX 80 Managing Address Book 3 The address book data is opened and contact names are displayed in the Contact list Up to three most recently opened address books are listed in the Address Book box ...

Page 83: ...and register up to 100 contacts in each group P 81 Managing contacts P 85 Managing groups Managing contacts You can add edit or delete contacts in an address book P 81 Adding a new contact P 84 Removing a contact from address book Adding a new contact You can add new contacts to the Location People folder in the private address book Also you can add new contacts to groups created in the private ad...

Page 84: ... details in Contact Name and Fax Number You can enter up to 20 characters in the Contact Name field You can not use in the Contact Name field You can enter up to 50 numbers and symbols in the Fax Number field Symbols you can use are T and You can not use as first character in the Fax Number field ...

Page 85: ...ging Address Book 83 5 SENDING A N W FAX 3 Click Add The contact is added to the address book If you want to edit information on existing contact click Update after editing the information in the Destination Information field ...

Page 86: ...ook You can remove contacts from an address book 1 Open the address book that contains the contact you want to remove 2 Select the contact you want to remove in the Contact Name field and click Delete The confirmation dialog box appears 3 Click OK The selected contact is removed ...

Page 87: ...ou can modify or delete groups in the address book P 87 Modifying a group name P 88 Removing group After you create a group you can add or delete contacts in the group For the instruction to add contacts in a group see the following page P 81 Managing contacts Creating groups You can create groups in the address book 1 Click Group in the Edit Address Book dialog box The Group dialog box appears ...

Page 88: ... Enter a group name in the Group Name field You can enter up to 20 characters in the Group Name field You can not use and as a group name 4 Click OK The group is created in the Group field 5 Proceed to add contacts to the group P 81 Managing contacts You can add up to 100 contacts to a group ...

Page 89: ...he address book Properties cannot be modified when they have been opened from the address book 1 Select the group whose name you want to modify from the Group List field 2 Click Change Name The Change Name dialog box appears 3 Modify the group name in the Group Name field and click OK The group name of the selected group is modified ...

Page 90: ... delete groups in the address book When you delete a group contacts registered in the group are also deleted 1 Select the group that you want to remove from the Group List field 2 Click Delete The confirmation dialog box appears 3 Click OK The selected group is removed ...

Page 91: ...NDING A N W FAX Cover Sheet Samples 89 Cover Sheet Samples Standard cover page Reference Number 0000000000000000 To 00000000001 From MFP 00C67861 Subject N W Fax Document Message This is a N W Fax Document ...

Page 92: ...5 SENDING A N W FAX 90 Cover Sheet Samples Business cover page Reference Number 0000000000000000 To 00000000001 From MFP 00C67861 Subject N W Fax Document Message This is a N W Fax Document ...

Page 93: ...ING A N W FAX Cover Sheet Samples 91 5 SENDING A N W FAX Professional cover page Reference Number 0000000000000000 To 00000000001 From MFP 00C67861 Subject N W Fax Document Message This is a N W Fax Document ...

Page 94: ......

Page 95: ...racters 96 Relationship between the digital keys and the input character 97 User Functions Menu Items 98 FAX 99 REPORT SETTING 102 LIST 102 ADDRESS BOOK 102 Registering the Terminal ID 103 Managing the Address Book 105 Registering or modifying a Speed Dial number 106 Registering or modifying a Group Dial number 108 Registering or modifying a One Touch Dial key number 111 Setting SECURE RECEIVE 113...

Page 96: ... the setting without making any changes You can also exit with the button if it is enabled When not all menu items can be displayed a cursor icon is displayed Press or to scroll menu Press CLEAR STOP to delete a character Keep pressing CLEAR STOP for a second to clear all characters 1 Press USER FUNCTIONS 2 Press or to highlight the item to set 3 Press to display the items in the lower hierarchies...

Page 97: ...6 SETTING ITEMS Operating the USER FUNCTIONS Menu 95 6 SETTING ITEMS 4 Press or to select the value to set 5 Press OK to confirm the set value 4 ON DISCARD OFF ...

Page 98: ... in the first line of the message display panel Set the type of character to enter by pressing the digital key The input mode switches as follows each time the key is pressed Alphabet characters Numbers Entering characters Example To enter Chicago 1 Press to set the alphabet input mode 2 Press 2 a few times to enter C 3 Press to move the cursor to the right If you want to enter a character assigne...

Page 99: ...haracters in the character input mode is as follows Characters entered in the character input mode You can enter the characters displayed on the upper side of the digital keys 1 In some character input modes you can only enter and 1 2 In some character input modes e g Scan to USB function you can only enter Space the minus sign and the plus sign SINGLE 001 ENTER NAME MAX20 Aa Chicago Digital key N...

Page 100: ...Functions Reference Pages FAX TERMINAL ID ID NAME P 99 FAX FAX NUMBER INITIAL SETUP RESOLUTION ORIGINAL MODE EXPOSURE TTI RTI ECM RX MODE REMOTE RX RINGER VOLUME MONITOR VOLUME COMPLETION VOLUME DIAL TYPE DOUBLE CHECK RX PRINT FAX DRAWER SETTING DISCARD REDUCTION SECURE RECEIVE REPORT SETTING AUTO JOURNAL P 102 REPORT SETTING MEMORY TX MULTI TX LIST ADDRESS BOOK P 102 LIST ADDRESS BOOK E MAIL PHON...

Page 101: ... original ORIGINAL MODE TEXT PHOTO TEXT PHOTO Sets the scanning mode based on the type of the original In the TEXT PHOTO mode or PHOTO mode transmission time may be longer than in the TEXT mode EXPOSURE AUTO MANUAL Sets the density at which the original is to be scanned TTI ON OFF Switch the TTI recording ON or OFF To enable this feature the Terminal ID must be registered to this equipment in adva...

Page 102: ...cation communication time is slightly longer than usual Even when the ECM communication is used an error may occur depending on the line status The ECM communication is not available for voice communication RX MODE AUTO MANUAL Sets the default setting for fax reception mode The following are required for manual reception Install an external telephone Set REMOTE RX to DIAL Receive the fax in Remote...

Page 103: ...confirming the recipient before transmission OFF Disables the function for preventing transmission to a wrong recipient RX PRINT FAX DRAWER SETTING OFF DRAWER1 DRAWER2 DRAWER3 DRAWER4 Sets the Fax exclusive drawer for Fax reception DISCARD ON If an original is longer up to 10 mm than the printing area of the printing paper the part that exceeds the paper printing area is discarded OFF The printing...

Page 104: ...ation report and No if you do not want to add the first page ON ERROR Press this button to print the communication report in the event of an error PRINT 1ST PAGE YES NO Select YES if you want to add the first page of the transmitted original to the communication report and No if you do not want to add the first page Menu Functions Settings Descriptions Reference Pages ADDRESS BOOK SPEED DIAL GROUP...

Page 105: ...1 From the USER FUNCTIONS menu select FAX TERMINAL ID P 94 Operating the USER FUNCTIONS Menu Press to start registering 2 Press to select ID NAME and then press 3 Enter the name up to 20 characters using the digital keys and then press OK P 96 Character Entry 4 Press to select FAX NUMBER and then press 5 Enter the telephone number up to 20 characters using the digital keys and then press OK 4 TERM...

Page 106: ...s you receive The recipient information is printed at the bottom of the original 2013 12 20 15 08 1234567890 FROM AABBCC 0001 P001 006 Date sent automatically attached Sender s terminal ID Number of pages Pages sent Total pages File number Sender s Fax number AABBCC project Reception Time 2013 12 05 15 08 Received From 0123456789 001 Date received automatically attached Sender s Fax number Receive...

Page 107: ...FUNCTIONS menu select ADDRESS BOOK PHONE BOOK and then press P 94 Operating the USER FUNCTIONS Menu 2 Select any one of the following using or 3 Press to start registering Item name Description Reference Pages SPEED DIAL Registers or modifies a speed dial number P 106 Registering or modifying a Speed Dial number GROUP DIAL Registers or modifies a group dial number P 108 Registering or modifying a ...

Page 108: ...er list 1 Enter the Speed Dial number 1 to 200 using the digital keys and then press OK Entering an already registered speed dial number displays a screen indicating the number is registered To delete a registered Speed Dial number press or to select DELETE and then press OK To edit a registered Speed Dial number press or to select EDIT and then press to proceed to the next step To leave the regis...

Page 109: ...a PBX 0 dialing for example or transmitting a fax to an overseas destination can be inserted by pressing PAUSE where required One PAUSE inserts a pause of approximately 2 seconds 6 Press or to select COMPLETE and then press OK 7 After displaying the completion screen the screen returns to that for registering the Speed Dial number ENTER NAME MAX20 Aa XX company_ SPEED DIAL 005 COMPLETE SPEED DIAL ...

Page 110: ...r list One Touch dial list and Group Number list P 60 Group Dial number list 1 Enter the Group Dial number 1 to 20 using the digital keys and then press OK Entering an already registered Group Dial number displays a screen indicating the number is registered To delete a registered Group Dial number press or to select DELETE and then press OK To edit a registered Group Dial number press or to selec...

Page 111: ...l key which is added to a group Using a Speed Dial number Enter the desired number and then press OK Using One Touch Dial key Press the desired key When the specified Speed Dial number or One Touch Dial key number is not registered a screen indicating the number is unregistered is displayed ENTER NAME MAX20 Aa Group B2 GROUP DIAL 08 4 COMPLETE GROUP DIAL 08 NAME FAX NUMBER ENTER SPEED NO OR ONE TO...

Page 112: ...ion screen 7 When all the numbers are entered select COMPLETE using or and then press OK 8 Press OK on the confirmation screen that displays 9 After displaying the completion screen the screen returns to that for registering the Group Dial number ADD GROUP DIAL 08 REVIEW LIST COMPLETE 4 AAA GROUP DIAL 08 ABC Co Ltd Tokyo Inc 4 ADD GROUP DIAL 08 COMPLETE REVIEW LIST 4 CHECK GROUP DIAL 08 DELETE 4 S...

Page 113: ...tal keys and then press OK Entering an already registered number of One Touch Dial key number displays a screen indicating the number is registered To delete a registered number of One Touch Dial key number press or to select DELETE and then press OK To edit a registered number of One Touch dial key press or to select EDIT and then press to proceed to the next step To leave the registered number o...

Page 114: ... PBX 0 dialing for example or transmitting a fax to an overseas destination can be inserted by pressing PAUSE where required One PAUSE inserts a pause of approximately 2 seconds 6 Press or to select COMPLETE and then press OK 7 After displaying the completion screen the screen returns to that for registering the One Touch Dial key number ENTER NAME MAX20 Aa 4F MFP_ ONE TOUCH 2 4 COMPLETE ONE TOUCH...

Page 115: ...rating the USER FUNCTIONS Menu 3 Select ENABLE and then press 4 Set the Password Time and Day 5 Press OK Item name Settings PASSWORD You can set a password for printing a received SECURE RECEIVE fax Enter a four digit number 0000 9999 TIME You can set the time for automatically enabling the SECURE RECEIVE function Time is displayed in 24 hour format To disable printing of SECURE RECEIVE faxes thro...

Page 116: ......

Page 117: ...7 TROUBLESHOOTING AND SPECIFICATIONS This chapter describes troubleshooting and specifications of Fax Troubleshooting 116 Error messages 116 Transmission reception trouble 118 Specifications of Fax 120 ...

Page 118: ...ory full during TX Wait for the memory to become available and then retry memory transmission or perform direct transmission Memory full during RX Contact the other party to re transmit the document COUNT OVER The number of pages scanned has exceeded the maximum value 50 sheets CANCEL JOB Count over is canceled SEND Stop the scan function the scanned images already stored in memory will be sent PU...

Page 119: ...17 FAX ERROR xxxx A communication error occurred during transmission reception Send or receive again PUT ORIGINAL ON GLASS Original detected in ADF RADF feed tray when NEXT ORIGINAL was displayed Remove original from ADF RADF feed tray Message Cause Remedy ...

Page 120: ...maximum number of originals that can be placed at one time 50 sheets for 50 to 104 g m2 or 9 5mm or less stack height Does the original that you are sending match the conditions of the original that is available for sending Have you pushed the originals into the feeder too hard The original is not being printed on the paper of the recipient s Fax even though it has been sent Was the original place...

Page 121: ... Is the equipment out of paper The received original is printed dark and is illegible or black stripes are printed on the original Make a local copy and confirm proper printing Is the original being sent a dirty copy Check this with the party trying to send the original Is the trouble due to a problem or operation error at the sender s Fax Check this with the party trying to send the original Pape...

Page 122: ...GD 1330 DP 2505F Size of Original A B format A3 1 A4 A4 R 1 A5 R B4 1 B5 B5 R 1 FOLIO 2 LT format LD 1 LG 1 LT LT R 1 ST R COMP 1 K format 8K 1 16K 16K R Recording Paper Size A B format A3 2 A4 A4 R 2 A5 R 2 B4 2 B5 2 B5 R 2 FOLIO 2 LT format LD 2 LG 2 LT LT R 2 ST R 2 COMP 2 K format 8K 16K 2 16K R 2 Compatibility Communication Modes ECM G3 Super G3 Communication Resolution Horizontal 8 dots mm 1...

Page 123: ...river options 77 Fax Number field 73 Fax screen 18 Faxing 65 Features and Functions 64 Format box 73 FUNCTION CLEAR button 17 G Group Name 86 87 J JOB STATUS button 17 Journal 54 L LCD screen 17 List of Destination 73 M Message 18 MIXED SIZE ORIGINAL 34 MULTI button 17 N network fax options 72 New 86 Next original 23 O OK button 17 One Touch Dial keys 17 Open 72 Original original scanning range 31...

Page 124: ...ok 39 speed dial 41 Redial function 23 Remaining memory 18 Reservation list 55 RESOLUTION 32 RESOLUTION button 16 S Same width originals 28 Scroll icon 18 Select cover sheet 74 Sender Information 74 76 Sender information 103 104 Set as Destination 73 SINGLE 2 SIDED_SCAN 33 Specifications 120 Specifying recipients 68 Standard cover page 89 START button 17 T Telephone line 19 TERMINAL ID 98 99 Termi...

Page 125: ...Printed in China DP 2505F DP 2007 2307 2507 with GD 1330 OME12023100 ...

Page 126: ...1 11 1 OSAKI SHINAGAWA KU TOKYO 141 8562 JAPAN MULTIFUNCTIONAL DIGITAL SYSTEMS Fax Guide with GD 1330 2013 TOSHIBA TEC CORPORATION All rights reserved 6LJ82255000 R120620M0100 TTEC Ver00 F3 2013 05 ...

Reviews: