background image

2. PRINTER SETUP 


ENGLISH VERSION  

2.4 Loading the Ribbon


E2-

13


2.4  Loading the Ribbon 

(Cont.) 


7.


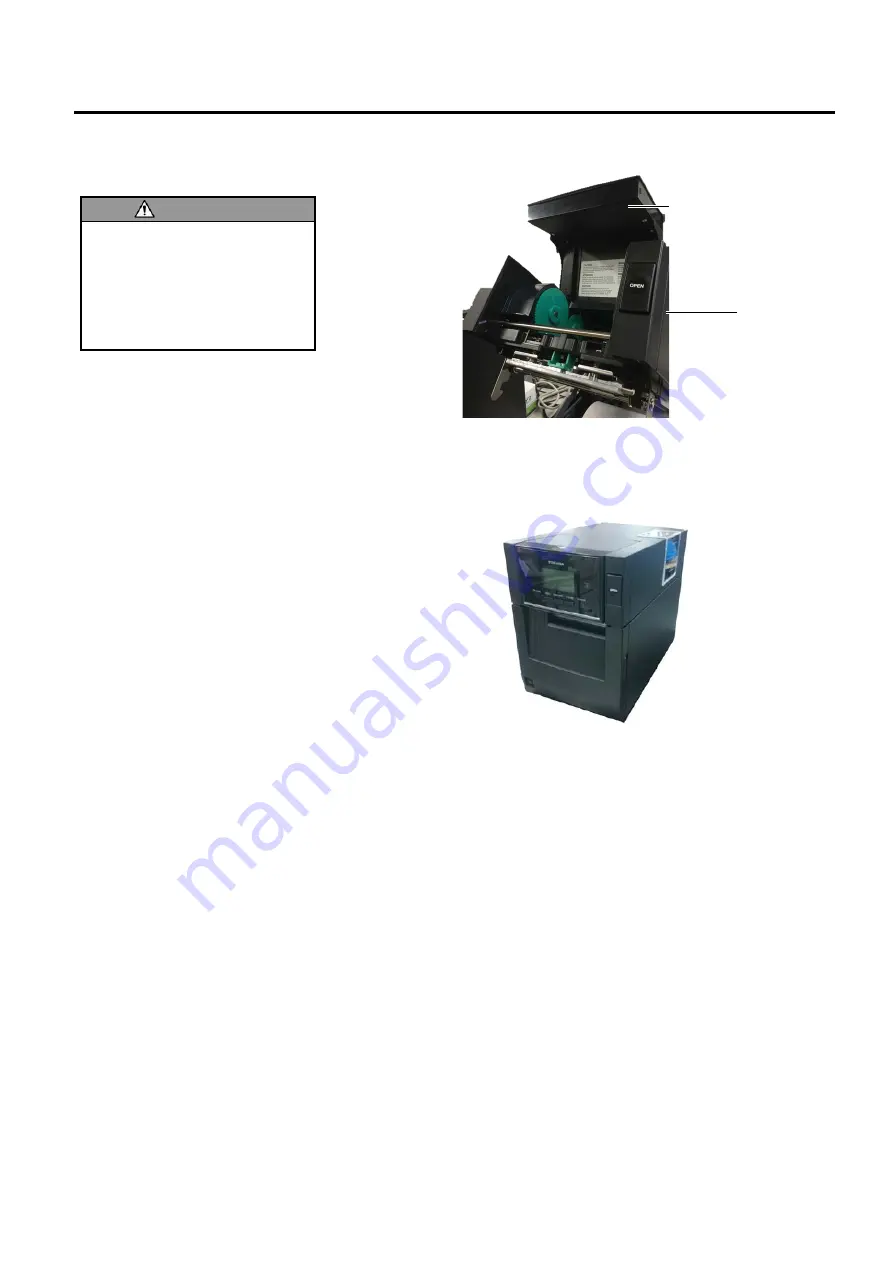
Close the Ribbon Cover until it clicks.


8.


Gently close the Top Cover until it clicks.


Be sure to close the Ribbon 
Cover before closing the Top 
Cover.  It is dangerous to close 
the Top Cover with the Ribbon 
Cover opened, as the Ribbon 
Cover slams shut. 

WARNING! 

Ribbon Cover 

Top Cover 

Summary of Contents for BA410T Series

Page 1: ...TOSHIBA Barcode Printer BA410T SERIES Owner s Manual ...

Page 2: ...tered trademark of Centronics Data Computer Corp Microsoft is a registered trademark of Microsoft Corporation Windows is a trademark of Microsoft Corporation This equipment has been tested and found to comply with the limits for a Class A digital device pursuant to Part 15 of the FCC Rules These limits are designed to provide reasonable protection against harmful interference when the equipment is...

Page 3: ...f this product For more detailed information about the take back and recycling of this product please contact your supplier where you purchased the product This product including components consumables parts and spares complies with the India E Waste Rules and prohibits use of lead mercury hexavalent chromium polybrominated biphenyls or polybrominated diphenyl ethers in concentrations exceeding 0 ...

Page 4: ...itsu Component Limited MBH7BTZ42 IFETEL RCPFUMB19 0018 Precaución para su uso en México Módulo WLAN instalado adentro de esta instrument REDPINE SIGNALS RS9113DB IFETEL RCPRERS18 0642 For safety Do not operate this product in locations where its use may be prohibited For example in an aeroplane or hospital If you are unsure whether operation is permitted please refer to and follow the airline comp...

Page 5: ...nt Head Platen Sensors E3 1 3 1 2 Covers and Panels E3 2 3 1 3 Optional Cutter Module E3 3 3 1 4 Optional Strip Module E3 4 4 TROUBLESHOOTING E4 1 4 1 Error Messages E4 1 4 2 Possible Problems E4 3 4 3 Removing Jammed Media E4 4 5 PRINTER SPECIFICATIONS E5 1 6 APPENDIX1 INTERFACE E6 1 7 APPENDIX2 POWER CORD E7 1 CAUTION 1 This manual may not be copied in whole or in part without prior written perm...

Page 6: ...ter module and strip module are as slim and small and fit inside the printer keeping the size compact Various interfaces possible The following interfaces are available Standard Option Bluetooth Serial USB Wireless LAN Built in LAN Expansion I O Parallel Superior hardware Specially developed 8 dots mm 203 dpi BA410T GS12 or 11 8 dots mm 300 dpi BA410T TS12 print head enable very clear print at a p...

Page 7: ...DOC OpenType Font License Guide 1 sheet Owner s manual Safety Precautions NOTE As a power cord is not supplied with this printer please purchase one that meets each country s safety standard For details refer to APPENDIX 2 Contents Bar code print application Bartender ultra lite Windows Driver Owner s Manual Specifications Programming Key operation etc Product information Safety Precaution Each La...

Page 8: ...chapters Dimensions in mm inches LCD Message Display Operation Panel Media Outlet Ribbon Cover Front Cover Supply Window Top Cover Power Switch RS 232C Serial Interface Connector Option USB Interface Connectors Parallel Interface Connector Option AC Power Inlet LAN Interface Connector Wireless LAN Interface Board Option Expansion I O Interface Connector Option Bluetooth Interface Top Cover Release...

Page 9: ...ving parts be sure to load the media once the printer has stopped moving completely 3 To avoid injury be careful not to trap your fingers while opening or closing the cover 4 Hot Part You may get burned The stepping motor will become very hot after media is issued continuously for about 1 hour Care must be taken not to touch it when the front cover is opened Ribbon Stopper Take up side Ribbon Cove...

Page 10: ...2C interface port Wireless LAN Board BA700 WLAN QM S Installing this PC board allows a communication by wireless LAN Expansion I O Board BA700 IO QM S Installing this board in the printer allows a connection with an external control device is a signal interface Real Time Clock BA700 RTC QM S This module holds the current time year month day hour minute second Fan Fold Guide BA904 FF QM S Guide ins...

Page 11: ...allation Connecting the power cord Loading the media Setting the operating environment Media sensor position alignment Loading the ribbon Connecting to a host computer Make a print test in your operating environment and check the print result Print test 2 1 Installation 2 2 Connecting the Power Cord 2 3 Loading the Media 2 3 Loading the Media 2 4 Loading the Ribbon 2 5 Connecting the Printer to Yo...

Page 12: ...e that the printer is connected to a clean source of AC Power and that no other high voltage devices that may cause line noise interference are connected to the same mains Assure that the printer is connected to the AC mains with a three prong power cable that has the proper ground earth connection 1 Connect the Power Cord to the printer as shown in the figure below 2 Plug the other end of the Pow...

Page 13: ...any moving parts To reduce the risk of fingers jewellery clothing etc being drawn into the moving parts be sure to load the media once the printer has stopped moving completely 2 The Print Head becomes hot immediately after printing Allow it to cool before loading the media 3 To avoid injury be careful not to trap your fingers while opening or closing the cover WARNING CAUTION 1 Make sure that the...

Page 14: ...Media Holder Left 7 Place the Media Holder Ass y into the printer 8 Slightly push the Upper Sensor Lever inside and open the Upper Sensor Ass y NOTE Be careful of the orientation of the Media Holder Ass y and the media Release Lever Media Holder Right Media Holder Left Media Holder Left Upper Sensor Ass y Upper Sensor Lever CAUTION Make sure that the Upper Sensor Ass y is closed when placing the M...

Page 15: ...cally center the media 10 Lower the Upper Sensor Ass y until the Upper Sensor Lever clicks into position NOTE Make sure that the Upper Sensor Ass y is locked If it is unlocked a paper jam or print failure may occur Media Guide Upper Sensor Lever Upper Sensor Ass y CAUTION Be sure to close the Upper Sensor Ass y before closing the Top Cover If the Upper Sensor Ass y is opened it may be damaged Clic...

Page 16: ...e Lower Sensor Tab with your finger to move the Feed Gap Sensor so that the Feed Gap Sensor is positioned at the center of the labels indicates the position of the Feed Gap Sensor It may be easier to move the Lower Sensor Tab if you use a pen inserting its tip into the pinhole of the tab 3 Lower the Upper Sensor Ass y until the Upper Sensor Lever clicks into position 4 Slide the Upper Sensor Tab t...

Page 17: ...r Sensor Tab to move the Black Mark Sensor so that it is in line with the center of the black mark on the media indicates the position of the Black Mark Sensor 4 Lower the Upper Sensor Ass y until the Upper Sensor Lever clicks in position Lower Sensor Tab Black Mark NOTES 1 Be sure to set the Black Mark Sensor to detect the centre of the black mark otherwise a paper jam or no paper error may occur...

Page 18: ...the media past the Platen 2 Close the Top Cover until it clicks When the optional Strip Module is fitted a label is automatically removed from the backing paper at the Strip Plate as each label is printed 1 Open the Front Cover holding its right side Note Strip mode Option Batch mode Front Cover Be careful that your fingers jewellery clothing etc are not draw into the rollers of the Strip Module W...

Page 19: ... 4 Pass the backing paper through the opening under the Backing Paper Feed Roller Then close the Strip Module until it clicks 5 Insert the leading edge of the backing paper into the slot of the Front Cover 6 Close the Front Cover and the Top Cover NOTE Be sure to close the Strip Module completely Failure to do this may cause a paper jam Backing Paper Backing Paper Feed Roller Click Top Cover Front...

Page 20: ...e the media loading procedure is now completed Close the Top Cover If the media is normal media it is also necessary to load a ribbon Refer to Section 2 4 Loading the Ribbon Media Cut mode Option CAUTION 1 When using a label stock be sure to cut the gaps Cutting labels will cause the glue to stick to the cutter which may affect the cutter quality and shorten the cutter life 2 Use of tag paper whic...

Page 21: ...N Be careful not touch the Print Head Element when opening the Top Cover Failure to do this may cause missing dots by static electricity or other print quality problems 1 Do not touch any moving parts To reduce the risk of fingers jewellery clothing etc being drawn into the moving parts be sure to load the ribbon once the printer has stopped moving completely 2 The print head becomes hot immediate...

Page 22: ...on Stopper 6 Turn the ribbon take up core in the direction indicated by the arrow to remove any slack NOTES 1 Be sure to remove any slack in the ribbon when printing Printing with a wrinkled ribbon will lower the print quality 2 When a ribbon end is detected RIBBON ERROR message will appear on the display and the ERROR LED will illuminate 3 When disposing of the ribbons please follow the local rul...

Page 23: ... Cont 7 Close the Ribbon Cover until it clicks 8 Gently close the Top Cover until it clicks Be sure to close the Ribbon Cover before closing the Top Cover It is dangerous to close the Top Cover with the Ribbon Cover opened as the Ribbon Cover slams shut WARNING Ribbon Cover Top Cover ...

Page 24: ...e connection between the printer s standard USB connector and your host computer s USB port Conforming to USB 2 0 High Speed A serial cable connection between the printer s optional RS 232C serial connector and one of your host computer s COM ports Option Wireless LAN using an optional Wireless LAN board Option Connect to the printer via the Standard Bluetooth Interface For details of each interfa...

Page 25: ... seconds as shown in the diagram below 2 Check that the ON LINE message appears in the LCD Message Display and that the ON LINE LED Blue is illuminated CAUTION Use the power switch to turn the printer On Off Plugging or unplugging the Power Cord to turn the printer On Off may cause fire an electric shock or damage to the printer Power Switch NOTES 1 If a message other than ON LINE appears on the d...

Page 26: ...aner or a cotton swab or soft cloth slightly moistened with absolute ethyl alcohol WARNING 1 Be sure to disconnect the power cord before performing maintenance Failure to do this may cause an electric shock 2 To avoid injury be careful not to pinch your fingers while opening or closing the cover and print head block 3 The print head becomes hot immediately after printing Allow it to cool before pe...

Page 27: ...dry soft cloth 7 Wipe the media path Wipe the covers and panels with a dry soft cloth or a cloth slightly moistened with mild detergent solution CAUTION 1 DO NOT POUR WATER directly onto the printer 2 DO NOT APPLY cleaner or detergent directly onto any cover or panel 3 NEVER USE THINNER OR OTHER VOLATILE SOLVENT on the plastic covers 4 DO NOT clean the panel covers or the supply window with alcoho...

Page 28: ...he cutter blade moves up and down when the Cutter Motor Shaft is rotated manually 5 In the same way clean the outside of the Cutter Blade WARNING As the cutter blade is sharp care should be taken not to injure yourself when cleaning Set Screw Cutter Module Cutter Module Cutter Motor Shaft Inside of the Cutter Blade Outside of the Cutter Blade NOTE To open and close the Front Cover first open the T...

Page 29: ...d media or backing paper if any 4 Wipe the Backing Paper Feed Rollers Guide Roller and Strip Roller with a soft cloth slightly moistened with absolute ethyl alcohol Backing Paper Feed Roller Guide Roller Strip Roller Front Cover Release Bar Strip Module NOTE To open and close the Front Cover first open the Top Cover If it is difficult to open the Front Cover hold the cover handle at the bottom ...

Page 30: ...ck Mark Sensor is not correctly aligned with the Black Mark on the media 3 Adjust the sensor position Then press the RESTART key Section 2 3 4 Size of the loaded media is different from the programmed size 4 Replace the loaded media with one that matches the programmed size then press the RESTART key or turn the printer off and then on select a programmed size that matches the loaded media Finally...

Page 31: ...does not solve the problem call a TOSHIBA TEC authorised service representative HEAD ERROR There is a problem with the Print Head The Print Head is required to be replaced Call a TOSHIBA TEC authorized service representative SYSTEM ERROR 1 The printer is used in a location where it is subject to noise Or there are power cords of other electrical appliances near the printer or interface cable 1 Kee...

Page 32: ... Call a TOSHIBA TEC authorized service representative for replacement of the battery Other error messages A hardware or software problem may have occurred Turn the printer off and then on If this does not solve the problem turn off the printer again and call a TOSHIBA TEC authorised service representative 4 2 Possible Problems This section describes problems that may occur when using the printer a...

Page 33: ...1 Close the Cutter Module properly 2 The media is jammed in the Cutter 2 Remove the jammed paper 3 The cutter blade is dirty 3 Clean the cutter blade 4 3 Removing Jammed Media This section describes in detail how to remove jammed media from the printer 1 Turn off and unplug the printer 2 Press the Top Cover Release Button and gently open the Top Cover to its fully open position supporting it with ...

Page 34: ...ing a print job 1 2 1A 100V to 1 1A 240V 155W rating During standby 0 19A 100V to 0 15A 240V 13W 100V to 22W 240V Resolution 8 dots mm 203 dpi 11 8 dots mm 300 dpi Printing method Thermal transfer or Thermal direct Printing speed 50 8 mm sec 2 inches sec 2 203 2 mm sec 8 inches sec 101 6 mm sec 4 inches sec 152 4 mm sec 6 inches sec Available media width including backing paper Thermal direct 25 0...

Page 35: ...tige Elite 2 sizes Courier 2 sizes OCR 2 types Gothic 1 size Outline font 4 types Price font 3 types Rotations 0 90 180 270 Standard interface USB interface V2 0 High speed LAN interface 10 100BASE Bluetooth interface 2400MHz 2483 5MHz CLASS2 2 5mW NFC MIFARE ISO IEC 14443 TypeA USB Host Interface Optional equipment Cutter module BA204 QM S Strip module BA904 H QM S Serial Interface Board BA700 RS...

Page 36: ...T UTP category 3 or category 5 100BASE TX UTP category 5 Cable length Segment length Max 100 m LED LED Status LAN status Link ON 10Mbps link or 100Mbps link is detected OFF No link is detected Communication cannot be made while the Link LED is off Activity ON Communicating OFF Idle Link LED Green Activity LED Orange NOTE To prevent radiation and reception of electrical noise the interface cables m...

Page 37: ...write in NFC tag Operation frequency 13 56 MHz Optional Serial Interface BA700 RS QM S Type RS 232C Communication mode Full duplex Transmission speed 2400 bps 4800 bps 9600 bps 19200 bps 38400 bps 115200 bps Synchronization Start stop synchronization Start bit 1 bit Stop bit 1 bit 2 bit Data length 7 bit 8 bit Parity None EVEN ODD Error detection Parity error Framing error Overrun error Protocol U...

Page 38: ...7 9 Data 8 Data 8 10 nAck PtrClk 11 Busy PtrBusy 12 PError AckDataReq 13 Select Xflag 14 nAutoFd HostBusy 15 NC NC 16 0V 0V 17 CHASSIS GND CHASSIS GND 18 5V For detection 5V For detection 19 TWISTED PAIR GND PIN1 TWISTED PAIR GND PIN1 20 TWISTED PAIR GND PIN2 TWISTED PAIR GND PIN2 21 TWISTED PAIR GND PIN3 TWISTED PAIR GND PIN3 22 TWISTED PAIR GND PIN4 TWISTED PAIR GND PIN4 23 TWISTED PAIR GND PIN5...

Page 39: ...0 MHz 5825 MHz Spacing 5 MHz 2 4GHz 20 MHz 5GHz Channel US 1 11 36 48 52 64 100 116 120 128 132 140 149 165 Europe 1 13 36 48 52 64 100 140 Japan 1 14 36 48 52 64 100 140 Antenna integrated antenna Communication speed Modulation 802 11b 1 2 5 5 11 Mbps 802 11g 6 9 12 18 24 36 48 54 Mbps 802 11n MCS0 to MCS7 with and without Short GI OFDM with BPSK QPSK 16 QAM and 64 QAM 802 11b with CCK and DSSS R...

Page 40: ...put Circuit Operating environment Temperature 0 to 40 C Humidity 20 to 90 No Condensation Pin Signal I O Function Pin Signal I O Function 1 IN0 Input FEED 13 OUT6 Output 2 IN1 Input PRINT 14 N C 3 IN2 Input PAUSE 15 COM1 Common Power 4 IN3 Input 16 N C 5 IN4 Input 17 N C 6 IN5 Input 18 N C 7 OUT0 Output FEED 19 N C 8 OUT1 Output PRINT 20 N C 9 OUT2 Output PAUSE 21 COM2 Common Ground 10 OUT3 Output...

Page 41: ...uency KR settings 920 9 923 3 MHz UHF Korea Output 1 to 100 mW Available RFID tag EPC C1 Gen2 ISO 18000 6C Option BA704 RFID U4 EU S Module TRW EUM 10 Frequency 869 85 MHz UHF Europe Output 1 to 100 mW Available RFID tag EPC C1 Gen2 ISO 18000 6C Option BA704 RFID U4 AU S Module TRW USM 10 Frequency 918 25 925 75 MHz UHF Australia Output 1 to 100 mW Available RFID tag EPC C1 Gen2 ISO 18000 6C ...

Page 42: ...or reflective sensor is enabled transmittance or reflectivity of a label or tag may vary at an RFID tag embedded area depending on the pattern of the antenna or other factors In such cases a manual threshold setting is required For details please contact the nearest TOSHIBA TEC support representative 5 Cutter When an RFID label or tag is used in cut issue mode care must be taken not to cut the ant...

Page 43: ...g types a check must be performed to make sure that the data is written on the target RFID tags The BCP RFID Analyze Tool can be used for this purpose For details please contact the nearest TOSHIBA TEC support representative 11 Defective RFID Media RFID media may include defective RFID tags at the time of shipment from the maker The defect rate differs depending on tag types method of converting t...

Page 44: ... S A UL Finland FEI Norway NEMKO Europe HAR France UTE Spain AEE Taiwan CNS South Africa SABS Power Cord Instruction 1 For use with 100 125 Vac mains power supply please select a power cord rated Min 125V 10A 2 For use with 200 240 Vac mains power supply please select a power cord rated Min 250V 3 Please select a power cord with the length of 4 5m or less Country Region North America Europe United...

Page 45: ... 2019 TOSHIBA TEC CORPORATION All Rights Reserved 1 11 1 Osaki Shinagawa ku Tokyo 141 8562 JAPAN PRINTED IN INDONESIA EO1 33122 EN ...

Reviews: