background image

INSTALLATION PROCEDURE FOR OPTIONAL EQUIPMENT


EO15-33005 


1. Linerless Label Kit: B-EP902-LL-QM-R/B-EP904-LL-QM-R


1- 2 

 Required 

Tools 

  Slotted jewellers screw driver 

  Phillips head jewellers screw driver (Only for installing the B-EP904-LL-QM-R) 


 Installation 

Procedure 

1.  Turn the printer power off and remove the battery pack from the printer.  
2.  Press the top cover open button and fully open the top cover. 
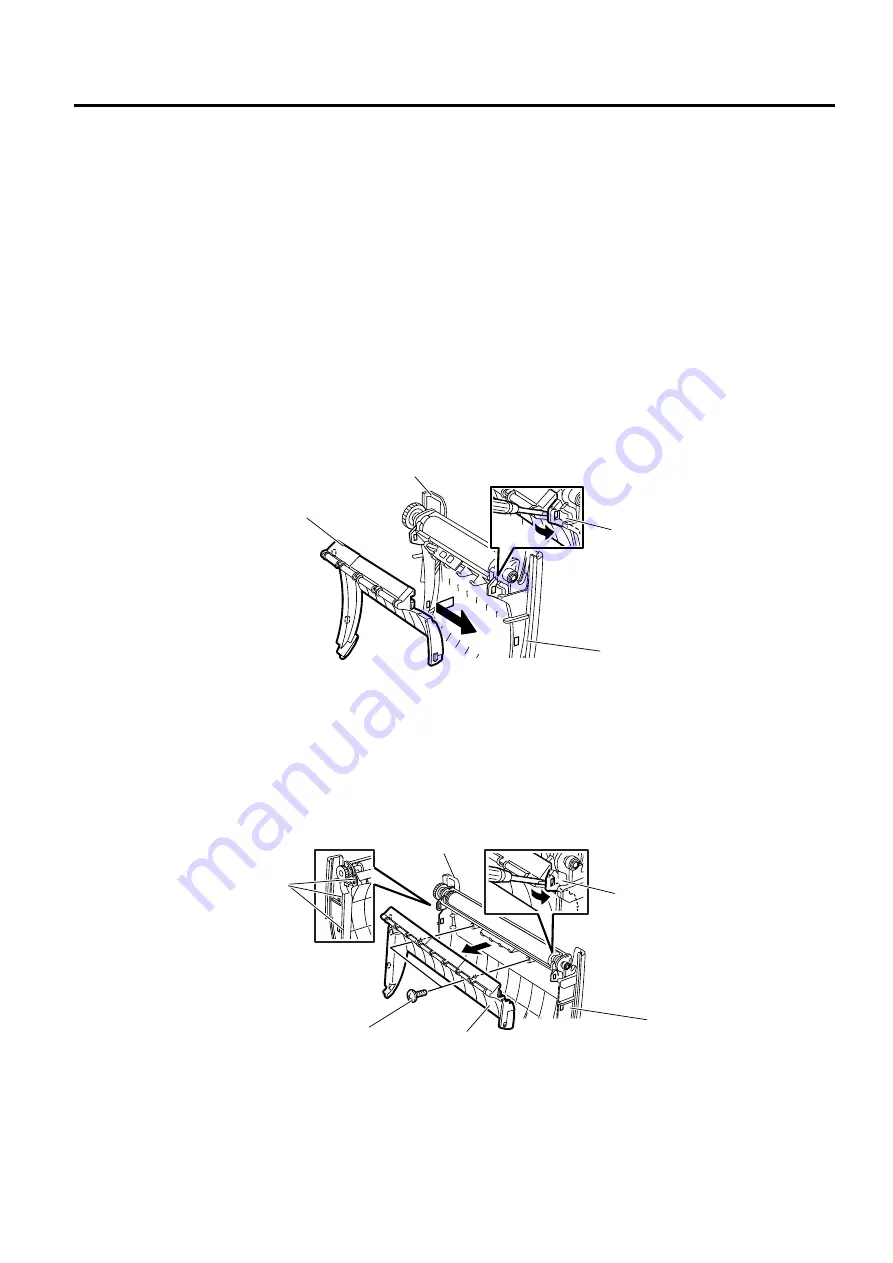
3.  Remove the inner top cover using the following procedure.  

(For the B-EP2DL Series) 

Release the two hooks on the right side of the inner cover with a slotted jewellers screw driver and 
remove the inner cover from the top cover.  
If the inner cover cannot be removed easily, release the left side hooks, also.  


(For the B-EP4DL Series)


(1)   Remove the two screws securing the inner cover with a Phillips head jewellers screw driver.  
(2)   Release the two hooks on the right side of the inner cover with a slotted jewellers screw driver. 
(3)   Release the three hooks on the left side of the inner cover with a slotted jewellers screw driver, 

and remove the inner cover from the top cover.  


NOTE: Do not push the hooks too hard, as doing so may break the hooks.  


Top Cover

Hook 

Hook 

Inner Cover 

Top Cover

Hook 

Hook 

Inner Cover 

M-2 x 5 Screw 

Hook 

Summary of Contents for B-EP2DL Series

Page 1: ...TOSHIBA Thermal Printer B EP2DL EP4DL SERIES Document No EO15 33005 Original Sep 2008 Revised Option Installation Manual PRELIMINARY Linerless Label Kit which are under development as of November 7 2008 could be changed ...

Page 2: ...QM R 2 1 3 Bluetooth Module B EP700 BLTH QM R 3 1 CAUTION 1 This manual may not be copied in whole or in part without prior written permission of TOSHIBA TEC 2 The contents of this manual may be changed without notification Copyright 2008 by TOSHIBA TEC CORPORATION All Rights Reserved 570 Ohito Izunokuni shi Shizuoka ken JAPAN ...

Page 3: ...hen installing the cutter module WARNING 1 Follow all manual instructions Failure to do so could create safety hazards such as fire or electrocution Manual instructions must be followed when installing option kits or adding cables to avoid system failures and to insure proper performance and operation Failure to follow manual instructions or any unauthorized modifications substitution or change to...

Page 4: ...the right side of the inner cover with a slotted jewellers screw driver and remove the inner cover from the top cover If the inner cover cannot be removed easily release the left side hooks also For the B EP4DL Series 1 Remove the two screws securing the inner cover with a Phillips head jewellers screw driver 2 Release the two hooks on the right side of the inner cover with a slotted jewellers scr...

Page 5: ...platen unit safe 5 Install the linerless label kit in place of the platen unit First fit the hook of the platen gear side then one on the other side 6 Attach the inner cover in place For the B EP2DL Series First fit the left side of the inner cover then the right side For the B EP4DL Series 1 First fit the left side of the inner cover then the right side 2 Secure the inner cover with the two screw...

Page 6: ...the POWER button The printer starts up in the system mode 3 Press the PAUSE button twice 4 Press the POWER button until LINERLESS XXX is displayed on the LCD 5 When the LINERLESS OFF is displayed press the PAUSE button to set this parameter to ON When the LINERLESS ON is displayed go to Step 6 without pressing the PAUSE button 6 Press the POWER button until 2 MODE SETTING is displayed on the LCD 7...

Page 7: ...re 1 Turn off the printer 2 Slide the battery lever in the direction of the arrow and remove the battery pack from the printer 3 Remove the four tapping screws T 3x10 from the bottom cover 1 Follow all manual instructions Failure to do so could create safety hazards such as fire or electrocution Manual instructions must be followed when installing option kits or adding cables to avoid system failu...

Page 8: ...e left side cover in the direction of the arrow NOTE The gears shown in the picture below is not secured and is easily removed Be careful not to drop and break or lose it 6 Remove the right side cover and the front cover in the direction of the arrow respectively Top Cover Top Cover Open Button Left Side Cover B EP4D B EP2D Gear Gear Gear Right Side Cover Front Cover ...

Page 9: ...0 22 37 5 14 1 7 5 15 5 32 5 20 29 5 22 5 8 5 14 FCC Cable Forming Indication Figure FCC Cable Folding Directions 7 5 20 46 5 15 29 5 6 5 16 8 5 Connect this terminal to the Wireless LAN module Connect this terminal to the MAIN PC Board Connect this terminal to the MAIN PC Board Unit mm Valley Fold Mountain Fold 15 20 150 7 5 20 5 28 5 14 5 34 5 21 5 16 16 8 5 6 5 29 5 15 46 5 20 26 1 14 37 5 22 1...

Page 10: ...N module 8 Pass the FPC cable through the slot as shown in the picture B EP4D model only 9 Secure the ground wire with the Tapping screw T 2x6 which secures the driver PC board Wireless LAN Module FPC Cable Ground wire FPC Cable Slot B EP2D B EP4D Driver PC Board Ground Wire T 2x6 Tapping Screw Driver PC Board Ground Wire T 2x6 Tapping Screw ...

Page 11: ...ect the FPC cable to the connector CN301 on the Main PC board 11 Fit the wireless LAN module into the following position NOTE Pass the FPC cable and the ground wire so that they do not get caught on the gears or by the cover B EP2D Wireless LAN Module B EP4D Wireless LAN Module Main PC Board FPC Cable CN301 ...

Page 12: ...the front cover NOTES 1 Make sure that the pins on the both sides of the front cover are fit in position as shown in the pictures below 2 Do not reassemble the Front Cover while the Top Cover Open Button is pressed Doing so may cause the Top Cover not to open Pin Front Cover Top Cover Open Button Good No Good ...

Page 13: ... slots of the printer enclosure B EP4D Series Fit the tabs A to D into the slot A to D B EP2D Series Fit the tabs A to C into the slot A to C NOTE It is easy to mount the left side cover if you fit the tabs from the LCD side in order then secure the bottom side Be careful not to catch the cable by the cover while reassembling Tab A Tab B Tab C Tab D A B C D Tab A Tab C Tab B A B C Left Side Cover ...

Page 14: ...ver if you fit the tabs from the LCD side in order then secure the bottom side Be careful not to catch the cable by the cover while reassembling 15 Close the top cover and load the battery pack Set a region code and configure the wireless LAN module settings in the system mode with reference to the PC setting tool operating specification and the Service manual or Key Operation Specification In add...

Page 15: ...nt radio interference to the licensed service this device is intended to be operated indoors and away from windows to provide maximum shielding Equipment that is installed outdoors is subject to licensing For safety Do not use this product in locations where use may be forbidden for example in an aeroplane or a hospital If you do not know the forbidden areas please referto and follow the airline c...

Page 16: ... Turn off the printer 2 Slide the battery lever in the direction of the arrow and remove the battery pack from the printer 3 Remove the four tapping screws from the bottom cover 1 Follow all manual instructions Failure to do so could create safety hazards such as fire or electrocution Manual instructions must be followed when installing option kits or adding cables to avoid system failures and to ...

Page 17: ...ide cover in the direction of the arrow NOTE The gears shown in the picture below is not secured and is easily removed Be careful not to drop and break or lose it 6 Remove the right side cover and the front cover in the direction of the arrow respectively Top Cover Top Cover Open Button Left Side Cover B EP4D Series B EP2D Series Gear Gear Right Side Cover Front Cover Gear ...

Page 18: ...CC Cable Forming Indication Figure FCC Cable Forming Indication Figure 6 5 7 5 7 5 36 5 180 44 16 5 31 5 18 5 11 5 12 8 5 37 5 7 5 24 5 19 5 33 5 19 5 17 5 6 8 12 8 5 37 5 24 5 7 5 19 5 33 5 19 5 17 5 FCC CableFolding Directions Connect this terminal to the Bluetooth module Connect this terminal to the MAIN PC Board Connect this terminal to the Bluetooth module Connect this terminal to the MAIN PC...

Page 19: ... shown in the picture B EP4D model only 9 Connect the FPC cable to the connector CN301 on the Main PC board 10 Fit the Bluetooth module into the following position NOTE Pass the FPC cable and the ground wire so that they do not get caught on the gears or by the cover Bluetooth Module FPC Cable Slot Main PC Board Connector CN301 FPC Cable B EP2D Bluetooth Module Bluetooth Module B EP4D ...

Page 20: ...he front cover NOTES 1 Make sure that the pins on the both sides of the front cover are fit in position as shown in the pictures below 2 Do not reassemble the Front Cover while the Top Cover Open Button is pressed Doing so may cause the Top Cover not to open Front Cover Pin Top Cover Open Button Good No Good ...

Page 21: ...lots of the printer enclosure B EP4D Series Fit the tabs A to D into the slots A to D B EP2D Series Fit the tabs A to C into the slots A to C NOTE It is easy to mount the left side cover if you fit the tabs from the LCD side in order then secure the bottom side Be careful not to catch the cable by the cover while reassembling Tab A Tab B Tab C Tab D A B C D Left Side Cover Tab A Tab C Tab B A B C ...

Page 22: ...t is easy to mount the right side cover if you fit the tabs from the LCD side in order then secure the bottom side Be careful not to catch the cable by the cover while reassembling 14 Close the top cover and load the battery pack Configure the Bluetooth module settings in the system mode with reference to the Service manual or Key Operation Specification In addition about Bluetooth Module Setting ...

Page 23: ... to the following two conditions 1 this device may not cause harmful interference and 2 this device must accept any interference received includinginterference that may cause undesired operation Changes or modification not expressly approved by manufacturer forcompliance could void the user s authority to operate the equipment For Canada Operation is subject to the following two conditions 1 this ...

Page 24: ...ce the Bluetooth and wireless LAN use the same radio frequency band each radio wave may interfere with each other when they are used at the same time causing a deterioration of communication performance or a disconnection of network If there is any problem with connection please stop using either Bluetooth or wireless LAN Do not use the product on a metal table or near a metal object Communication...

Reviews: