background image

TOSHIBA FULLY AUTOMATIC WASHING MACHINE

Thank you for purchasing TOSHIBA Fully Automatic

Washing Machine.

Please read this manual carefully in order to operate the
machine properly.

Sometimes you may find some water
remaining in the drainage hose at your first

operation. This is caused by the production-

line test and nothing to worry about.

CONTENTS

WARNING ............................................ 2
CAUTION ............................................. 3
DESCRIPTION OF PARTS .................. 3
CONTROL PANEL
DESCRIPTION.................................4~5
RECOMMENDED DETERGENT
AMOUNT.............................................. 5
HOW TO OPERATE.........................6~7
SUPER SPIN DRY (TUB DRY) ............ 8
CUSTOM WASH CYCLES ................... 9
CHILD PROOF MODE ....................... 10
OPTION MODE.................................. 11
PRESET MODE ................................. 12
RESUME FUNCTION ........................ 12
LAUNDRY GUIDE .............................. 13
MAINTENANCE ...........................14~16
INSTALLATION ............................16~18
BEFORE CALLING
THE SERVICEMAN .....................19~20
HANDLING METHOD FOR
EMERGENCY .................................... 20
SPECIFICATIONS ............................. 20

OWNER’S MANUAL

A E W - 9 7 7 0 S

AEW-9770SUP

A E W - 1 1 7 0 S

AEW-1170SUP 

Summary of Contents for AEW-1170S

Page 1: ...on line test and nothing to worry about CONTENTS WARNING 2 CAUTION 3 DESCRIPTION OF PARTS 3 CONTROL PANEL DESCRIPTION 4 5 RECOMMENDED DETERGENT AMOUNT 5 HOW TO OPERATE 6 7 SUPER SPIN DRY TUB DRY 8 CUSTOM WASH CYCLES 9 CHILD PROOF MODE 10 OPTION MODE 11 PRESET MODE 12 RESUME FUNCTION 12 LAUNDRY GUIDE 13 MAINTENANCE 14 16 INSTALLATION 16 18 BEFORE CALLING THE SERVICEMAN 19 20 HANDLING METHOD FOR EME...

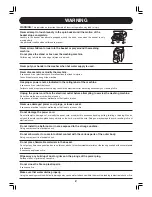
Page 2: ...with wet hands It can cause electrical shock or malfunctions that lead to injuries Never use damaged power cord plugs or loose socket It can cause electrical shock or malfunctions that lead to injuries or fire Do not damage the power cord Do not attempt to damage cut or modify the power cord or subject it to excessive bending pulling twisting or binding Also do not yank the metal portion place heav...

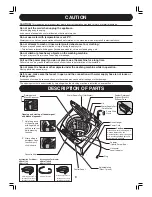
Page 3: ...on Moving parts may cause injury Before use make sure the faucet in open and the connection with water supply hose is not loose or leakage water Looseness of screws hose connections or other areas may cause water leakage or other damage The opening must not be obstructed by carpeting when the washing machine is installed on a carpet floor Accessories For Model AEW 9770S AEW 1170S Accesspries For Mo...

Page 4: ...upply using the m accompanying the compact deterge Depending on the kind of deterge water consumption by one spoo Adjust the detergent volume acc particular detergent in use After the start of operation If the lid is closed the estimated residual time to the end of wash ing will be displayed Reservation of the time to complete washing The preset hours are displayed If an error occurs An error code...

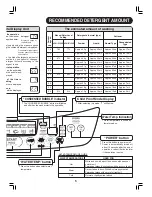
Page 5: ...synthetics with heavy or oily soil Warm Dark or faded fabrics White colored synthetics Permanent press with normal or light soil Cold Normal or lightly soiled fabrics Child Proof Mode Display After selecting this mode will light up WATER TEMPERATURE GUIDE The estimated amount of washing t n u o m A n o o p s Manual Water Level Setting Detergents normal type cup AEW 1170SU P AEW 9770SU P 1 4 79L 77...

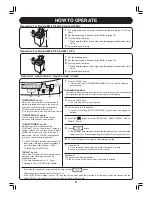
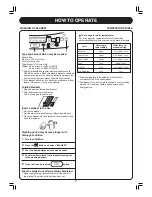
Page 6: ... Rinsing is set to OVERFLOW RINSE If you add the laundry during washing be sure to press button After stopping the basket put the laundry in it If the CHILD PROOF mode is set to ON and the lid is opened while the machine is in operation the buzzer beeps and the CHILD PROOF indicator flashes then the machine starts draining water 1 Turn the POWER on REGULAR and CONDENSED BUBBLE cycles will be select...

Page 7: ... the fastener Washing period may become longer with drainage condition 1 Turn the POWER on 2 Press the button and select BLANKET 3 Pour the liquid detergent in the wash basket 4 Put a large item placed in the blanket washing net in the washing basket 5 Close the lid and press the button Take the blanket out after washing completed Open the blanket net fastener and put at the center of the blanket ...

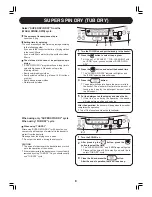
Page 8: ...peration of the washer If there is bacteria in the basket once it cannot easily removed by using TUB DRY So you should usually use TUB DRY cycle 1 Turn the POWER on and put the laundry in the basket 2 Press the button to select the program At the set of BLANKET TUB CLEANING with out SPIN cycle you cannot select SUPER SPIN DRY 3 Press the button and select the desired time The SUPER SPIN DRY indica...

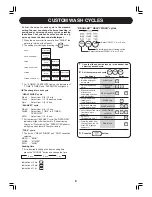
Page 9: ...e rinsing of BLANKET cycle The OVERFLOW indicator will light off when there is Shower rinsing 2 times or Static rinsing The OVERFLOW indicator will light up when there is Overflow rinsing SOAK cycle The time of WASH RINSE and SPIN cannot be selected WASH 8 MIN RINSE 2 TIMES SPIN 5 MIN Soaking time If it is desired to change the foam soaking time press the COURSE button and change the time 3 hrs 2 h...

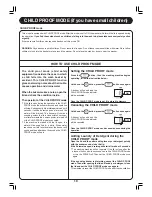
Page 10: ...nds or after alarm detection unless power is turned off or the CHILD PROOF mode is canceled If the machine is started with the lid open the water will be supplied for a while When water reaches a certain level however the buzzer will sound and then after about 5 seconds the CHILD PROOF mode will work Setting the CHILD PROOF mode Press the button then the washing machine begins operating follow the...

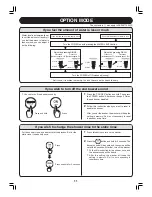
Page 11: ...ss the POWER button After buzzer beeps 3 times the end buzzer disabled 2 Follow this instruction when you want to reset to enable the buzzer After you set the buzzer the washer will keep the setting in memory So it is not necessary to reset the buzzer every time Press and hold If you wish to change the shower rinse to the static rinse For the shower rinse it needs twice for the process But for the...

Page 12: ...our per press 3 Press the button Check if the faucet is on 4 Put the detergent according to the detergent guide and then close the lid DETERGENT 25g 30L Pull the detergent case then place the detergent evenly in the case Then shut the case LIQUID DETERGENT Pour the liquid detergent into the bleach dispenser RESUME FUNCTION POWER FAILURE RECOVERY If a power failure occurs during operation the washe...

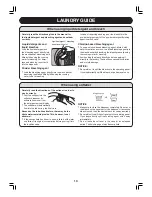
Page 13: ...he laundry These actions cause discoloration and or cloth damage NOTICE Be careful not to spill the bleach onto the operating panel If you inadvertently spill the bleach wipe it away at once When using softener Carefully read the directions of the softener in order to use it correctly Pour the softener into the softener dispenser by estimate its amount from the detergent amount display The softene...

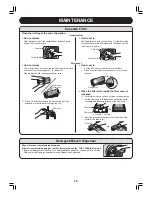
Page 14: ...1 Set the filter valve to the filter case while aligning its concavity and convexity to those of the filter case Filter slot Cassette filter Filter slot Cassette filter Filter cover Filter cover Filter case Filter cover Filter case Filter valve Concavity Filter cover Convexity 2 Insert the groove of the filter valve to the click at the center of the filter cover Groove Cassette Filter L How to remove Tur...

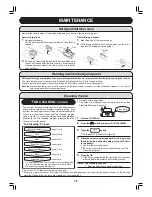
Page 15: ...G 3 Press the button No indicator All indicator will light off 4 When the pulsator spinning board starts to spin add the chlorine type whitening detergent about 300 ml to the basket Add it at the first used water Do not put any clothes in the basket during the Tub Cleaning program 5 Close the lid If the lid is opened during the operation the operation will stop before the draining and rinsing proce...

Page 16: ...chloric vinyl put the cloth between the machine and the cover Avoid place where the machine is exposed to direct sunlight Plastic parts may become deformed or discolored Avoid places where the machine may become frozen during cold weather Allow a space of at least 5 cm from the sides and 10 cm from the back side of the machine to the nearest vertical object When placed too near to walls or other o...

Page 17: ...e is tilted towards the right Tighten nuts of adjustable legs and lock them Height adjusting leg Unlock Lock Up Down Note Check the floor level indicator directly from above Standard point Bubble Installing the ground wire Be sure to ground your washing machine when installing When connecting or disconnecting the ground wire be sure to first remove the power plug from the AC socket In case of the ma...

Page 18: ...een the end of the hose and the adjacent surface or cut the hose diagonally to ensure proper drainage Allowing the flat end of the hose to come in contact with the flat surface of the washing machine will impair drainage Drainage hose extension Pay close attention to the height of the drainage hose and articles over which it passes If the drainage hose is too high proper drainage may not be obtained...

Page 19: ...ed with the laundry Is the faucet shape suited Are the hose coupling and the nozzle loose Is the water inlet nut loose Is the water supply hose connector clogged If you turn the power on and press START pad immediately it may not beep the end buzzer Is the end buzzer turned off does not operate making noise water leak does not beep the end buzzer Please confirm whether a power failure or fuse break...

Page 20: ...ater rotating and correcting the unbalanced load They are made by water retained by the machine for the purpose of maintaining balance and do not indicate malfunction There are a short pause before the machine begins to spin as the drainage valve opens sufficienty You may hear intermittent motor sound coon sound in spinning process occurs this is a sound which occurs in order to control rotation an...

Reviews: