background image

(E) 51/57/65H93

Copyright © 2003 TOSHIBA CORPORATION. All rights reserved.

50

(E)

/

/

HX

Chapter 6: Setting up your TV

Adjusting the color convergence

This projection TV uses three separate image tubes: red, green,
and blue. The red, green, and blue images are projected onto the
screen where they converge to form a full-color picture. You can
see a clear picture only when the three images converge correctly.
Convergence may drift over time or if you move the TV. If you
can see clear images on your TV screen, skip this procedure.
This adjustment should be made only after the TV has been on
for at least 30 minutes.

Automatically adjusting the color
convergence using TouchFocus™

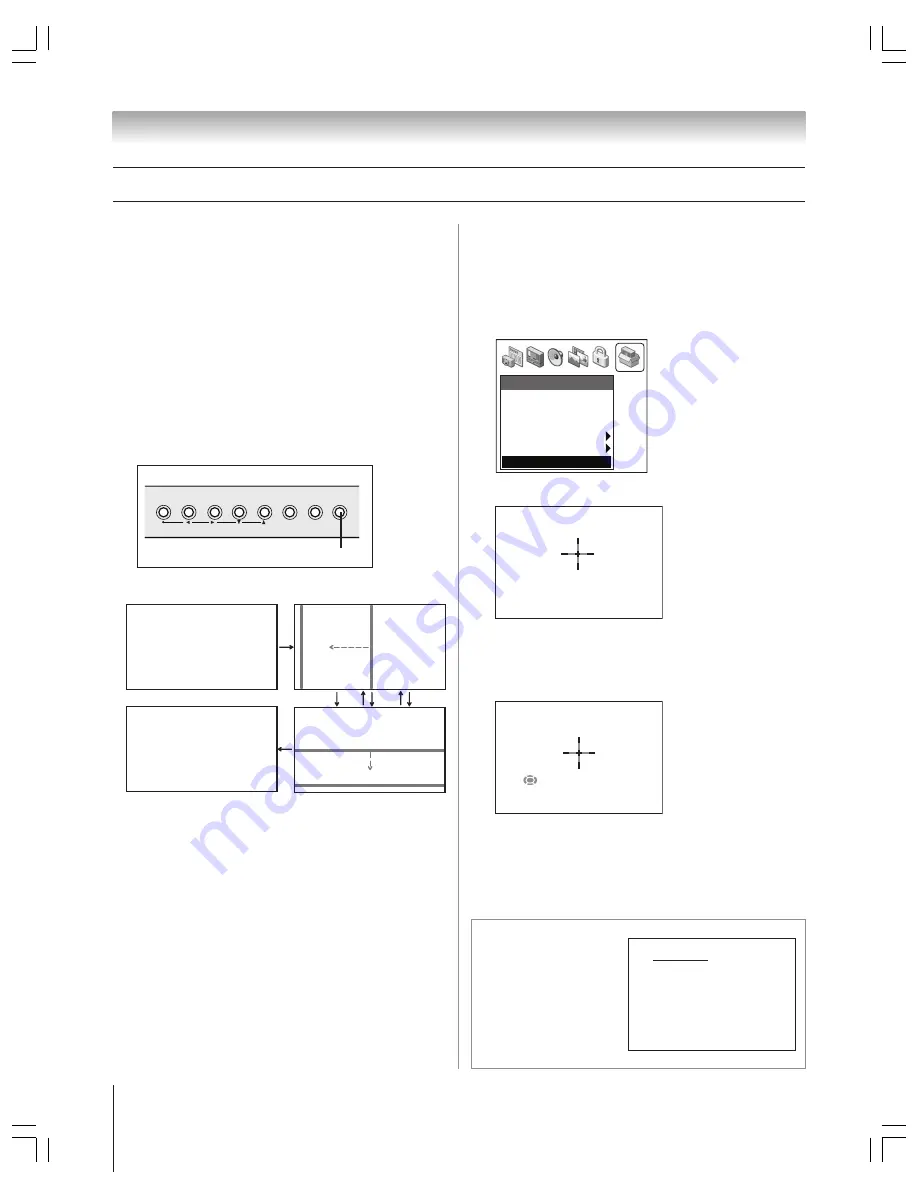
To automatically adjust the color convergence:

Press TouchFocus on the TV front panel one time.

The TV will enter the auto convergence mode.

TOUCH  FOCUS

TOUCH  FOCUS F I N I SHED

Horizontal

Vertical

B

R

G

When adjustment is complete, the normal picture will
reappear.

If the error message “Touch Focus Error” appears, retry the
TouchFocus adjustment or adjust the convergence
manually, as described at right.

Manually adjusting the color
convergence

To check and adjust the color convergence manually:

1. Press MENU and open the SETUP menu.
2. Highlight CONVERGENCE and press ENTER.

Setup

Installation

Sleep Timer

On/Off Timer

Digital Tuner Hold

  •   •   •   •   •   •   •

Off

Slide Show Interval

  •   •   •  

2 Sec

Convergence

3. The following screen opens.

ENTER : TO ADJUST
EXIT

: TO RESET

Press ENTER,* which starts the TouchFocus auto
convergence mode (as described at left).

4. When TouchFocus is done, the center convergence

adjustment window (below) opens.

: TO ADJUST RED

ENTER: TO CHANGE COLOR
EXIT

: TO ADJUST CONVERGENCE

If the red (in this example) and white lines in the cross do
not line up either horizontally or vertically, you need to
adjust the convergence.

5. Press 

y

 (up), 

z

 (down), 

x

 (left), or 

 (right) on the

remote control to align the red and white lines.


TouchFocus

TV front panel

*

If you press EXIT in step 3,

the screen at right appears.

• Press ENTER to start

TouchFocus and enter the
manual convergence
adjustment screens.

• Press EXIT to cancel

convergence adjustment and
return to normal TV viewing.

CONVERGENCE

WARNING

RESET USER’S ADJUSTMENT
TO FACTORY SETTINGS

ENTER : TO RESET
EXIT

: TO CANCEL

Summary of Contents for 51HX93

Page 1: ... of your TV Record these numbers in the spaces below Refer to these numbers whenever you communicate with your Toshiba dealer about this TV Model number Serial number I S O 14001 FILE No A96 4 5 T O S H I B A A M E RICA CONSUMER P R O D U C T S I N C For an overview of steps for installing setting up and using your new TV see page 8 ...

Page 2: ... friends Thank you 2500 Wilson Blvd Arlington VA 22201 U S A Tel 703 907 7600 Fax 703 907 7690 www CE org CEA is the Sponsor Producer and Manager of the International CES Safety Precautions WARNING TO REDUCE THE RISK OF FIRE OR ELECTRIC SHOCK DO NOT EXPOSE THIS APPLIANCE TO RAIN OR MOISTURE Dear Customer Thank you for purchasing this Toshiba TV This manual will help you use the many exciting featu...

Page 3: ...uctions 5 Do not use this apparatus near water 6 Clean only with a dry cloth 7 Do not block any ventilation openings Install in accordance with the manufacturer s instructions 8 Do not install near any heat sources such as radiators heat registers stoves or other apparatus including amplifiers that produce heat 9 Do not defeat the safety purpose of the polarized or grounding type plug A polarized ...

Page 4: ...appear distorted or the color appear faded If this happens turn off the TV for 6 to 7 hours to allow the condensation to evaporate 31 For added protection of your TV from lightning and power surges always unplug the power cord and disconnect the antenna from the TV if you leave the TV unattended or unused for long periods of time 32 During normal use the TV may make occasional snapping or popping ...

Page 5: ...he optic components of the TV SUCH DAMAGE IS NOT COVERED UNDER THE TOSHIBA LIMITED WARRANTY 3 Always keep the top and bottom sections of the TV cabinet in an upright position while disassembled Failure to follow this instruction may result in damage to the TV including but not limited to the optic components cabinet bezel and glass mirror SUCH DAMAGE IS NOT COVERED UNDER THE TOSHIBA LIMITED WARRAN...

Page 6: ... picture size 65 Scrolling the Theater Wide picture 66 Using the auto aspect feature 480i signals only 66 Selecting the cinema mode 67 Selecting the display format 480p signals only 67 Using the POP features 68 Using the POP double window feature 68 Switching the main and POP pictures 69 Freezing the main picture in the POP double window 69 Adjusting the size of the main and POP pictures 69 POP do...

Page 7: ...LE FOR ANY AMOUNTS REPRESENTING LOSS OF PROFITS LOSS OF BUSINESS OR INDIRECT SPECIAL OR CONSEQUENTIAL DAMAGES IN CONNECTION WITH THE PROVISION OR USE OF ANY INFORMATION EQUIPMENT OR SERVICES RELATING TO THE TV GUIDE ON SCREEN SYSTEM The TV Guide On Screen system is protected by one or more issued United States patents such as 6 331 877 6 239 794 6 154 203 5 940 073 4 908 713 4 751 578 4 706 121 Th...

Page 8: ...33 13 Turn on the TV and other device s 14 Follow the on screen Quick Connect Guide for assistance in configuring the TV s settings and setting up the TV Guide On Screen program guide The Quick Connect Guide starts automatically the first time you turn on the TV See page 36 for details 15 Program channels into the TV s channel memory page 42 if you did not already do so during the Quick Connect Gu...

Page 9: ...stantly 8 TV VIDEO Repeatedly press to change the source you are viewing ANT 1 ANT 2 VIDEO 1 VIDEO 2 VIDEO 3 DVI HDCP ColorStream HD1 ColorStream HD2 Press lift to open control panel door 9 TouchFocus Press to automatically adjust the color convergence see page 50 0 SD SmartMedia slot Insert a memory card to view JPEG files from a digital camera see page 80 VIDEO 3 The front panel A V connections ...

Page 10: ...both audio and video information no separate audio cables are required for a complete connection 5 Digital Audio OUT Optical audio ouput in Dolby Digital or PCM pulse code modulation format for connecting an external Dolby Digital decoder amplifier AV receiver or home theater system with optical audio input See page 19 6 IR OUT For controlling infrared remote controlled devices through the TV You ...

Page 11: ...t that meets CEA specifications for IEEE 1394 also known as Firewire IEEE 1394 cables carry both video and audio information therefore no separate audio cables are needed for a complete connection See pages 22 and 24 Note IEEE 1394 cable provides better picture performance than a standard composite video or S video cable Dual wand IR blaster G LINK cable is for use with video devices with IR infra...

Page 12: ...o ANT 2 and the Cable TV to ANT 1 because ANT 1 is the only source for the TV Guide On Screen program guide To view the VCR Turn ON the VCR Select the VIDEO 1 video input source on the TV or Turn ON the VCR Select the ANT 1 video input source Tune the TV to channel 3 or 4 whichever channel is vacant in your area _____________ To select the video input source press INPUT on the remote control see p...

Page 13: ...t source When you use a Cable box you may not be able to use the remote control to program or access certain features on the TV To view basic Cable channels and use the TV s features Select the ANT 2 video input source Use the TV front panel controls or remote control to change channels and access the TV s features To view basic and premium Cable channels Turn OFF the VCR Select the ANT 1 video in...

Page 14: ...he component video connections Select the ColorStream HD 1 video input source on the TV To view satellite programs using the standard video connections or to record satellite programs Turn on all three devices Select LINE IN on the VCR Select the VIDEO 1 video input source on the TV To view the VCR or view and record antenna channels Select the ANT 1 video input source on the TV Tune the TV to cha...

Page 15: ...on the TV and the DVD player connected to VIDEO 2 To view basic channels and access the TV s features Select the ANT 2 video input source Use the TV controls to change channels and access the TV s features To view premium Cable channels Turn OFF the VCR Select the ANT 1 video input source Tune the TV to channel 3 or 4 whichever channel is vacant in your area Use the Cable box controls to change ch...

Page 16: ...les one set of component video cables You can connect the component video cables plus audio cables from the DVD player to either set of ColorStream jacks on the TV HD 1 or HD 2 The ColorStream HD 1 and HD 2 jacks can be used with Progressive 480p 720p and Interlaced 480i 1080i scan systems A 1080i signal will provide the best picture performance If your DVD player does not have component video see...

Page 17: ...UT jacks instead of A V OUT or VAR AUDIO OUT to connect to an external A V system This connection cannot be used for timed recordings Because of copy protection requirements the REC OUT jacks may be blocked during playback of some IEEE 1394 content See Using the digital tuner hold on page 61 You will need one set of standard A V cables one coaxial cable The Video OUT jack does not output the POP p...

Page 18: ...NT 75 REC OUT ANT 1 ANT 2 PB PR Y L MONO AUDIO S VIDEO VIDEO 1 VIDEO 2 COLOR STREAM HD 1 COLOR STREAM HD 2 VIDEO R L AUDIO VIDEO R L AUDIO R PB PR Y L AUDIO R VIDEO L MONO ON OFF L AUDIO AUDIO VAR R R OUT CHANNEL IN AUDIO CENTER DVI HDCP IN R AUDIO L G LINK IR OUT DIGITAL AUDIO OUT IEEE1394 1 IEEE1394 2 TheaterNet TheaterNet VIDEO AUDIO L R L R R IN OUT DVI HDCP OUT 1 DVI HDCP Digital Visual Inter...

Page 19: ...the digital audio device Press MENU on the TV s remote control and open the AUDIO menu Highlight AUDIO SETUP and press ENTER In the OPTICAL OUTPUT FORMAT field select either DOLBY DIGITAL or PCM depending on your device see Selecting the optical audio output format on page 79 Audio Audio Settings Advanced Audio Settings Audio Setup Audio Setup MTS Language Speakers Audio Out Optical OutputFormat S...

Page 20: ...an A V audio video receiver to enhance your TV s sound If your sound system has Dolby Pro Logic surround sound you can add to the realism of the sound by using the TV s internal speakers as center channel speakers You will need one set of standard A V cables one single audio cable for the audio center channel Note When the Audio Center Channel ON OFF switch is in the ON position the TV speakers wi...

Page 21: ...ontrol at right 1 2 3 4 5 6 7 8 9 100 0 ENT TV CABLE SAT VCR POWER 10 DVD AUDIO1 AUDIO2 ACTION MODE PIC SIZE MENU LIGHT SLEEP ENTER FAV CH TV VCR VOL EXIT DISC CH RTN DVD RTN DVD CLEAR SLOW DIR PAUSE STEP AM FM SKIP SEA RCH PLAY REW FF STOP POP DIRECT CH FREEZE SPLIT CH SCAN SOURCE SWAP POP CH REC INPUT RECALL MUTE LIN K THEA T E R FAVORITE INFO GUIDE SETUP TITLE SUB TITLE A U D I O FAV IN ANT 75 ...

Page 22: ... from antenna or Cable TV systems To use the IEEE 1394 device s analog features you need to connect the device to the TV using standard A V cables or S video plus audio cables in addition to connecting the IEEE 1394 cable Note If you have an IEEE 1394 device connected to both digital and analog inputs on the TV the TV automatically switches between analog and digital modes as needed when the initi...

Page 23: ...ize non A V or non compatible IEEE 1394 devices however these devices may still be available to other compatible IEEE 1394 devices on the network You may be able to use the TV s remote control to operate some compatible IEEE 1394 devices You must first program the remote control to recognize the device see pages 30 33 If you have an IEEE 1394 Cable box or satellite receiver you may need to use the...

Page 24: ...rconnection Do not loop the last device in the chain back to the TV If the device chain is looped the TV may not work properly with the other devices in the chain Place devices with the slowest communication speed at the end of each chain If a device with a slower communication speed is placed ahead of a faster device in the chain the signal from the slower device will interfere with the signal fr...

Page 25: ...2 TheaterNet TheaterNet Back of TV Front of VCR Front of Cable box Infrared sensor G LINK IR blaster cable wand approx 1 inch from device To connect to the G LINK jack 1 Locate the infrared sensor on the front of your VCR or Cable box The sensor is marked on some devices 2 Align one of the G LINK IR blaster cable s wands about 1 inch away from the infrared sensor on the front of the VCR and attach...

Page 26: ...46 MENU accesses the menu system page 35 GUIDE opens the TV Guide On Screen system page 53 INFO provides detailed information on highlighted items in the TV Guide On Screen system page 56 BLUE and GREEN buttons select menu specific functions in the TV Guide On Screen system page 55 ENTER activates highlighted items in the main menu system and the TV Guide On Screen system yz x select or adjust pro...

Page 27: ...you own a non Toshiba device or a Toshiba device that the remote control is not preprogrammed to operate you will need to program the remote control See Programming the remote control to operate your other devices on page 30 MODE Default device mode control before programming TV Toshiba TV CABLE SAT Toshiba Satellite receiver VCR Toshiba VCR DVD Toshiba DVD AUDIO 1 Pioneer Audio receiver AUDIO 2 P...

Page 28: ...it 7 8 Digit 8 Digit 8 Digit 8 Digit 8 Digit 8 Cassette Digit 8 Digit 8 9 Digit 9 Digit 9 Digit 9 Digit 9 Digit 9 Aux Digit 9 Digit 9 100 Digital Sub CH 100 10 separator 0 Digit 0 Digit 0 Digit 0 Digit 0 Digit 0 Digit 0 10 GUIDE SETUP Guide Guide DVD setup INFO TITLE Guide Info INFO TITLE Top menu BLUE Blue Subtitle SUBTITLE Guide Key GREEN Green Audio AUDIO Guide Key THEATERNET TheaterNet MENU Me...

Page 29: ...n SPLIT POP Split TV TV TV TV TV TV TV POP DIRECT CH POP Direct ch TV TV TV TV TV TV TV FREEZE POP Freeze TV TV TV TV TV TV TV SWAP POP Swap TV TV TV TV TV TV TV CH SCAN POP Ch scan TV TV TV TV TV TV TV SOURCE POP Source TV TV TV TV TV TV TV Notes will send nothing TV will jump to TV VCR will jump to last active VCR or DVD Active VCR DVD is defined as the mode that remains for a minimum of 5 secon...

Page 30: ...re than one code is listed try each one separately until you find the one that works 2 Press MODE until the Mode indicator for the device CABLE SAT VCR DVD AUDIO 1 AUDIO 2 lights up 3 While holding down the RECALL button press the Channel Number buttons to enter the four digit code for your brand of device If a valid code is entered the mode indicator will blink twice If an invalid code is entered...

Page 31: ...tor will blink two times and then pause and blink two more times Using the volume lock feature 8000 For the TV CABLE SAT VCR and DVD modes the volume controls VOL y z and MUTE can be locked to the selected device mode This feature does not apply to the AUDIO 1 and AUDIO 2 modes To lock the volume controls to always control the CABLE SAT device volume for example 1 Repeatedly press MODE to select C...

Page 32: ...146 0166 0160 0111 0135 0136 0109 0144 0106 0105 0139 0110 0111 0144 0106 0169 0180 Multi brand remote control device codes ADMIRAL AIWA AKAI AUDIO DYNAMIC BELL HOWELL BROKSONIC CANON CCE CITIZEN CRAIG CURTIS MATHES DAEWOO DBX DIMENSIA EMERSON FISHER FUNAI GE GO VIDEO GOLDSTAR GRADIENTE HITACHI INSTANT REPLAY JENSEN JVC KENWOOD LG LXI MAGNAVOX MARANTZ MARTA MEMOREX MGA MINOLTA MITSUBISHI MULTITECH...

Page 33: ... 4121 4103 4105 4127 4131 4130 4149 4103 4111 4139 4134 4137 4122 4138 4112 4113 4111 4110 4121 4118 4119 4132 4133 4101 4102 Receivers cont Brand Code AIWA DENON FISHER JENSEN JVC KENWOOD MARANTZ NAKAMICHI ONKYO PANASONIC PHILIPS PIONEER RCA SANSUI SHARP SONY TEAC TECHNICS YAMAHA 7123 7124 7125 7131 7103 7114 7129 7130 7132 7133 7100 7107 7102 7105 7108 7109 7113 7116 7118 7122 7121 7104 7106 712...

Page 34: ...udio Setup Audio Setup window Favorite Channels Favorite Channels edit window Preferences Closed Caption Mode Off CC1 CC2 CC3 CC4 Text1 Text2 Text3 Text4 Closed Caption Advanced Advanced Closed Captions window Input Labeling Input Labeling window Menu Language English Español Français Enable Rating Blocking Off On Locks Edit Rating Limits Edit Rating Limits window Channels Block Channels Block win...

Page 35: ...not make a selection within 60 seconds The exceptions to this are the Quick Connect guide menus which close automatically after 15 minutes and the signal meter menu which closes automatically after 30 minutes To close a menu instantly press EXIT Setup Installation menu layout continued To open the INSTALLATION menu illustrated below press MENU on the remote control or TV front panel open the SETUP...

Page 36: ...Quick Connect Guide assisted setup below Note To stop the Quick Connect Guide press EXIT or turn off the TV Manually starting the Quick Connect Guide assisted setup 1 Press MENU and open the SETUP menu 2 Highlight INSTALLATION and press ENTER A new set of INSTALLATION menu icons will appear on screen as shown in step 3 Setup Installation Sleep Timer On Off Timer Digital Tuner Hold Off Slide Show I...

Page 37: ...o when using your cable box and then press ENTER Note This is a continuation of the Quick Connect Guide assisted setup from the previous page If you are not using the Quick Connect Guide assisted setup and want to manually start the TV Guide On Screen system setup process a Press MENU and open the SETUP menu b Highlight INSTALLATION and press ENTER A new set of INSTALLATION menu icons will appear ...

Page 38: ...ble box until the testing process is done 2 When testing is done if your Cable box tuned itself to channel 09 select YES and press ENTER Go to Configuring your VCR setup below If your Cable box did not tune itself to channel 09 and you want to test the same code again select TEST THIS CODE AGAIN and press ENTER If your Cable box did not tune itself to channel 09 and you want the Guide to search fo...

Page 39: ...tself to channel 09 and you want the TV Guide On Screen system to search for the correct code select NO and press ENTER Go to step 3 3 If the correct code is not found the following screens appear with helpful hints for finding the code Confirming your settings 1 Review the setup information displayed on your TV screen an example is shown below If the information on your TV screen is correct for y...

Page 40: ... Quick Connect Guide Please select your favorite Picture Mode Sports Bright dynamic STANDARD Normal TV picture MOVIE Movie like Movie Sports Standard Adjusting the color convergence Press the TOUCH FOCUS button on the TV front panel to start automatic color convergence For details on adjusting the color convergence see page 50 Quick Connect Guide Please push the TOUCH FOCUS button on the front pan...

Page 41: ... antenna input sources during the Quick Connect Guide assisted setup you can skip this step To configure the ANT 1 and ANT 2 input sources 1 Press MENU and open the SETUP menu 2 Highlight INSTALLATION and press ENTER A new set of INSTALLATION menu icons will appear on screen as shown in step 3 below Setup Installation Sleep Timer On Off Timer Digital Tuner Hold Off Slide Show Interval 2 Sec Conver...

Page 42: ...nput configured for ANTENNA This is normal however once channel programming is completed you should not have to repeat the programming process again unless your Cable TV service lineup changes significantly To program channels automatically 1 Make sure you have configured the antenna input sources See page 41 for details 2 Press MENU and open the SETUP menu 3 Highlight INSTALLATION and press ENTER...

Page 43: ...HANGE ANTENNA and press ENTER Channel Add Delete Change Antenna Channel Signal Antenna 2 Analog 1 3 Analog 1 4 Analog 1 5 Analog 1 5 1 Analog 1 5 2 Digital 1 5 3 Digital 1 5 4 Digital 1 Clear All Save Cancel Programming channels into the TV s channel memory continued To add a channel to the channel memory Highlight the unchecked box next to the channel number you want to add and then press ENTER t...

Page 44: ...ress ENTER Favorite Channels Set 1 A 6 A 26 A 46 B 5 B 12 B 66 B 70 Swap Edit Done Favorite Channels Set 2 A 73 A 98 B 77 B 78 Empty Empty Empty Swap Edit Done If you try to add more than 14 favorite channels the error message appears You will need to deselect a channel before you can add another 6 When done highlight SAVE and press ENTER To clear your favorite channel lists 1 Press MENU and open ...

Page 45: ...see page 21 To set up TheaterNet device control 1 Make sure you have properly connected your infrared remote controlled device s See page 21 for details 2 Press MENU and open the SETUP menu 3 Highlight INSTALLATION and press ENTER A new set of INSTALLATION menu icons will appear on screen as shown in step 4 Setup Installation Sleep Timer On Off Timer Digital Tuner Hold Off Slide Show Interval 2 Se...

Page 46: ...screen device control continued Cable SAT VCR DVD Audio Receiver MUTE INPUT VOL The following are examples of the TheaterNet on screen control icons for other types of devices P A G E ACTION ENTER MENU THEATER NET FAV 100 10 THEATER NET 3 Using the yzx buttons highlight the device you want to control and press ENTER TheaterNet Video 2 Video 1 Brandname ColorStream HD1 Toshiba Video 3 Brandname Tos...

Page 47: ... 0157 0179 0437 Classic 1297 DKK 0000 DMX Electronics 0157 Denon 0873 0003 Emerson 0305 Fisher 0174 0179 1325 GPX 1296 Garrard 0393 0420 Genexxa 0032 0305 Harman Kardon 0157 0173 Hitachi 0032 JVC 0072 1294 KLH 1318 1372 1373 Kenwood 0681 0826 0626 0028 0037 0190 Koss 1317 Krell 0157 LXI 0305 Linn 0157 MCS 0029 MTC 0420 Magnavox 0157 0305 Marantz 0626 0029 0157 0180 Miro 0000 Mission 0157 NSM 0157 ...

Page 48: ...ex 0240 Daewoo 0045 0278 1278 Denon 0042 Dynatech 0000 Electrohome 0037 Electrophonic 0037 Emerex 0032 Emerson 0037 0184 0000 0121 0043 0209 0002 0278 0479 1278 1479 Fisher 0047 0104 Fuji 0035 0033 Funai 0000 GE 0060 0035 0240 0760 0807 1035 1060 Garrard 0000 Go Video 0432 GoldStar 0037 0038 1237 Gradiente 0000 HI Q 0047 Harley Davidson 0000 Harman Kardon 0081 0038 Harwood 0072 Headquarter 0046 Hi...

Page 49: ...TMK 0240 Tatung 0041 Teac 0000 0041 Technics 0035 0162 Teknika 0035 0037 0000 Thomas 0000 Tivo 0618 0636 Toshiba 0045 0043 0845 Totevision 0037 0240 Unitech 0240 Vector 0045 Vector Research 0038 Video Concepts 0045 Videomagic 0037 Videosonic 0240 Villain 0000 Wards 0060 0035 0048 0047 0081 0240 0000 0042 0072 0149 0760 White Westinghouse 0209 0072 1278 XR 1000 0035 0000 0072 Yamaha 0038 Zenith 003...

Page 50: ...adjustment or adjust the convergence manually as described at right Manually adjusting the color convergence To check and adjust the color convergence manually 1 Press MENU and open the SETUP menu 2 Highlight CONVERGENCE and press ENTER Setup Installation Sleep Timer On Off Timer Digital Tuner Hold Off Slide Show Interval 2 Sec Convergence 3 The following screen opens ENTER TO ADJUST EXIT TO RESET...

Page 51: ... already set up the TV Guide On Screen system the time and date were set automatically and you can skip this step To set the time and date 1 Press MENU and open the SETUP menu 2 Highlight INSTALLATION and press ENTER A new set of INSTALLATION menu icons will appear on screen as shown in step 3 below 3 Open the TIME AND DATE menu highlight START SETUP and press ENTER Setup Installation Sleep Timer ...

Page 52: ...OK System Information Factory Defaults This window provides the ability to reset the TV settings Type in your PIN now or 0000 if no PIN has been set to restore settings to their factory default values OK System Information Factory Defaults This window provides the ability to reset the TV settings Type in your PIN now or 0000 if no PIN has been set to restore settings to their factory default value...

Page 53: ...a list of your favorite programs for easy browsing and tuning Messages View messages sent to you from the TV Guide On Screen service On screen help The TV Guide On Screen system contains on screen feature definitions and navigation instructions Promotions View a list of available promotions and TV Guide On Screen features and tips Setting up the TV Guide On Screen system Follow these instructions ...

Page 54: ...ses only The channels programs and TV Guide On Screen information as illustrated may not be available in your area The options and features as illustrated are subject to change when updates are downloaded from the TV Guide On Screen service to your TV The TV Guide On Screen system displays program listings for the TV s ANT 1 and VIDEO 1 input sources only See Chapter 2 Connecting your TV for conne...

Page 55: ... action Note The corresponding actions for the BLUE and GREEN buttons will vary depending on the current menu or selection The on screen descriptions will explain what action will occur when you press either button To select the on screen INFO button and open the INFO window Press INFO on the remote control Continue to press INFO to change the size of the INFO window To exit the TV Guide On Screen...

Page 56: ... s shows and teal for all others The top entry in the list will always be Last Channel so you can easily choose to return to the last channel you were watching by highlighting Last Channel and pressing ENTER Channel surfing Directly access a listing using the Channel Number buttons on the remote control Use the yz arrow buttons to browse up and down through the listings one program at a time Use t...

Page 57: ... as a favorite every day it appears at the same time on the same channel To view a list of programs you set as favorites to cancel a favorite or to change the frequency of a favorite 1 With the TV Guide On Screen system open press MENU and select the SCHEDULE menu 2 Select FAVORITES in the sub menu bar A list of the programs you set as favorites will display You can then either cancel a favorite o...

Page 58: ...e backward 24 hours From the SORT menu you can schedule programs as favorites or to record or open INFO windows for a selected listing For details on the FAVORITE RECORD and INFO buttons see pages 56 57 Sort menu Alphabetical sort Sort menu Children All sort Sort menu Movies sort LISTINGS menu continued Viewing panel ads and channel ads Panel ads and channel ads provide promotional information for...

Page 59: ...e the channel up the GREEN button to move the channel down or the Channel Number buttons to assign the position by number To reassign a channel number Highlight the channel number and then press the Channel Number buttons on the remote control to key the new number Review options change the auto display setting The TV Guide On Screen program guide automatically opens each time you turn on the TV T...

Page 60: ... to highlight an item and then press INFO to display the item To closed an expanded promotion INFO window Press the button MESSAGES menu The MESSAGES menu displays a list of messages containing consumer information sent to you by the TV Guide On Screen service To open the MESSAGES menu 1 Press GUIDE to open the TV Guide On Screen system 2 Press MENU to select the Menu Bar 3 Use the x buttons to se...

Page 61: ...anel Using the TV s features 8 Using the digital tuner hold The digital tuner hold helps to protect the digital tuner s signal when you record a digital signal If you are recording to a D VHS device the digital tuner hold is automatically activated If you are recording to an analog VCR using the REC OUT jacks you need to manually turn on the digital tuner hold To manually turn on the digital tuner...

Page 62: ...ng the TV s features Input labeling example If you connect a VCR to VIDEO 1 a DVD player to ColorStream HD 1 and a high definition device to DVI HDCP and then label the video input sources accordingly as shown in step 4 at left when you press INPUT or TV VIDEO the INPUT SELECTION screen would then look like the screen below right ANT 1 Video 1 Video 2 Video 3 ColorStream HD 1 ColorStream HD 2 DVI ...

Page 63: ...Channel Number buttons 0 9 on the remote control For example to select channel 125 press 1 2 5 Tuning digital channels Press the Channel Number buttons 0 9 on the remote control followed by the dash button and then the sub channel number For example to select digital channel 125 1 press 1 2 5 1 Tuning channels Upper channels Current channel highlighted Lower channels Channel label Switching betwee...

Page 64: ... Natural picture size In Natural picture size the program will be displayed close to its originally formatted proportion Some program formats will display with side bars and or bars at the top and bottom see examples below PIC SIZE NOTICE OF POSSIBLE ADVERSE EFFECTS ON TV PICTURE TUBE Avoid displaying stationary images on your TV screen for extended periods of time Fixed non moving images such as ...

Page 65: ...re picture is uniformly enlarged it is stretched the same amount both wider and taller retains its original proportion Part of the picture at the top and bottom is hidden To view the hidden areas see Scrolling the Theater Wide picture on page 66 Theater Wide 3 picture size The picture is non uniformly enlarged it is stretched wider to fill the width of the screen but only slightly stretched taller...

Page 66: ...To turn off the AUTO ASPECT feature Select OFF in step 3 above You can set separate scroll settings for Theater Wide 2 and Theater Wide 3 modes To set the scroll settings 1 Press MENU and open the VIDEO menu 2 Highlight THEATER SETTINGS and press ENTER Video Picture Settings Theater Settings Advanced Picture Settings 3 In the PICTURE SIZE field select either Theater Wide 2 or Theater Wide 3 you ca...

Page 67: ...ed to 1080i If you notice flicker in a 480p image try setting the DISPLAY FORMAT to 540p Selecting the cinema mode When you view a DVD 3 2 pulldown processed from a DVD player connected to the ColorStream component video or DVI HDCP inputs on the TV smoother motion can be obtained by setting the CINEMA MODE to FILM To set the CINEMA MODE to FILM 1 Press MENU and open the VIDEO menu 2 Highlight THE...

Page 68: ...s on screen press the Channel Number buttons for the channel you want to watch in the POP window To change to the next programmed channel press POP CH y or z If you try to watch a TV program that exceeds your set rating limits the program will be blocked see Using the Locks menu on pages 84 87 POP BLOCKED 24 To close the POP window Press SPLIT or EXIT POP CH yz SPLIT SOURCE Note You cannot view di...

Page 69: ...epeatedly press x or to change the size See notes at right SWAP FREEZE Still picture NOTICE OF POSSIBLE ADVERSE EFFECTS ON TV PICTURE TUBE Avoid displaying stationary images on your TV screen for extended periods of time Fixed non moving images such as still PIP POP windows or black gray bars in wide screen or PIP POP formats can become permanently engrained in the picture tube This type of damage...

Page 70: ...a moving picture The main picture is always moving 3 Press ENTER to display the channel you selected in step 2 as the main picture To cancel the channel scan without changing the channel Press EXIT Moving picture CH SCAN NOTICE OF POSSIBLE ADVERSE EFFECTS ON TV PICTURE TUBE Avoid displaying stationary images on your TV screen for extended periods of time Fixed non moving images such as still PIP P...

Page 71: ...the seven pictures which becomes a moving picture The main picture is always moving 3 Press ENTER to display the channel you selected in step 2 as the main picture 6 3 4 5 6 7 8 9 Moving picture NOTICE OF POSSIBLE ADVERSE EFFECTS ON TV PICTURE TUBE Avoid displaying stationary images on your TV screen for extended periods of time Fixed non moving images such as still PIP POP windows or black gray b...

Page 72: ...st the picture quality 1 Press MENU and open the VIDEO menu 2 Highlight PICTURE SETTINGS and press ENTER 3 Press z or y to select the picture quality you want to adjust CONTRAST BRIGHTNESS COLOR TINT or SHARPNESS and then x and to adjust the setting as described in the table below Video Picture Settings Theater Settings Advanced Picture Settings Picture Settings ANT 1 Mode Contrast Brightness Colo...

Page 73: ...sh Tone CableClear DNR Color Temperature Save Done Reset On On VSM Off Off Cool 4 To temporarily save the new settings highlight DONE and press ENTER To permanently save the new settings highlight SAVE and press ENTER To turn off the flesh tone feature Select OFF in step 3 above Adjusting the picture continued To activate the ALS 1 Press MENU and open the VIDEO menu 2 Highlight ADVANCED PICTURE SE...

Page 74: ...allows you to reduce visible interference in your TV picture This is useful when receiving a broadcast with a weak signal especially a Cable channel or playing back a video cassette or disc damaged by repeated use Note The CableClear DNR feature does not function in DVI ATSC digital Cable VIDEO and ColorStream modes To turn on CableClear DNR 1 Press MENU and open the VIDEO menu 2 Highlight ADVANCE...

Page 75: ...ed When the signal reception is weak When the signal reception is non standard Using the closed caption mode Advanced closed captions You can customize the closed caption display characteristics by changing the background color and the text size type edge and color Note This feature is available for digital channels only To customize the closed captions 1 Press MENU and open the PREFERENCES menu 2...

Page 76: ... language music or other audio information when provided by individual stations The MTS feature is not available when the TV is in VIDEO mode When the TV receives a stereo or SAP broadcast the word STEREO or SAP appears on screen when the TV is turned on the channel is changed or RECALL is pressed To listen to stereo sound 1 Press MENU and open the AUDIO menu 2 Highlight AUDIO SETUP and press ENTE...

Page 77: ...e audio continued Using the StableSound feature The StableSound feature limits the highest volume level to prevent extreme changes in volume when the signal source changes for example to prevent the sudden increase in volume that often happens when a TV program switches to a commercial To turn on the StableSound feature 1 Press MENU and open the AUDIO menu 2 Highlight AUDIO SETTINGS and press ENTE...

Page 78: ...alues 1 Highlight RESET in the Advanced Audio Settings menu and press ENTER 2 Highlight SAVE and press ENTER Advanced Audio Settings SRS WOW 3D SRS WOW Focus SRS WOW TruBass Save Done Reset Dolby Virtual SRS TruSurround Off Off Off Off Adjusting the audio continued Using the Dolby Virtual SRS TruSurround sound feature The Dolby Virtual SRS TruSurround sound feature allows you to enjoy virtual surr...

Page 79: ...P MAIN Outputs the sound of the main program through the AUDIO OUT jacks POP Outputs the sound of the POP program through the AUDIO OUT jacks Audio Setup MTS Language Speakers Audio Out Optical OutputFormat Save Done Reset English Stereo On Main Dolby Digital Audio Setup MTS Language Speakers Audio Out OpticalOutputFormat Save Done Reset English Stereo On POP Dolby Digital 4 To temporarily save th...

Page 80: ... the TV however you may be able to change settings on your camera or use a computer to change the format or directory structure of your memory card so that the photos will display The TV will not display pictures from directories on a memory card that are more than 10 levels down from the top level directory ______________ is a trademark of Toshiba Corporation SD is a trademark of SD Card Associat...

Page 81: ...ect another image Press CH RTN to stop the slide show and return to the picture viewer Press EXIT to stop the slide show and return to the regular TV screen To set the slide show interval Note The picture viewer must be closed before you can set the slide show interval 1 Press MENU and open the SETUP menu 2 Highlight SLIDE SHOW INTERVAL and press ENTER Select the interval from the menu sidebar 2 5...

Page 82: ...ld Note When a power failure occurs the ON OFF timer settings may be cleared To display the on time setting press RECALL To turn off the ON OFF timer Select NOT SET in step 3 above On Off Timer Turn TV ON Day Save Cancel Not Set Clear Setting the sleep timer You can set the sleep timer to turn off the TV at a set length of time to a maximum of 3 hours The sleep timer turns off the TV one time only...

Page 83: ...utomatically turn itself off after approximately 15 minutes if it is tuned to a vacant channel or a station that completes its broadcast for the day This feature does not work in VIDEO mode Understanding the last mode memory feature If the power is cut off while you are viewing the TV the Last Mode Memory feature automatically turns on the TV when the power is resupplied If the power is going to b...

Page 84: ... LOCKS menu below opens Locks Enable Rating Blocking Off Edit Rating Limits Channels Block Input Lock Off Front Panel Lock Off Game Timer Off New PIN Code Using the Locks menu 9 The LOCKS menu includes the RATING BLOCKING CHANNELS BLOCK INPUT LOCK FRONT PANEL LOCK GAME TIMER and NEW PIN CODE features You can use these features after entering the correct PIN code If you cannot remember your PIN cod...

Page 85: ...es by rating V Chip Ratings Description and Content themes TV MA Mature Audience Only This program is specifically designed to be viewed by adults and therefore may be unsuitable for children under 17 L Crude or indecent language S Explicit sexual activity V Graphic violence TV 14 Parents Strongly Cautioned This program contains some material that many parents would find unsuitable for children un...

Page 86: ...Block Input Lock Off Front Panel Lock Off Game Timer Off New PIN Code 5 Press yzx to highlight the channel you want to block then press ENTER which puts an X in the box next to that channel Channels Block Block All B 3 B 5 A 5 1 A 5 2 A 5 3 A 5 4 A 5 5 A 6 B 6 1 B 6 2 B 10 1 B 10 2 Save Cancel Allow All B 10 3 B 10 4 B 10 5 A 11 6 Repeat step 5 for other channels you want to block 7 Highlight SAVE...

Page 87: ...imer has expired and you will have to deactivate the video lock as described above NOTICE OF POSSIBLE ADVERSE EFFECTS ON TV PICTURE TUBE Avoid displaying stationary images on your TV screen for extended periods of time Fixed non moving images such as still PIP POP windows black gray bars in wide screen picture or PIP POP formats or some video games can become permanently engrained in the picture t...

Page 88: ... TV VIDEO on the TV front panel press INPUT or TV VIDEO a second time which will change to the next video input source and display the Input Selection window Cannot view external signals If you cannot view signals from external devices connected to VIDEO 1 VIDEO 2 or channel 3 or 4 VIDEO 3 or ColorStream or from channels 3 or 4 make sure the INPUT LOCK is set to OFF page 86 Black box on screen Set...

Page 89: ...he device page 27 If the TV stops responding to the controls on the remote control or TV front panel and you cannot turn off the TV press the RESET button on the front panel see page 8 for details If the TV still does not act as expected use the Restore Factory Defaults procedure as described on page 52 Channel tuning problems Make sure the remote control is set to the correct device mode page 27 ...

Page 90: ... the television the VCR must be tuned to the output channel and powered ON 7 Q I had a power outage Do I need to go through initial setup of the TV Guide On Screen system again A No The information you entered is in a protected part of the TV Guide On Screen system memory Note For Cable box users the TV must be OFF and the Cable box must be left ON for the TV Guide On Screen system to receive chan...

Page 91: ...must be plugged in and the cable box must be ON g A V Cable The VCR was turned OFF If the connection includes stereo cables with cable box to VCR and stereo connection from VCR to television the VCR must be ON 4 Q How do I add delete or change the assigned number of channels on the TV Guide On Screen system A See the Change channel display section in the TV Guide On Screen owner s manual 5 Q If a ...

Page 92: ...t my VCR change channels and why does it change to the wrong channel A There are several possibilities without a cable box a The cable box code was entered when no cable box is used Redo initial setup b The manual preset VCR must be left on the channel to be recorded c The electronic preset VCR is incompatible unless used in conjunction with a cable box d The VCR channels are not programmed into V...

Page 93: ...ARIABLE AUDIO OUTPUT 0 300 mV rms 30 modulation equivalent 4 7 k ohm REC RECORD OUT VIDEO 1 V p p 75 ohm negative sync AUDIO 200 mV rms 20 dBFS 4 7 k ohm For ATSC Digital Cable IEEE 1394 sources only Video Audio Terminals cont AUDIO CENTER CHANNEL INPUT 300 mV rms 30 modulation equivalent 10 k ohm DVI HDCP INPUT HDCP compliant E EDID 1 3 compliant DVI D uncompressed high speed digital single link ...

Page 94: ...Labor service charges for set installation setup adjustment of customer controls and installation or repair of antenna systems are not covered by these warranties Reception problems caused by inadequate antenna systems are your responsibility 5 Warranties extend only to defects in materials or workmanship as limited above and do not extend to any television or parts that have been lost or discarde...

Page 95: ...esponsibility 5 Warranties extend only to defects in materials or workmanship as limited above and do not extend to any television or parts that have been lost or discarded by you or to damage to television or parts caused by misuse accident Acts of God such as lightning or fluctuations in electric power improper installation improper maintenance or use in violation of instructions furnished by TC...

Page 96: ... E 51 57 65H93 Copyright 2003 TOSHIBA CORPORATION All rights reserved 96 Notes ...

Page 97: ... E 51 57 65H93 Copyright 2003 TOSHIBA CORPORATION All rights reserved 97 Notes ...

Page 98: ...eature 68 Double Window size adjustment 69 DTV receiver connection 14 DVD connection 15 DVHS A VC 22 DVI HDCP connection 18 E F G I EIA 775 22 FAV yz buttons 44 Favorite channels 44 Focus SRS WOW 78 Front of the TV 9 Front panel lock 87 Game timer 87 IEEE 1394 Firewire 22 INPUT button 61 Input lock 86 Integrated digital Tuning 7 IR blaster 25 L M Labeling video inputs 62 Language selection 41 Last...

Page 99: ...e picture 66 Secure Digital SD memory cards 80 Sleep timer 82 SmartMedia memory cards 80 Sound quality adjustments 77 SPEAKERS on off 79 Specifications 93 SpeedSurf 63 SRS WOW 78 StableSound 78 Stereo sound 76 Sub bass system SBS 77 S video cables 11 Index continued T TheaterNet button 46 Theaternet connection 45 TheaterNet setup 45 Theater wide picture 64 TouchFocus 50 Troubleshooting 88 TruBass ...

Page 100: ...COUVER 22171 FRASERWOOD WAY RICHMOND B C V6W 1J5 CANADA TEL 604 303 2500 HEAD OFFICE 327 KAMAKEE STREET HONOLULU HI 96814 U S A TEL 808 591 9281 MANUFACTURED BY HEAD OFFICE 82 TOTOWA ROAD WAYNE NJ 07470 U S A NATIONAL SERVICE DIVISION 1420 B TOSHIBA DRIVE LEBANON TN 37087 U S A ColorStream and StableSound are registered trademarks of Toshiba America Consumer Products Inc CableClear TouchFocus Surf...

Reviews: