Toshiba 46SV685DB Owner'S Manual Download Page 44

44

CONTROLS AND FEATURES

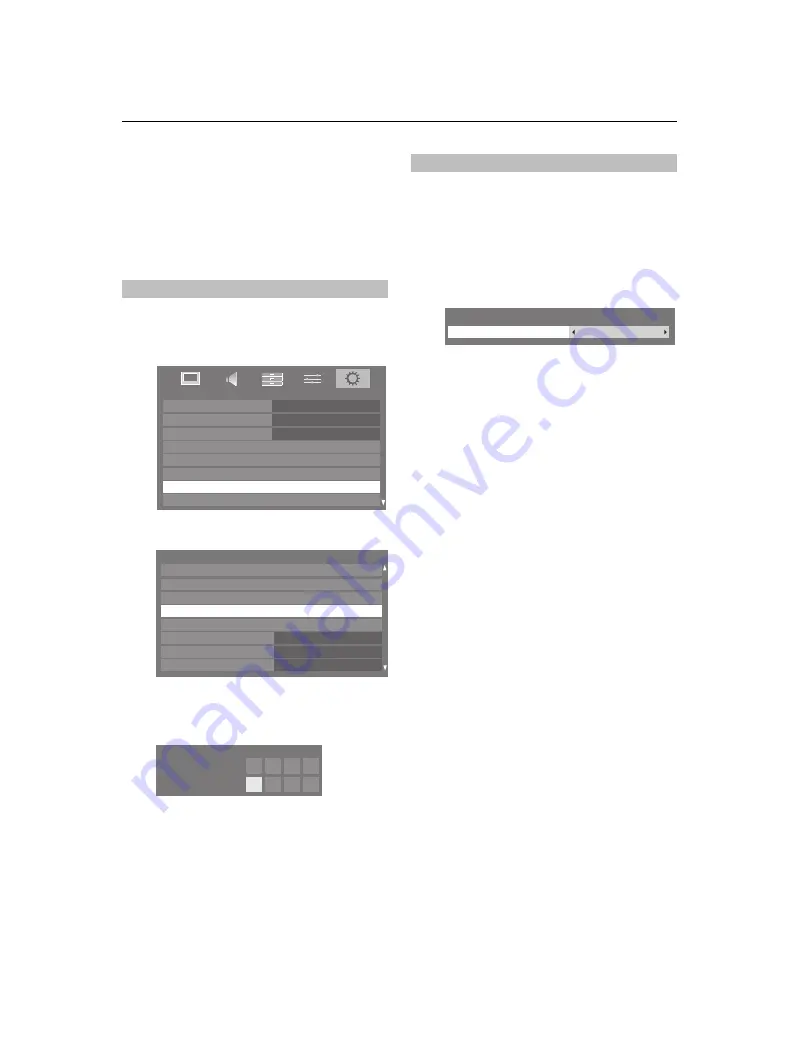
Digital settings – parental 
control

In order to prevent viewing of unsuitable films and 

programmes, channels and menus can be locked 

in digital mode. These can then only be accessed 

with a security code PIN.

a

Press 

MENU

 and 

c

 to select the 

SETUP

 menu.

b

Use 

b

 to select 

DTV Settings

, and then press 

Q

.

c

Press 

b

 to highlight 

PIN Setting

, and then press 

Q

.

d

Using the number buttons enter a four digit number. 
Once entered you will be prompted to confirm by 
entering again.

The PIN number is now set.

If the PIN code has been set, when 

Auto Tuning

 and 

Reset TV

 are executed, entering the PIN will be 

necessary.

The Parental Control feature allows you to block programmes 
according to their rating levels. If a PIN has been set, you will 

need to enter it before adjusting the level.

a

In the 

DTV Settings

 menu, press 

b

 to select 

Parental 

Control

, and then press 

Q

.

b

Use 

C

 or 

c

 to choose an option (

None

 or an age 

setting (4-17)).

To view blocked programmes, enter the PIN. To 
reactivate the Parental Control, turn the TV off and 
then on again.

Setting the PIN

SETUP

Menu Language

English

Country

Ant/Cable In

Auto Tuning 

ATV Manual Tuning 

DTV Settings

DTV Manual Tuning

Germany

Antenna

AV Connection

DTV Settings

Channels

Subtitle and Audio

Channel Options

PIN Setting

Parental Control

Auto Channel Update

DVB Character Set

Local Time Setting

Off

11:51

Standard

*   *   *   *

New PIN:

Confirm PIN:

PIN Setting

Parental Setup

Parental Setup

None

Parental Control

Summary of Contents for 46SV685DB

Page 1: ...SV6 D Digital Series ...

Page 2: ...0 CONTROLS AND FEATURES General controls 21 Quick Menu 21 Selecting positions 21 The Time Display analogue only 21 Stereo and Bilingual transmissions 21 Sound controls 22 Volume controls and mute sound 22 Dual 22 Bass Treble and Balance 22 Advanced Sound Settings 23 Dolby Volume 23 Dynamic Range Control 23 Audio Level Offset 23 Headphone Settings 23 Audio Description 24 Widescreen viewing 25 Pictu...

Page 3: ... TV 47 PC Settings 48 Horizontal and Vertical Position 48 Clock Phase 48 Sampling Clock 48 Reset 48 Input selection and AV connections 49 Input selection 49 External input skip 49 Input signal selection 49 Woofer setting 49 PC Audio 50 HDMI 1 Audio 50 HDMI Settings 50 Digital Audio Output 50 Using REGZA LINK 51 Enable REGZA LINK 51 TV Auto Power On 51 Auto Standby 51 Amplifier Control 51 Speaker P...

Page 4: ...and withdraw the mains plug before making or changing connections DO consult your dealer if you are ever in doubt about the installation operation or safety of your equipment DO be careful with glass panels or doors on equipment DO NOT obstruct the ventilation openings of the equipment with items such as newspapers tablecloths curtains etc Overheating will cause damage and shorten the life of the ...

Page 5: ...y images generated by 4 3 broadcasts text services channel identification logos computer displays video games on screen menus etc are left on the television screen for any length of time they could become conspicuous It is always advisable to reduce both the brightness and contrast settings Very long continuous use of the 4 3 picture on a 16 9 screen may result in some retention of the image at th...

Page 6: ... To display Contents Menu R TOP To access Top Menu R D DVD DVD Menus R D 16 s Stereo bilingual transmissions T AUDIO To access Audio menu R D 17 SUBTITLE Digital Subtitles or Analogue TEXT Subtitle pages if available T SET UP To access Setup menu R D 18 Widescreen viewing T R D 19 To call up text services T 20 When in TV mode MENU On screen menus ATV DTV To switch between ATV analogue television a...

Page 7: ... prevent acid from leaking into the battery compartment Dispose of them in accordance with instructions on page 59 of this manual Warning batteries must not be exposed to excessive heat such as sunshine fire or the like The performance of the remote control will deteriorate beyond a distance of five metres or outside an angle of 30 degrees from the centre of the television If the operating range b...

Page 8: ...ly LAN port is used to connect the TV to your home network A wide variety of external equipment can be connected to the back of the television therefore the relevant owner s manuals for all additional equipment must be referred to for exact instructions We recommend SCART 1 for a decoder and SCART 2 for a media recorder If connecting S VIDEO equipment set the INPUT for EXT 2 See page 49 If the tel...

Page 9: ...t required see illustration See HDMI 1 Audio on page 50 The HDMI 4 terminal is located on the side of the television To view the HDMI device video press the o button to select HDMI 1 HDMI 2 HDMI 3 or HDMI 4 mode Connect an HDMI to DVI adapter cable HDMI type A connector to the HDMI 1 terminal and audio cables to the PC HDMI1 AUDIO socket see illustration The recommended HDMI to DVI adapter cable l...

Page 10: ...e AV amplifier This function is available when one PC and one AV amplifier are connected separately However it may not operate properly if the PC is connected via the AV amplifier Before controlling the device s After completing the above connections set the REGZA LINK Setup menu as you desire see page 51 The connected devices must also be set For details see the operation manual for each device T...

Page 11: ...scenes A band may appear at the edges of the screen or parts of the picture may be obscured This is due to scaling of the picture by the set it is not a malfunction When PC input mode is selected some of the television s features will be unavailable e g Manual Settings in the SETUP menu Colour Tint Sharpness and Black White Level in the PICTURE menu If connecting a certain PC model with a unique P...

Page 12: ...ion and to upgrade it to a full professional version please visit http www transtechnology co jp products soft ucs NOTE The TV s home network feature is compatible with Microsoft Windows 2000 XP Vista The TV s home network connection allows access to file sharing only You will NOT be able to use the TV to access the Internet If you use a hub or switch to connect the TV to your home network you may...

Page 13: ...lter the volume press 2 To alter the programme position press b p B Press MENU and I i U or u to control the sound and picture options Press MENU to finish An S video cable provides better picture performance than a composite video cable If you connect an S Video cable to EXT 3 be sure to disconnect the standard composite video cable or the picture performance will be unacceptable Media Player fea...

Page 14: ... B to highlight Start Scan and then press Q NOTE If Cable is selected in step 7 additional setting options appear in the Auto Tuning screen See Ant Cable In section The television will start to search for available DTV and or ATV channels The progress bar will indicate the scan status You must allow the television to complete the search When the search is complete the television will automatically...

Page 15: ...ecuted The Quick Scan is a simplified version of the Full Scan that is designed to complete in less time DTV Start Frequency This sets the frequency from which the scan will begin DTV End Frequency This sets the frequency at which the scan will end Valid entry range for frequency items is 113 000 858 00 for C Book Other and 114 000 858 00 for Nordig C If numbers outside of this range are entered t...

Page 16: ...or example you might use the feature if the television cannot be connected to a media recorder decoder with a SCART lead or when you want to tune in a station on another System Use C and c to move across the screen and select any of the ATV Manual Tuning options Then use B or b to adjust the settings 1 Position The number to be pressed on the remote control to tune the channel 2 System Specific to...

Page 17: ...return to the list of channels and select the next number to tune k Press EXIT when you have finished l To name external equipment e g DVD on EXT 2 press o to select o2 then select Manual Settings from the SETUP menu m Press c to select Label then using B b C and c put in the required characters and then press Q to save Different Channel numbers may be displayed SETUP Menu Language English Country...

Page 18: ...trols on the television but can still be accessed by the number buttons on the remote control Channels may be moved and saved to the position of your choice a Select ATV Manual Tuning from the SETUP menu b With the list of channels showing use B or b to highlight the channel you want to move and press c c Use B or b to move through the list to your preferred position As you do so the other channel...

Page 19: ... specific baud rate KS s to be used for the manual scan DTV Settings The channel order may be changed to suit your personal preference a Select DTV Settings from the SETUP menu and press Q b Select Channels and press Q c With the list of channels showing use b or B to highlight the channel you want to move and press c d Use b or B to move through the list to your preferred position As you do so th...

Page 20: ...low the message a Select DTV Settings from the SETUP menu and press Q b Press b to select Dynamic Scan and use C or c to select On You can select either Home or Store mode Home is recommended for normal home use Select Store when using the television for displaying in a shop etc a Select Location from the SETUP menu b Press C or c to select Home or Store This is a digital television which is integ...

Page 21: ...e required programme number and if the word Dual appears press s to select Dual 1 Dual 2 or Mono Quick Menu Mode Quick menu item Description When viewing a TV programme or pictures from the external input Picture Mode See page 27 Picture Size See page 25 More Information See page 43 Sleep Timer See page 41 Media Player See page 32 Photo Frame See page 38 Headphone Level See page 23 Speaker Prefere...

Page 22: ...uage the DUAL feature allows selection between them a Press MENU and C or c to select SOUND b Use b to highlight Dual and then press C or c to choose between Dual 1 or Dual 2 The sound controls are accessible in digital and analogue modes a Select the SOUND menu b Press b to highlight Bass Treble or Balance and C or c to change the setting Mode Display Pressing c Stereo Stereo S Left S Right Dual ...

Page 23: ...et to Low or High Sometimes there can be large changes in volume when switching from a DTV 5 1ch to a DTV 2ch an ATV channel or an external input Using the Audio Level Offset feature reduces these volume differences a Set the volume level usually used when watching a DTV 5 1ch programme b Tune to a channel which is DTV 2ch or ATV or an external input c In the SOUND menu press b to highlight Audio ...

Page 24: ...a From the SOUND menu select Audio Description and press Q b Highlight Audio Description and then press C or c to select On c To adjust the level of the audio description sound to the main sound highlight Mixing Level and use C or c d Highlight Speaker Out and then press C or c to select On or Off On sound from both the headphone output and speakers Off sound from the headphone output See Headphon...

Page 25: ...oadcast this setting will raise the picture to ensure that all the text is displayed CINEMA When watching all sides panel format films video tapes this setting will eliminate or reduce the black bars at all sides of the screen by zooming in and selecting the image without distortion WIDE Use this setting when watching a widescreen DVD widescreen video tape or a 16 9 broadcast when available Due to...

Page 26: ...l source via HDMI or PC terminal PC WIDE This setting will show the picture without over scan and side panel This option is only available when watching a PC signal source via HDMI or PC terminal Dot by Dot is a non scaling display Depending on the input signal format the picture is displayed with side panels and or bars at the top and bottom e g VGA input source NATIVE This setting will show the ...

Page 27: ...eyed out when it is selected Store mode is only available when Location is set to Store Game mode is available in external input mode other than aerial input When you select Game mode suitable widescreen formats will be selected PC mode is available in RGB PC input mode or HDMI input mode a In the PICTURE menu press b to select Picture Mode b Press C or c to select the picture mode you prefer and ...

Page 28: ...to return to the previous menu To return to the factory settings select Reset and press Q Colour Temperature increases the warmth or coolness of the picture by increasing the red or blue tint a In the Advanced Picture Settings menu press b to select Colour Temperature and press Q b Press C or c to select the Colour Temperature setting 0 warm 10 cool c Press B or b to select an option you want to a...

Page 29: ... adjust the level The effect depends on the broadcast and is most noticeable on dark colours The static gamma feature allows you to adjust the levels of black in the picture a In the Advanced Picture Settings menu press b to select Static Gamma b Press C or c to adjust the level When watching a DVD the compression may cause some words or picture elements to become distorted or pixelated Using the ...

Page 30: ...ows the adjustment of motion smoothness a In the Advanced Picture Settings menu press b to select Film Stabilization b Press C or c to select Standard Smooth or Off NOTE When Picture Mode is set to AutoView the Film Stabilization feature will have an additional Auto mode This feature allows you to turn the colours red green and blue On Off individually in order to adjust each colour more accuratel...

Page 31: ...o select On or Off The Side Panel feature lightens or darkens the band on each side of the screen when in 4 3 or 14 9 format This helps prevent image retention of the band and can also make viewing in bright or dark conditions more comfortable a In the PREFERENCES menu and press b to select Side Panel b Press C or c to adjust 1 3 This feature is used to hold a still image on the screen Press r to ...

Page 32: ...the USB connector the prompt may not appear b Press C or c to select Yes and then press Q When the Auto Start function is On the Media Player menu will appear When you select No nothing happens NOTE The prompt will disappear after about 6 sec Manually open a Press MENU and C or c to select the APPLICATIONS menu b Press b to select Media Player and then press Q c Press b or B to select Photo Movie ...

Page 33: ...e the photo content manually When moving from Multi View to the Single View the currently selected photo shall be displayed a Press c to view the next photo Press C to view the previous photo b Press B to rotate the image 90 clockwise Press b to rotate the image 90 counterclockwise c Press to display file status information file number photo title date and time taken resolution etc The information...

Page 34: ...just the PICTURE Picture Size and SOUND menu functions from the QUICK menu To select subtitle and audio languages Press SUBTITLE repeatedly to select your preferred subtitle language Press AUDIO repeatedly to select your preferred audio language To set the repeat mode a Press QUICK to open the Quick Menu b Press C or c to select Off All or 1 c Press RETURN To close the Movie Viewer a Press EXIT To...

Page 35: ...ext file will automatically start to play from the beginning Depending on the file size it may take some time for playback to begin During playback Press W w to pause To resume normal playback press PLAY c To play in fast reverse or fast forward directions press CC or cc during playback Each time you press the CC or cc the playback speed will change To locate a specific file press Z or z repeatedl...

Page 36: ...e 32 select the Server device and then press Q To display device information a While the Photo list Movie list or Music list is on the screen press QUICK to open the Quick Menu b Press B or b to highlight Device Information and then press Q To open the Media Player DLNA the DLNA Logo and DLNA CERTIFIED are trademarks service marks or certification marks of the Digital Living Network Alliance Conte...

Page 37: ...art again from the beginning of the file If a file plays to the end in full screen mode you will also go back to the preview window and the file will play from the beginning Rewind Fast Forward See page 34 Skip to previous next video See page 34 Repeat play See page 34 Subtitle Audio Language selection See page 34 Picture Size selection See page 25 PICTURE Settings See page 27 SOUND Settings See p...

Page 38: ... a Press QUICK to open the Quick Menu b Press B or b to select Photo Frame and then press Q to open Photo Frame To close the Photo Frame a Press EXIT In the preview screen you can set various settings for Photo Frame Photo Select a In the Photo Frame Setup menu press B or b to select Photo Select and then press Q b If the device selection screen appears press B or b to select the appropriate devic...

Page 39: ...ess C or c to select Left or Right Auto Power Off Press C or c to select Off 00 30 01 00 02 00 04 00 06 00 or 12 00 If the Photo Frame window is left open the TV will automatically turn off after the set length of time maximum 12 hours d Press RETURN e Select Start and then press Q NOTE The clock display will only appear when time from a digital broadcast is available The Photo and Settings items ...

Page 40: ...elect an open timer position then press Q The Edit Timer menu will now appear on screen d Press B and b to go through the list adding the details of the programme by using the number buttons and C and c to make selections e When all of the details have been entered press Q to save the timer The ORANGE RED programme timer indicator on the front of the television will be lit see page 58 for details ...

Page 41: ... 1 HDMI 2 HDMI 3 HDMI 4 or PC Channel Set the channel that will be tuned when the television turns on NOTE When an external input is selected in the Input field a channel cannot be selected Volume Set the volume that will be applied when the television turns on Time until Power On only for DTV Clock Off mode Set the amount of time from now until the TV turns on using the number buttons maximum of ...

Page 42: ...rmation screen A check mark will appear if the timer is a Reminder Timer e Press b to select Also Details of programmes that have started on other channels will be provided Use C or c to change the display contents On screen Information icons Information 10 34 Tue 26 Apr 4 CANAL English Now City Hospital 15 min left News 10 49 11 49 10 00 10 49 Next Also SD 16 9 50 OK RETURN Edit Timer 10 50 Tue 2...

Page 43: ... assign Four colours will be available to set Press RETURN to go back to the guide screen d Press the YELLOW button to access the Genre Search screen e Press C or c to select the genre Programmes listed will change for the new genre Press B or b to highlight a particular programme f When a current programme is selected pressing Q will tune to that programme When a future programme is selected pres...

Page 44: ...y The Parental Control feature allows you to block programmes according to their rating levels If a PIN has been set you will need to enter it before adjusting the level a In the DTV Settings menu press b to select Parental Control and then press Q b Use C or c to choose an option None or an age setting 4 17 To view blocked programmes enter the PIN To reactivate the Parental Control turn the TV of...

Page 45: ...n tuned the 8 icon will be displayed in the banner to indicate as a skipped channel Locking Channels stops the viewing of digital channels They can only be accessed by entering the PIN a From the DTV Settings menu press b to select Channel Options and press Q b Press c to select the Locked Channel list c Press B or b to select a channel position to be locked Press Q to set the lock A tick will app...

Page 46: ...t Normal or For Hard of Hearing b Press b to select Primary Audio Language or Secondary Audio Language and use C or c to select an option If more than one soundtrack is available use the s button to select between them The Common Interface Slot situated on the side of the television enables the insertion of a CAM Conditional Access Module and card These are purchased from a service provider and al...

Page 47: ...formation such as signal strength signal quality centre frequency modulation etc a From the SETUP menu press B or b to select System Information b Press Q to display the System Information c For information about the signal quality of a particular multiplex press B or b to select that multiplex d Press Q for a screen showing detailed technical information about the selected multiplex The TV will a...

Page 48: ...ear vertical lines on the screen a In the SETUP menu press b until PC Settings is highlighted b Press Q to select and then b to highlight Sampling Clock c Use C or c to adjust until the picture clears Use Reset to return all items to the original factory settings a In the SETUP menu press b until PC Settings is highlighted b Press Q to select and then b to highlight Reset c Press Q NOTE When a PC ...

Page 49: ...Settings and press Q c Press B or b to set Skip on and press Q d Press EXIT The input set to Skip is greyed out in the Input Selection window and is skipped over when you press o on the remote control This specifies the type of signal going into SCART 2 EXT 2 on the back of the television Please refer to the manufacturer s instructions for the connected equipment a In the SETUP menu press b until ...

Page 50: ...isplay timing adjustment function that allows HDMI source devices to accurately perform synchronization automatically INSTAPORT On This feature reduces the lag time when switching HDMI sources RGB Range Auto This feature adjusts RGB full range signal automatically When Limit is selected RGB signal is output in the range from 16 to 235 When Full is selected RGB signal is output in the range from 0 ...

Page 51: ...ference feature to become available a In the REGZA LINK Setup menu press b to highlight Amplifier Control b Press C or c to select On or Off This feature allows the audio output preference to be set to the TV speakers or AV amplifier speakers The AV Amplifier option lets the television s remote control adjust or mute the volume of the audio a In the REGZA LINK Setup menu press b to highlight Speak...

Page 52: ... can be enabled or disabled from the REGZA LINK Setup see page 51 NOTE Even if the equipment is showing a menu the television may automatically show the input source This feature depends on the connected equipment and television state If the television is turned off standby mode the television will send a message to turn off standby mode all of the REGZA LINK devices connected to the television Th...

Page 53: ...a Press MENU and C or c to select the PREFERENCES menu b Press B or b to highlight Network Setup then press Q c Press b to highlight Auto Setup and then press C or c to select On default This setup requires the data listed below You can get this data from either your ISP or the configuration utility for your DSL cable modem or router a Press MENU and C or c to select the PREFERENCES menu b Press B...

Page 54: ...lour of the numbers will change indicating that these pages have been loaded These sub pages will remain available to view until another page is chosen or in normal TV mode the channel is changed If Fastext is available four coloured titles will appear at the base of the screen To access one of the four given subjects press the relevant coloured button on the remote control For further information...

Page 55: ...ll appear in the top left of the screen The page will be held on screen until the button is pressed again C To enlarge the text display size Press C once to enlarge the top half of the page press again to enlarge the bottom half of the page Press again to revert to normal size D To select a page whilst viewing normal picture Enter the page number then press D normal picture will be displayed The t...

Page 56: ...e the VCR or DVD player is connected to the television as shown on page 8 and then select the correct input by pressing o Q Why is there a picture but no sound A Check all lead connections No sound or unacceptable format sound may be received Check the volume has not been turned down or that sound mute has not been selected Q Why is the VCR DVD picture in black and white A Check that the correct E...

Page 57: ...tles are not currently being transmitted by the broadcaster Q Why are there problems with analogue text A Good performance of text depends on a good strong broadcast signal This normally requires a roof or loft aerial If the text is unreadable or garbled check the aerial Go to the main index page of the text service and look for the User Guide This will explain the basic operation of text in some ...

Page 58: ...n Timer is set Programme Timer is set LED indication Condition Solution LED 3 LED 2 LED 1 Red Solid Green Solid Red Solid Power ON Standby On Timer is set Programme Timer is active OFF Green Solid Red Solid Power OFF Standby On Timer is set Programme Timer is NOT set Orange Solid OFF Red Solid Power OFF Standby On Timer is NOT set Programme Timer is set Red Solid OFF Red Solid Power ON Standby On ...

Page 59: ...atteries and or accumulators must be collected and disposed of separately from household waste If the battery or accumulator contains more than the specified values of lead Pb mercury Hg and or cadmium Cd defined in the Battery Directive 2006 66 EC then the chemical symbols for lead Pb mercury Hg and or cadmium Cd will appear below the crossed out wheeled dust bin symbol By participating in separa...

Page 60: ... output format on your PC to conform to a signal in the table below Pin No Signal name Pin No Signal name Pin No Signal name 1 R 6 Ground 11 NC 2 G 7 Ground 12 NC 3 B 8 Ground 13 H sync 4 NC 9 NC 14 V sync 5 NC 10 Ground 15 NC Format Resolution V Frequency H Frequency Pixel Clock Frequency VESA Standard DMT VGA 640 480 59 940Hz 31 469kHz 25 175MHz 72 809Hz 37 861kHz 31 500MHz 75 000Hz 37 500kHz 31...

Page 61: ... in TV systems This results in clear rich sound with more intelligible dialog Format Resolution V Frequency H Frequency Pixel Clock Frequency VESA Standard 480i 720 480i 59 940 60 000Hz 15 734 15 750kHz 27 000 27 027MHz 576i 720 576i 50 000Hz 15 625kHz 27 000MHz 480p 720 480p 59 940 60 000Hz 31 469 31 500kHz 27 000 27 027MHz 576p 720 576p 50 000Hz 31 250kHz 27 000MHz 1080i 1920 1080i 59 940 60 000...

Page 62: ...ace version USB 2 0 USB class Mass Storage File system FAT12 FAT16 and FAT32 SD card slot Interface version SDHC File system FAT12 FAT16 and FAT32 Stereo Nicam 2 carrier system Visible Screen Size approx Model 46 55 117cm 140cm Display 16 9 Sound output at 10 distortion Main 10W 10W Power consumption approx Model 46SV 55SV 243W 315W Standby Model 46SV 55SV 0 4W 0 4W Dimensions approx Model 46SV 78...

Reviews: