background image

Intr

oduction

Connecting

y

our T

V

Using the

Remote Contr

ol

Setting up

y

our T

V

Using the T

V’s

F

eatur

es

Appendix

Index

16

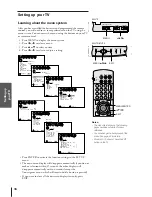
Setting up your TV

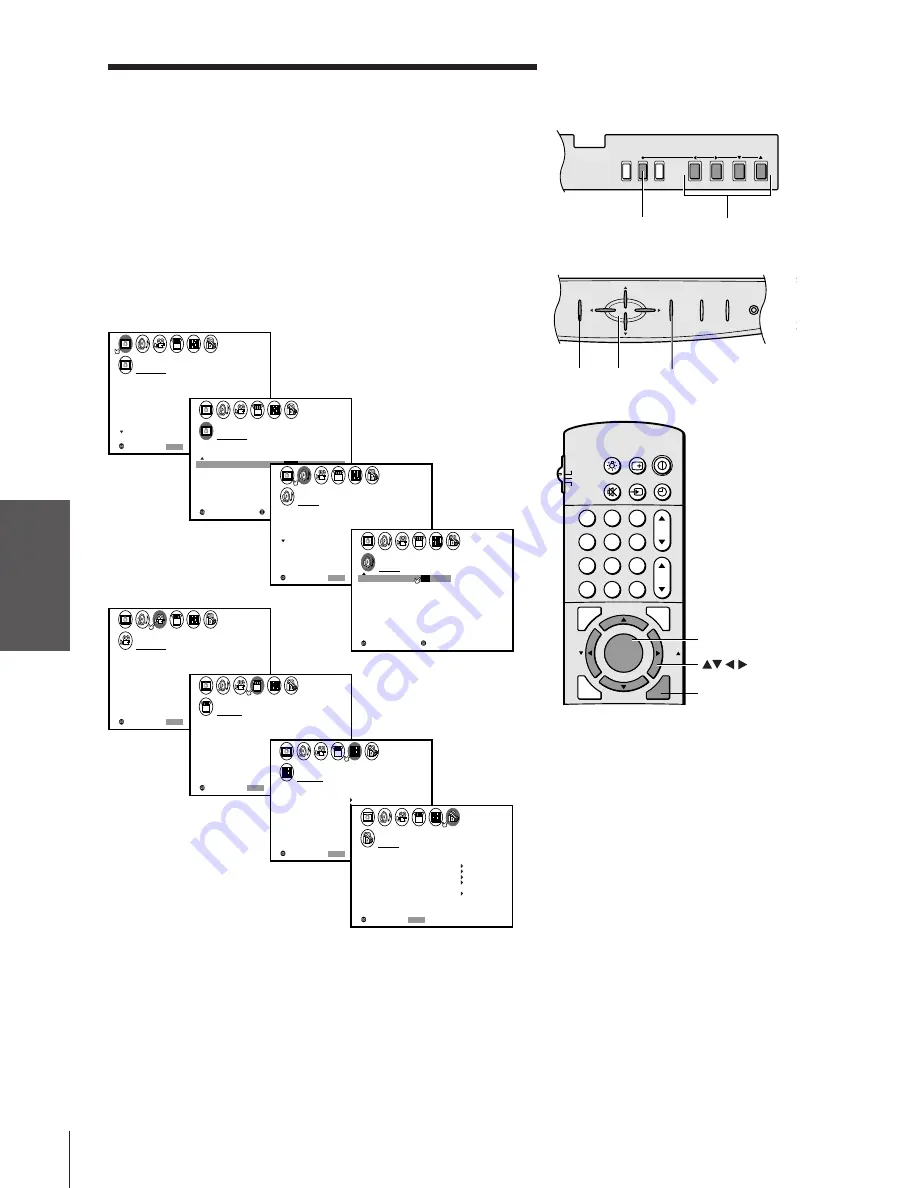
Learning about the menu system

After you have installed the batteries and programmed the remote
control, you will need to set some preferences on the TV using the
menu system. You can access the menu using the buttons on your TV
or remote control.

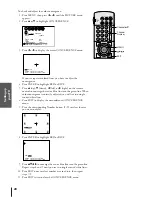
1. Press MENU to display the menu system.
2. Press 

x

 or 

 to select a menu.

3. Press 

y

 or 

z

 to select an item.

4. Press 

x

 or 

 to select or adjust a setting.

SELECT

:

P CTURE ANTENNA

I

MODE

SPORTS

PREFERENCE

CONTRAST
BR GHTNESS

I

COLOR

RESET
SAVE NEW

T I NT
SHARPNESS

5 0

5 0

5 0

0

1 0 0

END

:

EXIT

MOVE

:

SELECT

:

P CTURE ANTENNA

I

MODE

SPORTS

PREFERENCE

FLESH TONE

ON

OFF

COOL

OFF

/

DNR

CONVERGENCE 
SAVE NEW

COLOR

TEMPERATURE

SELECT

:

AUD O

I

MTS
BASS

STEREO

5 0

5 0

0

TREBLE

BALANCE

RESET

END

:

EXIT

MOVE

:

SELECT

:

AUD O

I

SBS
SBS L E V E L

ON

ON

ON

MA N

I

5 0

OFF

/

SPEAKERS

AUD O OUT

I

STABLE SOUND

SELECT

:

THEATER

SURROUND

P I CTURE S I ZE

1 0 8 0 I

SRS
OFF

END

:

EXIT

SELECT

:

SET UP

LANGUAGE
CLOCK
ANT

ADD

ADD

ERASE

/

TV
CH PROGRAM

CABLE

/ CABLE

1

ANT 1 ANT 2

/

/ 2

SET

ENGL SH

I

END

:

EXIT

SELECT

:

CUSTOM

T I MER
CC
FAVOR I

CH

OFF

1

TE

FAVOR I

CH2

TE

V
BACKGROUND

I DEO

CH L A B E L

L A B E L

I NG

END

:

EXIT

: SELECT

END

:

LOCKS

V CH I P

V

CH

NEW P I N

I

LOCK

LOCK

CODE

DEO

ENABLE

TV RAT
MPAA

I NG

RAT I NG

BLOCK I NG

BLOCK I NG OPT I ON

OFF

OFF

EXIT

• Press ENTER to activate the function settings in the SET UP

menu.

• The main menu display will disappear automatically if you do not

make a selection within 15 seconds; the other displays will
disappear automatically within 6 seconds (except the
Convergence menu, which will remain until a button is pressed).

• If you want to close all the on-screen displays instantly, press

EXIT.

DIO

R

DEMO MENU

VOLUME

TV/VIDEO

CHANNEL

Notes:

• The menu illustrations on the following

pages have been distorted for easy
reference.

• You can change the background of the

menu. See page 42 for details.

• Model 43H70 does not have the EXIT

button on the TV.

MENU

yzx


EXIT

MENU

VOL

VOL

CH

CH

EXIT

TV/VIDEO DEMO

POWER

MENU

x


•zy

43H70

55H70/61H70

1

2

3

4

5

6

7

8

9

ENT

100

0

CH

VOL

POWER

TIMER

RECALL

TV/VIDEO

MUTE

TV
CABLE

VCR

CH RTN

STROBE

EXIT

LIGHT

ADV/

PIP CH

ADV/

PIP CH

FAV

FAV

FAVORITE

MENU/

PREVIEW

ENTER

MENU/ENTER

EXIT

Summary of Contents for 43H70

Page 1: ... and serial number are on the back of your TV Record these numbers in the spaces below Refer to these numbers whenever you communicate with your Toshiba dealer about this TV Model number Serial number Introduction Connecting your TV Using the Remote Control Setting up your TV Using the TV s Features Appendix Index ...

Page 2: ...ght of the TV Model 43H70 must be used only with the Toshiba stand shown on page 44 Use with other stands may result in instability and cause possible injury Place the TV far enough away from the walls to allow proper ventilation This will prevent the TV from overheating and avoid possible damage to the TV Avoid dusty areas too Damage may occur if you leave the TV in direct sunlight or near a heat...

Page 3: ...tures 24 Changing the position of the small picture 24 Freezing the small picture 25 Using the Multi Window feature 25 Using the preview function 25 Using the favorite function 25 Using the strobe function 26 Using the LOCKS menu 26 Entering the PIN code 26 Using the V CHIP menu 27 ENABLE BLOCKING 27 TV RATING Independent rating system for broadcasters 27 MPAA RATING Independent rating system for ...

Page 4: ...anel and front panel behind the door provide all the terminal connections you will need to connect other equipment to your TV See Connecting your TV on page 5 VIDEO 3 IN VIDEO S VIDEO AUDIO L MONO R DEMO MENU VOLUME TV VIDEO CHANNEL POWER MENU VOL VOL CH CH EXIT TV VIDEO DEMO POWER 1 2 3 4 5 6 7 8 9 ENT 100 0 CH VOL POWER TIMER RECALL TV VIDEO MUTE TV CABLE VCR CH RTN S T R O B E E X I T LIGHT STO...

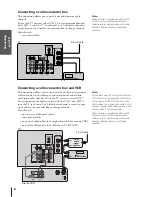
Page 5: ...erformance ColorStream cables can only be used with ColorStream compatible components Connecting a VCR This connection allows you to watch local channels and video programs play or record on the VCR while watching TV and record from one channel while watching another channel You will need one coaxial cable one pair of audio cables one single audio cable for a mono VCR one video cable one S video c...

Page 6: ...l 3 or 4 whichever channel is vacant in your area and use the converter box to change channels You will need one two way cable signal splitter three coaxial cables one pair of audio cables one single audio cable for a mono VCR one video cable one S video cable for an S VHS VCR Note When you use a converter box with your TV the remote control will not operate some features such as programming your ...

Page 7: ... distort the picture Do not connect the DVD player satellite receiver and VCR to the same video channel on the TV See the illustrations which show the DVD player satellite receiver connected to Video 1 and the VCR connected to Video 2 Caution The unauthorized recording of television programs videotapes and other materials may infringe upon the provisions of copyright laws OUT R L VAR AUDIO OUT VID...

Page 8: ... picture quality and realism You will need one coaxial cable three pairs of audio cables two single and one pair of audio cables for a mono VCR two video cables one set of ColorStream video cables one S video cable for a non ColorStream DVD player see notes at right Note For the highest possible picture quality you must use ColorStream video cables between the TV and DVD player You can connect the...

Page 9: ... pair of audio cables for a mono VCR two video cables one set of ColorStream video cables one S video cable for a non ColorStream DTV receiver see notes at right Note For the highest possible picture quality you must use ColorStream video cables between the TV and DTV receiver You can connect the ColorStream cables from the DTV receiver to either ColorStream jack on the TV HD1 or HD2 The ColorStre...

Page 10: ...an S video cable to Video 1 or Video 2 at the same time Do not connect the same VCR to the output and input jacks on the TV at the same time To dub or edit VCR 2 must select Line IN and the TV must select Video 1 The Video OUT jack does not output the PIP picture The Audio OUT jacks can output the sound of either the Main or PIP picture see Selecting the Audio OUT sound on page 41 Connecting a cam...

Page 11: ...eceiver for details about your surround sound system When the Audio Center Channel ON OFF switch is in the ON position the TV speakers will function only as center channel speakers Adjust the volume for the center channel speakers using the center level control on the A V receiver To use the TV speakers as normal speakers set the Audio Center Channel ON OFF switch to the OFF position Connecting an...

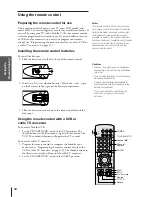
Page 12: ...To control a cable TV converter 1 Program the remote control to recognize the brand of your converter see Programming the remote control for use with a VCR or cable TV converter on page 13 The shaded buttons in the illustration at right will control the cable TV converter 2 Set the TV CABLE VCR switch to the CABLE position Note This remote control s functions may or may not operate your VCR or cab...

Page 13: ... and on the next page to find the corresponding code for your VCR or converter brand If more than one code is listed try each one separately until you find the one that works 2 If you are programming the remote control to operate your VCR Set the TV CABLE VCR switch on the remote control to VCR Cable converter Set the TV CABLE VCR switch on the remote control to CABLE 3 While holding down the RECA...

Page 14: ...MK 227 259 Toshiba 062 064 085 229 231 385 Totevision 056 259 Unitech 259 Vector 064 Vector Research 057 059 Video Concepts 059 064 080 Videosonic 259 Wards 019 054 061 066 067 081 091 168 231 259 XR 1000 019 054 091 Yamaha 057 Zenith 052 053 058 Cable TV converter codes Brand Code ABC 020 022 026 027 030 032 033 036 066 Antronix 041 Archer 041 058 172 Belcor 075 Cable Star 075 Cabletenna 041 Cabl...

Page 15: ...ows access to the Multi Window function page 25 EXIT exits programming menus page 16 MENU allows access to programming menus page 16 ENTER sets programmed menu information pages 16 and 21 yzx Buttons select or adjust programming menus page 16 ADV PIP CH yz Buttons cycle through PIP channels page 23 FAV zy Buttons cycle through favorite channels page 21 PIP Buttons allow access to PIP functions pag...

Page 16: ... LANGUAGE CLOCK ANT ADD ADD ERASE TV CH PROGRAM CABLE CABLE 1 ANT1 ANT2 2 SET ENGL SH I END EXIT SELECT CUSTOM T I MER CC FAVOR I CH OFF 1 TE FAVOR I CH2 TE V BACKGROUND I DEO CH LABEL LABEL I NG END EXIT SELECT END LOCKS V CH I P V CH NEW P I N I LOCK LOCK CODE DEO ENABLE TV RAT MPAA I NG RAT I NG BLOCK I NG BLOCK I NG OPT I ON OFF OFF EXIT Press ENTER to activate the function settings in the SET...

Page 17: ...8 29 30 31 32 33 34 35 1 2 3 4 5 6 7 8 9 10 11 12 13 14 15 16 17 18 19 20 21 22 23 24 25 26 27 28 29 30 31 32 33 34 35 SET UP LANGUAGE CLOCK ANT ADD ADD ERASE TV CH PROGRAM CABLE CABLE 1 ANT1 ANT2 2 SET ENGL SH I 3 Press x or to highlight either ANT 1 or ANT 2 depending on the antenna terminal you wish to use Using the TV VIDEO button on the TV To use the TV VIDEO button on the TV to monitor or ch...

Page 18: ...9 10 11 12 13 14 15 16 17 18 19 20 21 22 23 24 25 26 27 28 29 30 31 32 33 34 35 SET UP LANGUAGE CLOCK ANT ADD ADD ERASE TV CH PROGRAM TV CABLE CABLE 1 ANT1 2 SET ENGL SH I If you use an antenna choose TV If you use cable choose CABLE 4 Press z to select CH PROGRAM 1 1 2 3 4 5 6 7 8 9 10 11 12 13 14 15 16 17 18 1 2 3 4 5 6 7 8 9 10 11 12 13 14 15 16 17 18 2 3 4 5 6 7 8 9 10 11 12 13 14 15 16 17 18 ...

Page 19: ...4 for other channels you want to add or erase Changing channels To change the channel you can change the programmed channels using the remote control select a channel directly using the remote control scan the channels using the TV buttons To change to the next programmed channel Press Channel y or z on the TV or remote control To change to a specific channel programmed or unprogrammed Press the C...

Page 20: ...e red or blue line into the green line When color convergence is correctly adjusted you will see two single crossed white lines 6 Press EXIT to display the circumference CONVERGENCE menu 7 Press the corresponding Number button 1 9 to select the area you want to adjust 1 1 2 3 4 5 6 7 8 9 10 11 12 13 14 15 16 17 18 1 2 3 4 5 6 7 8 9 10 11 12 13 14 15 16 17 18 2 3 4 5 6 7 8 9 10 11 12 13 14 15 16 17...

Page 21: ...H LABEL LABEL I NG 1 1 2 3 4 5 6 7 8 9 10 11 12 13 14 15 16 17 18 1 2 3 4 5 6 7 8 9 10 11 12 13 14 15 16 17 18 2 3 4 5 6 7 8 9 10 11 12 13 14 15 16 17 18 19 20 21 22 23 24 25 26 27 28 29 30 31 32 33 34 35 1 2 3 4 5 6 7 8 9 10 11 12 13 14 15 16 17 18 19 20 21 22 23 24 25 26 27 28 29 30 31 32 33 34 35 CUSTOM T I MER CC FAVOR I CH OFF 1 TE FAVOR I CH2 TE V BACKGROUND I DEO CH LABEL LABEL I NG 3 Press...

Page 22: ... appear over the channel number display each time you turn on the TV select a channel or press the RECALL button You can choose any four characters to identify the channels To create channel labels 1 Press MENU then press x or until the CUSTOM menu appears 2 Press y or z to highlight CH LABELING 3 Press x or to display the CH LABELING menu CH INPUT will be highlighted 1 1 2 3 4 5 6 7 8 9 10 11 12 ...

Page 23: ...7 8 9 10 11 12 13 14 15 16 17 18 2 3 4 5 6 7 8 9 10 11 12 13 14 15 16 17 18 19 20 21 22 23 24 25 26 27 28 29 30 31 32 33 34 35 1 2 3 4 5 6 7 8 9 10 11 12 13 14 15 16 17 18 19 20 21 22 23 24 25 26 27 28 29 30 31 32 33 34 35 CUSTOM T I MER CC FAVOR I CH OFF 1 TE FAVOR I CH2 TE V BACKGROUND I DEO CH LABEL LABEL I NG CH LABEL 06 CLEAR ABCD I NPUT 6 Press x or to erase the channel label 7 Repeat steps ...

Page 24: ... will be displayed in purple ColorStream HD1 and HD2 can not be selected P P SOURCE TV V I 1 DEO V I 2 DEO V I 3 DEO SELECT I ON I SOURCE TO SELECT To turn PIP off Press PIP once or twice depending on the size of the small picture screen you selected Switching the main and small pictures Press SWAP while you are using the PIP feature to switch the main and small pictures The main and small picture...

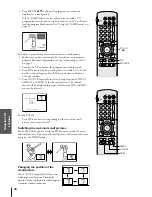
Page 25: ...y by the CH PROGRAM function The 6 picture multi search will start 4 6 7 9 12 15 To cancel the preview function Press PREVIEW again Using the favorite function 1 Press FAVORITE to scan the channels programmed in the TV memory by the favorite channel function page 28 The 9 picture multi search will start The first window will be displayed with a moving picture Each time you press FAVORITE the displ...

Page 26: ... 22 23 24 25 26 27 28 29 30 31 32 33 34 35 LOCKS BLOCK NG RESET I P I N CODE 11 10 1 1 2 3 4 5 6 7 8 9 10 11 12 13 14 15 16 17 18 1 2 3 4 5 6 7 8 9 10 11 12 13 14 15 16 17 18 2 3 4 5 6 7 8 9 10 11 12 13 14 15 16 17 18 19 20 21 22 23 24 25 26 27 28 29 30 31 32 33 34 35 1 2 3 4 5 6 7 8 9 10 11 12 13 14 15 16 17 18 19 20 21 22 23 24 25 26 27 28 29 30 31 32 33 34 35 LOCKS BLOCK NG ACT I VE I P I N COD...

Page 27: ...l that parents may find unsuitable for younger children D Some suggestive dialog L Infrequent coarse language S Some sexual situations V Moderate violence G General Audience Most parents would find this program suitable for all ages Y7 Directed to Older Children This program is designed for Y7FV children age 7 and above Note For those programs where fantasy violence may be more intense or more com...

Page 28: ... 17 18 2 3 4 5 6 7 8 9 10 11 12 13 14 15 16 17 18 19 20 21 22 23 24 25 26 27 28 29 30 31 32 33 34 35 1 2 3 4 5 6 7 8 9 10 11 12 13 14 15 16 17 18 19 20 21 22 23 24 25 26 27 28 29 30 31 32 33 34 35 LOCKS MPAA TV NONE RATING UNRATED BLOCK I NG OPT I ON OFF ON OFF V CH I P MENU TV NONE RATING Press x or to select ON Lock or OFF Unlock for programs rated NONE on TV PARENTAL GUIDELINES If you select ON...

Page 29: ... 3 4 5 6 7 8 9 10 11 12 13 14 15 16 17 18 1 2 3 4 5 6 7 8 9 10 11 12 13 14 15 16 17 18 2 3 4 5 6 7 8 9 10 11 12 13 14 15 16 17 18 19 20 21 22 23 24 25 26 27 28 29 30 31 32 33 34 35 1 2 3 4 5 6 7 8 9 10 11 12 13 14 15 16 17 18 19 20 21 22 23 24 25 26 27 28 29 30 31 32 33 34 35 LOCKS V CH I P V CH NEW P I N I LOCK LOCK CODE DEO 0 0 0 0 0 0 TV CABLE 0 0 ENABLE TV RAT MPAA I NG RAT I NG BLOCK I NG BLO...

Page 30: ...etting To set up the video lock 1 From the LOCKS menu select VIDEO LOCK 2 Press x or to highlight the appropriate video lock mode 1 1 2 3 4 5 6 7 8 9 10 11 12 13 14 15 16 17 18 1 2 3 4 5 6 7 8 9 10 11 12 13 14 15 16 17 18 2 3 4 5 6 7 8 9 10 11 12 13 14 15 16 17 18 19 20 21 22 23 24 25 26 27 28 29 30 31 32 33 34 35 1 2 3 4 5 6 7 8 9 10 11 12 13 14 15 16 17 18 19 20 21 22 23 24 25 26 27 28 29 30 31 ...

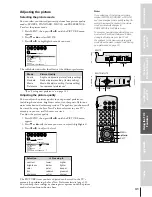
Page 31: ...3 14 15 16 17 18 1 2 3 4 5 6 7 8 9 10 11 12 13 14 15 16 17 18 2 3 4 5 6 7 8 9 10 11 12 13 14 15 16 17 18 19 20 21 22 23 24 25 26 27 28 29 30 31 32 33 34 35 1 2 3 4 5 6 7 8 9 10 11 12 13 14 15 16 17 18 19 20 21 22 23 24 25 26 27 28 29 30 31 32 33 34 35 P CTURE ANTENNA I MODE STANDARD PREFERENCE CONTRAST BR GHTNESS I COLOR RESET SAVE NEW T I NT SHARPNESS 5 0 7 5 5 0 5 0 0 The PICTURE items you have ...

Page 32: ...6 17 18 1 2 3 4 5 6 7 8 9 10 11 12 13 14 15 16 17 18 2 3 4 5 6 7 8 9 10 11 12 13 14 15 16 17 18 19 20 21 22 23 24 25 26 27 28 29 30 31 32 33 34 35 1 2 3 4 5 6 7 8 9 10 11 12 13 14 15 16 17 18 19 20 21 22 23 24 25 26 27 28 29 30 31 32 33 34 35 P CTURE ANTENNA I MODE PREFERENCE PREFERENCE FLESH TONE ON OFF MEDIUM OFF DNR CONVERGENCE SAVE NEW COLOR TEMPERATURE To turn off the flesh tone feature Choos...

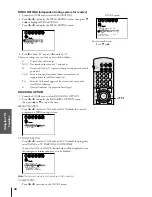
Page 33: ...ESH TONE ON AUTO COOL MED UM WARM I DNR CONVERGENCE SAVE NEW COLOR TEMPERATURE Resetting your picture adjustments 1 Press MENU then press x or until the PICTURE menu appears 2 Press y or z to highlight RESET 3 Press x or 1 1 2 3 4 5 6 7 8 9 10 11 12 13 14 15 16 17 18 1 2 3 4 5 6 7 8 9 10 11 12 13 14 15 16 17 18 2 3 4 5 6 7 8 9 10 11 12 13 14 15 16 17 18 19 20 21 22 23 24 25 26 27 28 29 30 31 32 33...

Page 34: ...es a 1080i letter box program on digital broadcasts the picture size automatically changes to the letter box format If the 1080i feature is OFF the picture will be stretched to fill the screen to the conventional 4 3 ratio To activate the 1080i picture size 1 Press MENU and then press x or until the THEATER menu appears 2 Press y or z to highlight 1080I PICTURE SIZE 3 Press x or to highlight ON 1 ...

Page 35: ...4 35 CUSTOM T I MER CC C2 FAVOR I CH OFF 1 TE FAVOR I CH2 TE V BACKGROUND I DEO CH LABEL LABEL I NG 3 Press x or to display the VIDEO LABEL menu 4 Press y or z to highlight the video source you want to label 5 Press x or to select the desired label 1 1 2 3 4 5 6 7 8 9 10 11 12 13 14 15 16 17 18 1 2 3 4 5 6 7 8 9 10 11 12 13 14 15 16 17 18 2 3 4 5 6 7 8 9 10 11 12 13 14 15 16 17 18 19 20 21 22 23 2...

Page 36: ... 25 26 27 28 29 30 31 32 33 34 35 CUSTOM T I MER CC C1 C2 C3 C4 T1 T2 T3 T4 FAVOR I CH OFF 1 TE FAVOR I CH2 TE V BACKGROUND I DEO CH LABEL LABEL I NG 4 Press x or to highlight the closed caption mode Select C1 C2 C3 or C4 to view captions Select C1 for translation of the primary language in your area Giant pandas eat leaves Select T1 T2 T3 or T4 to view Text WORLD WEATHER Temps Current F C Weather...

Page 37: ...lock To set the clock 1 Press MENU then press x or until the SET UP menu appears 2 Press y or z to highlight CLOCK SET 3 After the number position starts to blink press the Number buttons 0 9 to enter the correct time The clock operates on a 12 hour cycle 4 Press ENTER to start the clock 1 1 2 3 4 5 6 7 8 9 10 11 12 13 14 15 16 17 18 1 2 3 4 5 6 7 8 9 10 11 12 13 14 15 16 17 18 2 3 4 5 6 7 8 9 10 ...

Page 38: ...EO 1 1 2 3 4 5 6 7 8 9 10 11 12 13 14 15 16 17 18 1 2 3 4 5 6 7 8 9 10 11 12 13 14 15 16 17 18 2 3 4 5 6 7 8 9 10 11 12 13 14 15 16 17 18 19 20 21 22 23 24 25 26 27 28 29 30 31 32 33 34 35 1 2 3 4 5 6 7 8 9 10 11 12 13 14 15 16 17 18 19 20 21 22 23 24 25 26 27 28 29 30 31 32 33 34 35 AUD O I MTS BASS STEREO SAP MONO 5 0 5 0 0 TREBLE BALANCE RESET You can leave your TV in STEREO mode because it aut...

Page 39: ...ype Adjusting the sound quality You can change the sound quality of your TV by adjusting the bass treble and balance To adjust the sound quality 1 Press MENU then press x or until the AUDIO menu appears 2 Press y or z to highlight the item you want to adjust 1 1 2 3 4 5 6 7 8 9 10 11 12 13 14 15 16 17 18 1 2 3 4 5 6 7 8 9 10 11 12 13 14 15 16 17 18 2 3 4 5 6 7 8 9 10 11 12 13 14 15 16 17 18 19 20 ...

Page 40: ...m 1 Press MENU then press x or until the AUDIO menu appears 2 Press y or z to highlight SBS 3 Press x or to highlight ON 1 1 2 3 4 5 6 7 8 9 10 11 12 13 14 15 16 17 18 1 2 3 4 5 6 7 8 9 10 11 12 13 14 15 16 17 18 2 3 4 5 6 7 8 9 10 11 12 13 14 15 16 17 18 19 20 21 22 23 24 25 26 27 28 29 30 31 32 33 34 35 1 2 3 4 5 6 7 8 9 10 11 12 13 14 15 16 17 18 19 20 21 22 23 24 25 26 27 28 29 30 31 32 33 34 ...

Page 41: ...that are output from the Audio OUT jacks This is useful when amplifying or recording the PIP sound with the external equipment while hearing the sound of the main picture with the built in speakers To select the Audio OUT sound 1 Press MENU then press x or until the AUDIO menu appears 2 Press y or z to highlight AUDIO OUT 3 Press x or to select MAIN sound or PIP sound 1 1 2 3 4 5 6 7 8 9 10 11 12 ...

Page 42: ...ting from two preset types shaded and solid gray To select the background 1 Press MENU then press x or until the CUSTOM menu appears 2 Press y or z to highlight BACKGROUND 3 Press x or to select either a SHADED or SOLID background 1 1 2 3 4 5 6 7 8 9 10 11 12 13 14 15 16 17 18 1 2 3 4 5 6 7 8 9 10 11 12 13 14 15 16 17 18 2 3 4 5 6 7 8 9 10 11 12 13 14 15 16 17 18 19 20 21 22 23 24 25 26 27 28 29 3...

Page 43: ...rstanding the auto power off feature The TV will automatically turn off after approximately 15 minutes if it is tuned to a vacant channel or a station that completes its broadcast for the day This feature does not work in VIDEO mode Understanding the last mode memory feature If the power is cut off while you are viewing the TV the Last Mode Memory feature turns the TV on automatically when the pow...

Page 44: ...V rms 30 modulation equivalent 47 kohm ColorStream component video INPUT Y 1V p p 75 ohm PR 0 7 V p p 75 ohm PB 0 7 V p p 75 ohm AUDIO 150 mV rms 47 kohm VIDEO AUDIO OUTPUT VIDEO 1 V p p 75 ohm negative sync AUDIO 150 mV rms 30 modulation equivalent 4 7 kohm VARIABLE AUDIO OUTPUT 0 300 mV rms 30 modulation equivalent 4 7 kohm AUDIO CENTER CHANNEL INPUT 300 mV rms 30 modulation equivalent 10 kohm A...

Page 45: ...annel Check the antenna connections If you are using a VCR make sure the TV VCR button is set correctly Cannot receive above channel 13 Make sure the TV CABLE switch is set to the mode that corresponds to the signal source type cable company or outside antenna Black box appears on the screen Captioning may be turned on Unable to select a certain channel The channel may be locked out with the CH LO...

Page 46: ...ed this product This is one way to enable TACP THI to provide you with better customer service and improved products Failure to return the Demographic card will not affect your rights under this warranty Your Responsibility The above warranties are subject to the following conditions 1 You must retain your bill of sale or provide other proof of purchase 2 All warranty servicing of this product mus...

Page 47: ...memory 43 Locks menu 26 Menu system 16 MTS feature 38 Multi Window feature Favorite function 25 Preview function 25 Strobe function 26 MUTE button 38 P Picture adjustments COLOR TEMPERATURE 33 FLESH TONE 32 Picture mode 31 Picture quality 31 Picture in Picture PIP LOCATE button 24 PIP button 23 PIP CH yz buttons 24 SOURCE button 24 STILL button 25 SWAP button 24 Picture size selection 34 PREVIEW b...

Page 48: ...ONTREAL 1643 NORTH SERVICE RD TRANS CANADA HIGHWAY DORVAL QUEBEC H9P 1J1 CANADA TEL 514 856 4100 VANCOUVER 22171 FRASERWOOD WAY RICHMOND B C V6W 1J5 CANADA TEL 604 303 2500 HEAD OFFICE 327 KAMAKEE STREET HONOLULU HI 96814 U S A TEL 808 591 8377 MANUFACTURED BY PRINTED IN USA HEAD OFFICE 82 TOTOWA ROAD WAYNE NEW JERSEY 07470 NATIONAL SERVICE DIVISION 1420 B TOSHIBA DRIVE LEBANON TN 37087 ...

Reviews: