background image

35

Intr

oduction

Getting started

Basic oper

ation

Using T

V’s f

eatur

es

Equipment

connections

Ref

er

ence section

V

iewing teletest

NOTICE OF POSSIBLE ADVERSE EFFECTS

IN THE PLASMA DISPLAY PANEL

Avoid displaying stationary images on
your TV screen for extended periods of
time. Fixed (non-moving) images (such
as still picture or black bars in wide-
screen picture or computer display) can
become permanently ingrained in the
plasma display panel.

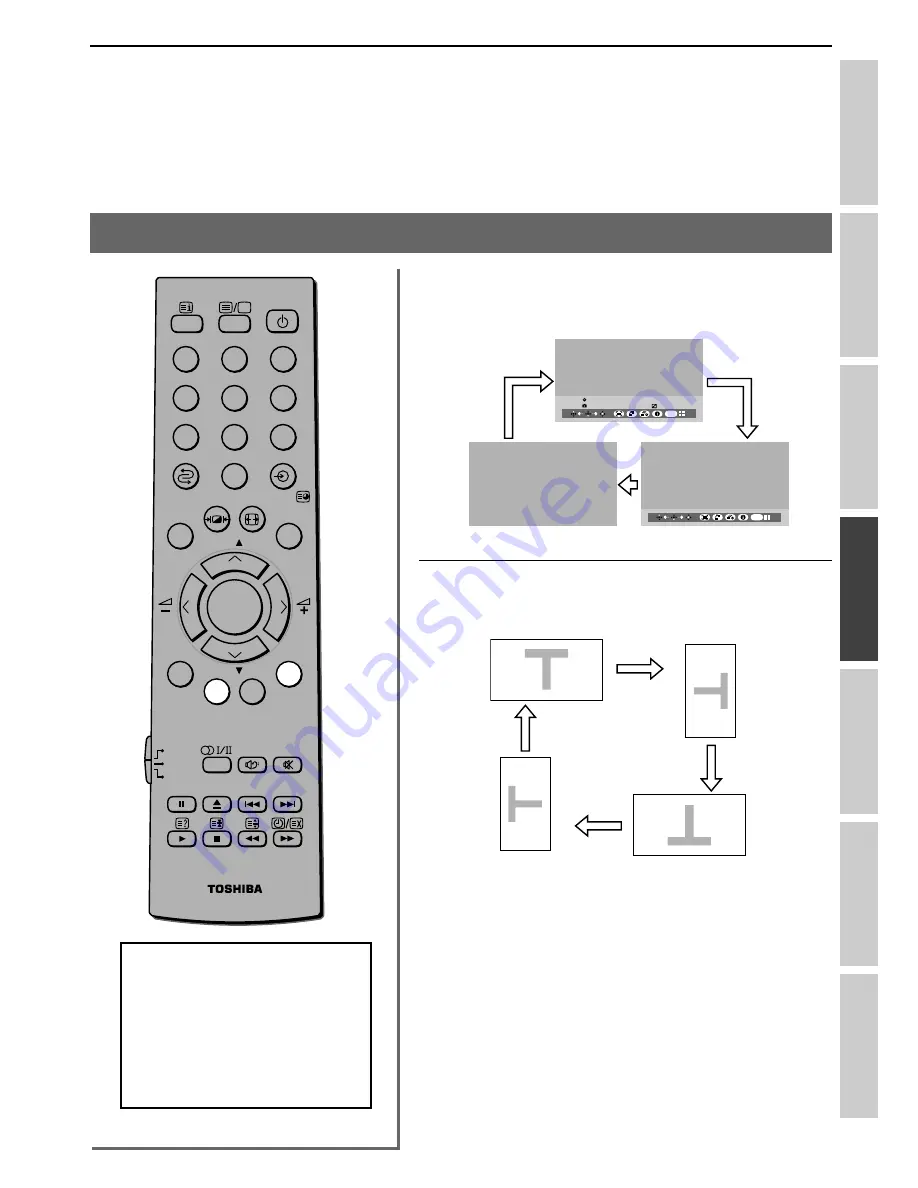
To select the information format:

Each time you press the 

B

 button, the on-screen information will

change as follows:

To select the rotation picture format:

Each time you press the 

G

 button, the picture rotates clockwise

by 90°:

To use the BRIDGE MEDIA (still picture) (continued)

Note:

This function also operates in the index menu.

EXIT

EXIT

5

/29

1280x960

2004-07-01  00:00:00 am
AUT_0242.JPG

DVD

MENU

P

P

2

1

3

5

4

6

8

7

9

VCR

TV

DVD

0

G

B

OK

CALL

MENU

EXIT

Summary of Contents for 42WP48A

Page 1: ... the TV Record these numbers in the spaces provided below Refer to them whenever you call upon your TOSHIBA dealer regarding this product Model number Serial number 42WP48T 42WP48E 42WP48A Introduction Getting started Basic operation Using TV s features Equipment connections Reference section Viewing teletest ...

Page 2: ...y adjustment 22 To activate the Digital Noise Reduction 23 To activate the Black stretch 23 To select the Color Temperature 23 Sound adjustment 24 Sound quality adjustment 24 Speaker On Off 24 MTS Multi channel TV Sound setting 25 Selecting the Dual 1 or Dual 2 mode 25 Stereo Bilingual selection 26 To activate deactivate BBE 27 To select the Audio output 27 Woofer Int Ext mode Bass boost Woofer sy...

Page 3: ...he earthing plug Never insert or remove the power plug with wet hands This may cause electric shock Do not place the TV in an unstabilized location such as on a shaky table incline or location subject to vibration The TV may drop or fall down which may cause injury or damage The slots and openings in the cabinet must never be blocked or covered Do not place the TV so that it is facing upwards or o...

Page 4: ... TV stand by using the supplied band see page 52 as shown in the illustration at right If the TV is not installed securely it may lean or fall over and cause an injury Precautions for moving the TV When moving the TV be sure to remove the power plug from the wall outlet and disconnect the antenna cable and audio video cables any steady ties band Fire or electric shock may result if the power cord ...

Page 5: ...V and remove the power plug from the outlet immediately and contact a service technician Do not insert objects metal or paper or pour water inside the TV from ventilation holes and other places These items may cause a fire or an electric shock If these objects are inserted inside the TV turn off the TV and remove the power plug from the outlet immediately and contact a service technician Be especi...

Page 6: ...e fire or electric shock Contact a service technician if the power cord is damaged If there is thunder or lightning do not touch the antenna cable or other connected cables You may suffer an electric shock Service Never repair modify or disassemble the TV by yourself If it may cause a fire or an electric shock Consult a service technician for inspection and repairs When a malfunction occurs or if ...

Page 7: ...sed by use or inability to use of product Toshiba is not liable for any damage caused by neglect of the instructions described in the owner s manual Toshiba is not liable for any damage caused by misuse or malfunction through simultaneous use of this product and the connected equipment Service continued Cleaning Remove the power plug before cleaning Do not use solvents such as benzine or thinner t...

Page 8: ...n extremely high level of precision technology however sometimes some parts of the screen may be missing picture elements or have luminous spots This is not a sign of a malfunction About infrared rays The plasma screen of this unit emits infrared rays in normal operation and may influence some infrared operated equipment by a use state although the measures of infrared ray filter etc are taken Loc...

Page 9: ...es with new ones If the batteries are dead or if you will not use the remote control for a long time remove the batteries to prevent battery acid from leaking into the battery compartment Connecting an antenna Optimum reception of color requires a good signal and will generally mean that an outdoor antenna must be used The exact type and positioning of the antenna will depend upon your particular ...

Page 10: ...the use of each control see the pages in brackets Remote sensor Power switch 13 Power ON indicator red 13 Input source selection 29 MENU 14 Volume 19 Menu 14 Program position 19 Menu 14 TV front view On timer indicator green 30 3 VIDEO 3 input terminals 44 Headphone jack 3 5mm stereo Card into the slot 32 Right side view Left side view Note Inserting the Headphone jack will mute the sound from all...

Page 11: ...b and pull cover RGB PC input 46 WOOFER output terminal 28 45 1 VIDEO 1 input terminals 45 C1 COMPONENT VIDEO INPUT terminals 45 C2 COMPONENT VIDEO INPUT terminals 45 AUDIO output terminals 45 Fixed Variable AUDIO input 46 Back view TV back view 2 VIDEO 2 input terminals 45 Wall outlet 110 240V AC 50 60 Hz Power cord MONITOR output terminals 45 HDMI input terminals 49 DVI AUDIO input 49 The exact ...

Page 12: ...tion 29 33 1 3 C1 C2 BM PC To access sub pages when in teletext 41 Picture size selection 20 EXIT 15 33 Menu 14 Program position 19 Teletext 42 Bass boost on off 28 External woofer on off 28 Sound mute 19 When in VCR or DVD mode Only for Toshiba VCR DVD players to PAUSE to EJECT to SKIP REWIND to SKIP FORWARD to PLAY to STOP to REWIND to FAST FORWARD BRIDGE MEDIA 32 39 Teletext control buttons 41 ...

Page 13: ...ide of the panel This TV is a design based on an extremely high level digital technology it takes approximately 10 seconds after the TV is turned on for picture to appear Switching off the TV Press the button on the remote control to switch to the standby mode To switch the TV off press the POWER switch on the TV Power indicator light will be turned off Notes This TV is not full disconnected from ...

Page 14: ... TruBass Speaker MTS Auto On SRS TruBass Speaker MTS Auto On On MENU Back Watch TV EXIT MENU Back Watch TV EXIT Balance Treble 0 0 0 Bass Balance Treble Bass 0 0 0 Dual Dual 1 MENU Back Watch TV EXIT OK Picture size position OK 50 50 Tint Color Brightness 0 100 Contrast Sha n 50 50 Tint Color Brightness 0 100 Contrast Sharpness 0 Sharpness 0 DNR 2 Color Temperature Black stretch On Normal Gray scr...

Page 15: ...menu is not available If you do not make a selection for a while the menu display disappears automatically If you want to close an on screen display instantly press the EXIT button except for the BRIDGE MEDIA function see page 32 To return to the previous menu press the MENU button except for the BRIDGE MEDIA function see page 32 The buttons function as the Program position P P buttons when there ...

Page 16: ...eset with the Auto tuning or if you would like to preset channels to specific position numbers one by one System selection Auto tuning Press the MENU button then press the or button to display the SET UP menu Press the or button to select Auto tuning Press and hold the OK button for several seconds to start the automatic search The search will begin for all available stations The slide bar will mo...

Page 17: ...arch down the band Press the or button repeatedly until your desired channel is displayed When a station satellite is found it will be displayed DO NOT PRESS ANY OTHER BUTTONS WHILE THE SET IS TUNING F Auto Fine Tuning Press the or button to turn the Auto Fine Tuning option On or Off 0 The Auto Fine Tuning feature automatically corrects slight fluctuations when receiving signals Manual Fine Tuning...

Page 18: ...ontinued This TV is capable of receiving a number of different channels depending upon where you live Program sorting is an easy way of storing each channel on the program position of your choice Program sorting MENU Back Watch TV EXIT SET UP English Language Manual tuning Auto tuning OK OK Program sorting OK AV connection OK MENU Back Sort Watch TV EXIT 1 2 3 4 5 6 Program sorting Prog Label Stor...

Page 19: ...tion number each time Select the first program position you want to view Select the second program position with the Number buttons 0 9 Press the button The previous channel will be displayed Each time you press the button the TV will switch back and forth between the two program positions To display the on screen information Press the CALL button to display the following on screen information The...

Page 20: ...ng when watching a 14 9 broadcast Wide Use this setting when watching a wide screen DVD wide screen video tape or a 16 9 broadcast when available Due to the range of wide screen formats 16 9 14 9 20 9 etc you may see bars on the top and bottom of the screen 4 3 Use this setting to view a true 4 3 broadcast Notes Using the special functions to change the size of the displayed image e g changing the...

Page 21: ...display the SET UP menu Press the or button to select Picture size position Press the OK button to display the Picture size position menu Press the or button to select Reset Press the OK button Basic operation Picture size position Reset Picture size position adjustments DVD MENU P P 2 1 3 5 4 6 8 7 9 VCR TV DVD 0 OK CALL MENU EXIT Notes When the picture format is in Wide or 4 3 mode only the Hori...

Page 22: ...tape which has been recorded and played back on an NTSC VCR DVD MENU P P 2 1 3 5 4 6 8 7 9 VCR TV DVD 0 OK CALL MENU EXIT Dynamic 100 Contrast MENU Back Watch TV EXIT 50 50 0 PICTURE Sharpness Tint Color Brightness 0 0 100 Contrast Mode Picture quality Dynamic bright and dynamic picture Standard standard picture Mild soft picture Memory the picture quality you set About ISM Image Sticking Minimiza...

Page 23: ...ton to select Black stretch Press the or button to select On or Off To select the Color Temperature You can change the tone of the picture by selecting from three preset color temperatures Cool Normal and Warm Press the MENU button then press the or button to display the PICTURE menu Press the or button to select Color Temperature Press the or button to select the mode you prefer Cool Lends a blue...

Page 24: ...dio system see page 45 To activate deactivate the speaker Press the MENU button then press the or button to display the SOUND menu Press the or button to select Speaker Press the or button to select On or Off MENU Back Watch TV EXIT 0 Bass 0 0 On Auto SOUND MTS Speaker Balance Treble DVD MENU P P 2 1 3 5 4 6 8 7 9 VCR TV DVD 0 OK CALL MENU EXIT 0 Bass MENU Back Watch TV EXIT Bass 0 0 On SOUND Spea...

Page 25: ... program on whose channel reception is usually good try setting MTS mode to Auto then press the button to Mono monaural see page 26 Selecting the Dual 1 or Dual 2 mode You can hear only Dual 1 or Dual 2 sound selected whenever bilingual programs are received Press the MENU button then press the or button to display the SOUND menu Press the or button to select Dual then press the or button to selec...

Page 26: ...cording to the transmission system NICAM or German stereo bilingual broadcast Dual 1 Dual 2 and Mono appear cyclically on the screen Stereo Bilingual selection DVD MENU P P 2 1 3 5 4 6 8 7 9 VCR TV DVD 0 OK CALL MENU EXIT ABCD 10 Stereo ABCD 10 Dual Dual 1 Stereo Sound to be heard Display NICAM German stereo bilingual broadcast Dual 1 Sub I sound Main sound Dual 2 Sub II sound Sub sound Mono Main ...

Page 27: ...ontroller to adjust the sound volume of the external audio system connected see page 45 To select the sound volume from AUDIO output terminals Press the MENU button then press the or button to display the SET UP menu Press the or button to select AV connection then press the OK button to display the AV connection menu Press the or button to select Audio output then press the or button to select Va...

Page 28: ...on to display Bass boost Off To use the external woofer system Connect the external woofer to the WOOFER output terminal located on the rear of the TV see page 45 Select Woofer External mode from the AV connection menu Press the button to display External Woofer level then press the or button to adjust the External Woofer level To turn off the external woofer press the button to display External W...

Page 29: ... button to select the item as shown below A Color System Confirm that color system is set to A Auto If not select A with the or button B Video label The video label allows you to label each input source for your TV To change or create video labels 1 Press the or button repeatedly to select a character for the first space then press the button 2 Repeat step 1 to enter the rest of the characters If ...

Page 30: ...nal is being received Press the MENU button then press the or button to display the FUNCTION menu Press the or button to select Gray screen Press the or button to select On or Off Note While in the PC input mode see page 29 the Gray screen is not available Using TV s features Timer ToactivateGray screen Timer The Timer is especially useful if you want the TV to turn itself on or off after a select...

Page 31: ...vent permanent after image of the boundary lines between the side panels and picture in 14 9 or 4 3 mode Press the or button to adjust The more you turn the brightness high the more effective is obtained Inverse Picture will be inversed Press the OK button Confirm the dialogue box and press the OK button To recover from Inverse press any button The picture is displayed alternately between positive...

Page 32: ...Pull out the SmartMedia card Memory Card Format About Memory Stick Magic Gate and high speed data transmission are not available on this TV Still Picture Format Item Format Memory Format File Format Compatibility Extension Number of Picture Elements Number of files Applicable maximum capacity JPEG Exif ver 2 2 DCF ver 1 0 JPG H 160 4096 V 120 4096 65535 1GB Motion Picture Format Item Format Memory...

Page 33: ...he index menu appears on the screen then press the or button to select the screen pictures If the memory card contains still pictures the mark appears on the screen To change to the MEMORY CARD menu press the EXIT button To change to the motion picture press the B button If there is no motion picture you cannot change the mode Press the OK button Press the or button to select another full screen p...

Page 34: ...r computer display can become permanently ingrained in the plasma display panel To use the zoom mode From the full screen picture press the Y button to display the picture with a frame Each time you press the Y button the picture zooms as follows To select the picture position When in the 2 zoom mode or 4 zoom mode you can select the picture position Press the or button to select the picture posit...

Page 35: ...creen picture or computer display can become permanently ingrained in the plasma display panel To select the information format Each time you press the B button the on screen information will change as follows To select the rotation picture format Each time you press the G button the picture rotates clockwise by 90 To use the BRIDGE MEDIA still picture continued Note This function also operates in...

Page 36: ... screen motion picture with frame and audio starts Press the or button to select another full screen motion picture you want to see on the screen Notes Adjust the sound volume with the or button The motion picture play back mark is displayed for several seconds To return to the index menu Press the EXIT button To freeze the picture and audio Each time you press the OK button to freeze the on scree...

Page 37: ... button the on screen information will change as follows To use the BRIDGE MEDIA motion picture continued 1 1 640x480 2004 07 01 00 00 00 am VCLP0006 MOV 00 01 00 1 1 640x480 2004 07 01 00 00 00 am VCLP0006 MOV 00 03 00 1 1 640x480 2004 07 01 00 00 00 am VCLP0006 MOV 00 06 00 1 1 640x480 2004 07 01 00 00 00 am VCLP0006 MOV 00 10 00 EXIT EXIT EXIT EXIT 00 04 30 1 1 640x480 2004 07 01 00 00 00 am VC...

Page 38: ...me will change as follows Ex Normal Ex No information 1 1 640x480 2004 07 01 00 00 00 am VCLP0006 MOV 1 1 640x480 2004 07 01 00 00 00 am VCLP0006 MOV EXIT EXIT 00 04 30 00 04 30 1 1 640x480 2004 07 01 00 00 00 am VCLP0006 MOV 00 10 00 1 1 640x480 2004 07 01 00 00 00 am VCLP0006 MOV 00 06 00 1 1 640x480 2004 07 01 00 00 00 am VCLP0006 MOV 00 03 00 1 1 640x480 2004 07 01 00 00 00 am VCLP0006 MOV 00 ...

Page 39: ...0 Y OK CALL MENU EXIT EXIT EXIT ScreenSaver 1 29 1280x960 2004 07 01 00 00 00 am AUT_0242 JPG OFF 10 min 20 min 30 min NO IMAGE No data to play back NO SD Memory Card No insert card NO SmartMedia No insert card NO MEMORY STICK No insert card NO FILE No recorded MEMORY STICK TYPE ERROR No accept Memory Stick FILE ERROR File broken or irregular file FILE ERROR Not accept BM format FILE TYPE ERROR No...

Page 40: ...ext problems are not available for 42WP48T This TV has a multi page teletext memory which takes a few moments to load and it offers two ways of viewing Teletext FAST and LIST which are explained on page 42 Teletext mode Note When you are watching the teletext program only PICTURE menu and SOUND menu are selectable DVD MENU P P 2 1 3 5 4 6 8 7 9 VCR TV DVD 0 OK CALL MENU EXIT FUNCTION MENU Back Wat...

Page 41: ...ch color button Sub pages Once in this chosen page if there are sub pages they will automatically load into memory without changing the one you are reading Arrows will appear alongside the page number indicating sub pages which have loaded to the left or right of the one on the screen If there are many sub pages it will take a long time for them all to load and this will depend on the speed with w...

Page 42: ...view these pages use the colored prompt buttons e g press the Green button to view page 200 If you want to change these stored pages press the colored button for the color you want to change e g press the Green button and enter the 3 digit number This number will change in the top left of the screen and in the colored highlight Press the OK button to store your choice The bars at the bottom of the...

Page 43: ... is part of the broadcast teletext system but you will not need it as this TV allows you to control the display of sub pages To enlarge the teletext display size Press the button once to enlarge the top half of the page press again to enlarge the bottom half of the page Press again to revert to the normal size To select a page while viewing a normal picture When in teletext mode if a page selectio...

Page 44: ... button to select 3 see page 29 then press OK Before connecting any external equipment turn off all main power switches Connect either the S VIDEO input terminal or VIDEO input terminal whichever terminal is used Do not connect to both of these terminals If you connect mono sound equipment to 3 connect the audio output of the equipment to the L MONO jack on the TV You can enjoy Video Games with th...

Page 45: ...her the S VIDEO input terminal or VIDEO input terminal whichever terminal is used Do not connect both of these terminals In addition there is a fixed variable external audio output which enables the connection of a suitable audio system A 3 5 mm switched phono socket allows an external active Woofer system to be connected The COMPONENT VIDEO INPUT consists of three component video jacks Y PB CB PR...

Page 46: ... no need to use an adapter for computers with DOS V compatible mini D sub 15 pin terminal A bar may appear in the upper lower right or left side of the screen or parts of the picture may be obscured depending on some signals This is not the malfunction If the edges of the picture are stretched readjust the picture size position adjustments in the PC Setting menu Depending on the specification of t...

Page 47: ...to select PC Setting Press the OK button to display the PC Setting menu Press the or button to select an option you want to adjust PC Setting menu Horizontal position Horizontal width Vertical position and Vertical height Press the or button to adjust the settings as required NOTICE OF POSSIBLE ADVERSE EFFECTS IN THE PLASMA DISPLAY PANEL Avoid displaying stationary images on your TV screen for ext...

Page 48: ...obtain a clear picture To adjust the Sampling clock From the PC Setting menu press the or button to select Sampling clock Press the or button to optimize the picture To reset the PC Setting From the PC Setting menu press the or button to select Reset Press the OK button Note The optimum points of the clock phase and sampling clock adjustments may be incomprehensible according to the input signals ...

Page 49: ...h bandwidth Digital Content Protection EIA CEA 861 861B compliance covers the transmission of uncompressed digital video with high bandwidth digital content protection which is being standardized for reception of high definition video signals Because this is an evolving technology it is possible that some devices may not operate properly with the TV To connect an HDMI device One HDMI cable type A ...

Page 50: ...mages The station may have broadcast difficulties Try another channel Antenna reception may be poor Use a high directional outdoor antenna Poor color or no color The station may have broadcast difficulties Try another channel Adjust the Tint and or Color in the PICTURE menu The remote control does not operate Remove all obstructions between the remote control and the remote control sensor in the T...

Page 51: ...lor signal broadcast transmission systems applicable to different countries or region NTSC 4 43 MHz is used in special VCRs to playback NTSC recorded video tapes through PAL television equipment Reference section Broadcast system Specifications Plasma Color Television Model 42WP48A 42WP48E 42WP48T Power source 110 240V AC 50 60 Hz Power consumption 370W 1 8W standby Dimensions 1 274mm W 766mm H 32...

Page 52: ...ono jacks Audio L Mono R C2 Input Component video Y PB CB PR CR Phono jacks Audio L Mono R MONITOR Output Phono jacks A V AUDIO Output Phono jacks Audio L R Fixed Variable Woofer Output Phono jack Bass Line out Variable PC Input Mini D sub 15 pin Analog RGB Audio Input 3 5 mm stereo mini jack Headphones jack 3 5 mm Diameter stereo HDMI Input type A 19 pin A V Digital Audio Input Phono jacks Analog...

Reviews: