background image

60

Chapter 9: Appendix

f. 

Service made necessary by the simultaneous 
use of this Television and connected 
equipment;  

g.  Modifications to the Television not approved in 

writing by TCL, and service made necessary 
by the use or installation of non-Toshiba 
modifications to the Television; 

h. 

Service of a Television on which the TOSHIBA 
label or logo, rating label or serial number 
have been defaced or removed;

i. 

Damage to the Television caused by failure 
to follow the specifications, User manuals or 
guides as to usage and/or storage.

j. 

Firmware updates that are posted to the 
Toshiba Support website and can be 
performed by the end user via a USB stick.

Disclaimer and Limitation of Remedy

TO THE EXTENT NOT PRECLUDED BY LAW, ALL 
OTHER EXPRESS AND IMPLIED WARRANTIES, 
CONDITIONS AND REPRESENTATIONS 
FOR THIS TELEVISION, INCLUDING THE 
IMPLIED WARRANTIES, CONDITIONS AND 
REPRESENTATIONS OF MERCHANTABILITY 
AND FITNESS FOR A PARTICULAR PURPOSE, 
ARE HEREBY DISCLAIMED AND EXCLUDED.  
IF THE APPLICABLE LAW, STATUTORY OR 
OTHERWISE, PRECLUDES THE EXCLUSION 
OF ANY IMPLIED WARRANTIES, CONDITIONS 
AND REPRESENTATIONS THEN SUCH 
IMPLIED WARRANTIES, CONDITIONS AND 
REPRESENTATIONS ARE OTHERWISE LIMITED 
IN DURATION TO THE TERM OF THIS EXPRESS 
WRITTEN LIMITED WARRANTY.  TO THE EXTENT 
NOT PRECLUDED BY LAW, STATUTORY OR 
OTHERWISE, THIS WRITTEN WARRANTY 
SUPERCEDES AND SPECIFICALLY DISCLAIMS 
ANY OTHER WARRANTY, CONDITION OR 
REPRESENTATION NOT STATED IN THIS WARRANTY, 
WHETHER MADE BY  TCL, TOSHIBA CORPORATION,  
THEIR AFFILIATES, ADRs AND ASPs AND WHETHER 
MADE ORALLY OR IN WRITING (INCLUDING ANY 
STATEMENT IN ANY BROCHURE, PRESS RELEASE, 
ANNOUNCEMENT, ADVERTISEMENT, POINT OF 
SALE DISPLAY, ETC.). 

YOU MUST READ AND FOLLOW ALL SET-UP AND 
USAGE INSTRUCTIONS IN THE APPLICABLE USER 
GUIDES AND/OR MANUALS. IF YOU FAIL TO DO SO, 
THIS TELEVISION MAY NOT FUNCTION PROPERLY 
AND MAY SUFFER DAMAGE. THIS WARRANTY WILL 
NOT COVER ANY SERVICE THAT IS REQUIRED, 
IN PART OR IN WHOLE, AS A RESULT OF ANY 
FAILURE TO FOLLOW THE SET-UP AND USAGE 
INSTRUCTIONS.   THIS WARRANTY DOES NOT APPLY 
AND SHALL BE VOID AND UNENFORCEABLE IF THE 
TELEVISION IS OPENED, SERVICED, OR REPAIRED 
BY PERSONS OTHER THAN THOSE AUTHORIZED BY 
TCL TO SERVICE OR REPAIR THE TELEVISION.

IF THE TELEVISION FAILS TO WORK AS WARRANTED 
ABOVE, YOUR SOLE AND EXCLUSIVE REMEDY 
SHALL BE REPAIR OR REPLACEMENT OF THE 
DEFECTIVE PART. IN NO EVENT WILL TCL, TOSHIBA 
CORPORATION, THEIR AFFILIATES, ADRs OR ASPs 
(THE “RELATED PARTIES”) BE LIABLE TO YOU OR 
ANY THIRD PARTY FOR ANY DAMAGES, MONEY, 
REIMBURSEMENT, COSTS OR EXPENSES.  THIS 
LIMITATION APPLIES TO DAMAGES, MONEY, 
REIMBURSEMENT, COSTS OR EXPENSES OF ANY 
KIND WHATSOEVER INCLUDING ANY DIRECT OR 
INDIRECT DAMAGES, DAMAGE TO PROPERTY 
OR PERSON, LOST PROFITS, LOST SAVINGS, 

INCONVENIENCE OR OTHER SPECIAL, INCIDENTAL, 
EXEMPLARY OR CONSEQUENTIAL DAMAGES, 
WHETHER FOR BREACH OF WARRANTY, BREACH 
OF CONTRACT, TORT (INCLUDING NEGLIGENCE), 
UNDER A STATUTE OR UNDER ANY OTHER LAW OR 
FORM OR ACTION, OR WHETHER ARISING OUT OF 
THE USE OF OR INABILITY TO USE THE TELEVISION, 
EVEN IF ANY OF THE RELATED PARTIES HAS BEEN 
ADVISED OF THE POSSIBILITY OF SUCH DAMAGES 
OR OF ANY CLAIM BY ANY OTHER PARTY.

No person, agent, distributor, dealer or company is 
authorized to change, modify or extend the terms of 
these warranties in any manner whatsoever.

Arbitration and Dispute Resolution

To the extent not precluded by law, any claim, dispute, 
controversy or disagreement (whether for breach of 
warranty, breach of contract, tort (including negligence), 
under a statute or under any other law or form of action) 
against any of the Related Parties arising out of, or 
otherwise relating to: (i) this warranty; (ii) the Television; 
(iii) any oral or written representations, statements, 
brochures, press releases, advertising, announcement, 
point of sale display, or promotional material relating to 
the Television; (iv) the relationships that result from this 
warranty, (the foregoing claims, disputes controversies 
and disagreements are collectively referred to as the 
“Dispute”), shall be referred to and resolved by final 
and binding arbitration (to the exclusion of the courts).  
To the extent not precluded by law, you agree to waive 
any right that you may have to commence or participate 
in any representative or class proceeding against the 
Related Parties relating to any Dispute.  If and where 
applicable and to the extent not precluded by law, you 
further agree to opt out of any such representative or 
class proceedings.  Arbitration of any Dispute will be 
conducted in the forum and in the manner as agreed 
to between you and TCL.  Failing such agreement, the 
arbitration will be conducted by one arbitrator pursuant 
to the laws and rules relating to arbitration generally in 
force in the jurisdiction in which you reside at the time 
that the Dispute arises.  To the extent not precluded by 
law, no claim, dispute, controversy or disagreement of 
any other person may be joined or combined with any 
Dispute by you, without the prior written consent of TCL.

Critical Applications

The Television you have purchased is not designed 
for any “critical applications.” “Critical applications” 
means life support systems, medical applications, 
connections to implanted medical devices, commercial 
transportation, nuclear facilities or systems or any other 
applications where Television failure could lead to 
injury to persons or loss of life or catastrophic property 
damage.

IF THE CUSTOMER USES THE TELEVISION IN ANY 
CRITICAL APPLICATION, THE CUSTOMER – AND 
NOT TCL, ITS AFFILIATES, ADRs OR ASPs – ASSUME 
SOLE AND FULL RESPONSIBILITY FOR SUCH USE.  
TCL RESERVES THE RIGHT TO REFUSE TO SERVICE 
ANY TELEVISION USED IN A CRITICAL APPLICATION.  
TCL, ITS AFFILIATES, ADRs AND ASPs HEREBY 
DISCLAIM ANY AND ALL LIABILITY, DAMAGES AND 
CONSEQUENCES ARISING OUT OF THE SERVICE 
OR REFUSAL TO SERVICE SUCH TELEVISION 
AND FURTHER DISCLAIM ANY AND ALL LIABILITY, 
CONSEQUENCES AND DAMAGES THAT MAY ARISE 
OR RESULT FROM THE USE OF THE TELEVISION IN 
ANY CRITICAL APPLICATIONS.

Summary of Contents for 40SL412U

Page 1: ...TOSHIBA Leading Innovation Easy Setup Guide High ...

Page 2: ...closure that may be of sufficient magnitude to constitute arisk of electric shock to persons The exclamation point within an equilateral triangle is intended to alert the user to the presence of important operating and maintenance servicing instructions in the literature accompanying the appliance Trademark Information WARNING To prevent injury this apparatus must be securely attached to the floor...

Page 3: ...1 Read these instructions Keep these instructions Heed all warnings Follow all instructions Do not block any ventilation openings Install in accordance with the manufacturer s instructions 8 Do not install near any heat sources such as radiators heat registers stoves or other apparatus that produce heat 9 Do not defeat the safety purpose of the polarized or grounding type plug Apolarized plug has ...

Page 4: ...ins constantly lit etc This is a structural property of LCD technology is not a sign of malfunction and is not covered under your warranty Such pixels are not visihle when the picture is viewed from a normal viewing distance MX Screw Size 200x200 400x400 Hole Pattern HxV 40 46 WARNING RISK OF ELECTRIC SHOCK 37 WARNING RISK OF ElECTRIC SHOCK Never attempt to service the TV yourself Opening and remo...

Page 5: ...ouch sensor This window doesn t appear until you activate the Touch Sensor TV back panel connections For an explanation of cable types and connections PC IN HDMIIN Homl 8 2 J E Il I 1 1 1 1 7 6 5 1 1 i LlMI O o DY E o 0 f I 2 PC O i l 3 AUDio 114 AU IT 0 1 4 TV back 1 PC IN For use when connecting a personal computer 2 HDMI IN High Definition Multimedia Interface input receives digital audio and u...

Page 6: ... select Antenna the Channel Tuning Mode setup window will appear To tunc only digital channels sclect Digital To tunc digital channels preferentially over analog when entering channel number directly select Auto For nnn11 11 tuning select Standard Press to continue to Auto Tuning 6 Press to select Start Scan and continue with the Auto Tuning You can stop dle Initial Senlp with E T However ifyou do...

Page 7: ...d warranty How to Obtain Warranty Service After following all of the operating instructions in the Owner s manual review the section entitled Concierge located on our Customer Support Web site at hllp supporl loshiba com If you find that service is needed follow the instructions provided on the web site or please contact TAIS Consumer Solution Center toll free at 1 800 631 3811 You must present up...

Page 8: ...ts brochures press releases advertising announcement point of sale display or promotional material relating to the Television IV the relationships that result from this warranty the foregoing claims disputes controversies and disagreements are collectively referred to as the Dispute shall be referred to and resolved by final and binding arbitration to the exclUSion of the courts To the extent not ...

Page 9: ... For details please contact your TV antenna installer cable provider or satellite provider 2011 TOSHIBA CORPORATION All Rights Reserved Owner s Record The model number and serial number are on the back of your TV Record these numbers in the spaces below Refer to these numbers whenever you communicate with your Toshiba dealer about this TV Model number Serial number Owner s Manual Integrated High D...

Page 10: ...joy your new product please keep these safety tips in mind The Issue The home theater entertainment experience is a growing trend and larger flat panel displays are popular purchases However flat panel displays are not always supported on the proper stands or installed according to the manufacturer s recommendations Flat panel displays that are inappropriately situated on dressers bookcases shelve...

Page 11: ...E Never place the TV on an unstable cart stand or table The TV may fall causing serious personal injury death or serious damage to the TV Important Safety Instructions 1 Read these instructions 2 Keep these instructions 3 Heed all warnings 4 Follow all instructions 5 Do not use this apparatus near water 6 Clean only with dry cloth 7 Do not block any ventilation openings Install in accordance with ...

Page 12: ...ction 810 of the National Electric Code Antenna lead in wire Antenna discharge unit NEC Section 810 20 Grounding conductors NEC Section 810 21 Power service grounding electrode system NEC Art 250 Part H Ground clamp Electric service equipment Ground clamps 33 DANGER RISK OF SERIOUS PERSONAL INJURY OR DEATH Use extreme care to make sure you are never in a position where your body or any item you ar...

Page 13: ...to perform routine safety checks to determine that the TV is in safe operating condition Choosing a location for your LCD TV To Display your LCD TV on the included Pedestal Stand Observe the following safety precautions 1 Read and Follow the pedestal assembly instructions included with the pedestal CAUTION Before beginning pedestal assembly carefully lay the front of the LCD Panel face down on a f...

Page 14: ...pedestal stand 3 Once you have removed all four screws holding the pedestal stand in place remove the pedestal stand from the TV 40 TV 46 TV 55 TV CAUTION Always place the TV on the floor or a sturdy level stable surface that can support the weight of the unit To secure the TV use a sturdy strap from the hook s on the rear of the TV to a wall stud pillar or other immovable structure Make sure the ...

Page 15: ...ons to this equipment not expressly approved by Toshiba could void the user s authority to operate this equipment ENERGY STAR User Information ENERGY STAR User Information Statement the factory default settings of this television meet ENERGY STAR requirements Changing Picture Settings may increase energy consumption possibly beyond the limits required for ENERGY STAR qualification To ensure your t...

Page 16: ... Multimedia Interface are trademarks or registered trademarks of HDMI Licensing LLC in the United States and other countries MPEG Layer 3 audio coding technology licensed from Fraunhofer IIS and Thomson This production contains Bitstream Vera Sans fonts under the following copyright Copyright 2003 by Bitstream Inc All Rights Reserved Bitstream Vera is a trademark of Bitstream Inc ...

Page 17: ... 35 Adjusting the picture quality 36 Using the closed caption mode 36 Base closed captions 36 Digital CC Settings 37 CC Selector 37 Adjusting the audio 38 Muting the sound 38 Using the digital audio selector 38 Selecting stereo SAP broadcasts 38 Adjusting the audio quality 38 Selecting the optical audio output format 39 Using the Dolby Digital Dynamic Range Control feature 39 Using the Locks menu ...

Page 18: ... page 17 One set of ColorStream HD high resolution component video inputs page 16 Digital Audio Out optical audio connection with Dolby Digital optical output format page 39 CableClear digital picture noise reduction page 52 PC IN Analog RGB computer terminal pages 19 20 REGZA LINK allows control of external devices from the TV remote via HDMI connection page 48 ClearFrame 120 Hz anti blur feature...

Page 19: ...ed all cables and devices to your TV 4 BEFORE connecting cables or devices to the TV learn the functions of the TV s connections and controls pages 12 13 5 Connect your other electronic device s to the TV pages 14 20 6 Install the batteries in the remote control page 21 7 See Learning about the remote control page 22 for an overview of the buttons on the remote control 8 AFTER connecting all cable...

Page 20: ...urn the TV on and off VOL These buttons adjust the volume level When a menu is on screen these buttons function as left right menu navigation buttons CH ST When no menu is on screen these buttons change the channel programmed channels only page 26 When a menu is on screen these buttons function as up down menu navigation buttons MENU OK To access the menu system pages 23 24 When a menu is on scree...

Page 21: ...tal ATSC off air antenna signals and analog and digital Cable TV QAM signals 5 DIGITAL AUDIO OUT Optical audio output in Dolby Digital or PCM Pulse Code Modulation format for connecting an external Dolby Digital decoder amplifier or home theater system with optical audio input TV back panel connections For an explanation of cable types and connections see pages 13 19 1 2 3 4 2 8 6 7 5 Power Cord T...

Page 22: ... with HDMI Logo HDMI High Definition Multimedia Interface cable is for use with devices with an HDMI output An HDMI cable delivers digital audio and video in its native format This cable carries both video and audio information therefore separate audio cables are not required for a complete HDMI device connection page 17 and page 20 Note HDMI cable provides better picture performance than a standa...

Page 23: ...nna or Cable signal Select the ANT CABLE video input source on the TV To view basic and premium Cable channels Turn OFF the VCR Select the ANT CABLE video input source on the TV Tune the TV to channel 3 or 4 whichever channel the Cable box output is set to Use the Cable box controls to change channels To view the VCR Turn ON the VCR Select the VIDEO video input source on the TV To view the camcord...

Page 24: ... player or satellite receiver does not have component video connect a standard A V cable to VIDEO terminal If your DVD player has HDMI video see page 17 To view antenna or Cable channels Select the ANT CABLE video input source on the TV To view the DVD player Turn ON the DVD player Select the ColorStream HD video input source on the TV To view satellite programs using the component video connectio...

Page 25: ...g audio cables are not required see illustration See Setting the HDMI audio mode page 27 8 HDMI device TV back panel To view the HDMI device video Select the HDMI 1 HDMI 2 or HDMI 3 video input source on the TV To select the video input source press on the remote control page 22 To connect a DVI device you will need One HDMI to DVI adapter cable For proper operation the length of an HDMI to DVI ad...

Page 26: ...ables with the HDMI Logo Before controlling the device s After completing the above connections set the REGZA LINK Setup menu as you desire page 49 The connected devices must also be set For details see the operation manual for each device The REGZA LINK feature uses the CEC technology as regulated by the HDMI standard This feature is limited to models incorporating Toshiba s REGZA LINK However To...

Page 27: ...put Format field select either Dolby Digital or PCM depending on your device Selecting the optical audio output format on page 39 Note Some audio systems may not be compatible with Dolby Digital bitstream signals Older audio systems that are not compatible with standard optical out signals may not work properly creating a high noise level that may damage speakers or headphones THIS DAMAGE IS NOT C...

Page 28: ... With either the PC IN or HDMI connection you can watch your computer s display on the TV and hear the sound from the TV s speakers To connect a PC to the PC IN terminal on the TV When connecting a PC to the PC IN terminal on the TV use an analog RGB 15 pin computer cable and a PC audio cable PC audio cable PC audio output Conversion adapter if necessary Computer TV back panel To use a PC set the ...

Page 29: ...ies in accordance with applicable laws and regulations If the remote control does not operate correctly or if the operating range becomes reduced replace batteries with new ones When necessary to replace batteries in the remote control always replace both batteries with new ones Never mix battery types or new and used batteries Always remove batteries from the remote control if they are dead or if...

Page 30: ...the sound page 38 13 VOL adjusts the volume level 14 INFO displays TV status information as well as program details when available pages 49 50 15 EXIT closes on screen menus 16 ENTER activates highlighted items in the main menu system 17 CH RTN returns to the last viewed channel or source page 32 18 Arrow buttons STWX When a menu is on screen these buttons select or adjust programming menus Also s...

Page 31: ...2 T3 T4 Digital CC Settings p Opens the Digital CC Setup menu Input Labeling p Opens the Input Labeling menu Menu Language p English Français Español Channel Browser Setup p Opens the Channel Browser Settings menu REGZA LINK Player Control p Opens the REGZA LINK Player Control Energy Saving Settings p Opens the Energy Saving Settings menu Locks Enable Rating Blocking p Off On Edit Rating Limits p ...

Page 32: ...ystem Status System Information p Opens the System Information screen Navigating the menu system You can use the buttons on the remote control or TV control panel to access and navigate your TV s on screen menu system Press to open the menu system When a menu is opened use the up down left right arrow buttons STWX on the remote control or ST on the TV control panel to move in the corresponding dir...

Page 33: ...top the Initial Setup with However if you do not finish the entire Initial Setup process the Initial Setup window will appear every time you turn on the TV Selecting the menu language You can choose from three different languages English French and Spanish for the on screen display of menus and messages To select the menu language 1 Press and open the Preferences menu highlight Menu Language 2 Pre...

Page 34: ...ured for Antenna This is normal however once channel programming is finished you should not have to repeat the programming process again unless your Cable TV service lineup changes significantly To program channels automatically 1 Configure the antenna input source if you have not already done so page 25 2 Press and open the Setup menu 3 Highlight Installation and press 4 A new set of Installation...

Page 35: ...rypted channel the following message will appear Digital Channel Is Encrypted Press 1 on remote to remove channel Press while the message is on the screen to remove the unnecessary channel from the channel list Setting the HDMI audio mode To set the HDMI audio mode 1 Press and open the Sound menu 2 Highlight Audio Setup and press 3 Press S or T to select HDMI 1 Audio and then press W or X to selec...

Page 36: ... to select the region highlight Done and then press After the time zone has been set you will be asked to set the current Daylight Saving Time status To set the Daylight Saving Time status 1 Press W or X to select Yes or No Highlight Done and then press Viewing the system status To view the system status 1 Press and open the Setup menu 2 Highlight Installation and press 3 A new set of Installation...

Page 37: ...ecting REGZA LINK input sources from the popup window using some REGZA LINK devices may automatically turn on Chapter 6 Using the TV s features When selecting input sources using ST you will have to press to actually select a particular device from the popup window Labeling the video input sources You can label each video input source according to the type of device you connected to each source fr...

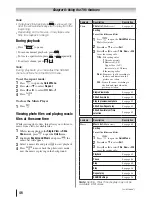
Page 38: ...ist that is integrated into the Channel Browser To add a favorite channel input 1 Tune to the channel or input 2 Press and hold for 3 seconds Note Additions are added to the beginning of the Favorites list on the left side of the Channel Browser To delete a favorite channel input 1 Press to open the Favorites browser list 2 Highlight the channel or input to delete by pressing W or X 3 Press and ho...

Page 39: ...item or surf forward to the next item in the list In Browse mode when you stop on an item in the Channel Browser it will be highlighted and the TV will automatically tune to the channel or input 2 Press to close the Channel Browser To tune to a channel or input in Select mode 1 While watching TV press W or X to open the Channel Browser and surf back to a previous item or forward to the next item i...

Page 40: ...l channels have been found in prior channel scans Channel Options will not have anything listed until a scan is done Tuning to the next programmed channel To tune to the next programmed channel Press or on the remote control or TV control panel Note This feature will not work unless you program channels into the TV s channel memory page 26 Tuning to a specific channel programmed or unprogrammed Tu...

Page 41: ...s on the remote control 2 While the Picture Size menu is open you can do one of the following to select the desired picture size Repeatedly press Press the corresponding Number button 0 5 while the Picture Size menu is opened Press S or T while the Picture Size menu is open To select the picture size using the menus 1 Select Picture Size in the Theater Settings menu 2 Press W or X to select the de...

Page 42: ...y for HDMI 1080p 1080i 720p 480p and 480i ColorStream 1080i and 720p and ANT CABLE digital inputs 1080p 1080i and 720p Depending on the input signals the border of the picture may be hidden displayed in black or noisy Picture Size 4 3 Some program formats will display with sidebars and or bars at the top and bottom Normal for VGA SVGA XGA WXGA and SXGA sources and Photo files Normal is a non stret...

Page 43: ...defined no ID 1 data or HDMI aspect data The current picture size you set under Selecting the picture size on page 33 Note The auto aspect ratio feature is not applicable to PC input To turn on the auto aspect ratio feature 1 Press and open the Picture menu 2 Highlight Theater Settings and press 3 In the Auto Aspect Ratio field select On 4 To save the new settings highlight Done and press To rever...

Page 44: ...ect the picture quality you want to adjust Contrast Backlight DynaLight Brightness Color Tint or Sharpness and then press W or X to adjust the setting as described in the table above 4 To save the new settings highlight Done and press You can use any of the picture modes Selecting the picture mode above left as a starting point for adjusting the picture settings To revert back to the base mode tha...

Page 45: ...ts highlight Reset and press Caption Size Auto Small Standard Large Caption Text Type Auto Default Mono w Serif Prop w Serif Mono w o Serif Prop w o Serif Casual Cursive Small Capitals Caption Text Edge Auto None Raised Depressed Uniform Left Drop Shadow Right Drop Shadow Caption Text Color Auto Black White Red Green Blue Yellow Magenta Cyan Text Foreground Opacity Auto Transparent Translucent Fla...

Page 46: ...ls on the ANT CABLE input To listen to stereo sound 1 Press and open the Sound menu 2 Highlight Audio Setup and press 3 In the MTS field select Stereo 4 To save the new settings highlight Done and press To reset the settings to the factory defaults highlight Reset and press Note You can typically leave the TV in Stereo mode because it will automatically output the type of sound being broadcast ste...

Page 47: ...utput with minimal compression 4 To save the new settings highlight Done and press To revert to the factory defaults highlight Reset and press Note This feature is available when turned to a digital RF channel with the Dolly Digital signal The Dolby Digital Dynamic Range Control will function in relation to Optical Output Format PCM mode Using the Locks menu The Locks menu includes the Enable Rati...

Page 48: ...ystem may become available for use in selectively blocking programs Note The currently tuned station must be receiving a digital signal before an additional rating system can be downloaded To download the additional rating system if available 1 Press and highlight the Locks menu icon 2 Press T to display the PIN code entering screen 3 Enter your four digit PIN code and press 4 Press T to highlight...

Page 49: ...children under 13 PG Parental Guidance Suggested Some material may not be suitable for children G General Audience Appropriate for all ages Note If you place an in the box next to None Rated programs rated None will be blocked however programs that do not provide any rating information will not be blocked To display the rating of the program you are watching press on the remote control If it is ra...

Page 50: ... inputs and channels 3 and 4 4 Press Locking channels With the Lock feature you can lock specific channels The locked channels can only be accessed by entering the PIN To lock channels 1 From the Setup menu highlight Installation and press 2 Press S or T to select Channel Options and press The list of channels will appear 3 Press X and then S or T to select a channel in the lock column 4 Press PIN...

Page 51: ...ontal Position and Vertical Position If the picture is affected by interference readjust the Clock Phase and Sampling Clock To adjust the PC settings 1 Repeatedly press to select PC input mode Selecting the video input source to view page 29 2 Press and open the Setup menu 3 Highlight PC Settings and press 00 00 Note If a PC is not connected or there is no PC input signal this feature will be gray...

Page 52: ...ber of files 500 folder Supported file system FAT16 and FAT32 Note Gently insert the USB device into the port and do not remove while using the Media Player USB device USB Mass Storage Class device MSC Support is not guaranteed for all devices Connect the USB device directly to the TV Do not use a USB Hub You must obtain any required permission from copyright owners to use copyrighted content Tosh...

Page 53: ... files located in the selected directory shall be displayed This view allows you to change the photo content manually When moving from Multi View to the Single View the currently selected photo shall be displayed 1 Press X to view the next photo Press W to view the previous photo 2 Press S to rotate the image 90 counterclockwise Press T to rotate the image 90 clockwise Slideshow This view allows y...

Page 54: ...ode now the music is playing in the background Contents Description Description Photo Photo list Multi view See page 45 Sorting To sort the folders and files 1 Press to open the Quick Menu from Multi View mode 2 Press S or T to select Sort 3 Press W or X to select Title New or Old to set the sorting rule Title File sorting rules 1 Unicode priority 2 Numerical 0 9 Upper Case A Z lowercase a z Chine...

Page 55: ...he TV either from the remote control or the TV control panel 1 From the Preferences menu highlight Energy Saving Settings and press 2 Press S or T to select Automatic Power Down 3 Press W or X to select On or Off and press Note The initial setting of this feature is off 1 minute before switching to standby a warning message will appear When the following features are set the feature that is set fo...

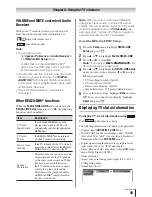
Page 56: ...d REGZA LINK Player Control menu functions 1 Press and open the Preferences menu 2 Highlight REGZA LINK Player Control and press Energy Saving Settings 3 Press S or T to select the item you want to control and press Item Description Power Turns the selected device on and off Root Menu Accesses the top menu of the selected device Contents Menu Accesses the contents list when you press At this time ...

Page 57: ...djust or mute the volume of the audio This item will be grayed out unless a REGZA LINK compatible audio receiver is connected Note When you turn on the Audio Receiver change its input source or adjust the sound volume the sound will be output from the audio receiver s speakers even if TV Speakers has been selected Turn the TV off and on again to output the sound from the TV speakers To set the REG...

Page 58: ...ration Detailed description Note The location of the banner can be moved to the top or bottom of the screen by pressing S or T while the RECALL or INFO display is on screen Understanding the last mode memory feature If power is lost while you are viewing the TV the Last Mode Memory feature automatically turns on the TV when power is restored Note If you will be away from the TV for an extended per...

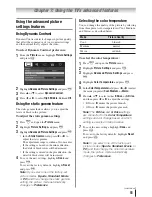
Page 59: ...ect one of the factory set picture modes Sports Standard Movie or PC and then change the static gamma setting the picture mode automatically changes to Preference Chapter 7 Using the TV s advanced features Selecting the color temperature You can change the quality of the picture by selecting from three preset color temperatures Cool Medium and Warm as described below Mode Picture Quality Cool blue...

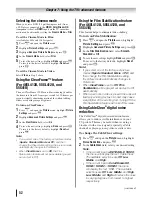
Page 60: ...bilization feature For 46SL412U 55SL412U and 55S41U This feature helps to eliminate video shaking To turn on Film Stabilization 1 Press and open the Picture menu highlight Picture Settings and press 2 Highlight Advanced Picture Settings and press 3 In the Film Stabilization field select Smooth Standard or Off 4 To save the new settings highlight Done and press To revert to the factory defaults hig...

Page 61: ...tings highlight Done and press To revert to the factory defaults highlight Reset and press Using the Game Mode feature You can use the Game Mode feature for shorter frame delays when playing a video game requiring split second timing between the on screen display and input from the controller such as music creation and action games This feature is more effective for 480i and 1080i input signals No...

Page 62: ...dow does not appear when you press on the remote control or TV press a second time which will change to the next video input source and display the Input Selection window Cannot view external signals or channel 3 or 4 If you cannot view signals from external devices connected to VIDEO ColorStream HDMI 1 HDMI 2 HDMI 3 PC or from channels 3 or 4 make sure the Input Lock is set to Off page 42 Poor co...

Page 63: ...lected is not closed captioned no captions will display page 37 If text is not available a black rectangle may appear If this happens turn off the closed caption feature page 37 A closed caption signal may not display correctly in the following situations a when a videotape has been dubbed b when the signal reception is weak or c when the signal reception is nonstandard page 37 Rating blocking V C...

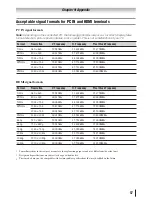
Page 64: ...UDIO INPUT VIDEO 1 V p p 75 ohm negative sync AUDIO 200 mV rms 20dBFS 47K ohm or greater ColorStream component video HD INPUT VIDEO Y 1V p p 75 ohm PR 0 7 V p p 75 ohm PB 0 7 V p p 75 ohm Suggested formats 1080i 720p 480p 480i Chapter 9 Appendix AUDIO 200 mV rms 20dBFS 47K ohm or greater HDMI INPUT HDMI compliant type A connector HDCP compliant Suggested formats See table on the next page HDMI Aud...

Page 65: ...V Frequency H Frequency Pixel Clock Frequency VGA 640 480 59 940Hz 31 469kHz 25 175MHz SVGA 800 600 60 317Hz 37 879kHz 40 000MHz XGA 1024 768 60 004Hz 48 363kHz 65 000MHz WXGA 1280 768 59 870Hz 47 776kHz 79 500MHz 1360 768 60 015Hz 47 712kHz 85 500MHz SXGA 1280 1024 60 020Hz 63 981kHz 108 000MHz 480i 720 480i 59 940Hz 15 734kHz 27 000MHz 480p 720 480p 59 940Hz 31 469kHz 27 000MHz 720p 1280 720p 60...

Page 66: ...ion of product that is mounted in such a manner as to impede normal service is not covered under these warranties This includes wall mounts custom cabinets and other installation methods that do not provide for direct and immediate access to the product for service purposes Labor service charges for set installation setup adjustment of customer controls and installation or repair of antenna satell...

Page 67: ...ABOUR Rental Units The warranty for Television rental units begins with the date of first rental or thirty 30 days from the date of shipment to the rental firm whichever comes first Your Responsibility Read the owner s manual thoroughly before operating this LCD Television Complete and mail the enclosed product registration card or register your LCD Television online at http support toshiba ca warran...

Page 68: ...EGLIGENCE UNDER A STATUTE OR UNDER ANY OTHER LAW OR FORM OR ACTION OR WHETHER ARISING OUT OF THE USE OF OR INABILITY TO USE THE TELEVISION EVEN IF ANY OF THE RELATED PARTIES HAS BEEN ADVISED OF THE POSSIBILITY OF SUCH DAMAGES OR OF ANY CLAIM BY ANY OTHER PARTY No person agent distributor dealer or company is authorized to change modify or extend the terms of these warranties in any manner whatsoev...

Page 69: ... warranty on the one hand and any statement in the packaging of the Television or in any other document enclosed with or used in the context of the promotion or sale of the Television on the other hand the provisions of this limited warranty shall prevail How to Obtain Warranty Services If after following all of the operating instructions in this manual checked the Troubleshooting section and have...

Page 70: ...7 U S A 726 2 1 7 HEAD OFFICE 191 McNABB STREET MARKHAM ONTARIO L3R 8H2 CANADA CableClear ColorStream GameTimer and TheaterWide are registered trademarks of Toshiba America Information Systems Inc Channel Browser DynaLight ClearFrame and SurfLock are trademarks of Toshiba America Information Systems Inc REGZA LINK is a registered trademark of Toshiba Corporation ...

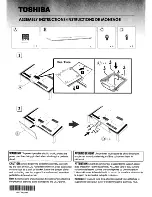
Page 71: ... the pedestal stand to avoid damage to the LCD panel 11111111111111111111111111111111111111111111111111111111II1111111 HF6TK400001 AVERTISSEMENT Pour eviter tout risque de choc electrique empikher Ie cordon electrique d iHre coince en fixant Ie piedestal ATTENTION Avant de commencer aassembler Ie support placer avec precaution I avant du panneau ACL face vers Ie bas sur une surface matelassee comm...

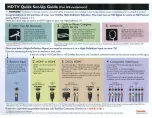
Page 72: ...ct directly from an antenna or basic cable Connect the cable directly to the antenna input on the back of the TV HOMI is the best connection for HOlY This is a digital connection that carries both digital video and digital audio Your HD Cable Box or HD Satellite Receiver may have a OVI connection This will be connected to the HDMI jack on the TV using an HDMI cable and an HDMI to DVI converter DVI...

Page 73: ...prouvez des difficultes techniques ou si vous avez des questions concernant Ie lonctionnement du produit les centres de service autorises la garantie ou les pieces veuillez appeler notre departement du service ala clientele au 1 800 631 3811 Etats Unls seulement 1 800 268 3404 Canada seulement VOUS trouverez egalement des reponses a de nombreuses questions sur les pieces Ie service etles garanties...

Reviews: