


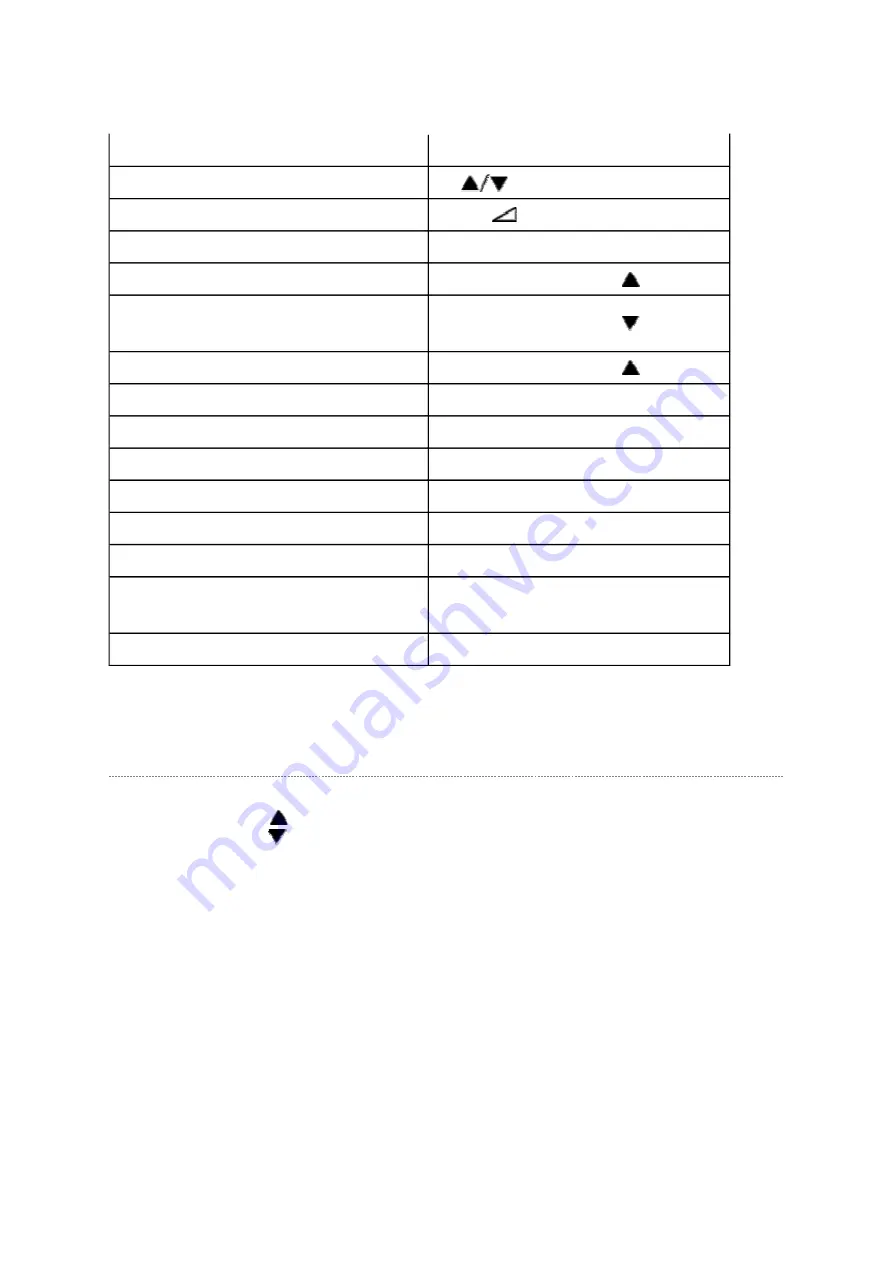
Selecting the Adjusting Item
Every pressing of CH
button in the service mode changes the adjustment items in the
order of table below. (
button for reverse order)
SETTING & ADJUSTING DATA
[ SERVICE MODE ]
ADJUSTING ITEMS AND DATA IN THE SERVICE MODE:
Note:
The image system data of RCUT-BDRV is different by each image format.
The PAL value is indicated in the table.
Never adjust H.POS and V.POS except PAL/WIDE mode.
Test signal selection
Selection of the adjustment items
CH
(on TV or remote control)
Change of the data value
Volume
+/- (on TV or remote control)
Adjustment menu mode ON/OFF
MENU button (on TV)
Initialization of the memory (QA02)
CALL + CH button on TV (
)
Reset the count of operating
protect circuit to "00"
CALL + CH button on TV (
)
Turn off I2C bus communication
CALL + CH button on TV (
)
"RCUT" selection
1 button
"GCUT" selection
2 button
"BCUT" selection
3 button
"CNTX" selection
4 button
"COLC" selection
5 button
"UVTT" selection
6 button
Automatic A/D Adjustment
(PC, Component, Composite (PAL, NTSC))
7 button
Self diagnostic display ON/OFF
9 button
Page 3 of 18
2013-12-02
file://\\serwer\instr\CD\1000-1099\CD1031\37WL68P-01\37WL68P-01\html\!adj-sm...
Summary of Contents for 37WL68P
Page 12: ...LOWB POWER AV TERM KEY SIGNAL 100 FRONT HDMI ...
Page 16: ......
Page 17: ......
Page 18: ......
Page 19: ......
Page 20: ......
Page 21: ......
Page 22: ......
Page 23: ......
Page 24: ......
Page 25: ......
Page 26: ......
Page 27: ......
Page 28: ......
Page 29: ......
Page 30: ......
Page 31: ......
Page 32: ......
Page 33: ......
Page 34: ......
Page 35: ......
Page 36: ......
Page 37: ......
Page 38: ......
Page 39: ......
Page 40: ......
Page 41: ......
Page 42: ......
Page 43: ......
Page 44: ......
Page 45: ......
Page 46: ......
Page 47: ......
Page 48: ......
Page 49: ......
Page 50: ......
Page 51: ......
Page 52: ......
Page 53: ......
Page 54: ......
Page 55: ......
Page 56: ......
Page 57: ......
Page 58: ......
Page 59: ......
Page 60: ......
Page 61: ......
Page 62: ......
Page 63: ......
Page 64: ......
Page 65: ......
Page 66: ......
Page 67: ......
Page 68: ......
Page 69: ......
Page 70: ......
Page 71: ......
Page 72: ......
Page 73: ......
Page 74: ......
Page 75: ......
Page 76: ......
Page 77: ......
Page 78: ......
Page 79: ......
Page 80: ......
Page 81: ......
Page 82: ......
Page 83: ......
Page 84: ......
Page 85: ......
Page 86: ......
Page 87: ......
Page 88: ......
Page 89: ......
Page 90: ......
Page 91: ......
Page 92: ......
Page 93: ......
Page 94: ......
Page 95: ......
Page 96: ......
Page 97: ......
Page 98: ......
Page 99: ......
Page 100: ......
Page 101: ......
Page 102: ......
Page 103: ......
Page 104: ......
Page 105: ......
Page 106: ......
Page 107: ......
Page 108: ......
Page 109: ......
Page 110: ......
Page 111: ......
Page 112: ......
Page 113: ......
Page 114: ......
Page 115: ......
Page 173: ...FUNCTION AND OPERATION The Remote Control Simple at a glance reference of your remote control ...
Page 175: ...Using the Control and Connection ...
Page 176: ......
Page 178: ......
Page 179: ......
Page 181: ......
Page 182: ......
Page 183: ......
Page 184: ......
Page 185: ...FUNCTION AND OPERATION Programme Skip Programme Skip ...
Page 186: ......
Page 187: ......
Page 188: ...FUNCTION AND OPERATION Auto Tune Using Auto Tuning ...
Page 189: ......
Page 190: ...SPECIFICATION ...
Page 191: ......


