background image

– 13 –

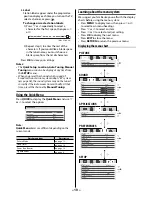
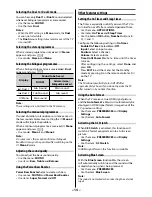
 Activating the Picture Mode

This TV off ers the choice of personalising the picture 
style.

Dynamic

Standard

Mild

Movie

 and 

Game

 are 

preset options and aff ect many features/settings 
within the TV.

• 

 Use  menus: 

PICTURE

 and 

Picture Settings

• 

 Use the item: 

Picture Mode

Note:

Game

 mode is available in external input mode (other 

than aerial input). When you select 

Game

 mode, 

suitable widescreen formats will be selected.

Activating the picture preferences

You can customise current 

Picture Mode

 settings 

as desired.

• 

 Use  menus: 

PICTURE

 and 

Picture Settings

• 

 Use  items: 

Contrast

Brightness

Colour

Tint

 and 

Sharpness

Setting the Contrast Booster

Contrast Booster

 improves the contrast of the 

picture.

• 

 Use  menus: 

PICTURE

 and 

Picture Settings

• 

 Use the item: 

Contrast Booster

• 

 Use  modes: 

High

,


Off 

Low

 and 

Middle

Using the Cinema Mode

A movie fi lm’s picture runs at 24 frames a second, 
whereas movie software such as DVD, etc., that you 
enjoy watching on TV at home runs at 30 (NTSC) 
or 25 (PAL) frames a second. To convert this signal 
to reproduce a smooth motion and picture quality, 
select the 

On

 mode.

Eff ective signal and setup conditions:

• 

 When the Video input mode is selected.

• 

 When the input signal format is 480i, 576i or 1080i 
signals.

• 

 Use  menus: 

PICTURE

 and 

Picture Settings

• 

 Use the item: 

Cinema Mode

Note:

When a DVD movie with subtitle is playing back, this 
mode may not work correctly.

Adjusting the Colour Temperature

Colour Temperature increases the warmth or 
coolness of the picture by setting the red, green or 
blue tint.

• 

 Use  menus: 

PICTURE

 and 

Picture Settings

• 

 Use  items: 

Colour Temperature

Red Level

Green Level

 and 

Blue Level

• 

 Use  modes: 

Cool

Natural

 and 

Warm

 etc.

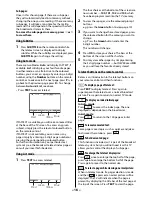
Activating the Noise Reduction (NR)

If the receiving signal of MPEG is a mosquito 
(grained) noise depending on the compression and 
conversion, the picture is weak and the picture is 
blurry, the picture may be improved when using this 
function.

• 

 Use  menus: 

PICTURE

Picture Settings

 and 

Noise 

Reduction

• 

 Use  items: 

Auto Clean

MPEG NR

 and 

DNR

• 

 Use  modes: 

Low

Middle

High

 and 

Off 

 etc.

Resetting the Picture Settings

• 

 Use  menus: 

PICTURE

 and 

Picture Settings

• 

 Use the item: 

Reset 

(select 

Yes

 and press 

OK

)

Adjusting the Colour Management

You can adjust the picture colour quality by 
selecting from 6 base colour adjustments : 

Red

Green

Blue

Yellow

Magenta

 or 

Cyan

.

• 

 Use  menus: 

PICTURE

3D Colour Management 

(On)

 and 

Base Colour Adjustment

• 

 Use  items: 

Hue

Saturation

 and 

Brightness

Resetting the Base Colour Adjustment

• 

 Use  menus: 

PICTURE

3D Colour Management


(On)

 and 

Base Colour Adjustment

• 

 Use the item: 

Reset

Sound adjustment

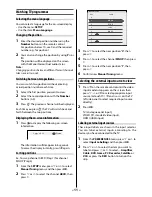
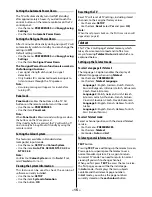
Setting the MTS (Multi-channel TV Sound)

Auto

 mode

The 

MTS Auto

 mode automatically recognize 

stereo/bilingual programmes depending on the 
broadcast signal.

Mono

 mode

If you experience noise or poor reception of any 
stereo/bilingual programme, set the 

MTS

 mode to 

Mono

.

Noise will be reduced and reception may improve.

• 

 Use the menu: 

SOUND

• 

 Use the item: 

MTS

Note:

If you experience noise with a particular programme 
on whose channel reception is usually good, try setting 
MTS mode to 

Auto

, then switch 

s

 to 

e

 Mono 

(monaural).

Summary of Contents for 32P1400 Series

Page 1: ...DUCTS INDONESIA All Rights Reserved TD J Welcome toToshiba Thank you for purchasing this Toshiba LED TV This manual will help you use the exciting features of your new TV Instructions in this manual are based on using the remote control You also can use the controls on the TV if they have the same name as those referred to on the remote control Please read all safety and operating instructions in ...

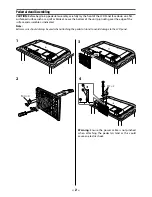
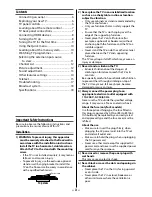
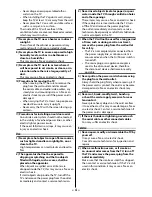
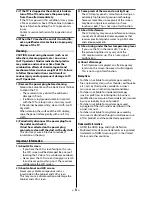
Page 2: ...s a quilt or blanket Leave the bottom of the unit protruding over the edge of the surface and assemble as indicated Note Extreme care should always be used when attaching the pedestal stand to avoid damage to the LCD panel M4 4 1 4 3 2 Warning Ensure the power cable is not pinched when attaching the pedestal stand as this could cause an electric shock M5 2 ...

Page 3: ...l outlet end Make sure to hold the plug when unplugging the AC power cord Never use other cord except for supplied AC power cord and never use the supplied power cord for any other purpose 5 Never insert or remove the power plug with wet hands This may cause an electric shock 6 Never block or cover the slots and openings in the cabinet Never place the TV so that it is facing upward or on its side ...

Page 4: ...V this may cause a fire or an electric shock If small objects drop inside the TV turn off the TV and remove the power plug from the outlet immediately and contact a service technician 3 Never insert objects metal or paper or pour water inside the TV through ventilation holes and other openings These items may cause a fire or an electric shock If these objects are inserted inside the TV turn off th...

Page 5: ...rongly or scratch it and never put anything on it These actions will damage the LCD screen 2 About cabinet and LCD screen Never spray volatile compounds such as insecticide on the cabinet and LCD screen This may cause a discolouration or damage the cabinet and LCD screen 3 Some pixels of the screen do not light up The LCD display panel is manufactured using an extremely high level of precision tec...

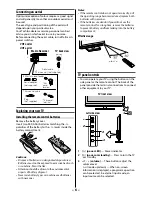
Page 6: ...ies must not be exposed to excessive heat such as sunshine fire or the like Attention should be drawn to the environmental aspects of battery disposal Never mix battery types or combine used batteries with new ones Notes If the remote control does not operate correctly or if the operating range becomes reduced replace both batteries with new ones If the batteries are dead or if you will not use th...

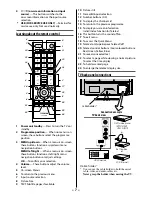
Page 7: ...ut source selection 8 Picture Size 9 TEXT Subtitle pages if available 10 Picture still 11 Stereo Bilingual selection 12 Number buttons 0 9 13 To display the Channel List 14 To return to the previous programme 15 To display on screen information Initial Index function for Teletext 16 This button turns the sound off on 17 To exit menu 18 To access the Quick Menu 19 Teletext on Superimpose Teletext o...

Page 8: ...GA VESA 1024 5 768 60 70 75 Hz W XGA VESA 1280 5 768 60 Hz W XGA VESA 1360 5 768 60 Hz S XGA VESA 1280 5 1024 60 Hz However these signal formats are converted to match the number of pixels of the LCD panel Therefore the TV may not display small text properly If you connect this unit to your PC the compressed image is displayed in S XGA mode therefore the picture quality may deteriorate and charact...

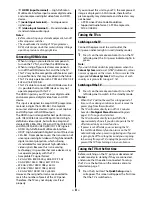
Page 9: ...station is found it will be displayed NEVER PRESS ANY OTHER BUTTONS WHILE THE SET IS TUNING H Manual Fine Tuning Press or until better picture and sound are obtained I Signal Booster If the receiving signal is weak strong and the picture is noisy the picture may be improved when using this function Press the or to turn the Signal Booster On or Off Quick Setup Menu Language English 2 Press or to se...

Page 10: ...Timer Power Bass Booster Signal Booster Dynamic 00 00 Off On Note Quick Menu items are different depending on the current mode Quick menu item Description Picture Mode page 13 Sleep Timer page 14 Power Bass Booster page 14 Signal Booster page 9 Learning about the menu system We suggest you familiarize yourself with the display charts before using the menu system Press MENU to display menu then pre...

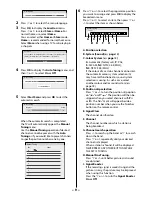
Page 11: ...ase the display instantly press again Sorting positions Ex To swap channel ABCD Prog 1 for channel MNOP Prog 4 1 From the SETUP menu press or to select Manual Tuning menu and then press OK 2 Press or to select the channel ABCD then press Manual Tuning Pos 0 1 ABCD 2 EFGH 3 IJKL MNOP 4 5 6 7 Label 3 Press to select the new position 4 then press 4 Press to select the channel MNOP then press 5 Press ...

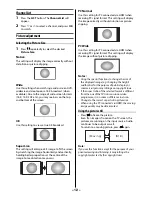
Page 12: ...tting will display the image correctly without distortion or picture clipping PC Wide Use this setting for PC connected via HDMI when receiving PC signal format This setting will display the image without picture clipping Notes Using the special functions to change the size of the displayed image e g changing the height width ratio for the purpose of public display or commercial gain may infringe ...

Page 13: ...the warmth or coolness of the picture by setting the red green or blue tint Use menus PICTURE and Picture Settings Use items Colour Temperature Red Level Green Level and Blue Level Use modes Cool Natural and Warm etc Activating the Noise Reduction NR If the receiving signal of MPEG is a mosquito grained noise depending on the compression and conversion the picture is weak and the picture is blurry...

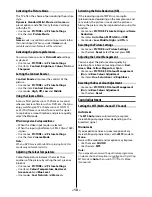
Page 14: ...Off Other features settings Setting the OnTimer and SleepTimer The Timer is especially useful if you want the TV to turn itself on or off after a selected period of time Use the menu APPLICATIONS Use items On Timer and Sleep Timer Use the button OK button Number buttons 0 9 and Configure the following settings in On Timer Enable On Timer Select On or Off Input Select an input source Position Selec...

Page 15: ...rently installed Use the menu SETUP Use the item System Information Use the button OK Resetting theTV Reset TV will reset all TV settings including stored channels to their original factory values Use the menu SETUP Use the item Reset select Yes and press OK Note When the set powers back on the first time screen will appear page 8 Teletext This TV has a multi page Teletext memory which takes a few...

Page 16: ...creen are now number 100 101 102 and 103 which have been programmed into the TV s memory 2 To view these pages use the coloured prompt buttons e g press the Green button to view page 101 3 If you want to change these stored pages press the coloured button for the colour you want to change e g Press the Green button and enter the 3 digit number This number will change 4 Press OK to store your choic...

Page 17: ...ties Try another channel Make sure the Colour System is properly set Teletext problems Check the aerial connections Good performance of text depends on a good strong broadcast signal The brightness of the screen comes down or flickers of the screen are caused or some parts of the screen do not light up When you just buy and start to use this TV a flickering may be caused in the screen In this case...

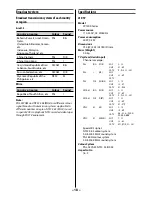
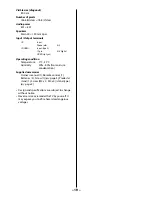
Page 18: ...s or region NTSC 4 43 MHz is used in special VCRs to playback NTSC recorded video tapes through PAL TV equipment Specifications LEDTV Model 2P1400 Series Power source 110 240 V AC 50 60 Hz Power consumption 40 W 0 4 W Dimensions 734 W 543 H 180 D mm Mass Weight 5 0 kg TV system Aerial input Channel coverage PAL B G CCIR VHF 2 12 UHF 21 69 CATV X Z 2 S1 S41 PAL I UK VHF UHF 21 69 CATV PAL D K CHINA...

Page 19: ...igital HDMI Lip Sync Operating condition Temperature 0 C 35 C Humidity 20 80 No moisture condensation Supplied accessories Owner s manual 1 Remote control 1 Batteries 2 Screw 1 page 3 Predestal stand 1 Screw M5 x 2 M4 x 4 stand type page 2 Design and specifications are subject to change without notice Never service or remodel the TV by yourself It may expose you to a fire hazard or dangerous volta...

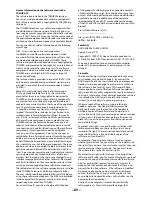
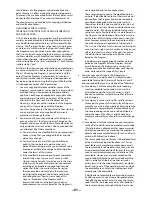
Page 20: ...components pre installed in the TOSHIBA Televisions which are subject to EULAs The user should read the applicable EULAs carefully before using these software components The EULAs are exhibited in their original text English as exactly written by the respective parties other than TOSHIBA For at least three 3 years from the date of distribution of this product Toshiba will give to anyone who contac...

Page 21: ...is License Exception if the Program itself is interactive but does not normally print such an announcement your work based on the Program is not required to print an announcement These requirements apply to the modified work as a whole If identifiable sections of that work are not derived from the Program and can be reasonably considered independent and separate works in themselves then this Licen...

Page 22: ...illing to distribute software through any other system and a licensee cannot impose that choice This section is intended to make thoroughly clear what is believed to be a consequence of the rest of this License 8 If the distribution and or use of the Program is restricted in certain countries either by patents or by copyrighted interfaces the original copyright holder who places the Program under ...

Page 23: ...tine library you may consider it more useful to permit linking proprietary applications with the library If this is what you want to do use the GNU Lesser General Public License instead of this License Exhibit B This copy of the libpng notices is provided for your convenience In case of any discrepancy between this copy and the notices in the file png h that is included in the libpng distribution ...

Page 24: ...the original source 3 This Copyright notice may not be removed or altered from any source or altered source distribution The Contributing Authors and Group 42 Inc specifically permit without fee and encourage the use of this source code as a component to supporting the PNG file format in commercial products If you use this source code in a product acknowledgment is not required but would be apprec...

Reviews: