background image

21

CONTROLS AND FEATURES

Picture controls

Most of the picture controls and functions are 
available in both 

digital

 and 

analogue

 modes. To 

access the required menus when in 

digital

 mode: 

press 

M

 and using 

u

 select 

TV Setup

, press 

Q


then 

I

 or 

i

 to select the desired menu. 

PLEASE NOTE: features not available in 

digital


mode will be greyed out

. To access the required 

menus when in 

analogue

 mode: press 

M

 and use 

I

 or 

i

 to select the desired menu.

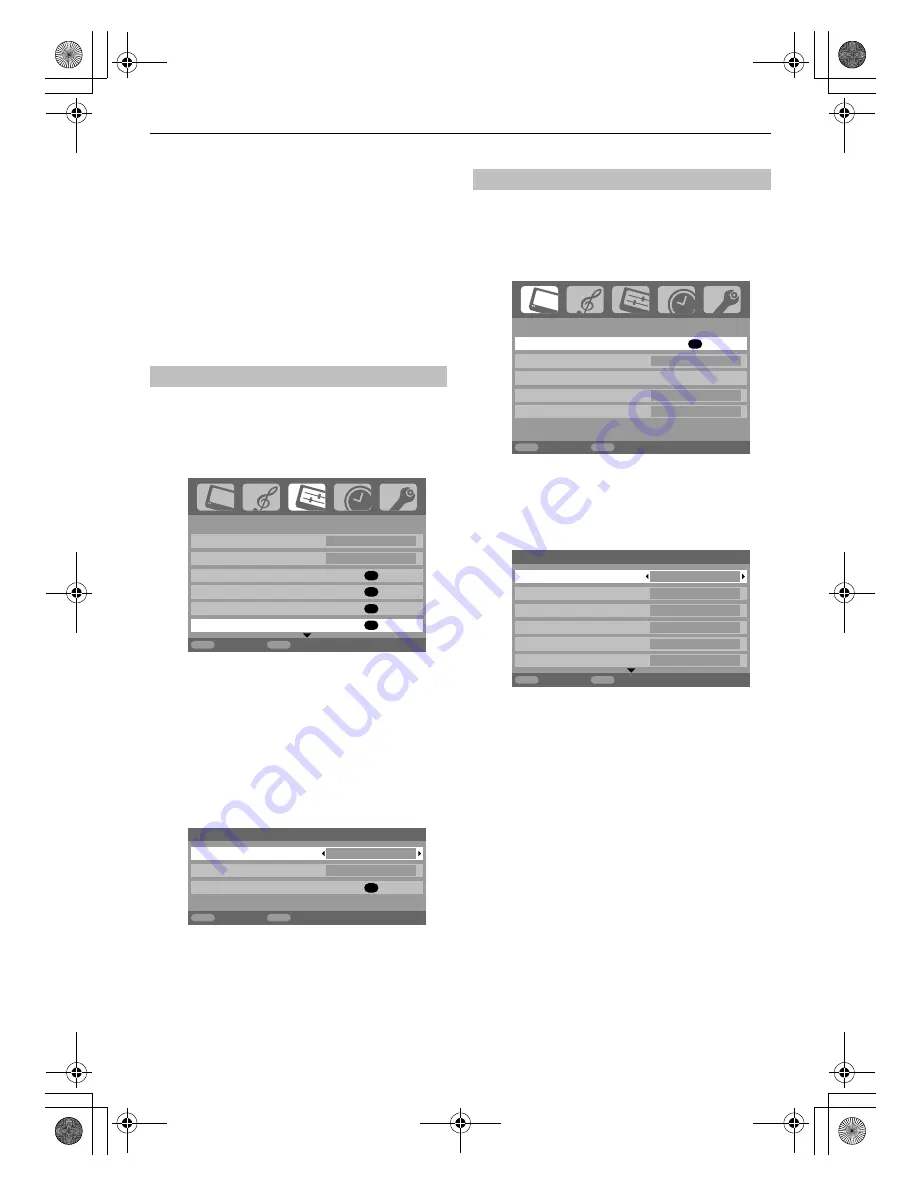
The picture position may be adjusted to suit personal preference 

and can be particularly useful for external inputs.

a

In the 

SET UP

 menu press 

u

 until 

Picture position

 is 

highlighted.

b

Press 

Q

 to view the options available for the picture 

format that has been selected.

c

Press 

U

 and 

u

 to select an option, then 

I

 or 

i

 to adjust 

the settings.

The options alter depending on the widescreen format 
chosen and when viewing connected equipment.

In 

Cinema 2

:

To return to the original factory settings select 

Reset

 in 

the 

Picture position

 menu and press 

Q

.

Adjusting the 

Backlight

 can improve the clarity of the screen 

when viewing.

a

In the 

PICTURE

 menu press 

u

 to select 

Picture 

settings

, then press 

Q

.

b

In the 

Picture settings

 menu press 

u

 to select 

Backlight

.

c

Press 

I

 or 

i

 to adjust.

Picture position – 

analogue

 only

OK 

OK 

OK 

OK 

MENU EXIT 

1/2

SET UP     

Language English 

Country

UK 

Auto tuning  

Manual tuning  

AV connection 

Picture position  

Back Watch 

TV 

OK

MENU

EXIT

Picture position

Horizontal position

0

Vertical position

0

Reset

Back

Watch TV

Backlight

OK 

MENU EXIT 

PICTURE 

Picture settings  

3D Colour management 

Off 

Base colour adjustment 

Active Backlight Control 

On 

Cinema mode  

On 

Back Watch 

TV 

MENU

EXIT

1/2

Picture settings

Backlight

100

Contrast

100

Brightness

50

Colour

50

Tint

0

Sharpness

0

Back

Watch TV

00GB_AV505D_EngOM.book  Page 21  Wednesday, November 28, 2007  2:36 PM

Summary of Contents for 32AV503

Page 1: ...Series AV50 00GB_AV505D_EngOM book Page 1 Wednesday November 28 2007 2 36 PM ...

Page 2: ...00GB_AV505D_EngOM book Page 2 Wednesday November 28 2007 2 36 PM ...

Page 3: ...ue only 21 Backlight 21 Picture preferences 22 Black stretch 22 MPEG NR Noise Reduction 22 DNR Digital Noise Reduction 22 Colour temperature 22 3D Colour management 23 Base colour adjustment 23 Active Backlight Control 23 Cinema mode 23 Automatic format Widescreen 23 4 3 stretch 24 Blue screen 24 Side panel adjustment 24 Picture still 24 Panel lock 24 The timers 25 Programme timer digital only 25 ...

Page 4: ...ng connections DO consult your dealer if you are ever in doubt about the installation operation or safety of your equipment DO be careful with glass panels or doors on equipment DO NOT obstruct the ventilation openings of the equipment with items such as newspapers tablecloths curtains etc Overheating will cause damage and shorten the life of the equipment DO NOT allow electrical equipment to be e...

Page 5: ...ey could become conspicuous it is always advisable to reduce both the brightness and contrast settings Very long continuous use of the 4 3 picture on a 16 9 screen may result in some retention of the image at the 4 3 outlines this is not a defect of the LCD TV and is not covered under the manufacturers warranty Regular use of other size modes eg Superlive and varying the side panel brightness if a...

Page 6: ...sions SUBTITLE Digital Subtitles D Time display When using the Programme Guide Z 24 hours z 24 hours CC 1 page cc 1 page 18 Text and interactive service control buttons Remove the back cover to reveal the battery compartment and make sure the batteries are inserted the right way round Suitable battery types for this remote are AAA IEC R03 1 5V Do not combine a used old battery with a new one or mi...

Page 7: ...and display VGA 480i 480p 576i 576p and 720p signals NOTE Although this television is able to connect to HDMI equipment it is possible that some equipment may not operate correctly A wide variety of external equipment can be connected to the back of the television therefore the relevant owners manuals for all additional equipment must be referred to We recommend SCART 1 for a decoder and SCART 2 f...

Page 8: ...HDMI1 terminal and audio cables to the HDMI1 Audio socket see illustration The recommended HDMI to DVI adapter cable length is 6 6 ft 2m An HDMI to DVI adapter cable transfers video only Separate analog audio cables are required See HDMI1 audio on page 32 NOTE To ensure that the HDMI or DVI device is reset properly it is recommended that you follow these procedures When turning on your electronic ...

Page 9: ...rminals To connect a PC to the HDMI terminal Format Resolution V Frequency H Frequency Pixel Clock Frequency 480i 720 480i 59 940 60 000Hz 15 734 15 750kHz 27 000 27 027MHz 576i 720 576i 50 000Hz 15 625kHz 27 000MHz 480p 720 480p 59 940 60 000Hz 31 469 31 500kHz 27 000 27 027MHz 576p 720 576p 50 000Hz 31 250kHz 27 000MHz 1080i 1920 1080i 59 940 60 000Hz 33 716 33 750kHz 74 176 74 250MHz 1080i 1920...

Page 10: ...five topics As each symbol is selected by pressing I or i on the navigation ring on the remote control its respective options will appear below To use the options press the U and u button on the remote control to move up and down through them and Q I or i to select the required choice Follow the on screen instructions The functions of each menu are described in detail throughout the manual To alte...

Page 11: ...he television to complete the search When the search is complete the television will automatically select programme one The AUTO TUNING screen will display the total number of services found e Use u or U to move through the list to select a programme then press Q to view NOTE The time will be set automatically by transmission but can be advanced or decreased by up to 3 hours using Local Time Setti...

Page 12: ...s Q to view This is a digital television which is integrated to allow the use of both digital and analogue services However during the lifetime of this set it is very likely that analogue services will be switched off to allow for more new digital services This switch off will happen in a number of phases which will be advertised in your area well in advance It is recommended that at each phase th...

Page 13: ...essary then press P This feature is available for service engineers or can be used for direct channel entry if the multiplex channel is known a Select Manual tuning from the SETUP MENU and press Q b Enter the multiplex number using the number buttons and then press Q The television will automatically search for that multiplex When the multiplex is found any channels not currently on the programme ...

Page 14: ...u must allow the television to complete the search When the search is complete the television will automatically select programme position 1 and the Manual tuning screen will appear f Use u or U to move through the list to select a programme then press P to view The station order may be changed using the Manual tuning screen see the analogue Sorting programme positions section Quick Setup Quick Se...

Page 15: ... and media recorder turn the decoder on insert a pre recorded film in the media recorder and press PLAY then manually tune a Press M and using I or i select the SET UP menu with u highlight Manual tuning press Q to select b Use U or u to highlight the programme position required e g we suggest Prog 0 for a media recorder c Press Q to select If the programme is skipped Programme skip must be remove...

Page 16: ...o highlight the programme position to be skipped and press Q to select c Press i to select Programme skip d Use U or u to turn Programme skip on Press Q 8 on the screen indicates a skipped programme position e Press M and repeat from Step 2 or press P Each programme position has to be individually selected To turn Programme skip off repeat the procedure for each position Skipped programme position...

Page 17: ...to select The television will now tune the stations for your country d Press u to highlight Auto tuning then press Q e To start Auto tuning press Q You must allow the television to complete the search When the search is complete the television will automatically select programme position 1 This may not be a clear picture so the station order can be changed see Sorting programme positions section S...

Page 18: ... of the televisions features a In digital mode press M and using u highlight TV Setup then press Q b Use I or i to select SOUND c In analogue mode press M and I or i to select SOUND d Press u to highlight Bass Treble or Balance and I or i to change the setting Bass boost enhances the depth of the sound on the TV speakers The difference will only be noticeable on sound with a strong bass a In the S...

Page 19: ...g will enlarge the image to fit the screen by stretching the image horizontally and vertically holding better proportions at the centre of the image Some distortion may occur When watching letterbox format films video tapes this setting will eliminate or reduce the black bars at the top and bottom of the screen by zooming in and selecting the image without distortion When watching all sides panel ...

Page 20: ... 9 broadcast Use this setting when watching a widescreen DVD widescreen video tape or a 16 9 broadcast when available Due to the range of widescreen formats 16 9 14 9 20 9 etc black bars may be visible on the top and bottom of the screen Use this setting to view a true 4 3 broadcast PC PC Wide Super Live 2 Cinema 2 4 3 Super Live 1 Cinema 1 Subtitle 14 9 When using a PC connected via HDMI this set...

Page 21: ...nding on the widescreen format chosen and when viewing connected equipment In Cinema 2 To return to the original factory settings select Reset in the Picture position menu and press Q Adjusting the Backlight can improve the clarity of the screen when viewing a In the PICTURE menu press u to select Picture settings then press Q b In the Picture settings menu press u to select Backlight c Press I or...

Page 22: ...r i to select a setting to suit your preference DNR enables you to soften the screen representation of a weak signal to reduce the noise effect a Select DNR from the Picture settings menu b Use I or i to select between Auto Low Middle High and Off The differences may not always be noticeable for the best result use lower settings as picture quality can be lost if the setting is too high Colour Tem...

Page 23: ... viewed selecting Cinema mode can help correct this by smoothing out the picture a In the PICTURE menu press u to select Cinema mode b Press I or i to select On or Off NOTE When a DVD with subtitles is being played this mode may not work correctly When this television receives a true Widescreen picture and Auto format is On it will automatically be displayed in Widescreen format irrespective of th...

Page 24: ...CTION menu press u until Side panel is highlighted b Press I or i to adjust This feature is used to hold a still image on the screen a Press r to hold an image on the screen press r again to cancel Panel lock Panel lock disables the buttons on the television All buttons on the remote control can still be used a From the FUNCTION menu select Panel lock and choose On or Off using I or i When Panel l...

Page 25: ...he option of watching or cancelling the programme The menus and other channels will not be available during the timed programme unless the programme timer is cancelled The television can be set to turn itself Off after a certain time a Press M and I or i to select the TIMER menu b Press u to select Sleep timer Use the number buttons to set the required time For example to switch the television off...

Page 26: ...button to bring up the Programme timers menu NOTE Recording can be set from both the information screen and guide In order for the recording operation to work the media recorder must be AV link compatible e Press z to move the Guide forward by 24 hours press Z to go back Pressing ccor CC will move the Guide forwards or backwards a page at a time Information EXIT TV FAV 11 36 Mon 11 Dec 11 30 King ...

Page 27: ... standby This feature locks various menus to prevent the television being retuned or the settings being overridden a In the PARENTAL CONTROL menu press u to select Mode b Use I or i to choose between ON LOCK MENU LOCK INSTALL and OFF When menus that have been locked are now selected they will only become available when the PIN is entered Setting the PIN OK OK OK MENU EXIT FEATURE MENU Parental Con...

Page 28: ...and u to go through the list of channels pressing Q to select the ones required a padlock will appear in the box d Press P and put the television into standby e When the television is switched back on and any of the channels in the Locked Programme list are selected the PIN must be entered before they can be accessed Selecting Encrypted Programmes allows all encrypted programmes to be shown in the...

Page 29: ...ct A screen will appear warning that all digital settings will be lost press Q to continue The Welcome screen will appear press Q to continue the television will then auto tune The Common Interface Slot situated on the back of the television enables the insertion of a CAM Conditional Access Module and card These are purchased from a service provider and allow additional subscription broadcasts to ...

Page 30: ...he SOFTWARE UPGRADE menu press U or u to select Search for New Software b Press Q The television will automatically start searching for a software upgrade the progress bar will move along the line If an upgrade is found the television will automatically start downloading if not a screen will appear stating that an upgrade is unavailable Version Auto Upgrade OK OK MENU EXIT FEATURE MENU Favourite a...

Page 31: ...appear on screen showing all stored programmes and external equipment Use U and u to highlight and Q to select HDMI displays equipment connected to Input HDMI on the back of the television It is designed for best performance with 1080i high definition signals This specifies the type of signal going into SCART 2 EXT2 on the back of the television Please refer to the manufacturers instructions for t...

Page 32: ...nd only Certain formats of DVD disk may not output from this TV 32 44 1 48kHz and 16 20 24 bits are acceptable Lip Sync can synchronize the sound and picture This feature is only available when equipment compatible with Lip Sync is connected via HDMI a In the AV connection menu press u to highlight Lip Sync b Using I or i select On or Off HDMI1 audio OK OK OK OK MENU EXIT 1 2 SET UP Language Engli...

Page 33: ...ill change indicating that these pages have been loaded These sub pages will remain available to view until another page is chosen or in normal TV mode the channel is changed If Fastext is available four coloured titles will appear at the base of the screen To access one of the four given subjects press the relevant coloured button on the remote control For further information on your particular t...

Page 34: ...d The television will indicate when the page is present by displaying the page number at the top of the screen Press to view the page To display news flashes Select the news flash page for the chosen text service see the index page of text service Press D The news flashes will be displayed as and when they are broadcast Press D again to cancel the display The news flash page must be cancelled befo...

Page 35: ...ideo DVD being played show on screen A Make sure the VCR or DVD player is connected to the television as shown on page 7 then select the correct input by pressing o Q Why is there a good video picture but no sound A Check all lead connections Q Why is there a picture but no sound A Check the volume has not been turned down or that sound mute has not been selected EXT2 A V C R OK MENU EXIT Manual s...

Page 36: ...re that no one else can use the Master PIN by removing the Owner s Manual Q Why when digital subtitles have been selected are they not showing on screen A Subtitles are not currently being transmitted by the broadcaster Q Why is there no digital text service A The digital programme being viewed is not broadcasting digital text Try another digital programme Q Why are there problems with analogue te...

Page 37: ...may vary Q Why are the colours wrong when an NTSC source is played A Connect the source via a SCART lead and play Select Manual setting from the SET UP menu Q Why don t the devices connected via HDMI operate properly A Make sure to use cables with the HDMI logo see page 8 Some early HDMI equipment may not work properly with the latest HDMI TV products due to new standard adoption Try Lip Sync sett...

Page 38: ...e symbol indicates that this product may not be treated as household waste By ensuring this product is disposed of correctly you will help prevent potential negative consequences for the environment and human health which could otherwise be caused by inappropriate waste handling of this product For more detailed information about recycling of this product please contact your local city office your...

Page 39: ...39 INFORMATION For your own records 00GB_AV505D_EngOM book Page 39 Wednesday November 28 2007 2 36 PM ...

Page 40: ...stem Visible Screen Size approx Model 32 37 42 80cm 94cm 107cm Display 16 9 Sound output at 10 distortion Main 10W 10W Power consumption as specified in EN60107 1 1997 Model 32 37 42 137W 169W 217W Standby approx Model 32 37 42 0 9W 0 9W 0 9W Dimensions approx Model 32 55cm H 80cm W 22cm D 37 62cm H 91cm W 25cm D 42 68cm H 101cm W 26cm D Height dimension includes foot stand Weight approx Model 32 ...

Page 41: ...License Information used with Toshiba Televisions 00GB_AV505D_EngOM book Page 41 Wednesday November 28 2007 2 36 PM ...

Page 42: ...ws These software components are not subject to any copyrights or other third party rights and are provided in as is condition without any warranty whether express or implied Warranty here includes but not limited to an implied warranty for marketability or fitness for specific uses All risks associated with the quality or performance of these software components are assumed by the user TOSHIBA sh...

Page 43: ...You must make sure that they too receive or can get the source code Also you must show them these terms so they know their rights We protect your right with two steps 1 copyright the software and 2 offer you this license which gives you legal permission to copy distribute and or modify the software Also for each author s protection and ours we want to make certain that everyone understands that th...

Page 44: ...ditions and telling the user how to view a copy of this License Exception if the program itself is interactive but does not normally print such an announcement your work based on the program is not required to print such an announcement These requirements apply to the modified work as a whole If identifiable sections of that work are not derived from the program and can be reasonably considered in...

Page 45: ...or copying distributing or modifying the Program or works based on it 6 Each time you redistribute the Program or any works based on the Program the recipient automatically receives a License from the original licensor to copy distribute or modify the Program subject to these terms and conditions You may not impose any further restrictions on the recipient s exercise of the rights granted herein Y...

Page 46: ...tware Foundation write to the Free Software Foundation we sometimes make exceptions for this Our decision will be guided by the two goals of preserving the free status of all derivatives of our free software and of promoting the sharing and use of software generally NO WARRANTY 11 BECAUSE THE PROGRAM IS LICENSED FREE OF CHARGE THERE IS NO WARRANTY FOR THE PROGRAM TO THE EXTENT PERMITTED BY APPLICA...

Page 47: ...n MA 02111 1307 USA Also add information on how to contact you by electronic and paper mail If the program is interactive make it output a short notice like this when it starts in an interactive mode Gnomovision version 69 Copyright 19yy name of author Gnomovision comes with ABSOLUTELY NO WARRANTY for details type show w This is free software and you are welcome to redistribute it under certain co...

Page 48: ...ate to certain responsibilities for you if you distribute copies of the library or if you modify it For example if you distribute copies of the library whether gratis or for a fee you must give the recipients all the rights that we gave you You must make sure that they too receive or can get the source code If you link other code with the library you must provide complete object files to the recip...

Page 49: ...on and modification follow Pay close attention to the difference between a work based on the library and a work that uses the library The former contains code derived from the library whereas the latter must be combined with the library in order to run GNU LESSER GENERAL PUBLIC LICENSE TERMS AND CONDITIONS FOR COPYING DISTRIBUTION AND MODIFICATION 0 This License Agreement applies to any software l...

Page 50: ... it the square root function must still compute square roots These requirements apply to the modified work as a whole If identifiable sections of that work are not derived from the Library and can be reasonably considered independent and separate works in themselves then this License and its terms do not apply to those sections when you distribute them as separate works But when you distribute the...

Page 51: ...ary will still fall under Section 6 Otherwise if the work is a derivative of the Library you may distribute the object code for the work under the terms of Section 6 Any executables containing that work also fall under Section 6 whether or not they are linked directly with the Library itself 6 As an exception to the Sections above you may also combine or link a work that uses the Library with the ...

Page 52: ...two things a Accompany the combined library with a copy of the same work based on the Library uncombined with any other library facilities This must be distributed under the terms of the Sections above b Give prominent notice with the combined library of the fact that part of it is a work based on the Library and explaining where to find the accompanying uncombined form of the same work 8 You many...

Page 53: ...ry under this License may add an explicit geographical distribution limitation excluding those countries so that distribution is permitted only in or among countries not thus excluded In such case this License incorporates the limitation as if written in the body of this License 13 The Free Software Foundation may publish revised and or new versions of the Lesser General Public License from time t...

Page 54: ... at least the copyright line and a pointer to where the full notice is found One line to give the library s name and a brief idea of what it does Copyright 19yy name of author This library is free software you can redistribute it and or modify is under the terms of the GNU Lesser General Public License as published by the Free Software Foundation either version 2 of the License or at your option a...

Page 55: ...lter it and redistribute it freely subject to the following restrictions 1 The origin of this software must not be misrepresented you must not claim that you wrote the original software If you use this software in a product an acknowledgement in the product documentation would be appreciated but is not required 2 Altered source versions must be plainly marked as such and must not be misrepresented...

Page 56: ...Printed on recycled paper 100 Chlorine free VX1A00080900 00GB_AV505D_EngOM book Page 56 Wednesday November 28 2007 2 36 PM ...

Reviews: