background image

45

English

Repeat Settings

— ‡ ˆ

.

Press 

 to select 

Off

One

 or 

Folder

.

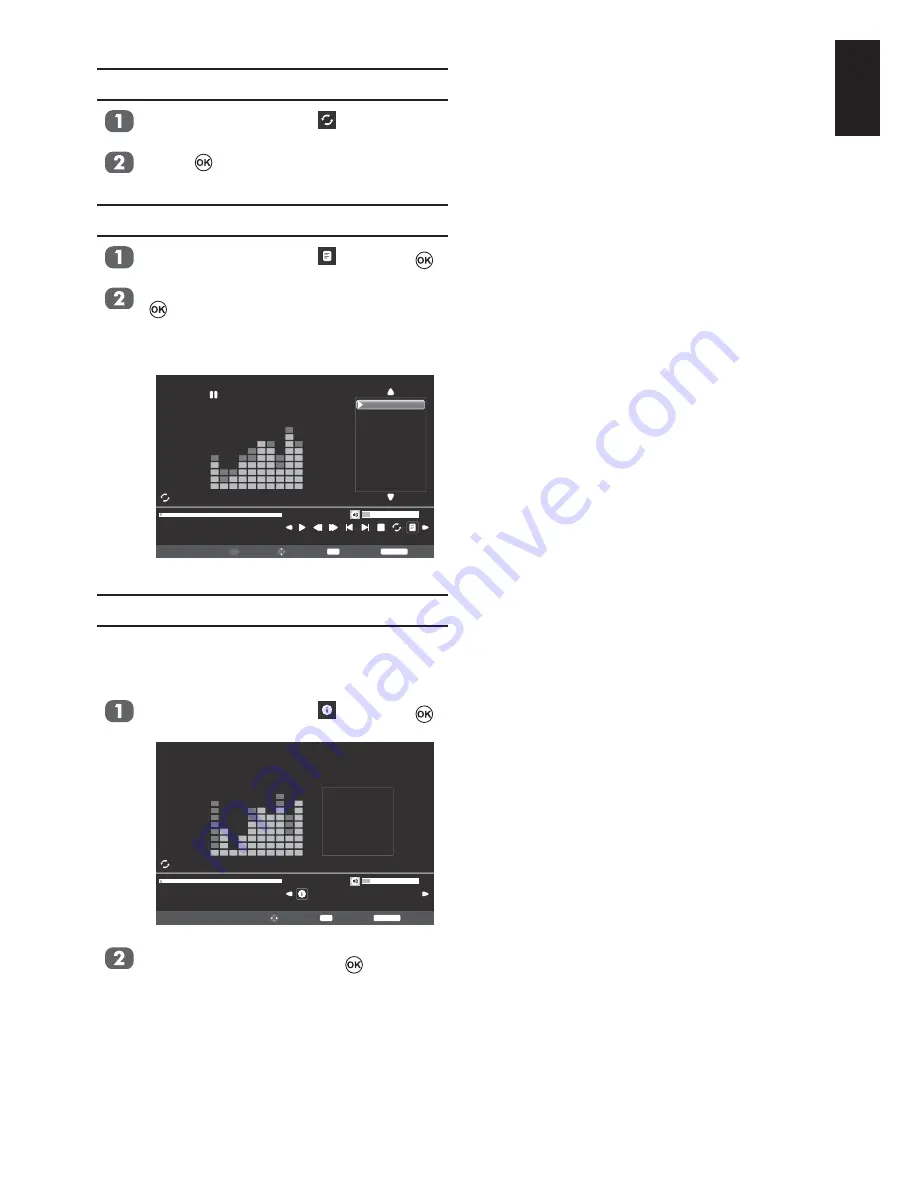
Using the Play List

— ‡ ˆ

 and press 

.

— „ †

 to play music.

Press 

EXIT

 on the remote to collapse 

the list.

00001 / 00003
001.MP3

00:00:02 / 00:02:42

16

Folder

Play List

Pause

001.MP3
002.MP3
003.MP3

001.MP3

1 / 1

Move

Select

OK

Back

RETURN

Page

P

Music Info

Info

 ‰

number, music title, Bit Rate, Artist, Sampling, 
Year, and size).

— ‡ ˆ

 and press 

.

00001 / 00003
001.MP3

00:00:02 / 00:02:42

16

Folder

Info

Move

Select

OK

Back

RETURN

001.MP3

Album:
Title:
Bit Rate:
Artist:
Sampling:
Year:
Size:

Music

01

320K

Singer

44K

2010

6366 KBytes

The information will be removed by time-
out (about 15 sec) or press 

 to exit.

Summary of Contents for 26/32EL93*G DIGITAL Series

Page 1: ...32AV93 G 32 40LV93 G 26 32EL93 G 32 40HL93 G DIGITAL Series ...

Page 2: ...ontrol 20 Using the Side Key Controls 20 Tuning the Television 21 First Time Using 21 Setting the Channels 23 Auto Tuning 23 Manual Tuning 24 Automatic Power Down 26 Reset TV 26 DTV Settings 27 Channels 27 Channel Options 28 Subtitle and Audio 29 Password 29 Parental 29 Standby Channel Update 29 Common Interface 30 Favorite Control 30 Favorite Program 30 Channel Grouping 31 Digital On Screen Infor...

Page 3: ...Play List 42 Background Music 42 Photo Info 43 Enjoy Music through USB Port 44 Play Music Files 44 Repeat Settings 45 Using the Play List 45 Music Info 45 Enjoy Videos through USB Port 46 Play Video Files 47 Repeat Settings 48 Set 48 Using the Play List 48 Slow Forward 48 Step Forward 48 Video Info 48 Aspect Ratio 48 Picture Mode 48 Goto Time 49 REGZA LINK Controls 50 Equipment Control 50 Select R...

Page 4: ...g the Modes 58 Navigating Pages using Auto 58 Navigating Pages using LIST 58 Control Buttons 58 PC Settings 59 Horizontal and Vertical Position 59 Horizontal Width 59 Clock Phase 59 Reset 59 Input Selection and AV Connections 60 Lip Sync Mode 60 Input Signal Selection 60 Frequently Asked Questions 61 Accessories 63 License Information 65 ...

Page 5: ...re properly made and in accordance with the manufacturers instructions Switch off and withdraw the mains plug before making or changing connections DO consult your dealer if you are ever in doubt about the installation operation or safety of your equipment DO be careful with glass panels on equipment WARNING To prevent injury this apparatus must ance with the installation instructions See page 6 D...

Page 6: ...near the TV pedestal Studies indicate that plastics may weaken and crack over time from the combi nation effects of chemical agents and mechanical stress such as weight of TV Failure to follow these instructions could result in serious injury and or permanent damaged to TV and TV pedestal Cleaning the screen and cabinet Turn off the power and clean the screen and cabinet with a soft dry cloth We r...

Page 7: ...levision screen for any length of time they could become conspicuous it is always advisable to reduce both the brightness and contrast settings Very long continuous use of the 4 3 picture on a 16 9 screen may result in some retention of the image at the 4 3 outlines this is not a defect of the LCD TV and is not covered under the manu facturers warranty Regular use of other size modes e g Super Liv...

Page 8: ... 9 Switch between ATV and DTV 10 Change the volume 11 Change the channel The Remote Control Simple at a glance reference of your remote control Inserting batteries and effective range of the remote Remove the back cover to reveal the battery compartment and make sure the batteries are inserted the right way round Suitable battery types for this remote are AAA 1 5V Do not combine a used old battery...

Page 9: ...CKET RGB PC POWER CORD a decoder could be Digital Satellite or any other compatible decoder Model will determine power code position HDMI 2 INPUT SOCKET USB SOCKET For 32AV93 G 32 40LV93 G HDMI 1 INPUT SOCKET RGB PC POWER CORD a decoder could be Digital Satellite or any other compatible decoder Model will determine power code position HDMI 2 INPUT SOCKET USB SOCKET For 26 32EL93 G 32 40HL93 G ...

Page 10: ...ndby HDMI video signals but will also accept and display 480i 480p 576i 576p 720p and 1080p HDMI1 also support VGA SVGA XGA WXGA and SXGA NOTE Although this television is able to connect to HDMI equipment it is possible that some equip ment may not operate correctly A wide variety of external equipment can be connected to the back of the television there fore the relevant owners manuals for all ad...

Page 11: ...e control if a REGZA LINK compatible device is connected The back of your television AV amplifier HDMI out Playback equipment HDMI out HDMI in Playback equipment HDMI out For 32AV93 G 32 40LV93 G The back of your television AV amplifier HDMI out Playback equipment HDMI out HDMI in Playback equipment HDMI out For 26 32EL93 G 32 40HL93 G ...

Page 12: ...y HDMI equipment may not work properly with your latest HDMI TV due to the adoption of a new standard Supported Audio format Linear PCM and Dolby Digital sampling rate 32 44 1 48kHz To connect an HDMI device Connect an HDMI cable type A connector from the device to the HDMI terminal For proper operation it is recommended that you use an HDMI cable with the HDMI Logo If your HDMI connection is capa...

Page 13: ...13 English HDMI cable HDMI device HDMI out not supplied For 26 32EL93 G 32 40HL93 G To view the HDMI device video press the button to select HDMI 1 or HDMI 2 mode ...

Page 14: ...A connector to the HDMI 1 The recommended HDMI to DVI adapter cable length is 6 6ft 2m An HDMI to DVI adapter cable transfers video only Separate analogue audio connection are not supported for audio receivers DVI device HDMI to DVI adapter cable not supplied For 32AV93 G 32 40LV93 G ...

Page 15: ...93 G 32 40HL93 G To ensure that the HDMI or DVI device is reset properly it is recommended that you follow these procedures DVI device television 1 EIA CEA 861 D compliance covers the transmission of uncompressed digital video with high bandwidth digital content protection ...

Page 16: ...t a PC to the HDMI terminal When connecting a PC to the HDMI terminal on the television use an HDMI to DVI adapter cable If connecting a PC with an HDMI terminal use an HDMI cable type A connector A separate ana logue cable is not necessary the back of your television HDMI to DVI adapter cable not supplied 2 Computer For 32AV93 G 32 40LV93 G ...

Page 17: ...r cable not supplied 2 Computer For 26 32EL93 G 32 40HL93 G For acceptable PC and video signal formats see page 18 NOTE The edges of the images may be hidden If connecting a certain PC model with a unique PC signal the PC signal may not be detected correctly ...

Page 18: ... 72 809 31 500 Negative Negative 832 520 640 x 480 37 500 75 000 31 500 Negative Negative 840 500 800 x 600 35 160 56 250 36 000 Positive Positive 1024 625 800 x 600 37 879 60 317 40 000 Positive Positive 1056 628 800 x 600 48 077 72 188 50 000 Positive Positive 1040 666 800 x 600 46 875 75 000 49 500 Positive Positive 1056 625 1024 x 768 48 363 60 004 65 000 Negative Negative 1344 806 1024 x 768 ...

Page 19: ...HDMI 2 INPUT SOCKET Common Interface USB Headphone Power Up down Volume or channel Programme Volume Source RED LED Standby GREEN LED Power on GREEN LED On Timer IR SENSOR For 32AV93 G 32 40LV93 G HDMI 2 INPUT SOCKET Common Interface USB Headphone Power Up down Volume or channel Programme Volume Source RED LED Standby GREEN LED Power on GREEN LED On Timer IR SENSOR For 26 32EL93 G 32 40HL93 G ...

Page 20: ...money by reducing electricity bills NOTE Putting the television into standby mode will reduce energy consumption but will still draw some power Using the Remote Control To set up the television you will now need to use the on screen menus Press MENU on the remote control to see the menus on the navigation ring on the remote control To use the options press move up and down through the menu and use...

Page 21: ...guês Neder lands Svenska Dansk Norsk Suomi ª µ Press to enter Quick Setup menu Country and try Austria Belgium Bulgaria Croatia Czech Denmark Finland France Germany Greece Hungary Ireland Italy Luxembourg Netherlands Norway Others Poland Portugal Romania Russia Serbia Slovakia Slovenia Spain Sweden Switzerland Turkey UK or Ukraine Quick Setup Country Digital Subtitle Language Digital Subtitle Lang...

Page 22: ... the aerial is connected to the TV before tuning Previous settings will be lost Press EXIT for no change Auto tuning Tuning Mode Start Scan ATV and DTV OK Back RETURN Edit Tuning Mode ATV DTV or ATV and DTV Start Scan and press Auto tuning ATV DTV Stop EXIT Progress 1 0 Channel C3 Station Found 0 0 The search will begin for all available stations The slide bar will move along the line as the searc...

Page 23: ...p English Germany Antenna OK OK OK OK OK Tuning Mode ATV DTV or ATV and DTV Auto tuning Tuning Mode Start Scan ATV and DTV OK Previous settings will be lost Press EXIT for no change Back RETURN Edit Start Scan and press to start Auto Tuning Auto tuning ATV DTV Stop EXIT Progress 2 0 Channel C4 Station Found 0 0 Tuner Mode Cable Switching between tuner modes will change the features available on yo...

Page 24: ...art Scan and press to start tuning NOTE The information should be given by your cable provider Network ID is only available for Quick Scan Manual Tuning There are two TV modes ATV and DTV that can be tuned in manually using Manual Tun ing ATV mode Antenna Cable Press MENU SETUP and press to enter the submenu ATV Manual Tuning and press to enter the sub menu Enter OK Back RETURN 1 2 SETUP Language ...

Page 25: ... Strong Poor Back RETURN Edit Input 0 9 Start Scan and press to start tuning Press to display the breakdown shown below ATV Manual Tuning Manual fine tuning 1 BG P C 69 0 Back RETURN Select Change Save OK A B C D E F G H I A Position The number to be pressed on the remote control B System C Colour system Factory set to Auto should only be changed if problems are experienced i e NTSC input from ext...

Page 26: ...nput 0 9 Start Scan and press to start tuning Automatic Power Down The TV will automatically turn itself off standby within 4 hours if you do not touch the control buttons on the remote control or on the TV control panel It will also automatically turn off if no input signal is detected after ap proximately 15 minutes In the SETUP select Automatic Power Down Press to select Off 4h 6h or 8h Back RE...

Page 27: ...OK OK OK OK OK OK Enter OK Back RETURN OK Channels Channels TV Back RETURN Re number Skip Position 803 804 805 806 807 273 Name Rossia 1 Rossia 24 NTV TRK 5 kamal Bibigon Service Information Radio Three Sort OK Re number Press the button on the remote to renumber the highlighted channel Edit the channel number using the num ber keys on the remote and press Channels Back RETURN Position 804 805 806...

Page 28: ...st be entered before they can be accessed Sort channel and then press A tick icon appears Channels TV Position 803 804 805 806 807 273 Name Rossia 1 Rossia 24 NTV TRK 5 kamal Bibigon Service Information Radio Three Back RETURN Store OK wish to swap with the one selected in Step 8 and then press The positions of the two channels are swapped Channels TV Position 804 803 805 806 807 273 Name Rossia 2...

Page 29: ...ly executed and any new chan nels are saved In the DTV Settings Standby Channel On or Off Subtitle and Audio You can choose the Subtitle Type or Audio Type from Normal or Hearing Impaired If the Hearing Impaired is selected it provides subtitle services to deaf and hard of hearing viewers with additional descriptions Subtitle Language or Audio Language allow of soundtrack language provided they ar...

Page 30: ...to disable or enable the favorite channel list In the DTV Settings Favorite Control On or Off DTV Settings Channels Channel Options Subtitle and Audio Password Parental Local Time Setting Standby Channel Update Favorite Control Favorite Program Favorite Network Channel Grouping Common Interface 22 17 Off On On OK OK OK OK OK OK OK Back RETURN Edit When Favorite Control is On the favorite channel l...

Page 31: ...ouping Common Interface 22 17 Off On On OK OK OK OK OK OK OK Back RETURN Edit When Channel Grouping is On the channel change by P and P will be within a single service group press ATV DTV on the remote control can be still used for change services among ATV DTV Video DTV Radio and DTV Text channel and press to edit NOTE Press the button on the re mote to delete the channel Favorite List Back RETUR...

Page 32: ...ent Information Press and the information screen will appear giving details of the channel and programme currently being viewed 1 BBC Parliament Westminster Hall Prime Minister s Questions Recorded coverage of questions in the House of Commons to Prime Minister Gordon Brown from Wednesday 26 November 07 00 11 30 11 30 12 00 News Current 72 Minutes Left 10 18 Sun 30 Nov Exit EXIT Change Now or Next...

Page 33: ...nu and to change Quick access Picture Size Picture Mode Media Player Sleep Timer System Information REGZA LINK Wide Standard 00 00 OK OK NOTE Quick access items are different depending on the current mode Subtitles If Subtitles are available for your current pro gramme pressing the SUBTITLE button will toggle Subtitles on or off Picture Still This feature is used to hold a still image on the scree...

Page 34: ... analogue modes Press MENU SOUND and press to enter the submenu Bass Treble or Balance the setting Stable Sound The Stable Sound feature limits high volume levels in order to prevent the extreme changes in volume that can occur when channels are changed or a programme switches to a com mercial Press MENU SOUND and press to enter the submenu Stable Sound On or Off Surround Sound Surround Sound enha...

Page 35: ...Audio Description is an additional narration describing on screen action body language expressions and movements for people with visual disabilities while watching the TV This function enables you to choose the type of narrations Press MENU SOUND and press to enter the submenu Audio Descrip tion and press to enter the submenu Audio Descrip tion On or Off Audio Description Audio Description Mixing ...

Page 36: ... better proportions at the centre of the image Some distortion may occur Cinema video tapes this setting will eliminate or reduce the black bars at the top and bottom of the screen by zooming in and selecting the image without distortion Subtitle When subtitles are included on a letterbox format broadcast this setting will raise the picture to ensure that all the text is displayed 14 9 Use this se...

Page 37: ... Size and Position Control Wide 4 3 Super Live Cinema Subtitle 14 9 Native Normal Dot by Dot ATV o o o o o o x x x DTV SD o o o o o o x x x HD o o o o x o o x x Scart o o o o o o x x x CVBS o o o o o o x x x YPbPr SD o o o o o o x x x HD o o o o x x x x x HDMI SD o o o o o o o x x HD o o o o x x o x x D SUB o x x x x x x o o DVI o x x x x x x o o Normal This setting will show the picture without o...

Page 38: ... mode based on the programme category Press MENU PICTURE and press to enter the submenu PICTURE SOUND SETUP APPLICATIONS PREFERENCES Picture Settings and press to enter the submenu Picture Settings OK Picture Mode Active Backlight Control Back Light Contrast Brightness Colour Tint Sharpness Black White Level Cinema Mode Colour Temperature Static Gamma Reset Standard High 70 95 50 50 0 50 Middle On...

Page 39: ...settings as required Static Gamma The static gamma feature allows you to adjust the levels of black in the picture In the Picture Settings Static Gamma Static Gamma 5 5 Reset This feature resets all picture settings to the factory settings In the Picture Settings to select Reset and press to reset settings NOTE If any picture settings have not been changed Reset is not available Active Backlight C...

Page 40: ... OK Edit OK Back RETURN Hue Saturation or Brightness Base Colour Adjustment Brightness Hue Saturation 0 Red required NOTE In the PC Input mode this function is not available Digital Noise Reduction DNR Digital Noise Reduction enables you to soften the screen representation of a weak signal to reduce the noise effect In the PICTURE select DNR Off Low Mid dle or High NOTE This function is not availa...

Page 41: ...ference design limited only by DRAM Dynamic Random Access Memory size and performance The larger the resolution the more memory required The smaller the resolution the less performance required decrease the time required to display a picture A JPEG decoder is a hardware decoder with a max resolution of 15360 x 8704 A PNG BMP decoder is a software decoder running on a co processor with a max resolu...

Page 42: ...e show stops at the last photo in the directory Repeat Settings for Slideshow Press MENU to change the settings when viewing a photo and press to turn On or Off Set Interval Time Press MENU to change the settings when viewing a photo and press to select the desired interval time 3 5 10 15 30 60 90 Sec NOTE If Repeat is On slide show starts Using the Play List Press MENU to change the settings when...

Page 43: ... Music Photo Video and press to select One or Folder Photo Info Info tent number photo title shooting date and time resolution etc Press MENU to change the settings when viewing a photo and press 00001 00004 0000 1 jpg Off On 15 sec 788 X 1157 Info 0000 1 jpg Resolution Size Date Time 788 X1157 323 KBytes EXIT EXIT The information will be removed by time out about 15 sec or press to exit ...

Page 44: ...0 Photo Music Movie Move Select OK wish to play and press to enter Press P or P to page up or down USB 1 1 Move Select OK Page P Back RETURN Return Music Photo Video music and press to play 00001 00003 001 MP3 00 00 02 00 02 42 16 Folder Pause Play Move Select OK Back RETURN Play or pause the selected music Rewind the selected music Fast forward the selected music Go to the previous music Go to th...

Page 45: ...Pause 001 MP3 002 MP3 003 MP3 001 MP3 1 1 Move Select OK Back RETURN Page P Music Info Info number music title Bit Rate Artist Sampling Year and size and press 00001 00003 001 MP3 00 00 02 00 02 42 16 Folder Info Move Select OK Back RETURN 001 MP3 Album Title Bit Rate Artist Sampling Year Size Music 01 320K Singer 44K 2010 6366 KBytes The information will be removed by time out about 15 sec or pre...

Page 46: ...30fps 20 º High Level mp4 m4v MP4 H 264 MPEG4 1080P 30fps 20 _ ºJ _ _ and Advanced Simple ºJ mkv MKV H 264 MPEG1 MPEG2 MPEG4 1080P 30fps 20 _ ºJ _ º High Level _ and Advanced Simple ºJ divx div AVI 1 0 2 0 DMF0 1 2 DivX 3 11 DivX 4 12 DivX 5 x DivX 6 1080P 30fps 20 _ and Advanced Simple avi AVI 1 0 2 0 DMF0 1 2 H 264 MPEG1 MPEG2 MPEG4 DivX 3 11 DivX 4 12 DivX 5 x DivX 6 1080P 30fps 20 _ ºJ _ º _ a...

Page 47: ...peat all video Repeat from A to B Set A A Set Repeat and Start Set B B Set Repeat and repeat from A to B Show play list Video information Slow forward the selected video Step forward the selected video Aspect Ratio Picture Mode Allows you to input a search time and press Play Video Files Insert a USB storage device and press on the remote MEDIA and press TV 1 2 3C HDMI1 HDMI2 MEDIA PC Inputs Movie...

Page 48: ...en viewing a video and press to select Native 4 3 or 16 9 Picture Mode Press MENU to change the settings when viewing a video and press to select Standard Mild Movie or Dynamic Repeat Settings Press MENU to change the settings when viewing a video and press to select Off One or Folder Set Press MENU to change the settings when viewing a video and press to select Set A Set B or None Using the Play ...

Page 49: ...o Press MENU to change the settings when viewing a video and press Use the number key pad on the remote to enter time Press to go to the input time 00001 00001 001 avi 00 00 08 00 02 28 16 Standard 16 9 Folder Goto Time Play Move Select OK Back RETURN Input search time 0 0 0 0 0 0 OK ...

Page 50: ... by the connected equipment are Standby Volume and Sound Mute REGZA LINK Controls This feature uses CEC Consumer Electronics Control technology and allows the control of Toshiba REGZA LINK compatible equipment from the television s remote control NOTE Not all Toshiba products currently support REGZA LINK Select REGZA LINK Device Press A list appears on screen showing modes and all stored external ...

Page 51: ... the input source selection and that the Speaker Preference is set to Audio Receiver in the REGZA LINK Setup menu NOTE its input source changed or the volume adjusted the sound will be output from speakers has been selected Turn the television off then on again to output the sound from the TV s speakers The full function may not work and is depend Enable REGZA LINK When the Enable REGZA LINK is se...

Page 52: ...uipment In the REGZA LINK Setup menu press Auto Standby On or Off When is set to On it allows the Speaker Preference feature to become available In the REGZA LINK Setup menu press On or Off Speaker Preference This feature allows the audio output prefer ence to be set to the TV speakers or Ampli television s remote control adjust or mute the volume of the audio In the REGZA LINK Setup menu press Sp...

Page 53: ...s The Pass Through Control Panel appears Some functions are only available when the Pass Through Control Panel is displayed on the screen Please refer to the following procedure Please refer to the Remote Control the Pass Through Control Panel MENU and RETURN buttons on the remote control are unavailable when the Pass Through Control Panel is on No Item Description 1 GUIDE Turn off the desired REG...

Page 54: ...e On Timer is On Enable DTV Clock On or Off NOTE Power On Time and Repeat are only available when Enable DTV Clock is On Power On Time key pad on the remote to enter the time Repeat and ONCE DAILY Mon Fri Mon Sat or Sat Sun Input and press ATV EXT 1 EXT 2 EXT 3 HDMI 1 HDMI 2 PC or DTV Channel and number or use the number key pad on the remote to enter the channel number NOTE Channel is only availa...

Page 55: ...hiama Italia Deejay Hits The Club Deejay Tg Deejay News Beat Deejay News Beat 27 Aug 08 54 17 Fri 27 Aug 4 4 5 6 7 8 9 10 11 Rossia K Radio Rossia NTV Rossia 2 TRK 5 Kanal Bibigon Service Information Service Information SIT 5 Back RETURN Save OK Edit Programme Timers 4 Rossia K Deejay Chiama Italia 09 04 10 58 27 Aug 2010 ONCE Off Repeat Subtitle 07 42 12 Fri 27 Aug Repeat or settings as required ...

Page 56: ...l Lock Panel Lock disables the buttons on the televi sion All buttons on the remote control can still be used Press MENU PREFERENCES and press to enter the submenu PICTURE SOUND SETUP APPLICATIONS PREFERENCES Panel Lock and On or Off PREFERENCES REGZA LINK Setup Teletext Panel Lock Auto Format 4 3 Stretch Blue Screen Side Panel DivX Registration DivX Deregistration Auto Off On Off On 1 OK OK Edit ...

Page 57: ...ion OK Cancel to exit and press Deregistration code XXXXXXXX Deregister at http vod divx com Continue with registration OK Cancel System Information In the SETUP System Information and press to display System Information TOSHIBA 2012 Dec 13 2011 19 52 05 FW v0 14 PR Strong Weak 530 MHz Good Average Back RETURN Enter OK System Upgrade Press MENU SETUP and press to enter the submenu PICTURE SOUND SE...

Page 58: ...ck RETURN PREFERENCES REGZA LINK Setup Teletext Panel Lock Auto Format 4 3 Stretch Blue Screen Side Panel DivX Registration DivX Deregistration Auto Off On Off On 1 OK OK Auto or LIST Navigating Pages using Auto If Fastext is available four coloured titles will appear at the base of the screen To access one of the four given subjects press the relevant coloured button on the remote control For fur...

Page 59: ...nter OK Back RETURN SETUP Language Country AV connection PC Setting Auto Adjust Automatic Power Down Location Software Upgrade English Germany Off Home OK OK OK OK Horizontal Posi tion or Vertical Position PC Setting OK Horizontal position Vertical position Horizontal width Clock phase Reset 0 0 0 0 Edit Back RETURN Horizontal Width In the PC Setting to select Horizontal width required Clock Phase...

Page 60: ...ack RETURN Lip Sync Mode This option activates an auto audio video display timing adjustment function that allows HDMI source devices to accurately perform synchronization automatically All of the above HDMI settings require a proper HDMI source device If HDMI source products do not support these functions the TV may not work properly when activating these functions NOTE In a non HDMI signal mode ...

Page 61: ...en turned down or that the sound has not been muted Q A Interference or a weak signal Try a tuning may help Select the ATV Manual Tuning in the SETUP menu Highlight the station and press then tuning ATV Manual Tuning Manual fine tuning 1 BG P C 69 0 Back RETURN Select Change Save OK picture and sound Press and then RETURN Q A Check that the batteries aren t dead or inserted incorrectly Q 5 A Good ...

Page 62: ...K Q A Use the universal password 1276 then change to a new number of your choice Q A Make sure to use cables with the HDMI logo Some early HDMI equipment may not work properly with the latest HDMI TV products due to adoption of new standards Q 4 93 4 A Check the correct input has been cho sen S VIDEO or AV Q 04 A After roughly 15 minutes without any input video signal at TV mode the TV will turn o...

Page 63: ...lass 32EL93 G A Class 32HL93 G A Class 40HL93 G A Class Visible Screen Size approx 32AV93 G 80cm 32LV93 G 80cm 40LV93 G 102cm 26EL93 G 66cm 32EL93 G 80cm 32HL93 G 80cm 40HL93 G 102cm On mode power consumption approx 32AV93 G 55 9W 32LV93 G 54 5W 40LV93 G 87 2W 26EL93 G 27 0W 32EL93 G 29 6W 32HL93 G 31 5W 40HL93 G 46 8W Annual power consumption approx 32AV93 G 81 6KWh y 32LV93 G 79 6KWh y 40LV93 G ...

Page 64: ...12 5kg 32HL93 G 12 5kg 40HL93 G 18 5kg TV without stand 32AV93 G 8 7kg 32LV93 G 8 2kg 40LV93 G 13 0kg 26EL93 G 5 5kg 32EL93 G 8 5kg 32HL93 G 8 9kg 40HL93 G 13 7kg Dimensions H x W x D mm approx 32AV93 G 785 x 528 x 205 32LV93 G 785 x 528 x 205 40LV93 G 980 x 641 x 240 26EL93 G 620 x 426 x 175 32EL93 G 746 x 507 x 205 32HL93 G 736 x 497 x 205 40HL93 G 924 x 604 x 225 Headphone Socket R3 5mm stereo ...

Page 65: ...L7 L M9 K K 0 4 0U K7 3L9 K L 0K 7M Q9L K 4 ML 9L4 M9 M7 M U MP K 0L 9L4 M MP F 4 ML 7L M7 M P9K70M L9 K M M QL9 K7U L0 M9 M K 0 L7K 7QL9 K0 L7 7 7P 0 K0 9M K0 7P 0L 9L L0 L7K 70M97K K7 L M9 K M K7 M7 7P KU M L 0K 7M Q9L MP K MM 00 233 MP K L 0 9L 0 M7 M 7 M9 0 M K4 K0M70 L90QL L M7 M QL9 0 M M9 L7K K7 7L7 L M9 K M LQ K L7 M9 0L N OM7 L M 4 ML 7 L K7 M 0 0 M K4 0K7 K9 NRK4 4 MLO K7 3L9 N O M L M K...

Page 66: ...isposal of products 0 0 0 K J GG assure the proper disposal of products and batteries and thus help to prevent potential negative Q Disposal of batteries and or accumulators 0 3 N O N O 3 N O N GG 3 3M O N O N O 3 N O Q EU In conformity with the EEE Regulation EU Conformity Statement This product is marked with CE and complies therefore with the applicable harmonized European standards listed unde...

Page 67: ......

Page 68: ... All rights reserved Reproduction in whole or part without written permission is strictly prohibited Specification is subject to change without notice ul Pokoju 1 Biskupice Podgórne 55 040 Kobierzyce Poland TOSHIBA Television Central Europe Sp z o o ...

Reviews: