
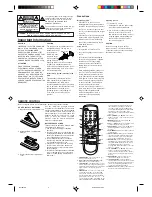
SETTING V-CHIP
This TV is fitted with a V-CHIP controller which provides you with channel viewing access controls and restrictions.
This function is to prevent your children from watching violent or sexual scenes that you may choose to exclude.
Press
MENU
and press
SET +
or
–
until the indicator next to "V-CHIP SET" begins to flash, then
press
ENTER
.
Enter your password (4 digits) using the Direct channel selection buttons (0-9).
In the event of entering incorrect password press
RESET
. Then press
ENTER
.
Enter the same password for confirmation, then press
ENTER
.
Press
SET +
or
–
until the indicator next to "V-CHIP" begins to flash.
Press
ENTER
to select ON.
Press
SET +
or
–
until the indicator next to "TV RATING" or "MOVIE RATING" begins to flash. Press
ENTER
.
Press
SET +
or
–
to select the desired rating for the applicable video or TV channel. Press
ENTER
.
When you select TV-Y7, TV-PG, TV-14 or TV-MA, press
RECALL
to explain the rating.
Press the
SET +
or
–
to select the desired rating you want. Press
ENTER
to select the setting ON or OFF.
NOTES:
• If you want to change your password, follow steps 1 and 2 and select "CHANGE PASSWORD" option. Then
enter your new password.
• The V-Chip function is activated only on programs and tapes that have the rating signal.
• Once you block a program using the V-Chip function, the blocked program cannot be watched based on the
content of the show. When the program starts, the "INPUT PASSWORD" will appear on the screen. When you
want to release the V-Chip temporarily, enter the password.
If you change the channel or turn off the TV while the V-Chip function was temporarily released, the original
setting will be resumed. If you return to the channel you were watching you must re-enter your password to
temporarily release your V-Chip function again.
• When you watch the TV using a cable box or a VCR and the TV is tuned to channel 3 or 4, you must release
the V-Chip temporarily. The V-Chip setting will not be resumed until you turn off the TV. The TV channel is not
used in this case.
• When changing the channel with the cable box or the VCR, approximately 10 seconds will pass until the
program appears.
TV RATING
MOVIE RATING
Press
MENU
repeatedly until the MENU screen is cleared.
OFF
PG
PG-13
R
NC-17
SET –
SET +
X
G
OFF
TV-Y7
TV-G
TV-14
TV-MA
SET –
SET +
TV-Y
TV-PG
1
3
4
5
6
2
: all children
: 7 years old and above
: children's program
TV-PG
TV-14
TV-MA
: parental guidance
: 14 years old and above
: 17 years old and above
TV-Y
TV-Y7
TV-G
: all ages
: parental guidance
: parental guidance less than 13 years old
R
NC-17
X
: under 17 years old parental
guidance suggested
: 17 years old and above
: adult only
G
PG
PG-13
7
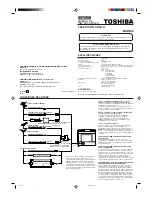
CONNECTION TO OTHER EQUIPMENT
The exact arrangement you use to interconnect various video and audio components to the TV is dependent on
the model and features of each component. Check the Owner's Manual provided with each component for the
location of video and audio inputs and outputs.
The connection diagrams in the following are offered as suggestions. You may need to modify them to
accommodate your particular assortment of components. The diagrams are intended to show component video
and audio interconnections only.
If you connect the TV to VCR, camcorder or TV game,
you can select by pressing
TV/VIDEO
.
Press
TV/VIDEO
repeatedly to select the desired
mode."VIDEO" will display on the screen for 4 seconds.
TV/VIDEO SELECTION
ADJUSTING PICTURE
1
2
3
You can adjust the settings for color, sharpness, contrast, brightness and tint.
TO RETURN TO INITIAL SETTING
Press
RESET
while the picture adjusting mode appears on-screen.
4
Press
MENU
.
Press
SET +
or
–
until the indicator next to "PICTURE" begins to flash, then press
ENTER
.
Press
ENTER
repeatedly to select the item you want to adjust.
Press
SET +
or
–
button to adjust the setting.
VIDEO
CONTRAST
COLOR
BRIGHTNESS
TINT
SHARPNESS
BRIGHTNESS
CONTRAST
COLOR
TINT
SHARPNESS
+
increase brightness
increase contrast
brilliant color
greenish color
decrease brightness
decrease contrast
pale color
reddish color
makes picture softer
makes picture clearer
–
The TV can also be used as a display device for
many video games. However, due to the wide
variety of different types of signal generated by
these devices and subsequent hook-up variations
required, they have not all been included in the
suggested connection diagrams. You'll need to consult
each component's Owner's Manual for additional
information.
2. To connect the TV to a TV Game
LOCK
〈
+ / – / ENTER / MENU
〉
GAME TIMER
CH LOCK
VIDEO LOCK
CHANGE PASSWORD
CH LOCK
〈
+ / – / ENTER / MENU
〉
TV
INPUT
ALL CLEAR
--- --- ---
--- --- ---
--- --- ---
VIDEO LOCK
〈
+ / – / ENTER / MENU
〉
OFF
VIDEO
VIDEO+
GAME TIMER
〈
+ / – / ENTER / MENU
〉
OFF
30
60
90
1
2
3
4
6
1
2
3
4
5
1
2
3
4
5
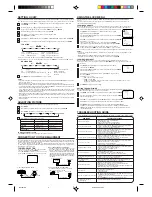
USING THE LOCK MENU
The LOCK menu includes the CH LOCK, VIDEO LOCK, GAME TIMER and CHANGE PASSWORD
functions.
You can use these functions after entering the correct PASSWORD. (This password is the same one
selected under "SETTING V-CHIP".)
LOCKING CHANNELS
With the CH LOCK feature, you can lock specific channels. You will not be able to tune locked channels
unless you clear the setting. You can choose to lock up to nine TV channels and nine cable channels.
Use the Channel Number Buttons (0-9) to display the television channel you wish to lock.
Press
MENU
, then press
SET +
or
–
until the indicator next to "LOCK"
begins to flash. Then press
ENTER
.
Use the Channel Number buttons (0-9) to enter your password, then press
ENTER
.
The LOCK menu appears.
Press
SET +
or
–
until the indicator next to "CH LOCK" begins to flash, then press
ENTER
.
Press
SET +
or
–
to select:
•
INPUT to select the channel as one to be locked. Then press
ENTER
.
•
ALL CLEAR to clear all channels from the list of locked channels. Then press
ENTER
.
Repeat steps 1 through 5 to lock other channels. When you are finished
locking channels, press
MENU
repeatedly until the MENU screen is cleared.
If you try to tune a locked channel, the TV will not display it, but will display the nearest unblocked channel.
NOTES:
• If you are accessing the LOCK menus or V-chip menus for the first time, choose a four-digit number to be
your password.
• After programming CH LOCK, change channels before turning off the television.
• If you want to unlock channels, select ALL CLEAR on step 5, then press
ENTER
.
LOCKING VIDEO INPUT
With the VIDEO LOCK feature, you can lock out the input source (VIDEO) and channel 3 and 4.
You will not be able to select the input sources with the
TV/VIDEO
button or Channel buttons unless you
clear the setting.
Press
MENU
, then press
SET +
or
–
until the indicator next to "LOCK"
option, then press
ENTER
.
Use the Channel Number buttons (0-9) to enter your password, then press
ENTER
.
The LOCK menu appears.
Press
SET +
or
–
until the indicator next to "VIDEO LOCK" begins to flash,
then press
ENTER
.
Press
SET +
or
–
to select:
•
OFF: Unlocks all video input sources.
•
VIDEO: Locks VIDEO.
•
VIDEO +: Locks VIDEO, channel 3 and channel 4. This option should be used if you use
the antenna) to play a video tape.
Press
MENU
to return to normal viewing.
SETTING THE GAME TIMER
With the GAME TIMER feature, you can automatically activate the VIDEO LOCK feature (VIDEO setting) to
set a time limit for playing a TV game (30, 60, or 90 minutes).
Press
MENU
, then press
SET +
or
–
until the indicator next to "LOCK", then press
ENTER
.
Use the Channel Number buttons (0-9) to enter your password, then press
ENTER
.
The LOCK menu appears.
Press
SET +
or
–
until the indicator next to "GAME TIMER" begins to flash, then press
ENTER
.
Press
SET +
or
–
to select a time limit (30 minutes, 60 minutes, 90 minutes or OFF).
Press
MENU
repeatedly until the MENU screen is cleared. After the GAME TIMER is
programmed, the display will appear briefly every ten minutes to remind you that the GAME
TIMER is operting. When the programmed end time is reached, the display will change the last
channel automatically.
5
• Check all CATV connections.
• Set TV/CABLE menu option to the CABLE mode.
• Station or CATV system problems, try another station.
• Check antenna connections, reorient antenna.
• Check for sources of possible interference.
Horizontal or diagonal bars on
screen
No reception above
channel 13
No CATV reception
• Batteries are weak, dead or inserted incorrectly.
• Remote is out of range, move closer to TV (within 15 feet).
• Make sure Remote is aimed at sensor.
• Confirm there are no obstructions between the Remote and the TV.
• Make sure the power cord is plugged in.
• Make sure TV/CABLE menu option is in the appropriate mode.
• If using antenna, check UHF antenna connections.
No Remote operation
• No broadcast on station tuned.
• Sleep Timer is set.
• Power interrupted.
• TV station experiencing problems or program tuned is not closed
captioned. Try another channel.
• Check CATV connection or VHF/UHF antenna, reposition or rotate
antenna.
• Press
CAP/TEXT
to turn on the closed caption decoder.
Closed - Caption is not activated
TV shuts off
• Select proper language in the menu options.
Display is not shown in
your language
• Make sure the power cord is plugged in.
• Try another AC outlet.
• Power is off, check fuse or circuit breaker.
• Unplug unit for an hour, then plug it back in.
• Station or CATV experiencing problems, tune to another station.
• Check sound adjustments (VOLUME and MUTE).
• Check for sources of possible interference.
• Station or CATV experiencing problems, tune to another station.
• Make sure channels are set into memory.
• Check antenna or CATV connections, adjust antenna.
• Check for sources of possible interference.
• Check picture control adjustments.
• Station or CATV experiencing problems, tune to another station.
• Make sure channels are set into memory.
• Station is weak, adjust antenna to receive desired station.
• Check for sources of possible interference.
• Station or CATV experiencing problems, tune to another station.
• Make sure channels are set into memory.
• Check picture control adjustments.
• Check antenna or CATV connection. Adjust antenna.
• Station or CATV experiencing problems, tune to another station.
• Make sure channels are set into memory.
• CATV company is scrambling signal.
• Adjust antenna.
TV does not operate
Poor sound or No sound
Poor picture or No picture
Picture wobbles or drifts
Poor color or no color
Poor reception on some channels
TROUBLESHOOTING GUIDE
Before requesting service, please refer to the following chart for the symptom and possible solution.
SYMPTOMS
POSSIBLE SOLUTIONS
VIDEO
AUDIO
VIDEO
AUDIO
TV GAME
VIDEO
AUDIO
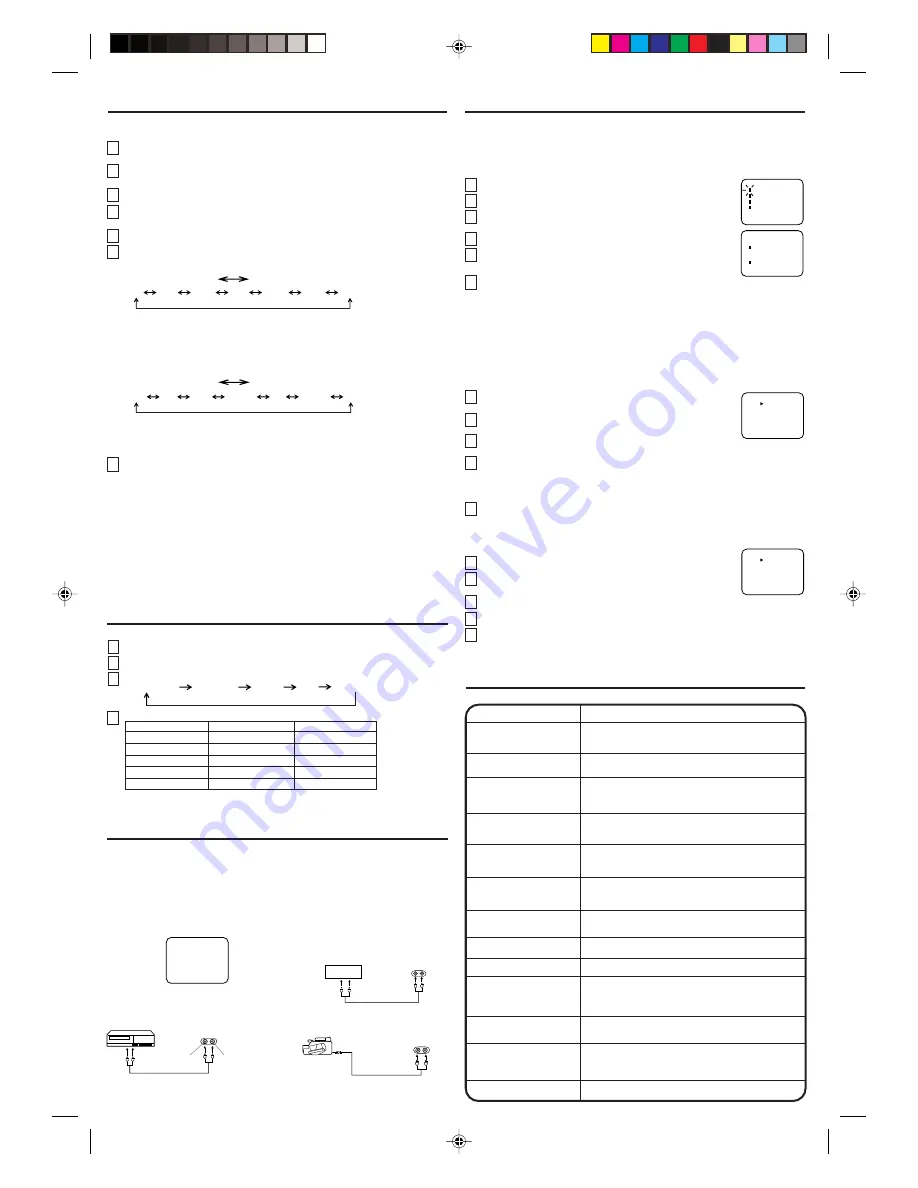
1. To connect the TV to a VCR
(not supplied)
To Audio/
Video OUT
AUDIO
VIDEO
Front of TV
VCR
To Audio/Video OUT
(not supplied)
Front of TV
3. To connect the TV to a camcorder
To playback from the camcorder, connect the
camcorder to the TV as shown.
Front of TV
(not supplied)
To AV OUT
jack
3L21001A E
04/04/2002, 10:53
5


