


33
m–5178
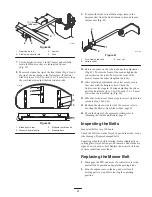
1
2
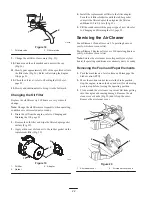
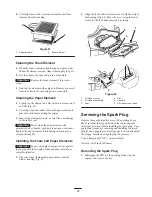
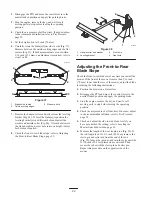
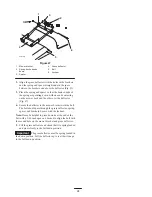
Figure 43
1. Hairpin cotter and clevis
pin
2. Front trunion
6.
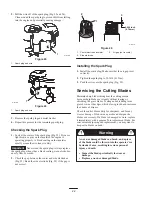
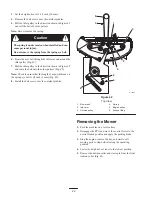
Remove the hairpin cotter and clevis pin from the rear
trunion rod (Fig. 44) on each side of the mower.
7.
Remove the hairpin cotter and washer at the mower
leveling brackets (Fig. 44) on each side of the mower.
Note which hole the leveling bracket is mounted in for
future installation. Slide the brackets off of the
mounting pin.
m–5177
1
3
4
2
Figure 44
1. Hairpin cotter and clevis
pin
2. Rear trunion rod
3. Hairpin cotter and washer
4. Leveling bracket
8.
Slide the mower rearward to remove the mower belt
from the engine pulley.
9.
Slide the mower out from underneath the tractor.
Note:
Retain all parts for future installation.
Installing the Mower
1.
Park the machine on a level surface.
2.
Disengage the PTO and move the control levers to the
neutral locked position and apply the parking brake.
3.
Stop the engine, remove the key, and wait for all
moving parts to stop before leaving the operating
position.
4.
Slide the mower under the tractor.
5.
Lower the height-of-cut lever to the lowest position.
6.
Attach the rear trunion rod to the tractor with the clevis
pin and hairpin cotter (Fig. 44) on each side of the
mower.
7.
Slide the leveling brackets onto the mounting pins and
secure them with the washers and hairpin cotters
(Fig. 44).
8.
Attach the front trunion rods to the tractor with the
clevis pins and hairpin cotters (Fig. 43).
9.
Install the mower belt onto the engine pulley; refer to
Replacing the Mower Belt, page 31.
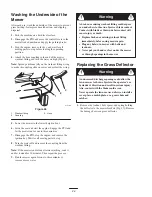
Servicing the Fuses
Service Interval/Specification
The electrical system is protected by fuses. It requires no
maintenance; however, if a fuse blows, check the
component/circuit for a malfunction or short.
Fuse: Main F1—30 amp, blade-type
Charge Circuit F2—25 amp, blade-type
Optional Headlight Kit—10 amp, blade type
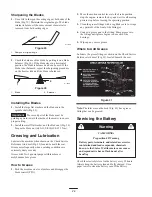
1.
Raise the seat to gain access to the fuse holder (Fig. 45).
2.
To replace a fuse, pull out on the fuse to remove it
(Fig. 45).
m–5144
1
2
3
Figure 45
1. Main—30 amp
2. Charge circuit—25 amp
3. For optional Headlight
Kit—10 amp
Summary of Contents for TimeCutter ZX480
Page 6: ...6 ...
Page 7: ...7 Slope Chart ...
Page 8: ...8 ...
Page 11: ...11 107 2473 107 7399 ...
Page 41: ...41 ...
Page 42: ...42 ...
Page 43: ...43 ...


