background image

27

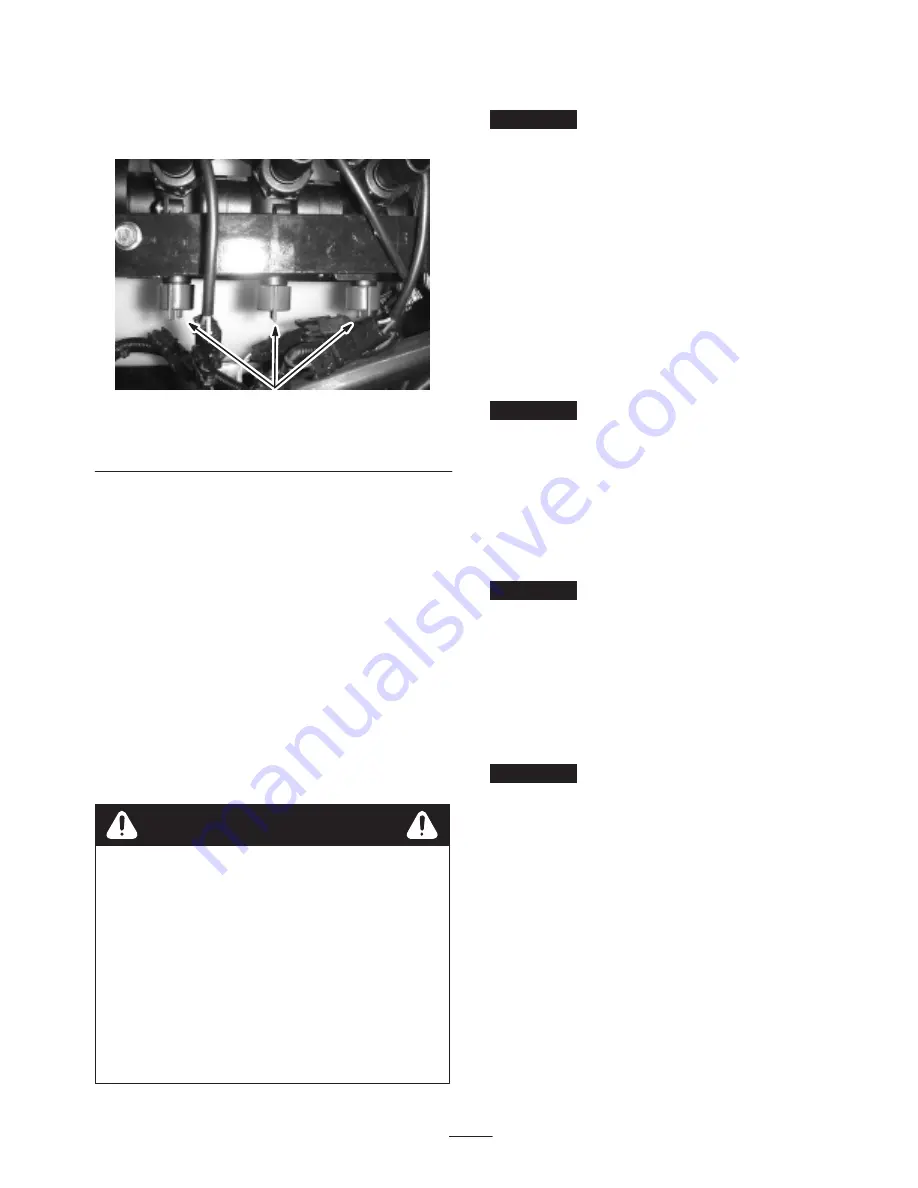
11. Adjust the boom bypass valve (Fig. 26) under the

boom control valve for the boom you turned off until
the pressure reading on the gauge is the same as it was
in step 8.

1

Figure 32

1.

Boom bypass valves

12. Turn the boom on.

13. Repeat steps 10 through 12 for the other booms.

14. Drive the vehicle at the desired speed while spraying

and turn each boom off individually. The pressure on
the gauge should not change.

Operating the Sprayer

To operate the sprayer you first fill the spray tank, then
apply the solution to the work area, and finally clean the
tank.  It is important that you complete all three of these
steps in succession to avoid damaging the sprayer.  For
example, do not mix and add chemicals in the spray tank
at night and then spray in the morning.  This would lead to
separation of the chemicals and possible damage to the
sprayer components.

Chemicals are hazardous and can cause personal
injury.

Read the directions on the chemical labels
before handling the chemicals and follow all
manufacturer recommendations and
precautions.

Keep chemicals away from your skin.  Should
contact occur, wash the affected area
thoroughly with soap and clean water.

Wear goggles and any other protective
equipment recommended by the chemical
manufacturer.

Caution

Filling the Spray Tank

Important


Ensure that the chemicals you will be using

are compatible for use with Viton (see the manufacturer’s
label; it should indicate if it is not compatible).  Using a
chemical that is not compatible with Viton will degrade
the o-rings in the sprayer, causing leaks.

1. Stop the sprayer on a level surface, move the range

selector to the Neutral position, stop the engine, and
set the parking brake.

2. Determine the amount of water needed to mix the

amount of chemical you need as prescribed by the
chemical manufacturer.

3. Open the lid on the spray tank.

4. Add 3/4 of the required water to the spray tank using

the anti-siphon fill receptacle.

Important


Always use fresh clean water in the spray

tank.  Do not pour concentrate into an empty tank.

5. Start the engine, engage the PTO, and set the hand

throttle if equipped.

6. Turn the agitation control valve to the 9 o’clock

position to start agitation in the tank.

7. Add the proper amount of chemical concentrate to the

tank, as directed by the chemical manufacturer.

Important


If you are using a wetable powder, mix the

powder with a a small amount of water to form a slurry
before adding it to the tank

8. Add the remaining water to the tank.

Note: Better agitation can be achieved by decreasing the
application rate setting.

Applying Chemicals

Important


In order to ensure that your solution

remains well mixed, use the agitation feature whenever
you have solution in the tank. For agitation to work, the
PTO must be engaged and the engine must be running
above an idle.  If you stop the vehicle and need agitation
on, place the shift lever in the Neutral position, set the
parking brake, Engage the PTO, engage the clutch, and set
the hand throttle, if equipped.

Note: This procedure assumes that the PTO is engaged
from the Filling the Spray Tank procedure.

1. Swing the booms into position.

2. Set the master boom switches to the Off position.  The

Spray Pro monitor displays “HOLD.”

3. Set the individual boom switches, as needed, to the On

positions.

4. Drive to the location where you will be spraying.

Summary of Contents for 41229

Page 1: ...perator s Manual Original Instructions EN GB Register your product at www Toro com Form No 3351 160 Rev A Workman 200 Spray System Heavy Duty Workman Vehicles Model No 41229 Serial No 240000001 and Up...

Page 2: ...e 33 Troubleshooting 33 Troubleshooting the Spray System 33 Troubleshooting the Spray Pro Monitor 34 The Toro General Commercial Products Warranty 36 Introduction Read this manual carefully to learn h...

Page 3: ...ent for additional safety instructions READ THESE MANUALS TO REDUCE THE POTENTIAL FOR INJURY OR DEATH COMPLY WITH THE FOLLOWING SAFETY INSTRUCTIONS Supervisor s Responsibilities Make sure that operato...

Page 4: ...bout one inch below top of tank bottom of filler neck Do not overfill Wipe up any spilled gasoline Use only an approved non metal portable fuel container Static electric discharge can ignite gasoline...

Page 5: ...brake Remove key from ignition Note Block wheels if machine is on an incline Braking Slow down before you approach an obstacle This gives you extra time to stop or turn away Hitting an obstacle can d...

Page 6: ...fficient force to penetrate skin and do serious damage If fluid is injected into the skin it must be surgically removed within a few hours by a doctor familiar with this form of injury or gangrene may...

Page 7: ...system 93 6687 1 Do not step here 93 6689 1 Warning do not carry passengers 106 5065 1 On 2 Tank drain 3 Off 106 5016 1 Warning read the Operator s Manual 2 Electric shock hazard overhead power lines...

Page 8: ...hazard belt stay away from moving parts 106 1354 1 540 RPM 106 1355 1 Warning do not enter the tank 106 1365 1 Crushing hazard sprayer tank keep bystanders a safe distance from the sprayer tank and re...

Page 9: ...ease 6 Decrease 7 Locked rate switch 8 Unlocked rate switch 9 Master boom spray 10 Left boom 11 Center boom 12 Right boom 13 Spray on 14 Spray off 15 Automatic 16 Manual 17 Left boom foam marker 18 Ri...

Page 10: ...e tank 58 inches 147 cm Overall vehicle height with standard spray system and the booms stored in the X pattern 72 inches 183 cm Overall vehicle width with the standard spray system and the booms stor...

Page 11: ...arts Note Use the chart below to verify that all parts have been shipped Description Qty Use Jack stands Clevis pins 4 4 Preparing the Workman Cover assembly Geartooth sensor Screw M6 x 1 00 x 12 Spri...

Page 12: ...Manual 1 Read before operating the machine Operator s Video 1 Watch before operating the machine Parts Catalog 1 Use for ordering replacement parts Selection Guide 1 Use for selecting nozzles Registr...

Page 13: ...he negative battery cable from the post Note This is a safety precaution since the installation will require installing an electrical harness Installing the Vehicle Speed Sensor Important The speed se...

Page 14: ...Foam marker fuse slot 8 Boom lift fuse slot 9 Spray system fuse slot 10 Open slot not used 3 Connect the black ground wire to the existing 1 4 inch bolt on the vehicle frame using the star washer Fig...

Page 15: ...and throttle kit is installed it must be separated from the dashboard in order to install the control mount plate Refer to the Hand Throttle Kit Operator s Manual for directions in removing and instal...

Page 16: ...yoke Fig 13 3 Install the prop rod assembly on the inside of the rear lefthand side of the tank skid frame at the yoke using a clevis pin and cotter pin Fig 13 5 6 4 3 2 1 Figure 13 1 Prop rod 2 Jam...

Page 17: ...l vehicles with air cooled engines 4 Install the radiator panel to the radiator cover assembly by lining the three drilled holes in the panel with the corresponding holes in the cover assembly Importa...

Page 18: ...epeat on the opposite side Attaching Pump Drive 9 Pull rearward on the rubber cowling of the front of the PTO drive shaft and install the drive shaft onto the PTO output shaft Fig 19 Important Verify...

Page 19: ...he J Clips 5 Install two J clips in the center console at the points located in figure 21 using the existing screws 2 2 3 1 4 m 7184 Figure 21 1 J clip 2 Existing screws 3 Control box harness 4 Center...

Page 20: ...y system is now prepared for the continued installation of the Boom Kit Refer to the Boom Kit Installations Instructions for more information m 7154 1 4 6 7 5 2 3 Figure 23 Left side shown 1 Left boom...

Page 21: ...itor power switch is the On Off switch for the monitor Press the switch to enable or disable the Spray Pro monitor Fig 25 When the switch is turned on a light on the switch illuminates See the Spray P...

Page 22: ...knob on top of the valve to manually obtain the desired application rate 2 1 3 4 Figure 26 1 Rate control valve 2 Flowmeter 3 Boom valves 4 Boom bypass valves Flowmeter The flowmeter measures the flow...

Page 23: ...ine and set the parking brake then turn the front half of the cover to the left and swing it open You can remove the strainer inside for cleaning To seal the tank replace the strainer if removed close...

Page 24: ...lume Displays the total volume in US gallons US and TURF or liters SI that you have applied since you last pressed the RESET button for this setting Sub Volume Displays the total volume in US gallons...

Page 25: ...ial to the Sub Area position 7 Use the or buttons to change the boom width as needed 8 Repeat steps 4 through 7 for the other booms as needed 9 Press CAL until the red light turns off You can also exi...

Page 26: ...reads 500 feet you do not need to calibrate the monitor any further If it does not read 500 feet continue with the rest of this procedure 13 Set the parking brake 14 With the selection dial set to th...

Page 27: ...p the sprayer on a level surface move the range selector to the Neutral position stop the engine and set the parking brake 2 Determine the amount of water needed to mix the amount of chemical you need...

Page 28: ...f it according to local codes and the material manufacturer s instructions 3 Fill the tank with at least 50 US gallons 190 L of clean fresh water and close the cover Note You can use a cleaning neutra...

Page 29: ...ck Item Mon Tues Wed Thurs Fri Sat Sun Check the brake and parking brake operation Check the gear shift neutral operation Check the fuel level Check the engine oil level before filling the tank Check...

Page 30: ...you leave the key in the ignition switch someone could accidently start the engine and seriously injure you or other bystanders Remove the key from the ignition and disconnect the wire s from the spar...

Page 31: ...dy one way Align the pin of the paddle wheel assembly with the hole in the flowmeter body Do not force the paddle wheel assembly into the body in any other orientation 5 Install the retaining cap 3 1...

Page 32: ...eneral Purpose Lithium Base Grease 1 Wipe the grease fitting clean so that foreign matter cannot be forced into the bearing or bushing 2 Pump grease into the bearing or bushing Important Only a few pu...

Page 33: ...rfaces Paint is available from your Authorized Service Dealer 12 Store the machine in a clean dry garage or storage area 13 Cover the machine to protect it and keep it clean Removing the Sprayer If re...

Page 34: ...brate the speed sensor 3 The speed sensor is damaged 3 Contact your Authorized Service Dealer The Distance is inaccurate 1 The speed sensor is not calibrated correctly 1 Calibrate the speed sensor 2 T...

Page 35: ...ay radios away from the monitor and its cables The displayed measurements do not make sense 1 The Units of Measurement is set to a system other than what you expect 1 Check the Units of Measurement to...

Page 36: ...contamination use of unapproved coolants lubricants additives or chemicals etc Normal wear and tear items Normal wear and tear includes but is not limited to damage to seats due to wear or abrasion wo...

Reviews: