


Printed in USA
1999 The Toro Company
All Rights Reserved
2
Contents
Page
Introduction
2
. . . . . . . . . . . . . . . . . . . . . . . . . . . . . . . .
Safety
3
. . . . . . . . . . . . . . . . . . . . . . . . . . . . . . . . . . . . .
Safe Operating Practices
3
. . . . . . . . . . . . . . . . . . .
General Operation
3
. . . . . . . . . . . . . . . . . . . . . . . .
While Operating
3
. . . . . . . . . . . . . . . . . . . . . . . . . .
Maintenance And Storage
4
. . . . . . . . . . . . . . . . . .
Safety and Instruction Decals
5
. . . . . . . . . . . . . . . . . .
Assembly
6
. . . . . . . . . . . . . . . . . . . . . . . . . . . . . . . . . .
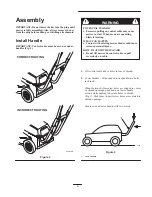
Install Handle
6
. . . . . . . . . . . . . . . . . . . . . . . . . . . .
Before Starting
8
. . . . . . . . . . . . . . . . . . . . . . . . . . . . . .
Charging Battery
8
. . . . . . . . . . . . . . . . . . . . . . . . .
Secure Extension Cord
9
. . . . . . . . . . . . . . . . . . . . .
Battery Power Status
10
. . . . . . . . . . . . . . . . . . . . . .
Operation
11
. . . . . . . . . . . . . . . . . . . . . . . . . . . . . . . . . .
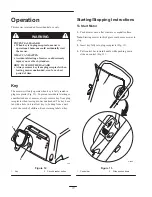
Key
11
. . . . . . . . . . . . . . . . . . . . . . . . . . . . . . . . . . . .
Starting/Stopping Instructions
11
. . . . . . . . . . . . . . .
Circuit Breaker
12
. . . . . . . . . . . . . . . . . . . . . . . . . . .
Mowing Tips
13
. . . . . . . . . . . . . . . . . . . . . . . . . . . .
Adjusting Height-of-Cut
14
. . . . . . . . . . . . . . . . . . .
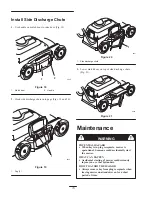
Install Side Discharge Chute
15
. . . . . . . . . . . . . . . .
Maintenance
15
. . . . . . . . . . . . . . . . . . . . . . . . . . . . . . . .
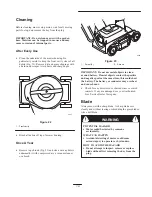
Cleaning
16
. . . . . . . . . . . . . . . . . . . . . . . . . . . . . . . .
Blade
16
. . . . . . . . . . . . . . . . . . . . . . . . . . . . . . . . . .
Battery Disposal
18
. . . . . . . . . . . . . . . . . . . . . . . . . .
Servicing “On/Off” and Blade Brake System
18
. . .
Storage
18
. . . . . . . . . . . . . . . . . . . . . . . . . . . . . . . . . . . .
The Toro Total Coverage Guarantee
20
. . . . . . . . . . . . .
Introduction
Thank you for purchasing a Toro product.
All of us at Toro want you to be completely satisfied with
your new product, so feel free to contact your local
Authorized Service Dealer for help with service, genuine
Toro parts, or other information you may require.
Whenever you contact your Authorized Service Dealer or
the factory, always know the model and serial numbers of
your product. These numbers will help the Service Dealer
or Service Representative provide exact information about
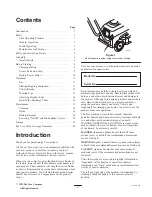
your specific product. You will find the model and serial
number decal located in a unique place on the product
(Fig. 1).
2233
1
Figure 1
1.
Model and serial number engraved in mower housing
For your convenience, write the product model and serial
numbers in the space below.
Model No:
Serial No.
Read this manual carefully to learn how to operate and
maintain your product correctly. Reading this manual will
help you and others avoid personal injury and damage to
the product. Although Toro designs, produces and markets
safe, state-of-the-art products, you are responsible for
using the product properly and safely. You are also
responsible for training persons who you allow to use the
product about safe operation.
The Toro warning system in this manual identifies
potential hazards and has special safety messages that help
you and others avoid personal injury, even death.
DANGER, WARNING and CAUTION are signal words
used to identify the level of hazard. However, regardless
of the hazard, be extremely careful.
DANGER signals an extreme hazard that will cause
serious injury or death if the recommended precautions
are not followed.
WARNING signals a hazard that may cause serious injury
or death if the recommended precautions are not followed.
CAUTION signals a hazard that may cause minor or
moderate injury if the recommended precautions are not
followed.
Two other words are also used to highlight information.
“Important” calls attention to special mechanical
information and “Note” emphasizes general information
worthy of special attention.
The left and right side of the machine is determined by
standing behind the handle in the normal operator’s
position.
Summary of Contents for 20052
Page 19: ...19 ...


