Toro 20052 Operator'S Manual Download Page 13

13

Mowing Tips

Battery Run Time

With a battery powered lawn mower, the condition of the
grass and the way that you mow the grass will affect how
long the battery will run on a single charge at each
mowing.

The following are some things that will affect battery run
time:

Moisture content of grass – The more moisture there is
in the grass, the faster the battery will run down.

Walking/mowing speed – The faster you walk, the
faster the battery will run down.

Mode of operation – Mulching grass requires the most
battery energy. Bagging requires the second highest
amount of battery energy and side discharging uses the
least.

Height-of-cut setting – If you are experiencing
problems with the battery running down too fast, try
raising the height-of-cut setting one notch.

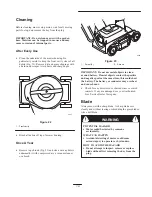
General Mulching Tips

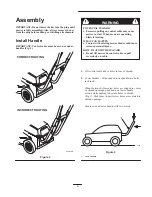
Your mower is designed to mulch grass when the mulch
door is completely closed (Fig. 16). Follow these
instructions whether cutting grass or leaves for the best
cutting results and lawn appearance:

2225

Figure 16

1.

Mulch door

2.

Handle

Maintain a sharp blade throughout the cutting season.
Periodically file down nicks on blade.

Only mow dry grass or leaves. Wet grass and leaves
tend to clump on yard and may cause mower to plug or
motor to stall. They may also be slippery to walk on
and could cause you to slip and fall.

WARNING

POTENTIAL HAZARD

Wet grass or leaves can cause you to slip and
contact blade.

WHAT CAN HAPPEN

Blade contact can seriously injure you.

HOW TO AVOID THE HAZARD

Mow only in dry conditions.

Clean clippings or leaves from underside of mower
deck after each mowing.

Grass grows at different rates at different times of the
year. In the heat of summer, it is generally best to cut
grass at the 2

/

”, 3” or 3

/

” height-of-cut settings.

Only about 

/

 of the grass blade should be cut off.

Cutting below the 2

/

”setting is not recommended

unless grass is sparse or it is late fall when grass
growth begins to slow down.

When changing height-of-cut from the established
setting (ex. 2

/

”, 3” or 3

/

”) to a lower height, the

grass may appear ragged or uneven until the grass
adjusts to the new established height-of-cut and
regains its normal appearance.

When cutting grass over six inches tall, you may want
to first mow using the side discharge chute or try the
highest height-of-cut setting and a slower walking
speed; then mow again at a lower setting for best lawn
appearance. If grass is too long and leaves clumps on
top of lawn, mower may plug and cause motor to stall.

Alternate mowing direction. This helps disperse
clippings over lawn for even fertilization.

If the finished cut lawn appearance is unsatisfactory, try
one or more of the following:

Sharpen the blade.

Walk at a slower pace while mowing.

Raise the height-of-cut setting on your mower.

Cut grass more frequently.

Overlap cutting swaths instead of cutting a full swath
with each pass.

Set height-of-cut on front wheels one notch lower than
rear wheels. (example: set front wheels at 2 inch
setting and rear wheels at 2.5 inch setting)

Summary of Contents for 20052

Page 1: ... su producto Pour obtenir gratuitement une version en français de ce manuel écrivez à l adresse ci dessous N oubliez pas d indiquer les numéros de modèle et de série de votre produit The Toro Company Attn Parts Dept 8111 Lyndale Ave S Bloomington MN 55420 1196 Domestic English EN Form No 3324 189 E24 Carefree Cordless Walk Power Lawn Mower Model No 20052 200000001 and Up ...

Page 2: ...ngraved in mower housing For your convenience write the product model and serial numbers in the space below Model No Serial No Read this manual carefully to learn how to operate and maintain your product correctly Reading this manual will help you and others avoid personal injury and damage to the product Although Toro designs produces and markets safe state of the art products you are responsible...

Page 3: ...owing Objects struck by the lawn mower blade can cause severe injuries to persons 4 Wear long pants and substantial shoes Do not operate mower while wearing open toed shoes jewelry loose clothing or when barefoot Use of rubber gloves and footwear is recommended when working outdoors 5 Keep all guards shields safety devices side discharge chute or optional grass catcher in place Repair or replace d...

Page 4: ...p motor before leaving the operator s position behind the handle Remove the key from the plug if mower will be unattended 25 If mower must be lifted to be transported stop motor stay behind the handle until all moving parts stop and remove key from the plug receptacle Maintenance And Storage 1 Perform only those maintenance instructions described in this manual If major repairs are ever needed or ...

Page 5: ... Allow motor to cool before storing in an enclosure 18 At the time of manufacture the mower conformed to the safety standards in effect for rotary mowers To assure best performance and continued safety certification of the mower use genuine Toro replacement parts and accessories Replacement parts and accessories made by other manufacturers may result in non conformance with the safety standards an...

Page 6: ...ng blade is rotating WHAT CAN HAPPEN Contact with rotating mower blade could cause serious personal injury HOW TO AVOID THE HAZARD Do not lift mower by control cable or pull excessively on cable 1 Lift control cable above holes in rear of shroud 2 Lower Handle Slide ends of lower handle into holes in shroud If handle stops before screw holes are aligned in center of shroud openings push down on lo...

Page 7: ...lign with lower handle holes Secure handles in place with bolts and knobs 1 2 5 3 6 4 Figure 4 1 Upper handle 2 Lower handle 3 Screw 2 4 Bolt 2 5 Knob 2 6 Control cable 4 If handles are in highest height position use clip to attach cable to left side of lower handle tube Fig 5 2431 1 Figure 5 1 Clip If handles are in lowest height position use clip to attach cable to right side of lower handle tub...

Page 8: ...lights on the control panel will indicate the charging status Fig 9 Refer to the Charging Chart page 9 for a summary of the LED lights The red light on the control panel will begin to flash to indicate battery is present and is ready to charge Figure 9 1 Red light 2 Yellow light 3 Green light 4 Empty box 5 Half full box 6 Full box 5 After a few minutes the red light will stop flashing and become a...

Page 9: ... only a UL listed CSA certified in Canada extension cord To reduce the risk of electric shock this mower has a polarized plug one blade is wider than the other Fig 10 and will require the use of a polarized extension cord The polarized extension cord receptacle will fit onto the mower plug only one way If the extension cord receptacle does not fit fully onto the mower plug reverse the cord recepta...

Page 10: ...tance Battery Power Status The three horizontal LED lights at the top of the control panel indicate approximately how much charge is left in the battery while the mower is in operation Fig 9 The lights are only accurate when the mower is operating and cutting grass The following is an explanation of the symbols under the battery power status LED lights Full Box Battery is between 50 and 100 charge...

Page 11: ... plug receptacle Fig 12 To prevent accidental starting or unauthorized use of mower always remove key from plug receptacle when leaving mower unattended The key has a tab with a hole in it to allow key to be hung from a nail out of the reach of children Read warning label on key 2211 Figure 12 1 Key 2 Circuit breaker button Starting Stopping Instructions To Start Motor 1 Push mower onto a flat con...

Page 12: ...recommended that the battery be left continually on charge when it is not in use year round During the non mowing season the mower can be unplugged and stored if the battery is fully charged however there is a greater chance of battery failure if you forget to charge the battery periodically Circuit Breaker If mower is run under too much load the circuit breaker will trip Follow these instructions...

Page 13: ...lade WHAT CAN HAPPEN Blade contact can seriously injure you HOW TO AVOID THE HAZARD Mow only in dry conditions Clean clippings or leaves from underside of mower deck after each mowing Grass grows at different rates at different times of the year In the heat of summer it is generally best to cut grass at the 2 3 or 3 height of cut settings Only about of the grass blade should be cut off Cutting bel...

Page 14: ...evers could bring hands into contact with moving blade WHAT CAN HAPPEN Contact with blade could cause serious personal injury HOW TO AVOID THE HAZARD Stop motor remove the key from the plug and wait for all moving parts to stop before changing the height of cut Do not put fingers under housing to lift mower when adjusting height of cut levers 1 Stop motor and wait for all moving parts to stop Disc...

Page 15: ... chute 3 Lower mulch door on top of side discharge chute Fig 21 2230 Figure 21 Maintenance WARNING POTENTIAL HAZARD When key is in plug receptacle mower is operational Someone could accidentally start the mower WHAT CAN HAPPEN Accidental starting of mower could seriously injure you or other bystanders HOW TO AVOID THE HAZARD Always remove key from plug receptacle when leaving mower unattended even...

Page 16: ...cuum cleaner or a brush 2225 Figure 23 1 Screw 4 2 Shroud IMPORTANT Do not use metal objects to clean around battery If metal objects contact the positive and negative posts at the same time this could short the battery The battery or conductor may overheat and cause burns Check for any discolored or charred wires or switch contacts If any are damaged see your Authorized Toro Service Dealer for re...

Page 17: ... or bystanders HOW TO AVOID THE HAZARD Inspect blade periodically for wear or damage Replace a worn or damaged blade 4 REMOVING BLADE Grasp end of blade using a rag or thickly padded glove Remove blade bolt washer and blade Fig 25 2206 Figure 25 1 Blade bolt 2 Washer 3 Blade 5 SHARPENING BLADE Using a file sharpen top side of blade and maintain original cutting angle Fig 26 The blade will remain b...

Page 18: ...d disposal of this battery Servicing On Off and Blade Brake System The motor and blade are designed to stop within 3 seconds after releasing the control bail Ensure that the control bail functions properly before each use of mower If the blade does not stop within 3 seconds or if there is a grinding or scraping metal to metal noise when the control bail is released contact your local Authorized To...

Page 19: ...19 ...

Page 20: ...12 888 8801 800 348 2424 Owner Responsibilities You must maintain your Toro Product by following the maintenance procedures described in the operator s manual Such routine maintenance whether performed by a dealer or by you is at your expense Items and Conditions Not Covered There is no other express warranty except for special emission system coverage on some products and the Toro Starting Guaran...

Reviews: