background image

Note:

Reel bearings do not require preload.

Over tightening reel bearing adjuster nut will
damage reel bearings.

4. Retighten set screw securing bearing adjusting nut to

bearing housing. Torque to 12-15 in-lb.

Servicing the Bedbar

Removing the Bedbar

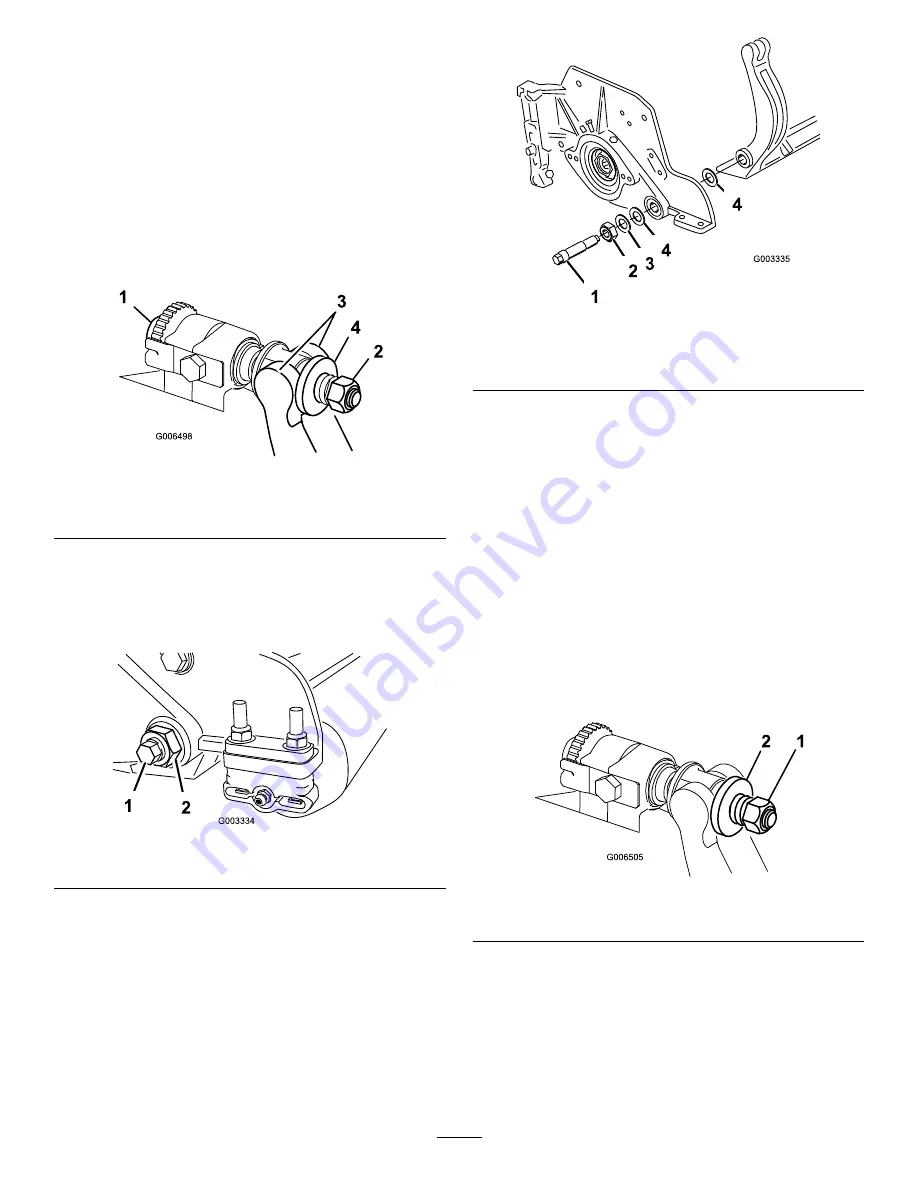
1. Turn bedbar adjuster screws, counterclockwise, to

back bedknife away from reel (Figure 32).

Figure 32

1.

Bedbar adjusting screw

3.

Bedbar

2.

Spring tension nut

4.

Washer

2. Back out the spring tension nut, until the washer is

no longer tensioned against the bedbar (Figure 32).

3. On each side of the machine, loosen the lock nut

securing the bedbar bolt (Figure 33).

Figure 33

1.

Bedbar bolt

2.

Lock nut

4. Remove each bedbar bolt allowing bedbar to be

pulled downward and removed from machine bolt
(Figure 33). Account for 2 nylon and 1 stamped steel
washers on each end of bedbar (Figure 34).

Figure 34

1.

Bedbar bolt

3.

Steel washer

2.

Nut

4.

Nylon washer

Assembling the Bedbar

1. Install bedbar, positioning mounting ears between

washer and bedbar adjuster.

2. Secure bedbar to each side plate with bedbar bolts

(nuts on bolts) and 6 washers. A nylon washer is to
be positioned on each side of side plate boss. Place
a steel washer outside each of the nylon washers
(Figure 34). Torque bedbar bolts to 27-33 ft.-lb.
Tighten locknuts until the outside steel washer
stops rotating and end play is removed but do not
overtighten or deflect side plates. Washers on inside
may have a gap.

3. Tighten spring tension nut until spring is collapsed,

then back off 1/2 turn (Figure 35).

Figure 35

1.

Spring tension nut

2.

Spring

19

Summary of Contents for 03863 Reelmaster 6500

Page 1: ...A 8 and 11 Blade DPA Cutting Units with 7 inch Reels Reelmaster 6500 6700 Traction Units Model No 03863 Serial No 280000001 and Up Model No 03864 Serial No 280000001 and Up Register at www Toro com Original Instructions EN ...

Page 2: ... a hazard that may cause serious injury or death if you do not follow the recommended precautions Figure 2 1 Safety alert symbol This manual uses 2 other words to highlight information Important calls attention to special mechanical information and Note emphasizes general information worthy of special attention Contents Introduction 2 Safety 3 Safety and Instructional Decals 3 Setup 4 1 Inspection...

Page 3: ...t is advisable and required by some local ordinances and insurance regulations Remove all debris or other objects that might be picked up and thrown by the cutting unit reel blades Keep all bystanders away from the working area If the cutting blades strike a solid object or the unit vibrates abnormally stop and shut the engine off Check cutting unit for damaged parts Repair any damage before resta...

Page 4: ...brackets and chains 4 Kickstand supplied with traction unit 1 Use the kickstand when tipping the cutting unit 5 No parts required Adjust the rear shield 6 No parts required Mount the counter weights 7 Large O ring 5 7 Install the cutting units Media and Additional Parts Description Qty Use Parts catalog 1 Operator s Manual 1 Certificate of Compliance 1 Review the material and save in an appropriat...

Page 5: ... spring from the lift arm Repeat the procedure on the 1 and 3 lift arms Figure 3 1 Pivot rod 2 Tipper support bracket w roller Note The tipper bracket w roller and the tipper support brackets are not required when operating the DPA cutting units Figure 3 They may be removed if desired 2 Disconnect the lift chains from the cutting units if attached 3 Mount the Lift Brackets and Chains Parts needed ...

Page 6: ...ne of the pivot knuckle Figure 6 Rotate the brackets 10 degrees to the outboard side of the machine Figure 6 4 Tighten all the U bolt nuts to 38 48 ft lbs 5 Mount a lift chain to each chain bracket with a screw washer and nut positioning as shown in Figure 7 Figure 7 1 Lift chain 2 Chain bracket 4 Cutting Unit Kickstand Parts needed for this procedure 1 Kickstand supplied with traction unit Proced...

Page 7: ...re 9 loosen the cap screw securing the shield to the left side plate rotate the shield to the open position and tighten the cap screw Figure 9 1 Rear shield 2 Cap screw 6 Mount the Counter Weights No Parts Required Procedure All cutting units are shipped with the counter weight mounted to the left end of the cutting unit Use the following diagram to determine the position of the counter weights an...

Page 8: ...e 5 Steering locking pin 3 Lift arm steering plate 2 Insert the horizontal shaft of the pivot knuckle into the mounting tube of the carrier frame Figure 13 3 Secure pivot knuckle to carrier frame with a thrust washer flat washer and a flange head capscrew Figure 13 4 Insert a thrust washer onto vertical shaft of pivot knuckle Figure 13 5 If removed insert the vertical shaft of the pivot knuckle in...

Page 9: ...crews Figure 15 Rotate the motor counterclockwise until the flanges encircle the cap screws then tighten the cap screws Important Make sure the reel motor hoses are not twisted kinked or in the risk of being pinched Figure 15 1 Reel drive motor 2 Capscrew Note If fixed cutting unit position is required insert steering locking pin into pivot knuckle mounting hole Figure 13 11 Hook spring wire aroun...

Page 10: ...t Power Attachment The reel motors feature quick disconnect for removal or installation onto cutting unit The cutting units can be driven from either end Frame Die cast aluminum cross member with three bolt on die cast aluminum side plates Rollers The front roller is a 3 inch 76 mm diameter plastic Wiehle roller The rear roller is a 3 0 inch 76 mm diameter steel full roller Bedknife Replaceable si...

Page 11: ...tion The combination of groomer and broomer systems optimize the quality of cut and after cut appearance for more consistent playing conditions Comb Scraper Kit A fixed comb installed behind the front roller which helps reduce grain and spongy turf by standing up the grass before cutting A scraper for the front Wiehle roller is included in the kit High HOC Kit New front roller brackets and additio...

Page 12: ...edknife moves 0009 in 023 mm closer to reel Do not overtighten the adjusting screws Figure 17 4 Check for light contact at other end of reel using paper and adjust as required 5 After adjustment is accomplished check to see if reel can pinch paper when inserted from the front and cut paper when inserted at a right angle to the bedknife Figure 17 It should be possible to cut paper with minimum cont...

Page 13: ...on your turf conditions and desired results Experience with the cutting unit on your turf will determine the best setting to use Aggressiveness of cut may be adjusted throughout the cutting season to allow for various turf conditions In general less to normal aggressive settings are more appropriate for warm season grasses Bermuda Paspalum Zoysia while cool season grasses Bent Bluegrass Rye may re...

Page 14: ...s Normal More 4 5 6 1 375 Less Normal More 4 5 6 1 500 Less Normal More 5 6 7 1 625 Less Normal More 6 7 8 1 750 Less Normal More 6 7 8 1 875 Less Normal More 7 8 9 2 000 Less Normal More 7 8 9 High HOC Kit Part No 110 9600 must be installed Front HOC bracket must be positioned in the top side plate hole When the Height of Cut is above 1 inch and a rear roller brush is used the High Height of Cut ...

Page 15: ...e adjusting screw until the front roller contacts the gauge bar Figure 23 Adjust both ends of roller until entire roller is parallel to the bedknife Figure 23 Important When set properly the rear and front rollers will contact the gauge bar and the screw will be snug against the bedknife This ensures that the height of cut is identical at both ends of the bedknife 5 Tighten nuts to secure adjustme...

Page 16: ...tant Light contact is preferred at all times If light contact is not maintained the bedknife reel edges will not sufficiently self sharpen and dull cutting edges will result after a period of operation If excessive contact is maintained bedknife reel wear will be accelerated uneven wear can result and quality of cut may be adversely affected Note As the reel blades continue to run against the bedk...

Page 17: ...commended top and front bedknife grind angle is 3 to 7 degrees Figure 26 Figure 26 1 Bedknife service limit Note All bedknife service limit measurements reference the bottom of the bedknife Figure 27 Figure 27 17 ...

Page 18: ...of the reel bearings periodically check if reel end play exists The reel bearings can be checked and adjusted as follows 1 Loosen reel to bedknife contact by turning the bedknife adjusting knobs Figure 29 counterclockwise until no contact exists Figure 29 1 Bedknife adjusting knob 2 Using a rag or thickly padded glove hold on to the reel blade and try to move the reel assembly side to side Figure ...

Page 19: ...lowing bedbar to be pulled downward and removed from machine bolt Figure 33 Account for 2 nylon and 1 stamped steel washers on each end of bedbar Figure 34 Figure 34 1 Bedbar bolt 3 Steel washer 2 Nut 4 Nylon washer Assembling the Bedbar 1 Install bedbar positioning mounting ears between washer and bedbar adjuster 2 Secure bedbar to each side plate with bedbar bolts nuts on bolts and 6 washers A n...

Page 20: ...and outer seals to rebuild a roller The Roller Rebuild Tool Kit includes all the tools and the installation instructions required to rebuild a roller with the roller rebuild kit Refer to your parts catalog or contact your distributor for assistance Figure 36 1 Rebuild kit Part No 114 5430 6 Bearing nut 2 Rebuild tool kit Part No 115 0803 7 Inner seal tool 3 Inner seal 8 Washer 4 Bearing 9 Bearing ...

Page 21: ...Notes 21 ...

Page 22: ...Notes 22 ...

Page 23: ...Notes 23 ...

Page 24: ...t limited to weather storage practices contamination use of unapproved coolants lubricants additives or chemicals etc Normal wear and tear items Normal wear and tear includes but is not limited to damage to seats due to wear or abrasion worn painted surfaces scratched decals or windows etc Parts Parts scheduled for replacement as required maintenance are warranted for the period of time up to the ...

Reviews: