6. Re-secure roller bracket and spacers to underside
of side plate mounting flanges with nuts previously
removed.
7. Verify that bedknife to reel contact is correct. Tip
mower to expose front and rear rollers and bedknife.
Note:
The position of the rear roller to the
reel is controlled by the machining tolerances
of the assembled components and paralleling is
not required. A limited amount of adjustment is
possible by setting the cutting unit on a surface
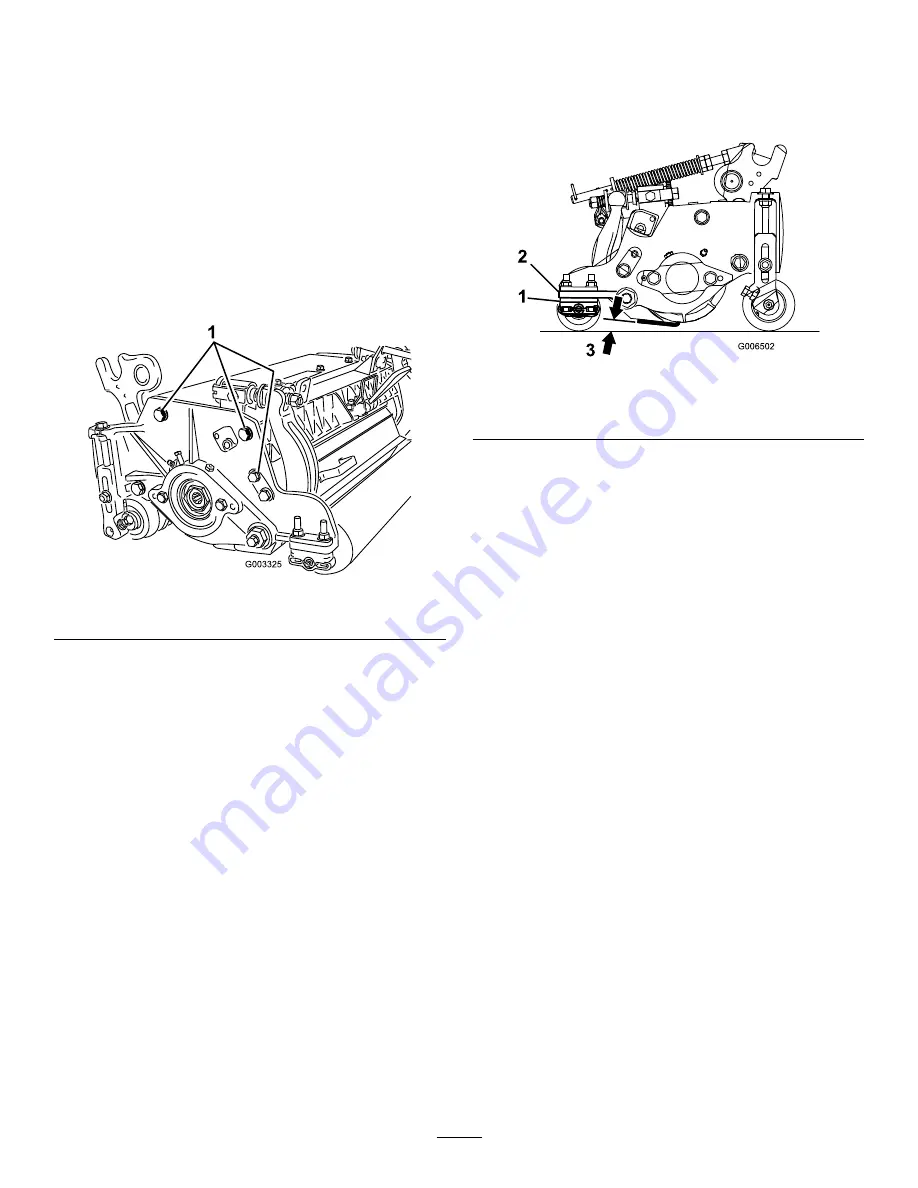
plate and loosening the side plate mounting cap
screws (Figure 19). Adjust and retighten cap screws.
Torque the cap screws to 27-33 ft-lb.
Figure 19
1.
Side plate mounting cap screws
Height of Cut Chart Terms
Height of Cut Setting (HOC)
The desired Height of Cut.
Aggressiveness of Cut
Cutting unit Aggressiveness of Cut has a significant
impact on the performance of the cutting unit.
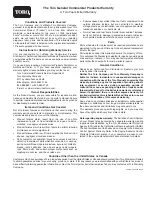
Aggressiveness of Cut refers to the angle of the
bedknife relative to the ground (Figure 20).
The best cutting unit setup is dependent on your
turf conditions and desired results. Experience with
the cutting unit on your turf will determine the best
setting to use. Aggressiveness of cut may be adjusted
throughout the cutting season to allow for various turf
conditions.
In general, less to normal aggressive settings are
more appropriate for warm season grasses (Bermuda,
Paspalum, Zoysia) while cool season grasses (Bent,
Bluegrass, Rye) may require normal to more aggressive
setups. More aggressive setups cut more grass off by
allowing the spinning reel to pull more grass up into
the bedknife.
Figure 20
1.
Rear spacers
3.
Aggressiveness of cut
2.
Side plate mounting flange
Rear Spacers
The number of rear spacers determines the
aggressiveness of cut for the cutting unit. For a given
height of cut, adding spacers, below the side plate
mounting flange, increases the aggressiveness of the
cutting unit. All cutting units on a given machine must
be set to the same aggressiveness of cut (Number of
rear spacers, part no. 106-3925), otherwise the after-cut
appearance could be negatively affected (Figure 20).
Groomer
These are the recommended height of cut settings
when a groomer kit is installed on the cutting unit.
13


