


6
1
2
3
4
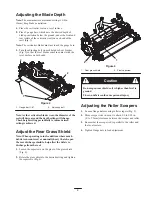
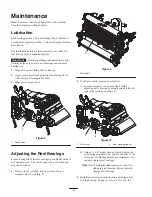
Figure 5
1. Front roller scraper
2. Rear roller scraper
3. Transport roller
4. Cotter pin
Adjusting the Transport Rollers
Before the verticutters are lowered to the shop floor or
removed from the traction unit, lower the transport rollers
(Fig. 5) to protect the blades from hard surface contact.
1.
Remove the cotter pin securing the transport roller
bracket to the sideplate pin.
2.
Position the transport roller as follows:
•
Lower the roller bracket before the verticutter is
lowered to the shop floor.
•
Raise the roller bracket after the verticutter is raised
to the operating position.
3.
Secure the transport roller bracket to the sideplate pin
with the cotter pin.
4.
Repeat the procedure on the opposite end of verticutter.
Mount Verticutter Reel
Important
When lowering verticutter reels, care
must be taken to prevent damage to the reel blades due
to contact with a concrete floor or a paved surface.
Lower the transport rollers before lowering the
verticuttiers to a concrete floor or a paved surface.
The verticutters can be installed at any of the five locations
on the traction unit. Figure 6 shows the orientation of the
hydraulic drive motor for each of the locations. For any of
the locations requiring the motor to be mounted on the right
end of the verticutters, install a counterweight on the left
end of the verticutters. For the locations requiring the motor
to be mounted on the left end, install a counterweight on
the right end of the verticutters.
#1
#4
#5
#3
#2
Motor
Weight
Motor
Weight
Weight
Motor
Weight
Motor
Weight
Motor
Figure 6
Note:
Counterweights are shipped installed to the right end
of the verticutters. The capscrews on the left end are to be
used for securing the hydraulic motor.
Verticutter reels are mounted to traction unit the same way
cutting units are. Refer to Traction Unit Operator’s Manual
for mounting instructions.
Important
When connecting the lift arm chain to the
veticutter, use the third link from the top instead of the
forth.
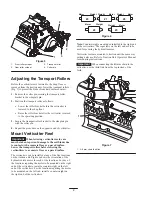
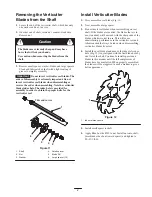
1
Figure 7
1. Lift arm chain third link


