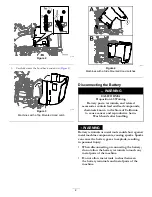
background image

g035802

Figure 14

1.

Holes (beacon bracket)

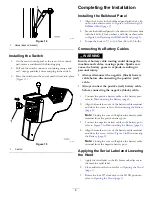
Installing the Switch

1.

On the main control panel at the rear of the control
pad, remove and discard the blanking plug.

2.

Pull out the switch connector containing orange and
red / orange and black wires and plug in the switch.

3.

Press the switch into the cutout until it clicks into place
(

Figure 15

).

g034461

Figure 15

1.

Switch

Completing the Installation

Installing the Bulkhead Panel

1.

Align the 4 holes in the bulkhead panel with the 4 clip
nuts on the chassis; refer to

Figure 6

in

Removing the

Bulkhead Panel (page 3)

.

2.

Secure the bulkhead panel to the chassis of the machine
with the 4 bolts, 4 lock washers, and 4 flat washers; refer
to

Figure 6

in

Removing the Bulkhead Panel (page 3)

.

3.

Torque the bolts to 7.7 to 11.6 N∙m (68 to 103 in-lb).

Connecting the Battery Cables

WARNING

Incorrect battery cable routing could damage the
machine and cables, causing sparks. Sparks can
cause the battery gases to explode, resulting in
personal injury.

Always disconnect the negative (black) battery
cable before disconnecting the positive (red)
cable.

Always connect the positive (red) battery cable
before connecting the negative (black) cable.

1.

Connect the positive battery cable to the battery post;
refer to

Disconnecting the Battery (page 2)

2.

Align the insulator cover of the battery-cable terminal
and close the cover; refer to

Disconnecting the Battery

(page 2)

.

Note:

Closing the cover will tighten the battery cable

terminal from the positive battery post.

3.

Connect the negative battery cable to the battery post;
refer to

Figure 5

in

Disconnecting the Battery (page 2)

.

4.

Align the insulator cover of the battery-cable terminal
and close the cover; refer to

Figure 5

in

Disconnecting

the Battery (page 2)

.

Note:

Closing the cover will tighten the battery cable

terminal from the negative battery post.

Applying the Serial Label and Lowering
the Hood

1.

Apply the serial label to the left frame rail, adjacent to
the machine serial label.

2.

Close and secure the hood; refer to

Opening the Hood

(page 1)

.

3.

Rotate the lock 90° clockwise to the LOCK position;
refer to

Opening the Hood (page 1)

.

6


Summary of Contents for 02920

Page 1: ...level surface 2 Lower the mower deck reel cutting unit or flail cutting unit to the ground 3 Engage the parking brake 4 Shut off the engine remove the key 5 Wait for all moving parts to stop Opening...

Page 2: ...lead compounds chemicals known to the State of California to cause cancer and reproductive harm Wash hands after handling WARNING Battery terminals or metal tools could short against metal machine co...

Page 3: ...ote Lifting the cover will loosen the battery cable terminal from the positive battery post 4 Remove the positive battery cable from the battery Removing the Bulkhead Panel 1 Remove the 4 bolts 6 x 25...

Page 4: ...tighten the locknut to a torque of 15 N m 11 ft lb Note Do not overtighten them as this will make the ROPS difficult to fold 5 Align the small holes in the beacon bracket with the upper holes in the...

Page 5: ...ack into the beacon stand 4 Loosen the wing nut on the beacon Figure 11 g034466 Figure 11 1 Wing nut 5 Assemble the beacon onto the top of the beacon stand Figure 12 g036077 Figure 12 6 Tighten the wi...

Page 6: ...sulting in personal injury Always disconnect the negative black battery cable before disconnecting the positive red cable Always connect the positive red battery cable before connecting the negative b...

Page 7: ...k 2 Remove the 10 A fuse from the slot in the fuse block located at the 3rd position from the right Figure 17 g188128 Figure 17 1 10 A fuse 2 Fuse block socket 3rd position from the right 3 Insert a 1...

Page 8: ...Notes...

Page 9: ...Notes...

Page 10: ...Notes...

Page 11: ...these activities We will not sell your personal information to any other company We reserve the right to disclose personal information in order to comply with applicable laws and with requests by the...

Page 12: ...eather storage practices contamination use of unapproved coolants lubricants additives fertilizers water or chemicals etc Normal noise vibration wear and tear and deterioration Normal wear and tear in...

Reviews: