Tornado 2440 ANNEX A User Manual Download Page 44

• 

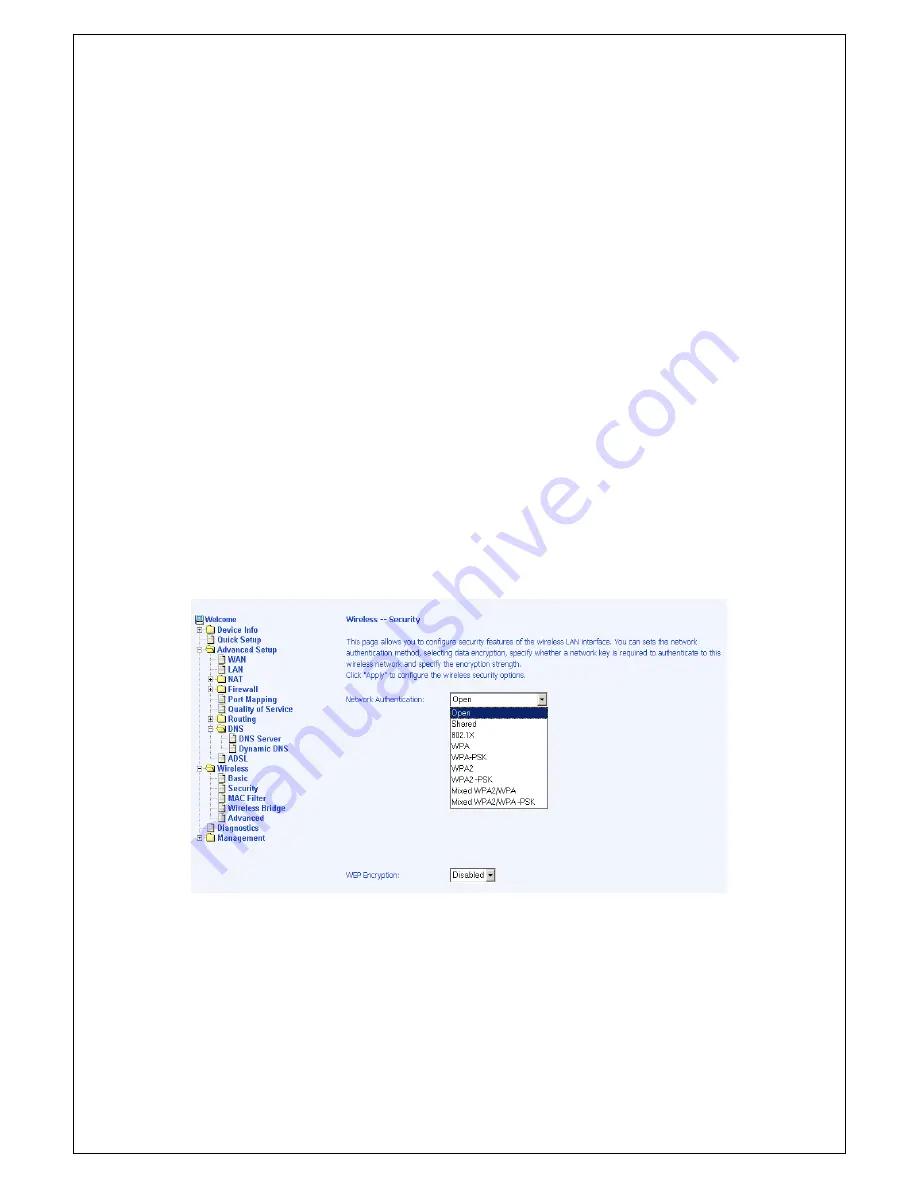
WPA-PSK (Wi-Fi Protected Access – Pre-Shared Key)—WPA for 
home and SOHO environments also using the same strong TKIP 
encryption, per-packet key construction, and key management that 
WPA provides in the enterprise environment.  The main difference 
is that the password is entered manually.  A group re-key interval 
time is also required. 

• 

WPA2 (Wi-Fi Protected Access 2)—second generation of WPA 
which uses AES (Advanced Encryption Standard) instead of TKIP 
as its encryption method.  Network re-auth interval is the time in 
which another key needs to be dynamically issued.   


• 

WPA2-PSK (Wi-Fi Protected Access 2 – Pre-Shared Key)—suitable 
for home and SOHO environments, it also uses AES encryption 
and requires you to enter a password and an re-key interval time. 


• 

Mixed WPA2 / WPA—during transitional times for upgrades in the 
enterprise environment, this mixed authentication method allows 
“upgraded” and users not yet “upgraded” to access the network via 
the router.  RADIUS server information must be entered for WPA 
and a as well as a group re-key interval time.  Both TKIP and AES 
are used. 


• 

Mixed WPA2 / WPA-PSK—useful during transitional times for 
upgrades in the home or SOHO environment, a pre-shared key 
must be entered along with the group re-key interval time.  Both 
TKIP and AES are also used.   


 - 

43 

-  


Summary of Contents for 2440 ANNEX A

Page 1: ...Tornado 2440 Annex A Tornado 2441 Annex B ADSL 2 2 Wireless LAN Modem Router User Manual...

Page 2: ...Wireless Ethernet Router features 4 LAN ports and a wireless ability Included in the package are the following 1 4 Port Wireless Ethernet Router 1 AC Power Adapter 1 RJ 11 Cable 1 RJ 45 Cable 1 User M...

Page 3: ...ected to ADSL Solid ADSL is connected and there is no ADSL traffic No light ADSL is not connected XDSL ACT Quick blinking There is ADSL traffic Solid Router is connected to the LAN No light No connect...

Page 4: ...he button for less than 4 seconds Default settings press the button for 4 seconds or longer LAN1 LAN4 RJ 45 connects the unit to an Ethernet device such as a PC or a switch Console NOTE To be used for...

Page 5: ...ernet cable to connect your computer directly to the router Connect one end of the Ethernet cable to one of the ports labeled LAN on the rear panel of the router and connect the other end to the Ether...

Page 6: ...Installation Diagram 5...

Page 7: ...rnet Protocol TCP IP Properties dialog box click on the radio button labeled Use the following IP address Type an address between 192 168 1 3 and 192 168 1 254 in the IP Address field and 255 255 255...

Page 8: ...ick on the Local Area Connection icon and then select Properties The Local Area Connection Properties dialog box displays a list of currently installed network components If the list includes Internet...

Page 9: ...the network component labeled TCP IP and then click on the Properties button If you have multiple TCP IP listings select the listing associated with your network card or adapter 10 In the TCP IP Prop...

Page 10: ...box click on the Protocols tab 9 In the Protocols tab select TCP IP and then click on Properties 10 In the Microsoft TCP IP Properties dialog box click on the radio button labeled Use the following I...

Page 11: ...ne below will be displayed after you connect to the user interface 3 Enter your user name and password and then click on OK to display the user interface NOTE There are two default user name and passw...

Page 12: ...nu items under Device Info Summary Access the general status report from the router by clicking on Summary under Device Info It shows information about the router such as the version of the software b...

Page 13: ...AN Access the WAN status report from the router by clicking on WAN under Device Info STATISTICS LAN Statistics Access the LAN statistics from the router by clicking on the LAN item under Statistics 12...

Page 14: ...AN Statistics Access the WAN statistics from the router by clicking on the WAN item under Statistics ATM Statistics Access ATM statistics from the router by clicking on the ATM item under Statistics 1...

Page 15: ...ADSL Statistics You can view ADSL statistics by clicking on the ADSL item under Statistics Information contained in this screen is useful for troubleshooting and diagnostics of connection problems 14...

Page 16: ...mber transmitted If you click on the ADSL BER Test button at the bottom of the ADSL Statistics page the following pop up screen will appear allowing you to set the tested time and to begin the test Be...

Page 17: ...Route Access the routing status report from the router by clicking on the Route item under Device Info 16...

Page 18: ...ARP Access the ARP status report from the router by clicking on the ARP item under Device Info 17...

Page 19: ...ble PVC and automatically detect PPPoE PPPoA and Bridge Protocol with DHCP Server available To continue click on the Next button If you do not use DSL Auto connect then you may need to change the VPI...

Page 20: ...The next screen to appear will depend on the connection type that was selected in the previous screen The following screen is a result of choosing IP over ATM IPoA as the connection type 19...

Page 21: ...figure the WAN settings as provided by your ISP Click on the Add button if you want to add a new rule for the WAN interface The ATM PVC Configuration screen appears The ATM PVC Configuration screen al...

Page 22: ...32 to 65535 o Service Category Five classes of traffic are listed UBR Without PCR UBR With PCR CBR Non Realtime VBR Realtime VBR 21 Enabling QoS for a PVC improves performance for selected classes of...

Page 23: ...ion modes PPP over ATM PPPoA PPP over Ethernet PPPoE MAC Encapsulation Routing MER IP over ATM IpoA Bridging Select the mode that your ISP has instructed you to use and click on Next After you click o...

Page 24: ...he WAN configurations made Click on the Save button when the settings are correct The below screen will appear showing the WAN settings that you made When satisfied with the settings and no changes ar...

Page 25: ...After selecting the Finish button the below screen will appear At this point the router will reboot to save the changes made 24...

Page 26: ...ubnet Mask for the LAN interface to correspond your LAN s IP Subnet The Save button only saves the LAN configuration data but does not apply the configurations Select the Save Reboot button to save th...

Page 27: ...r Port Triggering and DMZ Host Virtual Servers A virtual server allows you to direct incoming traffic from the WAN side to a specific IP address on the LAN side Select the virtual server from the drop...

Page 28: ...erver names select the check box and click on the Remove button Port Triggering Click on the Add button to add Port Triggering to your Internet application 27 The below screen appears when you click o...

Page 29: ...The below screen appears after you save your selections You will be able to add or remove selections made by clicking on the Add and Remove buttons 28...

Page 30: ...DMZ Host You can define the IP address of the DMZ Host on this screen Enter the IP address and click on Save Apply 29...

Page 31: ...LAN traffic from entering the WAN side Click on the Add button to create filters The below screen will appear when you click on Add Input the filter name source information from the LAN side and dest...

Page 32: ...coming Incoming filter filters the WAN traffic to the LAN side Click on the Add button to add incoming filter settings Enter a filter name information about the source address from the WAN side and in...

Page 33: ...orward or block traffic by MAC address You can change the policy or add settings to the MAC filtering table using the MAC Filtering Setup screen If you click on Change Policy a confirmation dialog all...

Page 34: ...to view and delete MAC filtering rules Port Mapping Port mapping is a feature that allows you to open ports to allow certain Internet applications on the WAN side to pass through the firewall and ente...

Page 35: ...34...

Page 36: ...Quality of Service You can configure the Quality of Service to apply different priorities to traffic on the router On this screen you can view and delete QoS settings 35...

Page 37: ...the box is checked for automatic assigned default gateway to be enabled Click the Save Apply button to enable or disable this feature Static Route Use the Routing Static Route screen to add a static...

Page 38: ...RIP If RIP is enabled the router operation can be configured as active or passive 37...

Page 39: ...DNS DNS Server Use the DNS Server screen to request automatic assignment of a DNS or to specify a primary and secondary DNS Dynamic DNS 38...

Page 40: ...s value only as directed by your ISP Phone Line Pair The Tornado 244X ADSL router supports phone lines on pins 2 and 3 or pins 1 and 4 to connect your ADSL line If your phone system uses pins 2 and 3...

Page 41: ...Settings The frequency band of ADSL is split up into 256 separate tones each spaced 4 3125 kHz apart With each tone carrying separate data the technique operates as if 256 separate modems were running...

Page 42: ...41...

Page 43: ...default is a disabled WEP encryption setting Shared WEP encryption is enabled and encryption key strength of 64 bit or 128 bit needs to be selected Click on Set Encryption Keys to manually set the net...

Page 44: ...o be dynamically issued WPA2 PSK Wi Fi Protected Access 2 Pre Shared Key suitable for home and SOHO environments it also uses AES encryption and requires you to enter a password and an re key interval...

Page 45: ...manage and then select the mode that you want to use to manage them You can disable this feature or you can allow or deny access to the MAC addresses that you add to the list The following screen appe...

Page 46: ...In this next screen you can select which mode you want the router to be in either access point or wireless bridge 45...

Page 47: ...Interval sets the Wake up interval for clients in power saving mode Beacon Interval a packet of information that is sent from a connected device to all other devices where it announces its availabili...

Page 48: ...802 11g throughput under most conditions WMM Wi Fi Multimedia feature that improves the your experience for audio video and voice applications over a Wi Fi network 47...

Page 49: ...ting Diagnostics The diagnostics screen allows you to run diagnostic tests to check your DSL connection In addition you can test the connection to your DSL service provider Management Settings Backup...

Page 50: ...49...

Page 51: ...restore saved settings select Management Settings Restore User Settings Select the backup file you want to restore and click on Update Settings The router will restore settings and reboot to activate...

Page 52: ...ent settings and restore the router to factory default settings To restore the router to factory default settings select Management Settings Restore Default Reply OK to the confirmation dialog The rou...

Page 53: ...The System Log dialog allows you to view the System Log and configure the System Log options To view the System Log click on the View System Log button to check the log file Below is a view of the Sys...

Page 54: ...og If the log is enabled the system will log selected events Emergency Alert Critical Error Warning Notice Informational and Debugging All events above or equal to the selected log level will be logge...

Page 55: ...specified IP address and UDP port of a remote system log server If the selected mode is Local or Both events will be recorded in the local memory Select the desired values and click on the Save Apply...

Page 56: ...N side can be configured Services IP Addresses Web access to the router can be limited when Access Control Mode is enabled The IP addresses of allowed hosts can be added using Access Control IP Addres...

Page 57: ...anagement services enter the IP address in the box and click on the Save Apply button Passwords Access the Passwords screen under the Access Control section to change a password Select an account and...

Page 58: ...SP 2 Enter the path to the image file location or click on the Browse button to locate the image file 3 Click the Update Software button once to upload the new image file Reboot Router Select Manageme...

Reviews: