background image

Tormach, Inc.

P: 608.849.8381 / F: 209.885.4534

tormach.com

TECHNICAL DOCUMENT

Page 3

©Tormach® 2017. All rights reserved.

Specifications subject to change without notice.

TD10422_SmartCool_Install_0417A

2. 

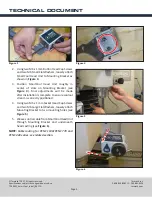
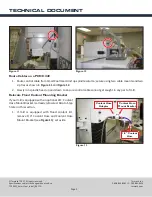
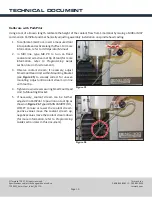
Using two M6 x 1 mm Button Head Cap Screws 

and two M6 Small Flat Washers, loosely attach 

SmartCool Head Unit to Mounting Bracket as 

shown in 

Figure 3

.

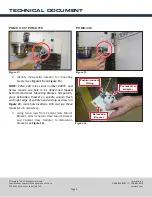
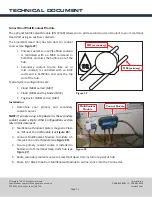
3. 

Position  SmartCool  Head  Unit  roughly  in 

center  of  slots  on  Mounting  Bracket  (see 

Figure 4

).  Final  adjustments  will  be  made 

after installation is complete to ensure coolant 

stream is correctly positioned.

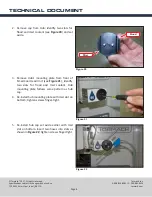
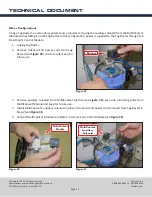
4. 

Using two M6 x 1 mm Socket Head Cap Screws 

and two M6 Large Flat Washers, loosely attach 

Mounting Bracket to two mounting holes (see 

Figure 5

).

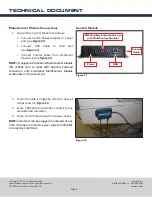
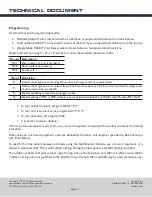
5. 

Weave control cable from SmartCool Head Unit 

through  Mounting  Bracket  and  underneath 

head casting (see 

Figure 6

).

NOTE: 

Cable routing for PCNC 1100/PCNC 770 and 

PCNC 440 varies; see related section.

Figure 6


Figure 4


Figure 3


Figure 5


Summary of Contents for SmartCool

Page 1: ...oolant Module PN 37168 4 Relocate Flood Coolant Mounting Bracket 9 Programming 5 Make Coolant Connections 10 Troubleshooting Qty SmartCool Starter Kit PN 1 SmartCool Head Unit 1 Control Module 1 USB C...

Page 2: ...ant 440 Relocation Bracket IMPORTANT Download and install the latest version of PathPilot before proceeding PathPilot v1 9 7 or later is required to use these instructions For more information refer t...

Page 3: ...tCool Head Unit roughly in center of slots on Mounting Bracket see Figure 4 Final adjustments will be made after installation is complete to ensure coolant stream is correctly positioned 4 Using two M...

Page 4: ...and B as shown in Figure 8 4 Route control cable from SmartCool Head Unit to back of mill based your specific mill configuration If power drawbar optional is installed Route through power drawbar s ca...

Page 5: ...es as shown in Figure 11 and Figure 12 2 Slowly run spindle head up and down to ensure control cable cannot get caught in any part of mill Relocate Flood Coolant Mounting Bracket If your mill is equip...

Page 6: ...uire one hole to be drilled and tapped behind SmartCool s Mounting Bracket Temporarily place Relocation Bracket on spindle column flush with right edge of spindle head casting as shown in Figure 15 ma...

Page 7: ...are pre configured for use with flood coolant but can be configured to use mist coolant as the primary coolant source NOTE An optional MultiCoolant Module PN 37168 allows the SmartCool to use flood co...

Page 8: ...igure 20 and set aside 3 Remove Hub s mounting plate from front of SmartCool Head Unit see Figure 21 identify two slots for flood and mist coolant Hub mounting plate follows same pattern as hub cap 4...

Page 9: ...e Figure 23 NOTE If equipped with optional MultiCoolant Module PN 37168 wait to make M07 Auxiliary Solenoid connection until SmartCool MultiCoolant Module section later in this document 2 Control Modu...

Page 10: ...ype M8 P0 to turn on flood coolant and aim stream at tip of tool for more information refer to Programming Guide section later in this document 3 Observe coolant stream if necessary adjust SmartCool H...

Page 11: ...aims the top slot of the hub Typical system configurations are Flood M08 and air M07 Flood M08 and Fog Buster M07 Fog Buster M08 and air M07 Installation 1 Determine your primary and secondary coolant...

Page 12: ...the Fog Buster through the SmartCool s Control Module 1 Unplug Fog Buster 2 Remove solenoid and power cord from Fog Buster see Figure 29 and set aside keep for future use 3 Remove auxiliary solenoid f...

Page 13: ...ptional if the P word is omitted the target point of the coolant stream is the Z0 R Enables oscillating coolant stream wiggle mode Q Enables pulsing of M07 or M08 solenoid in seconds Requires SmartCoo...

Page 14: ...ff all coolant M09 Keyboard Shortcuts Key Code Description Alt U Manually override PathPilot coolant control to point nozzle up1 Alt D Manually override PathPilot coolant control to point nozzle down1...

Page 15: ...to place If pins do not hold replace control cable Over tightened hub High Listen for a sound from the SmartCool Head Unit that indicates it is working Verify that the SmartCool Head Unit does not mov...

Reviews: