background image

5. Reexamine the alignment of the ATC in the X direction. If the

rod isn't perpendicular to the vertical edge of the machinist's

square, repeat Steps 2 through 5.

Examine the Alignment of the Carousel Door Opening

1. Remove the tool holder from the fork, and then set it aside.

Note:

You'll need this tool later in the installation

procedure to make further alignments.

2. Power on the machine and the PathPilot controller.

a. Turn the Main Disconnect switch to

ON

 on the side of the

electrical cabinet.

b. Twist out the Emergency Stop button on the operator box,

which enables movement to the machine axes and the

spindle.

c. Press the Reset button on the operator box.

d. Bring the machine out of reset and reference it.

3. Verify that the ATC is all the way forward (toward the

spindle), and then slowly move the Z-axis down (-Z) to

examine the clearance of the carousel door opening.

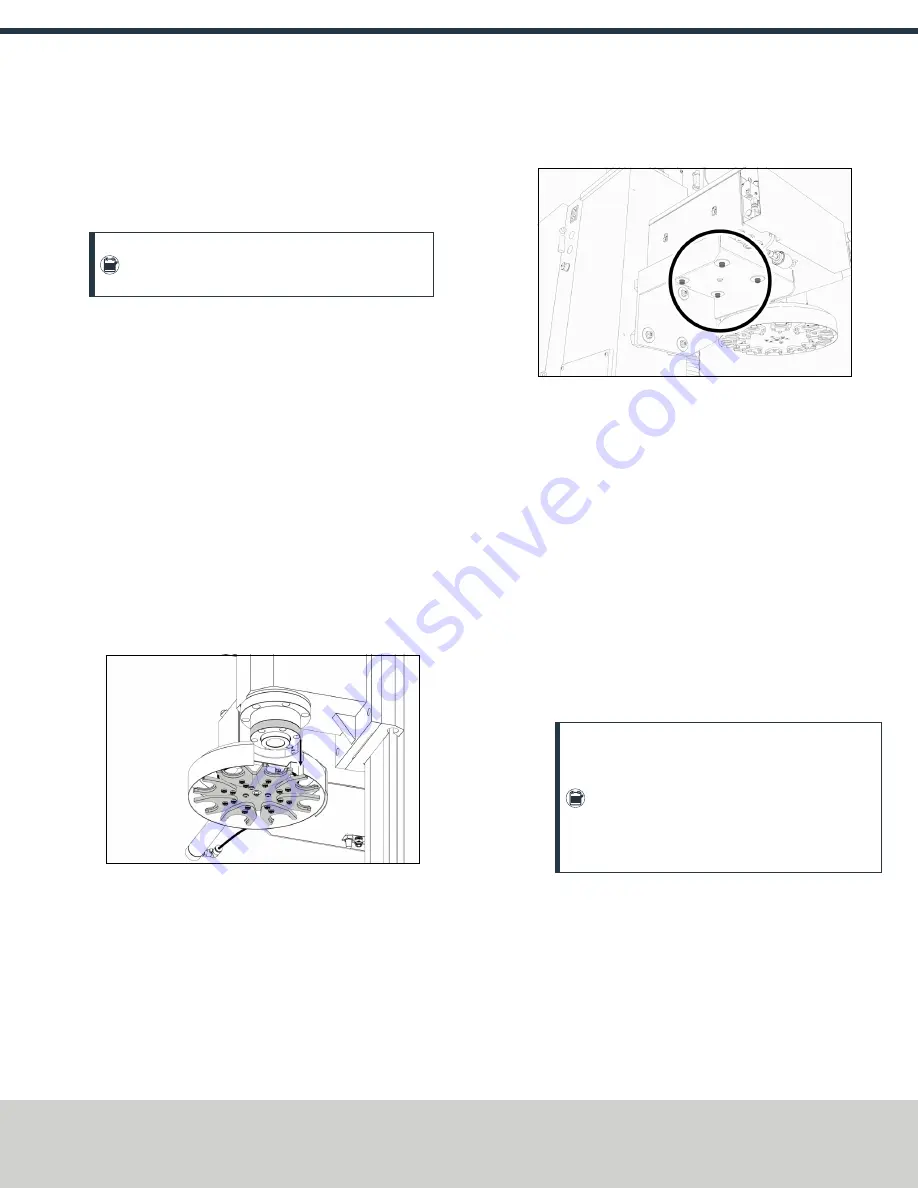
4. Make sure that the carousel door opening is approximately

equal to the front back and left of the spindle mounting

flange:

l

If it is, go to Step 8.

Figure 2-11: Distance between the carousel door

opening and the spindle mounting flange.

l

If it's not, go to Step 5.

5. Loosen the four socket head cap screws that secure the ATC

main assembly to the mounting bracket with a 6 mm hex

wrench.

Figure 2-12: Socket head cap screws securing the ATC main

assembly to the mounting bracket.

6. Adjust the carousel door opening as required:

l

If the Carousel Door Opening is Contacting the Front

Pivot the ATC around the locating pin on the bottom of the

mounting bracket toward the front of the machine (closer

to you).

l

If the Carousel Door Opening is Contacting the Back

Pivot the ATC around the locating pin on the bottom of the

mounting bracket toward the back of the machine (closer

to the machine column).

l

If the Carousel Door Opening is Contacting the Left

Loosen the four flange nuts that attach the mounting

bracket to the column to move the bracket forward or

backward.

Note:

Moving the ATC mounting bracket could

change the position of the tilt standoff (on the Z-

column). If you move it, you must verify that the

ATC is still correctly installed; go to "Examine

Perpendicularity in the Y Direction" (on the

previous page).

Repeat this step as needed.

7. Tighten the socket head cap screws and the flange nuts (if you

loosened them in Step 5).

8. Move the tool tray to its retracted position.

Page 7

©Tormach® 2019
Specifications subject to change without notice.

tormach.com

TD10627: Owner's Guide: 770MX Automatic Tool Changer (ATC) (1019A)

TECHNICAL DOCUMENT

Summary of Contents for 770MX

Page 1: ...TECHNICAL DOCUMENT Version 1019A OWNER S GUIDE 770MX AUTOMATIC TOOL CHANGER ATC Page 1...

Page 2: ...requires more tools the ATC changes tools automatically for all tools assigned to the tray and pauses for a manual tool change for all tools not assigned to the tray Note If any of these items are mi...

Page 3: ...2 Remove any accessories or fixtures from the machine table 3 Center the machine table from the PathPilot interface in the MDI Line DRO field type the command for your machine s center position as de...

Page 4: ...into the air cylinder 3 Connect the air lines from the ATC main assembly to the air cylinder as follows l Connect the short air line to the front of the cylinder l Connect the long air line to the bac...

Page 5: ...2 Lift the ATC main assembly on to the mounting bracket Figure 2 6 ATC main assembly positioned above the mounting bracket 3 Align the locating pin on the ATC main assembly with the matching hole in...

Page 6: ...t be adjusted go to Step 2 2 Loosen the flange nuts on the standoffs 3 Turn the tilt standoff with an adjustable wrench and slowly pivot the ATC until the rod is perpendicular to the vertical edge of...

Page 7: ...ocket head cap screws that secure the ATC main assembly to the mounting bracket with a 6 mm hex wrench Figure 2 12 Socket head cap screws securing the ATC main assembly to the mounting bracket 6 Adjus...

Page 8: ...es in the following order a Connect the Retract PDB Bottom airline to the bottom push to connect elbow on the Power Drawbar b Connect the Advance PDB Top airline to the top push to connect elbow on th...

Page 9: ...light on the Status tab Note If the VFD Running light did not come on in Step 8 we can help Email support tormach com to contact Tormach Technical Support for guidance on how to proceed 8 Select Stop...

Page 10: ...e fork by hand and hold it in place Then select OK b Rotate the spindle counterclockwise in the fork by hand and hold in place Then select OK The tool change rotation position has now been set In the...

Page 11: ...cated to PathPilot 19 Adjust for the ATC s backlash apply light pressure forward and backward on the carousel then from the PathPilot interface on the ATC tab select or until there s equal space on th...

Page 12: ...rent Tool Figure 3 1 Store Current Tool button on the ATC tab The tool is assigned to the nearest open slot The ATC fetches the tool from the spindle and stores the tool in the tray When stored the to...

Page 13: ...EV The tray moves to the next slot location 5 Select Retract The tray returns to the machining position 3 1 6 Retrieve a Tool From the Tool Tray Depending on your workflow do one of the following from...

Reviews: