background image

C4204 INVENTORY LIST 

2- 3/4” -10 X 4-1/2” GR8 HEX BOLT 
8- 1/2” -13 NUT  -FLANGE SERRATED GR5 
4- 1/2” WASHER-LOCK GR5 
4- 1/2” WASHER -STAR GR5 
2- 3/4” WASHER -LOCK GR5 
2- 1/4” X 2-1/4” SNAPPER PIN 
2- FRAME UNITS 
2- THREE HOLE STRAP PLATE 

6- 1/2” -13 X 3-1/2” GR8 HEX BOLT 
6- 1/2” -13 X 1-1/4” GR5 HEX BOLT 
4- 1/2” -13 NUT -HEX GR8   
2- 1/2” WASHER GR5  
2- 3/4” -10 NUT-HEX JAM GR5   
2- 3/4” WASHER GR5  
2- 16-1/2” BENT INSERTS   
2- HOOK BOLTS 
2- 

ADUSTABLE MOUNTING PLATE


2- 7”(18cm) ZIP TIES 

2- 2-1/2” X 2-1/2” X 7”(18cm) SQUARE TUBING

INSTALLATION INSTRUCTIONS:


LOCATE AND INVENTORY ALL PARTS TO BECOME FAMILIAR WITH ALL BRACKETS. READ AND 
UNDERSTAND ALL INSTRUCTIONS. MAKE SURE THE VEHICLE IS IN PARK, ON A LEVEL 
SURFACE AND WHEELS ARE CHOCKED BEFORE STARTING THE INSTALLATION.


* NOTE: 

SOME VEHICLES ARE SLIGHTLY DIFFERENT; LOOK FOR THE BED MOUNT PERCH 

FOR REFERENCE POINT.


STEP 1


Locate the driver’s side rear cab mount and drivers side front bed cross member perch. Using one 3-hole strap, insert 
one 1/2” -13 x 3-1/2” GR8 bolt and one 1/2” star washer onto the last oval slot. Place the 3 hole strap behind the bed 
cross member perch with the bolt protruding to the outside. (The oval hole to the rear of the vehicle, with the 1/2” hole 
towards the front of the vehicle)


place one 5/16” hook bracket onto the 1/2” -13 x 3-1/2” GR8 bolt, hooking it to the 

bed mount perch. 

SEE PHOTO A, B & C


STEP 2 

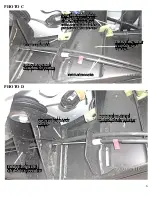
Zip tie e-brake cables between the cab mount and the bed mount. Then locate the driver’s side 3 hole angle tie down 
frame plate. Just below the cab mount perch, line up the 3/4” hole in the 3-hole angle tie down frame plate with the 
hole in the frame. (The angle with the two holes facing rear-ward) insert the supplied 3/4” x 4-1/2” GR8 bolt through 
the hole. On the back side of the frame in front of the fuel tank, place one 3/4” flat washer, one 3/4” lock washer and 
one 3/4” Jam nut onto the 3/4” x 4-1/2” GR8 bolt. Hand tighten. 

SEE PHOTO D, E & F 

STEP 3 

Next, locate the driver’s side tie down frame plate and place it in the gap between the cab mount and the bed mount 
perch. Line up the top hole on the tie down frame plate with the 3-hole strap. Place one 1/2” -13 x 1-1/4” GR5 bolt and 
one 1/2” star washer though the 3-hole strap and tie down frame plate. Install one 1/2” flat washer, one 1/2” lock 
washer and one 1/2” GR5 hex nut onto the previously installed bolt. 

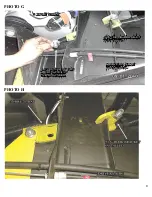
SEE PHOTO G, H


Summary of Contents for C4204

Page 1: ...1 IMPORTANT OWNER OPERATOR INSTALLATION INSTRUCTIONS C4204...

Page 2: ...occur in some incidental harsh driving conditions on or off road A rubber bed mat is recommended to protect the truck bed and camper but is not a requirement to maintain the Torklift legendary lifeti...

Page 3: ...the bed cross member perch with the bolt protruding to the outside The oval hole to the rear of the vehicle with the 1 2 hole towards the front of the vehicle place one 5 16 hook bracket onto the 1 2...

Page 4: ...e holes with the best angle SEE PHOTO J STEP 6 Press up on the bottom of both tie down frame plates and tighten the previously installed 1 2 fasteners from step 4 NOTE THE E BRAKE CABLE MAY RUB AGAINS...

Page 5: ...5 PHOTO A PHOTO B...

Page 6: ...1 2 13 X 3 1 2 GR8 BOLT WITH ONE 1 2 LOCK WASHER AND ONE 1 2 GR5 HEX NUT DRIVERS SIDE BED MOUNT PERCH E BRAKE LINES DRIVERS SIDE CAB MOUNT PERCH 3 HOLE STRAP DRIVERS SIDE BED MOUNT PERCH ZIP TIED E B...

Page 7: ...E BRAKE LINES 5 16 HOOK BRACKET INSTALLED 3 4 13 X 4 1 2 GR8 BOLT INSTALLED THROUGH THREE HOLE FRAME PLATE DRIVERS SIDE FRAME RAIL ONE 3 4 JAM NUT INSTALLED ONE 3 4 FLAT WASHER INSTALLED ONE 3 4 LOCK...

Page 8: ...8 PHOTO G PHOTO H 5 16 HOOK BRACKET INSTALLED 3 HOLE STRAP 1 2 13 X 1 1 4 GR5 BOLT WITH 1 2 STAR WASHER DRIVERS SIDE FRAME RAIL...

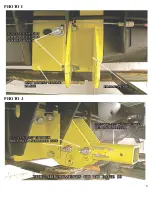
Page 9: ...9 PHOTO I PHOTO J...

Page 10: ...10 PHOTO K DRIVERS SIDE TIGHTEN ALL GR5 FASTENERS TO 60 FT LBS 81nm WITH A TORQUE WRENCH ALL GR8 FASTENERS TO 60 FT LBS 81nm WITH A TORQUE WRENCH...

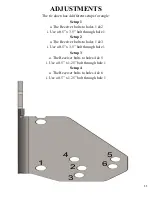
Page 11: ...s 1 2 i Use a 0 5 x 3 5 bolt through hole 1 Setup 2 a The Receiver bolts to holes 1 3 i Use a 0 5 x 3 5 bolt through hole 1 Setup 3 a The Receiver bolts to holes 4 5 i Use a 0 5 x 1 25 bolt through ho...

Page 12: ...s well known for its anti corrosive properties however in some environments such as coastal regions or when in contact with some road chemicals corrosion may occur We recommend occasional polishing of...

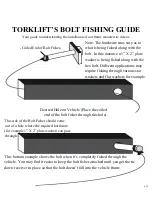
Page 13: ...re fishing through various star washers and flat washers for example Desired Hole on Vehicle Place the coiled end of the bolt fisher through this hole This side of the Bolt Fisher should come out of a...

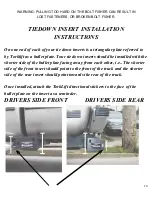
Page 14: ...let plate Your tie down inserts should be installed with the shorter side of the bullet plate facing away from each other i e The shorter side of the front insert should point to the front of the truc...

Page 15: ...bed surface and the camper can slide on top of the slick surface of the bed liner The liner can also act as a spring causing a trampoline effect increasing vertical truck camper movement independent o...

Reviews: