background image

Mini  Dome  Series  |  User  Manual 


16 


2.4 

IP Finder 

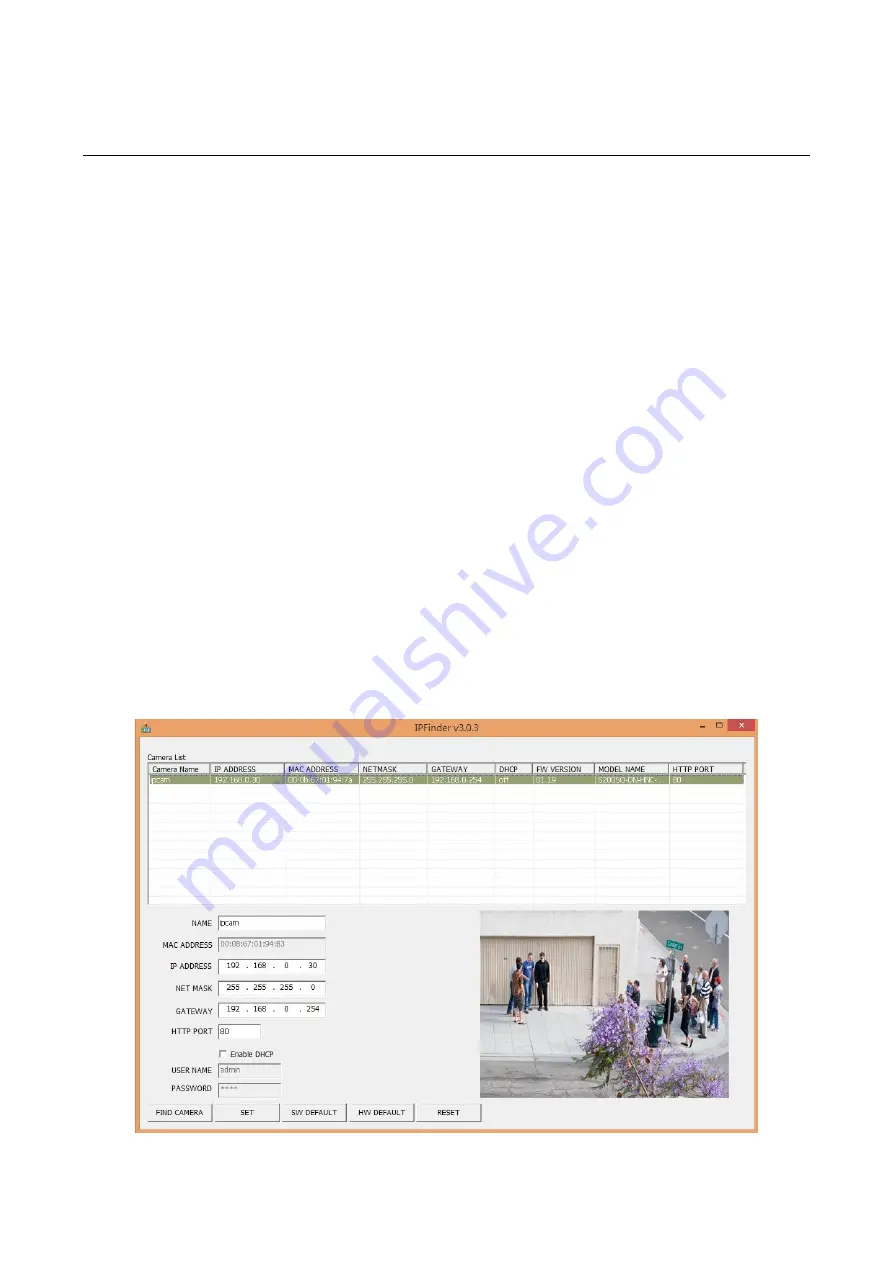
IP Finder is a utility program that helps users to locate the unit in local area network that computer is 

connected to. Please note that IP Finder works only in Microsoft Windows XP, Microsoft Windows Vista, and 

Microsoft Windows 7 or above. Steps to get the utility program running are listed below.   

1. 

Insert the CD-ROM in the optical drive. 

2. 

Copy the IP Find

er’s folder on the CD-ROM to computer. 

3. 

Double click on 

IPFinder.exe

 in computer

’s IP Finder folder, and the IP Finder window should pop out.   

4. 

The window would list information of units in operation at present. Press 

FIND CAMERA

 to find more units. 

5. 

Locate and double-click one of the cameras in the list you want to configure the network settings. If you 

have multiple cameras connected to your local network, locate the MAC address on the camera to 

distinguish the target camera from others. 

6. 

Configure the following settings as needed. 


NAME: Enter a descriptive name for the camera. 


NETWORK SETTINGS: If you have a DHCP server on your network to assign IP addresses to 

network devices, enable the DHCP option. Otherwise, manually enter the IP ADDRESS, NET MASK 

and GATEWAY values. 


USERNAME & PASSWORD: Manually setup preferred username and password. 


SET: Whenever you make revision of camera settings, click 

“SET” to take effect. 


SW DEFAULT: To perform the factory defaults excluding network settings of the selected camera. 


HW DEFAULT: To perform the factory defaults of the selected camera. 


RESET: To reboot the selected camera. 

Click Save to enable the settings and click Exit to exit the utility. 


Figure 2 - 16: IP Camera Finder 

Summary of Contents for A100WIRF Series

Page 1: ...3MP Ultra Discreet In Ceiling Industrial Indoor Network Dome Camera User Manual V 02 11...

Page 2: ...ra 9 2 2 5 Network Topology 11 2 2 6 System Requirements 11 2 3 Connection 12 2 3 1 Default IP address 12 2 3 2 Connecting from a computer Viewing Preparation 12 2 4 IP Finder 16 3 Administration and...

Page 3: ...sources of powerful radio or TV transmitters Close to fluorescent lamps or objects with reflections Under unstable or flickering light sources Get Started This user manual is designed as a reference f...

Page 4: ...tion which can be determined by turning the unit off and on the user is encouraged to try to correct the interference by one or more of the following measures Reorient or relocate the receiving antenn...

Page 5: ...Mini Dome Series User Manual 4 1 Product Overview 1 1 Physical Characteristics Figure 1 1 Dimension Pictorial Index Unit...

Page 6: ...cable for network connection along with PoE Power over Ethernet capability Ethernet Link LED Solid green light stands for a live connection is established Ethernet Activity LED Amber flashing indicat...

Page 7: ...ation Following tools might help you complete the installation a drill screwdrivers wire cutters 2 2 1 Checking Appearance When first unboxing please check whether if there is any visible damage to ap...

Page 8: ...screws on the dome case 1 Use a screwdriver to counterclockwise loosen the screw on the dome case Figure 2 1 Disassembling the Camera 1 4 Step 2 Remove the dome case 1 After the screw was loosened ge...

Page 9: ...are thinner which are the 1st priority to pulling apart before the rest thicker one 2 Take off the unit body while the bracket is still attached to the ceiling Figure 2 3 Disassembling the Camera 3 4...

Page 10: ...on ceiling and attach the cable to the unit body with bracket 4 Put unit body with bracket into the round hole on ceiling Please hold it securely since it s not fixed yet Figure 2 5 Installing the Ca...

Page 11: ...vertically for users to adjust till a desired view angle Figure 2 7 Installing the Camera 3 5 Step 4 1 Mount the dome case onto the steadily fixed unit It s required to pay heed to the right direction...

Page 12: ...are component inferior to the requirements is recommended Table 2 1 System Requirements System Hardware CPU Intel Pentium 4 2 4GHz or equivalent RAM 1 GB or above Display NVIDIA GeForce 6 Series or AT...

Page 13: ...from a computer 1 Make sure the unit and your computer are in the same subnet 2 Check whether if the networking available between the unit and the computer by executing ping the default IP address To...

Page 14: ...kies Click OK 2 When a proxy server is used click Internet Options on the Tools menus of Internet Explorer select Connect tab click LAN button and set proxy server 3 Change Security in Internet option...

Page 15: ...d set as follows Download signed ActiveX controls Prompt recommended Download unsigned ActiveX controls Prompt Initialize and script ActiveX not marked as safe for scripting Prompt Figure 2 13 Securit...

Page 16: ...rked safe for scripting Enable Figure 2 15 Security Settings 4 4 Press OK to save the settings Close all your browser windows and restart a new window This will allow the new settings taking effect Ty...

Page 17: ...t you want to configure the network settings If you have multiple cameras connected to your local network locate the MAC address on the camera to distinguish the target camera from others 6 Configure...

Page 18: ...ve View functionalities in this chapter and will detail Configuration in the 3 2 Configuration later Figure 3 2 Live View After clicking Live View you will be led to real time live view screen the lef...

Page 19: ...s for users to display a full screen live view display Press Esc to back The Audio Input button is for users to toggle on off the audio input function The vibration like icon indicates motion s being...

Page 20: ...nformation Users can view after clicking Information the detailed information related to the unit including Firmware Version MAC Address and Model Name in the middle of the screen Figure 3 5 Informati...

Page 21: ...ement depending on your settings Stream1 Stream2 and Stream3 which can be configured separately to send video signals for simultaneous triple streams with optimized quality and bandwidth based on your...

Page 22: ...1 50 Select the GOP length number from NTSC 1 to 60 PAL 1 to 50 Less number means the distance between 2 I frames is smaller which needs more network bandwidth with better image By contrast larger nu...

Page 23: ...320x240 30fps 640x360 10fps 1280x720 30fps 320x180 30fps 640x360 10fps H 264 MJPEG H 264 MJPEG MJPEG Table 3 4 Correlations of Resolution Streams FPS Codecs PAL Resolution Single stream Double stream...

Page 24: ...eferred shutter speed ranging from the fastest 1 10000 second to the slowest 1 60 1 50 second Figure 3 8 Shutter Speed Manual Gain db When exposure mode is manual users can adjust preferred manual gai...

Page 25: ...ensation It is the exposure compensation telling the unit by setting value from 2 0 to 2 0 with intervals of per 0 5 for scenes to be either darker or brighter Unavailable when exposure mode is manual...

Page 26: ...posure mode is manual Figure 3 17 BLC Settings WDR It is intended to provide clear images even under backlight circumstances where intensity of illumination can vary excessively namely where there are...

Page 27: ...htest image Contrast Set image contrast from level 0 to 255 The 255 provides the highest contrast Hue Set picture hue from level 15 to 15 Selecting 15 provides the deepest hue Saturation It describes...

Page 28: ...rientation function Figure 3 22 Flip Mirror Settings Note Settings will be restored to the factory defaults if pressing Reset to default Privacy Zone Privacy Zone enables users to black out a specific...

Page 29: ...3 2 3 Network Settings Network This section for users to set detailed settings related to wired network condition for the unit Figure 3 24 Network Network Settings View current network settings Click...

Page 30: ...ress under IPv4 Subnet Mask Please use default address 255 255 255 0 If subnet mask is not properly configured the unit may not be able to communicate with other devices Default Gateway Leave blank as...

Page 31: ...ts SNMP SNMP Simple Network Management Protocol is an Internet standard protocol on top of application layer that restructures the exchange of management information among network attached nodes which...

Page 32: ...your settings Users can also click Reset to Default to set all the settings back to the factory defaults 802 1X 802 1X is an IEEE Standard for Port based Network Access Control and defines the encaps...

Page 33: ...rd are Username admin Password 1234 User Other than admin Guest level can only access to unit under authorization from system administrator At most 5 users are allowed to view live view No operation w...

Page 34: ...e by pressing with left click and dragging on the live view screen to outline a desired size of detected frame Clean Click Clean to erase detect zone settings Figure 3 30 Motion Detection Settings Not...

Page 35: ...st secure of all the SASL authentication mechanisms since the password is sent unencrypted across the network Login The Login mechanism is supported by Microsoft s Outlook Express and by some other cl...

Page 36: ...igure 3 34 E mail Address List Settings Tick Enable and input the assigned email address accordingly Address Input an email address to which motion event will be sent There re maximum 10 email address...

Page 37: ...sfer Protocol is used as a service component to transfer files by simply entering the FTP IP address or hostname with the Login ID and password Figure 3 36 FTP Sever Settings FTP Sever Input a FTP ser...

Page 38: ...Recording Frame Set the number of frame to be recorded immediately before an event occurs Pre Recording Cycle Set a time interval before recording Recording Frame Set the number of frame while record...

Page 39: ...e 3 43 NTP Settings NTP Server Please input desired NTP server in the field Synchronizing Period Select sync period between 1 and 24 by 6 of each interval NTP Test Click it to test if your assigned NT...

Page 40: ...ble All unit motions will be stopped during firmware update Please close any other screens before firmware update Never disconnect power or LAN cable during the updating process It takes approximately...

Page 41: ...load configuration settings from local to the unit Export User Configuration Press Export to download configuration settings to local computer Reboot Camera Press Reboot Camera to reboot the unit Soft...

Page 42: ...B W 0 01 lux at 50 IRE F2 0 S N Ratio More than 50dB when AGC off Gain Control Off On Selectable White Balance ATW 2500K 10000K Manual Electric Shutter 1 7 5 1 10000 sec 1 6 25 1 10000 sec Video Compr...

Page 43: ...Class 0 Class 0 compliant Power Consumption 4 5W Max Surge Protection EN55024 certified Environmental Operating Temperature 10 C to 50 C Operating Humidity 90 non condensing Storage Temperature 20 C t...

Reviews: