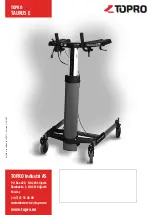
TOPRO 814789 User Manual Download Page 11

TAURUS E

www.topro.no

10

EN

EN

Intention

The TOPRO TAURUS is a walker, which shall give support to users with reduced balance and/or reduced walking 

ability. The model TOPRO TAURUS E Premium can also be used as a raising support. The intended user is an adult. 

The walker is developed for pushing, not pulling.

The main user of the product is the patient him-/herself; however, the walker can also be operated by an  assistant. 

The walker is not suitable for persons with low strength in arms and legs, with very poor balance, or with 

 considerable cognitive disabilities. The product is designed and approved for indoor use on plain foundation. We 

advise caution when using the TOPRO TAURUS in private homes with narrow doorways, as the maximum width of 

the walker is 660 mm.

Important to know about safety and use

3


The walker must be adjusted to the recommended height for right support and safe walking: Stand with relaxed 

shoulders and have your elbow at a 90 degree angle 

A

. Hold the walker as close to your body to maintain the 

 correct support and a safe walk 

B

. The easiest way to keep your balance is to walk straight, look forward and hold 

your backside in 

C

.


Do not push the walker too far from your body as this can cause unnecessary strain and you could fall.


Do not push the walker forward if the front wheels have stopped at an obstacle. The walker may tilt and  

cause an accident.


Do not use the walker on stairs. Be careful when descending thresholds etc.


Maximum user weight is 150 kg. Maximum user height is 210 cm.


Do not let children play with the walker.


Some parts of the walker might feel very hot or cold when exposed to extreme temperatures.


Do not put your fingers or any loose objects in the gap between the brake lever and the handle so that you do not 

hurt your fingers.


Be aware: TOPRO TAURUS E must not be used in a damp environment.


Do not alter the product as this might put your safety at risk and the guarantee will not be valid.

Height adjustment (electric)

4

Press the button 

A

 on top of the handle to the left or to the right to regulate the height.

Adjusting the forearm supports

5

The forearm supports are adjusted individually. Unscrew the lock underneath the forearm support 

A

 until the cush-

ion is moveable. Place at the required position and tighten the screw. 

NB If the lever sticks out, it can be dangerous. 

Pull it down and rotate it away to be hidden.

Angle adjustment and twisting the handle (TOPRO TAURUS E Premium)

6

Unscrew the screw 

A

 until you can move the handle. Adjust the handle 

B

 to the required angle, length and twist 

and tighten the screw. 

NB

 The screw must not be screwed too far out as the parts will fall from each other. If this 

happens, then put the pin 

C

 in the hole 

D

 and 

E

. It is not possible to pull the handles all the way out; there are physi-

cal stops both ways. See figure 1 for more detailed instructions.

Hand brakes (TOPRO TAURUS E Premium)

7

Adjusting/controlling the brakes:

Unscrew the nut 

A

. Tighten / loosen the brake wire with the adjusting screw 

B

. Ensure that the brakes are working 

properly and only touching the wheels when in use. Adjust the brakes evenly on both sides.

Important information:

Ensure that the brakes work properly before each trip. Inspect the brakes frequently by following the information 

above. The walker wheels are made of a soft rubber, which gives an optimal braking capacity on slippery floor. 

Wrong use can cause unsafe situations and damage to the walker: 

The walker must not be driven or pushed with force 

when the parking brakes are on or when the wheels are partly locked using the brakes. 

This indicates incorrect use and 

can cause wear and tear, which makes the tires and brake quality weaker.

Using the parking brakes:

The brake lever 

C

 works on both rear wheels simultaneously. Push the brake lever forward. It has some resistance 

before it stops and locks both the rear wheels. Pull the brake lever backwards to release the rear wheels. Inspect the 

brakes frequently to make sure they work properly.

Using the driving brakes:

The brake lever 

D

 works on both rear wheels simultaneously. Pull the brake lever towards you to stop the rear 

Summary of Contents for 814789

Page 1: ...TOPRO TAURUS E NO Bruksanvisning 3 8 EN User manual 9 14 DE Bedienungsanleitung 15 21 www topro no ...

Page 2: ...C 814001 D 814810 E 814034 F 814821 A 814646 B 814846 814820 G H 814645 I 814793 814085 J TOPRO TAURUS E ...

Page 3: ...m m 660 mm max 220 mm 36 mm 3 4 0 m m 340 470 mm 31 mm 1 2 5 m m B A 3 C 8 A A A A B 9 5 A 101359 100096 300915 100789 716931 101362 716910 102044 101929 716924 102044 101883 A B C D 10 C D A B 7 1 A A D 4 A C B BASIC PREMIUM 8147 0 9 814789 TOPRO TAURUS E ...

Page 4: ... med bruks anvisningen og dens sikkerhets og vedlikeholdsinstruksjoner Røde nummererte felt nedenfor refererer til nummererte illustrasjoner på innsiden av innbretten Montering og innstilling 1 TOPRO TAURUS E Basic behøver litt montering TOPRO TAURUS E Premium leveres ferdig montert Juster armputer og håndtak se figur 5 og 6 Batteriet må lades se figur 9 Mål 2 A Merket på baksiden av søyla viser g...

Page 5: ...t A for å regulere høyden Justering av armputer 5 Armputene justeres individuelt Skru opp låsespaken på undersiden av armputen A til puta beveger seg Plasser den i ønsket posisjon og skru til NB Hvis låsespaken stikker ut kan den være til skade Dra i så fall spaken ned og roter den slik at den ikke stikker ut Vinkeljustering og vridning av håndtak TOPRO TAURUS E Premium 6 Løsne skruen A til håndta...

Page 6: ...s Om batteriet lades opp vil det fortsatt gi strøm men kun for en begrenset periode Langt beeeep nårTaurusen kjøres opp ned batterispenning lavere enn 17 6 volt Da er det bare mulig å kjøre den ned ikke opp Korte beep beep beep beep for høy temperatur inne i kontrollboksen Ta en pause Låsing av sving retningssperre TOPRO TAURUS E Premium 10 Gjøres med indekspinne A på begge bakhjul Se til at brake...

Page 7: ...aiere Høydeinnstilling 1 Batteriet er tomt fungerer ikke 2 Lad eller bytt batteri Se punkt 9 Lading av batteri 1 Høydeinnstiling fungerer ikke går ned men ikke opp 2 Se punkt 9 Lading av batteri 1 Batteriet er ikke riktig montert 2 Sjekk at batteriet er rengjort og riktig montert 1 Løs kabelkontakt 2 Sjekk at alle kontakter sitter ordentlig på plass 1 Skade på kabel 2 Sjekk alle kabler og skift de...

Page 8: ...ke miljøet som er angitt nedenfor Kunden eller brukeren avTOPRO TAURUS skal sikre at den anvendes i et slikt miljø Immunitetstest IEC 60601 testnivå Samsvarsnivå Elektromagnetisk miljø veiledning Statisk elektrisitet ESD IEC 61000 4 2 6 kV kontakt 8 kV luft 6 kV kontakt 8 kV luft Gulvet bør være av tre betong eller keramiske fliser Hvis gulvene er dekket med syntetisk mate riale bør den relative l...

Page 9: ...dere det elektromagnetiske miljøet med hensyn til faste RF sendere bør en elektromagnetisk stedsundersøkelse overveies Hvis den målte feltstyrken i området hvor enheten brukes overskrider gjeldende RF overholdelsesnivå ovenfor må enheten observeres for å kontrollere at den fungerer normalt Hvis det avdekkes unormal ytelse kan ytterligere tiltak være nødvendig for eksempel å vende på eller flytte en...

Page 10: ...nance instructions The red numbered squares below refer to the numbered illustrations on the inside of the cover Assembling and adjusting 1 TOPRO TAURUS E Basic needs assembling TOPRO TAURUS E Premium is delivered completely assembled Adjust the forearm supports and handles see figure 5 and 6 The battery must be charged see figure 9 Measurements 2 A The label on the rear side of the column shows t...

Page 11: ...justment electric 4 Press the button A on top of the handle to the left or to the right to regulate the height Adjusting the forearm supports 5 The forearm supports are adjusted individually Unscrew the lock underneath the forearm support A until the cush ion is moveable Place at the required position and tighten the screw NB If the lever sticks out it can be dangerous Pull it down and rotate it a...

Page 12: ... low battery level Charge the battery Long beeeeep when the battery is put in the control box good connection Short beep beep when the walker is being raised and lowered low voltage The battery should be replaced If recharged the battery will still give power but only for a limited time Long beeeeep when theTaurus is being raised and lowered battery voltage lower than 17 6 V It will only be possib...

Page 13: ...eel 2 Change the entire back wheel section 1 Worn out defect brake handle 2 Change the complete brake handle 1 Worn out damaged brake wire 2 Change the brake wire Height adjustment 1 Battery is flat does not work 2 Charge or change the battery See point 9 charging the battery 1 The height adjustment does not work 2 See point 9 charging the battery It only goes down not up 1 The battery is not corr...

Page 14: ...61000 3 3 Complies Guidance and manufacturer s declaration Electromagnetic IMMUNITY for all ME EQUIPMENT and ME SYSTEMS TheTOPRO TAURUS is intended for use in the electromagnetic environment specified below The customer or the user of the TOPRO TAURUS should assure that it is used in such an environment IMMUNITY test IEC 60601 test level Compliance level Electromagnetic environment guidance Electr...

Page 15: ... electromagnetic environment due to fixed RF transmitters an electromagnetic site survey should be considered If the mea sured field strength in the location in which theTOPRO TAURUS is used exceeds the applicable RF compliance level above the TOPRO TAURUS should be observed to verify normal operation If abnormal performance is observed additional measures may be necessary such as re orienting or ...

Page 16: ... die Darstellungen auf der Innenseite der Bedienungsanleitung Die Zahlen in den roten Kästchen sind identisch mit den Nummern in der Illustration Montage und Einstellung 1 TOPRO TAURUS E Basic benötigt etwas Montageaufwand vor Ort TOPRO TAURUS E Premium wird montiert gelie fert Die Armauflagen und Handgriffe einstellen s Fig 5 und 6 sowie die Batterie aufladen s Fig 9 Abmessungen 2 A Der Aufkleber...

Page 17: ...ite des Knopfes oben am Handgriff drücken um die Höhe einzustellen Einstellung der Armauflagen 5 Die Armauflagen können individuell eingestellt werden Den Schließbügel unter der Armauflage A aufschrauben bis die Armauflage sich bewegt Dann die gewünschte Position einstellen und wieder zuschrauben Achtung Sollte der Schließbügel herausragen kann er Schaden verursachen Ziehen Sie in diesem Fall den ...

Page 18: ... zeigt D Bitte beachten Sie Ist die Kapazität des Akkus zu gering kann eine Höhenverstellung des Gehwagens nur noch nach unten nicht mehr nach oben möglich sein In diesem Fall muss die Batterie zurückgesetzt wer den Nehmen Sie die Batterie aus dem Batteriefach der Säule und drücken Sie den roten Knopf der Höhen verstellung siehe Abbildung 4 so lange bis ein Signalton ertönt Unterschiedliche Pieptö...

Page 19: ...lle und Wartung der unten angeführten Punkte regelmäßig durchgeführt wird die Häu figkeit ist davon abhängig wie intensiv und wie stark der Gehwagen genutzt wird Rohre Rahmen und Schrauben Kabel Handgriffe und Armauflagen Bremsen Räder und Zubehör Beim Wiedereinsatz sind die hier genannten Teile am Gehwagen ebenfalls zu kontrollieren und gegebenenfalls auszutauschen bzw einzustellen Beachten Sie h...

Page 20: ...tischen Umgebung bestimmt Der Kunde oder Anwender derTOPRO TAURUS Gehwagen sollte sicherstellen dass er in einer solchen Umgebung benutzt wird Aussendungs Messung Überein stimmung Elektromagnetische Umgebung Leitlinien HF Aussendung nach CISPR 11 Gruppe 1 DerTOPRO TAURUS Gehwagen verwendet HF Ener gie ausschließlich zu seiner internen Funktion Daher ist seine HF Aussendung sehr gering und es ist u...

Page 21: ...n keinem geringe ren Abstand zumTOPRO TAURUS Gehwagen einschließlich der Leitungen als dem empfohlenen Schutzabstand ver wendet der nach der für die Sendefrequenz geeigneten Gleichung berechnet wird Empfohlener Schutzabstand d 1 16 P d 1 16 P 80 MHz 800 MHz d 2 33 P 800 MHz 2 5 GHz gestrahlte HF Stör größen nach IEC 61000 4 3 V m 80 MHz bis 2 5 GHz 3 V m mit P als der Nennleistung des Senders in W...

Page 22: ...quenz m 150 kHz 80 MHz d 1 16 P 80 MHz 800 MHz d 1 16 P 800 MHz 2 5 GHz d 2 33 P 0 01 0 12 0 12 0 23 0 1 0 37 0 37 0 74 1 1 16 1 16 2 33 10 3 67 3 67 7 37 100 11 6 11 6 23 3 Für Sender deren Nennleistung in obigerTabelle nicht angegeben ist kann der Abstand unter Verwendung der Gleichung bestimmt werden die zur jeweiligen Spalte gehört wobei P die Nennleistung des Senders in Watt W gemäß der Angab...

Page 23: ...Art No User Manual 100913 Version 3 2018 03 TOPRO TAURUS E TOPRO Industri AS P O Box 428 NO 2803 Gjøvik Rambekkv 5 NO 2816 Gjøvik Norway 47 61 13 46 00 customerservice topro no www topro no ...

Reviews: