background image

<<28>>


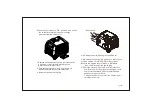
b. Turn the fuel switch to “ON” position, and


loosen 


the carburetor drain screw to discharge 


gasoline


from the carburetor. 


c. Remove off the spark plug cap, pull the starter 
    grip three or four times to discharge the


    gasoline from the fuel lines.


d. Turn the fuel switch to 

“OFF” 

position, and 

     tighten the drain screw of the carburetor. 

e. Reinstall the spark plug cap.


9.3) Change the oil while engine is still warm. 


9.4) Remove the spark plug,


and pour a


tablespoon


of clean engine oil


(

10~20ml

)

into the cylinder.


Revolve the engine several times to distribute


the oil,and reinstall the spark plug.


9.5) Pull the starter grip slowly until resistance is 
        felt

At this point, the piston is coming up on its


        compression stroke and both the intake and 
        exhaust


valves are closed.


        This position helps to protect the engine from 
        internal corrosion.

STARTER


GRIP

Summary of Contents for HY30i

Page 1: ...CHONGQING HEYA TECHNOLOGYCO LTD TOOLINE INVERTER GENERATOR USER MANUAL Model HY30i 4 Stroke Engine ...

Page 2: ......

Page 3: ...heck 1 Check oil level 2 Check fuel level 3 Check air cleaner 05 Starting the engine 06 Generator use 1 DC application 2 AC application 3 Output and overload indicator 4 Oil alert system 07 08 Maintenance 1 Change oil 2 A ir cleaner service 3 Spark plug service 4 Spark arrester maintenance 09 Transporting Storing 10 Troubleshooting 11 Technicalspecifications 12 Wiring diagram 13 Appendix 1 Environ...

Page 4: ... to avoid electric shock or fires do not connect another electrical system or generator Place the generator on a level surface in order to avoid overturning or spilling fuel Children and pets should be keep away from the operating area Do not operate with wet hands Do not expose the generator to rain moisture or snow Place the generator at least 1 m away from buildings or other equipment during op...

Page 5: ...nerator cool before storing Gasoline is explosive and flammable please use the generator outdoors Do not connect to a building s electrical system ÿ T A Do not expose the generator to rain moisture or snow Never use inside a home or in unventilated conditions exhaust contains carbon monoxide CO Read the operator s instruction manual before operating ...

Page 6: ... 06 2 SAFETY LABEL LOCATIONS ...

Page 7: ... 07 MUFFLER FUEL CAP AIR CLEANER MAINTENANCE COVER HANDLE WHEEL OIL MAINTENANCE COVER CONTROL PANEL STARTER GRIP BATTERY MAINTENANCE COVER 3 COMPONENDFICATION ...

Page 8: ...rminal 3 2 ECON SW Economy control switch When the economy control switch is turned to ON Vw the engine keeps running at idle state automatically when the electrical appliance is disconnected It will return to the proper speed when the electrical load is reconnected The ON _ is recommended to minimize fuel consumption OFF ON 08 ...

Page 9: ...and it is unnecessary to restart the engine Press and holdthe RESET buttonfor one second untilthe overload indicator light red and the output indicator light green is on Under the non overloading condition the RESET is ineffective NOTE ÿ For protectioncondition the output indicator light green is off andthe overload indicator light red is on ÿ When starting the engine the RESET button is available...

Page 10: ...the engine oil Avoid getting dirt or dust into the engine oil Mixing different kinds of engine oil is prohibited 10 4 PRE OPERATION CHECK WARNING Be sure the generator is on a level surface and the generator is stopped 4 1 Check Oil Level Remove the oil filler cap fill the specified amount of the recommended oil and then tighten the oil filler cap NOTE Do not tilt the generator when adding engine ...

Page 11: ...el tank Do not use a mixture of gasoline containing ethanol or methanol it will seriously damage the engine Fuel Capacity 7 4L UPPER LIMIT MARK FUEL CAP OPEN WARNING Gasoline is extremely explosive and flammable Smoking around the refueling area and fuel storage area is prohibited Do not overfill the fuel tank above the red upper limit mark After refueling make sure the fuel cap is closed properly...

Page 12: ...leaner Check the air cleaner element is clean and in good condition a Loosen the air cleaner maintenance cover screws and remove the cover COVER SCREW AIR CLEANER MAINTENANCE COVER b Check the element clean or replace it if necessary AIR CLEANER ELEMENT AIR CLEANER COVER o o o O ...

Page 13: ...ctrical starting NOTE Before starting the engine disconnect the load from the AC receptacle When fueling for the first time refueling or storing for a long time the fuel switch should first be opened for ten or twenty seconds in order for enough fuel to enter the carburetor WARNING Never use inside a home or in unventilated areas 5 1 Turn the fuel switch to the ON position OFF ON STOP RUN REMOTE S...

Page 14: ...MOTE position the engine will be in stand by starting mode If the engine is started within 15min the mode will be ineffective If the generator re enters the stand by starting mode again the engine switch should be returned to STOP and then turn to RUN REMOTE 5 3 Choose one of the starting modes to start the engine CAUTION If the battery is missing or faulty this generator can not be started by any...

Page 15: ...enerator operates at high altitude change the mains nozzle or adjust the idling screw of carburetor If the generator always operates at altitude above NOTE Engine switch should not stay in the START position for more than 1 second during starting c Wireless remote electrical starting Press the START button on the controller once NOTE The controller wil operate up to 8m without any obstacles or up ...

Page 16: ...s been modified for high altitude operation the air fuel mixture will be too lean for low altitude use Operation at low altitude may cause the engine to overheat and result in serious engine damage The carburetor needs return to original specifications 6 GENERATOR USE WARNING Be sure to ground the generator when the connected electrical appliance is grounded Do not connect to the building s electr...

Page 17: ...be used while the AC power is in use If using both at same time be sure not to exceed the total power for AC and DC AC 2 6kVA DC 5A When starting most motor appliances require more than their rated wattage 6 1 DC Application The DC receptacle 15 30V under no load condition may be used for charging 12V battery only NOTE In DC operation turn the ECON SW to the OFF position 6 1 1 Disconnect the vehic...

Page 18: ...eep the battery away from sparks or fires Charge the battery in ventilated conditions Battery electrolyte contains sulfuric acid that could cause severe burns to the skin and eyes Therefore it is necessary to wear protective clothing and a mask If battery electrolyte gets into eyes flush thoroughly with warm water for 15min at least and call a doctor immediately If battery electrolyte is swallowed...

Page 19: ... on 6 2 2 Confirm all electrical appliances are switched off and connect the appliance plugs to the generator receptacle NOTE To obtain the best working and longest working life of the generator run a new generator for 20 hours at 50 rated load NOTE Confirm all electrical appliances are in good working condition before connecting them to the generator If an electrical appliance becomes abnormal sl...

Page 20: ...overload indicator light red is off and the output indicator light green is on reconnect the electrical appliances Otherwise stop the engine and check the generator OVERLOAD INDICATOR LIGHT RED OUTPUT INDICATOR LIGHT GREEN 6 4 Oil Alert System The oil alert system is designed to prevent engine damage caused by an insufficient amount of oil in the crankcase Before the oil level in the crankcase fal...

Page 21: ... the connected electrical appliances and pull out their plugs ON OFF 7 3 Turn the fuel switch to the OFF position STOP RUN REMOTE START PLUG 7 2 Turn the engine switch to the STOP position or press the STOP button of the controller NOTE The controller operates up to 8m without any obstacles or up to 3m with one obstacle 6 llaE8 all ...

Page 22: ... Air cleaner Check Clean Every 3 months or 50 hrs Every 6 months or 100 hrs Every 2 years or 300 hrs Spark plug Check adjust Fuel tank filter After every 300 hrs 2 Every year 2 Clean Spark arrester Spark plug Valve Clearance CombustionChamber Clean Check adjust Replace Fuel line Check Every 2 years Replace if necessary 2 NOTE 1 Service more frequently when used in dusty areas 2 These items should ...

Page 23: ...il collection pan under oil drain plug 8 1 4 Remove the oil drain plug and drain oil into the oil collection pan completely 8 1 5 Reinstall the oil drain plug 8 1 6 Refill with recommended oil and check the oil level 8 1 7 Reinstall the oil dipstick and tighten it After oil change wash your hands with soap OIL RULER BOLT o o C3 ...

Page 24: ...trict air flow into the carburetor Clean and maintain the air cleaner regularly especially in extremely dusty areas WARNING Do not use gasoline or low ignition point solvents for cleaning They are flammable and explosive under certain conditions NOTE Never run the generator without the air cleaner 8 2 1 Loosen three screws of the air cleaner maintenance cover and remove the cover COVER SCREW AIR C...

Page 25: ... air cleaner element in clean engine oil and squeeze out the excess ELEMENT 8 2 4 Reinstall the air cleaner element and cover 8 2 5 Reinstall the maintenance cover and tighten the screws 8 3 Spark Plug Service Recommendation spark plug F7TC Check the spark plug gap and clean away carbon deposition 8 3 1 Remove the spark plug cap ...

Page 26: ...g carefully by hand to avoid cross threading A new spark plug should be tightened 1 2 turn with a spanner A used spark plug should be tightened 1 8 to 1 4 turn with a spanner 8 3 6 Reinstall the spark plug cap 8 3 7 Reinstall the spark plug maintenance cover NOTE The spark plug must be securely tightened Tightening incorrectly will cause the spark plug to run hot and even damage the engine Never u...

Page 27: ... a brush to remove carbon deposits from the spark arrester If the spark arrester is worn replace it 8 4 4 Reinstall the spark arrester and muffler guard 8 5 Replace battery and fuse If the battery is flat replace it Battery specifications Voltage Capacity Dimension L 138mm 12V 7Ah W 66mm H 88mm ...

Page 28: ...tery 8 5 1 Loosen the screws of the battery maintenance cover and remove the cover 8 5 2 Unhook the battery belt 8 5 3 Remove the black cable from battery negative terminal and then remove the red cable from battery positive terminal 8 5 4 Remove the battery from battery tray and replace a new one 8 5 5 Reconnect red cable to battery positive terminal and reconnect black cable to battery negative ...

Page 29: ... used in a well ventilated area Avoid direct exposure to the sunlight when the generator is in an enclosed transport vehicle for a long time The high temperature inside the vehicle could cause fuel to vapourize resulting in an explosion Drain off the fuel prior to transporting the generator on rough roads Storing for a long period 9 1 Make sure the storage area is without excessive humidity and du...

Page 30: ... carburetor e Reinstall the spark plug cap 9 3 Change the oil while engine is still warm 9 4 Remove the spark plug and pour a tablespoon of clean engine oil 10 20ml into the cylinder Revolve the engine several times to distribute the oil and reinstall the spark plug 9 5 Pull the starter grip slowly until resistance is felt At this point the piston is coming up on its compression stroke and both th...

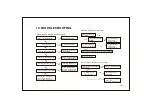
Page 31: ...Is the overload indicator light ON Check the electrical appliance for any fault NO YES NO NO Is the DC circuit protector OFF YES NO Check the electrical appliance for any fault NO YES Change or replace the appliance Push the DC circuit protector ON Contact an authorized Tooline dealer YES Contact with an authorized Tooline dealer Contact with an authorized Tooline dealer YES Appliance does not ope...

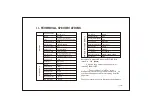
Page 32: ... Noise LpA Dimensions L W H Net Weight WorkingAmbientTemperature OTHER SPECIFICATIONS Noise level is measured when the ECON SW is turned to ON L shows the guaranteed sound power wA tested by 2000 14 EC The noise level in dB 7m is the arithmetic mean value of sound press level L in pA four directions measured 7 meters away from the generator The noise level may vary in different environments 1 4 0k...

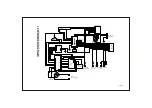
Page 33: ...ng Ignition Module AC Receptacle Hourmeter INVERTER Main Winding Aux Winding 1 Aux Winding 2 Stepper Motor Ignition Oil sensor ECON SW Engine Switch Ground Terminal DC Connector Battery 12V 7Ah Actuator Booster Plate 31 12 WIRING DIAGRAM TlVzT ...

Page 34: ...71 0 69 0 66 0 64 0 62 0 60 0 58 0 56 0 54 0 52 0 50 0 48 0 46 0 500 1000 2000 3000 4000 Ambient temperature Factor of environment correction NOTE Relative humidity 60 correction factorC 0 01 Relative humidity 80 correction factorC 0 02 Relative humidity 90 correction factorC 0 03 Relative humidity 100 correctionfactorC 0 04 Example Rated power P 2 6kVA generator Altitude N 1000m Ambient temperatu...

Page 35: ...ssion and exposure levels this cannot be used reliably to determine whether or not further precautions are required Factors that influence the actual level of exposure of work force include the characteristics of the work room the other sources of noise etc i e the number of machines and other adjacent processes and the length of time for which an 13 2 Noise and Access operator is exposed to the n...

Page 36: ... made or attempted by others persons not authorized by the manufacturer or retailer Exclusively at our option we will repair or replace warrantable products at no charge to the original owner Additional Limitations Neither the retailer nor the manufacturer shall be liable for any other expense loss or damage whether direct incidental consequential or exemplary arising in connection with the sale o...

Reviews: