background image

30

11 Pressure guages

Working air is not available until the compressor has raised the TANK (tank) pressure above the pressure set at the 

TOOL (tool) pressure gauge. It may take a few moments for tank pressure to build.


– TANK (tank) pressure gauge: Shows reserve air pressure in the tank. 


– TOOL (tool) pressure gauge: Shows air pressure available at the outlet side. This pressure is controlled by the 

regulator and is always less than or equal to the tank pressure.

12 Troubleshooting

Important: 
If any parts are damaged or need replacing, consult a specialist workshop or contact customer service.

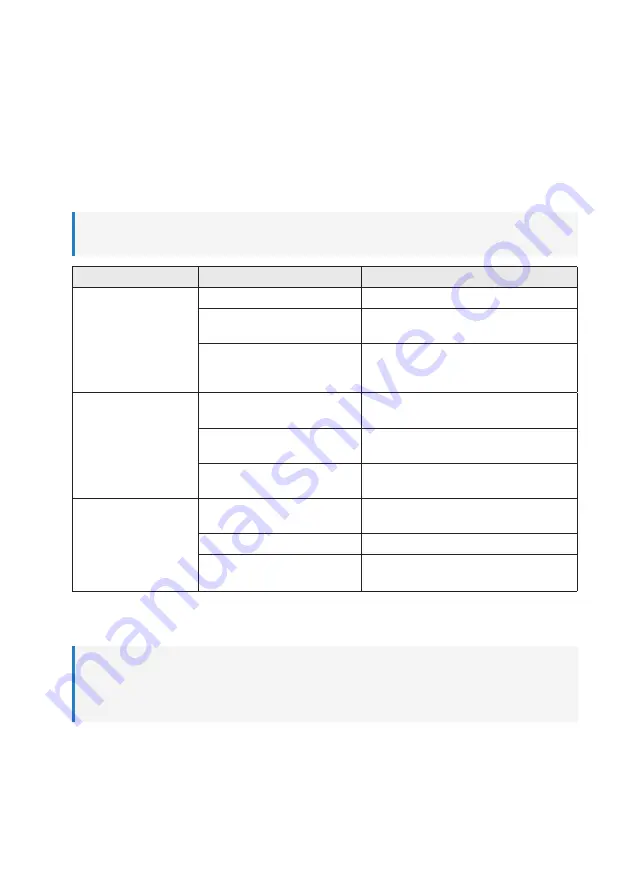
Problem

Possible cause

Suggested solution

Compressor does not 

start.

No power supply.

Check the rechargeable batteries.

Ambient temperature too low.

Never operate when ambient temperature is 

<5 ºC.

Motor has overheated.

Switch the power OFF. Remove any conditions 

causing the overheating and/or allow the motor 

to cool down. 

The compressor starts 

but there is no outlet 

pressure.

The non-return valve has leaks.

Check the non-return valve. Replace if neces-

sary.

The seals are damaged.

Check the seals for damage. Replace if neces-

sary.

Drain valve for condensation has a 

leak or is not fully closed.

Check the drainage valve. Replace if neces-

sary.

When the compressor 

starts, pressure is shown 

on the pressure gauge, 

but there is no pressure 

at the end of the high-

pressure hose.

The hose connections have a leak. Check the compressed air hose and connected 

accessories. Replace if necessary.

A quick-connect has a leak.

Check the quick-connect. Replace if necessary.

Insufficient pressure is set on the 

pressure regulator.

Use the pressure regulator to increase the set 

pressure.

13 Cleaning

Important:


– Do not use aggressive cleaning agents, rubbing alcohol or other chemical solutions. They damage the hous-

ing and can cause the product to malfunction.


– Do not immerse the product in water.

1.  Disconnect the battery pack(s).
2.  Clean the product with a dry, fibre-free cloth.
3.  Use a vacuum cleaner with soft brush to remove any blockages from the air intake filter.

Summary of Contents for 2471599

Page 1: ...Originalbedienungsanleitung Kabelloser Luftkompressor Best Nr 2471599 Seite 2 19 Original Instructions Cordless Air Compressor Item No 2471599 Page 20 37...

Page 2: ...e Atmung Erstickungsgefahr 9 7 10 Angeschlossene Ger te und Zubeh r 9 7 11 Gefahr durch herumfliegende Gegenst nde 9 8 Ger te bersicht 10 8 1 Kompressor 10 8 2 Zubeh r 11 9 Schutzfunktionen 11 9 1 Sch...

Page 3: ...se Br nde Stromschl ge oder andere Gefahren verursachen Das Produkt entspricht den gesetzlichen Vorgaben und erf llt s mtliche der nationalen und europ ischen Vorschrif ten Aus Sicherheits und Zulassu...

Page 4: ...e Sollten Sie die in dieser Bedienungsanleitung aufgef hrten Sicherheitshin weise und Informationen f r einen ordnungsgem en Gebrauch nicht beachten bernehmen wir keine Haftung f r daraus resultierend...

Page 5: ...der den Anschluss des Produkts haben Sollte kein sicherer Betrieb mehr m glich sein nehmen Sie das Produkt au er Betrieb und sch tzen Sie es vor unbeabsichtigter Verwendung Sehen Sie UNBEDINGT davon a...

Page 6: ...K rperhaltung Sorgen Sie f r einen sicheren Stand und halten Sie jeder zeit das Gleichgewicht Dadurch k nnen Sie das Elektrowerkzeug in unerwarteten Situationen besser kontrol lieren Tragen Sie geeign...

Page 7: ...eratur von 5 bis 40 C Gefahr von Herunterfallen Betreiben Sie das Ger t niemals auf einem Dach oder in einer anderen erh hten Stelle Verwenden Sie einen zus tzlichen Luftschlauch um hoch gelegene Stel...

Page 8: ...l chen des Kompressors stets trocken sauber und frei von l und Fettr ckst nden Infor mationen dazu finden Sie im Abschnitt Pflege und Reinigung Die Ansaug Bel ftungs ffnungen des Ger ts d rfen nicht a...

Page 9: ...r Druckanzeige 4 Sicherheitsventil 5 Druckregler 6 Ablassventil f r Kondenswasser 7 Akkupack getrennt erh ltlich 8 Akkupack getrennt erh ltlich 9 TOOL Werkzeug Druckanzeige 10 Druckluftausgang Schnell...

Page 10: ...r t AUS aus und wieder EIN um den Betrieb wiederaufzunehmen 9 2 Druckschalter Der Druckschalter hat diese automatischen Funktionen Startet den Motor wenn der Druck im Luftbeh lter unter den werksseiti...

Page 11: ...kzeuge und Zubeh r Stellen Sie sicher dass der Druckregler auf einen niedrigeren Druck als den maximalen Betriebsdruck des angeschlossenen Werkzeugs eingestellt ist Wichtig Einschaltdauer Um die Leben...

Page 12: ...orhanden Das R ckschlagventil ist un dicht berpr fen Sie das R ckschlagventil Gegebenen falls ersetzen Die Dichtungen sind besch digt berpr fen Sie die Dichtungen auf Besch digun gen Gegebenenfalls er...

Page 13: ...en Das aus dem Luftbeh lter abflie ende Wasser kann l und Rost enthalten beides kann Flecken verursachen 1 Schalten Sie den Strom aus 2 Entfernen Sie alle eingesetzten Akkupacks 3 Drehen Sie den Regle...

Page 14: ...sinn um den Ausgangsdruck auf Null zu stellen 4 Entfernen Sie s mtliches angebrachtes Zubeh r ACHTUNG Gefahr von Verletzungen und oder Sachsch den Informationen dazu finden Sie in Abschnitt 14 Wartung...

Page 15: ...E m ssen diese getrennt vom unsortierten Haus m ll entsorgen Aufgebrauchte Batterien nicht l nger verwendete Akkus die nicht fest in Elektro und Elektronik Altger ten verbaut sind und Leuchtmittel die...

Page 16: ...agen Sie einen geeigneten Geh rschutz Der Wert des A bewerteten Emissionsschalldruckpegels am Arbeitsplatz der Wert der zugeh rigen Unsicherheit ist gem Klausel 8 der EN ISO 2151 2008 anzugeben der We...

Page 17: ...17 19 Teile 19 1 Schaubild...

Page 18: ...lzug 28 1 ST4x18 Schraube 8 1 Zubeh rfachabdeckung 29 5 M5x10 Schraube 9 1 Ger uschfilter 30 1 Spule 10 4 ST4X30 Schraube 31 1 Untere Platte 11 1 Hinteres Geh use 32 3 M6 Mutter 12 1 bergangsgelenke 3...

Page 19: ...19...

Page 20: ...7 9 Risk to breathing asphyxiation 26 7 10 Attachments and accessories 26 7 11 Risk from projectiles 26 8 Product overview 27 8 1 Compressor 27 8 2 Accessories 28 9 Safety features 28 9 1 Accidental...

Page 21: ...hazards The product complies with the statutory national and European requirements For safety and approval purposes you must not rebuild and or modify the product Read the operating instructions caref...

Page 22: ...fully and especially observe the safety information If you do not follow the safety instructions and information on proper handling in this manual we assume no liability for any resulting personal inj...

Page 23: ...product yourself Safe operation can no longer be guaranteed if the product is visibly damaged is no longer working properly has been stored for extended periods in poor ambient conditions or has been...

Page 24: ...erly used Use of dust collection can reduce dust related hazards 7 7 4 Power tool use and care Do not force the power tool Use the correct power tool for your application The correct power tool will d...

Page 25: ...le battery Make sure that the intake air is dry and dust free Use flexible hoses to prevent transmitting unacceptable loads to the pipeline system at the connection between the compressor system and t...

Page 26: ...o protect against dust or debris in the air 7 9 Risk to breathing asphyxiation Compressed air is not safe for breathing The air stream can contain carbon monoxide toxic vapors or solid particles from...

Page 27: ...nk pressure gauge 4 Safety valve 5 Pressure regulator 6 Drain valve for condensed water 7 Battery pack sold separately 8 Battery pack sold separately 9 TOOL tool pressure gauge 10 Compressed air outle...

Page 28: ...d then replaced again Switch the power OFF and then back ON to resume use 9 2 Pressure switch The pressure switch automatically starts the motor when the air tank pressure drops below the factory set...

Page 29: ...ting for air tools and accessories Make sure the regulator is set to a pressure lower than the maximum operating pressure of the connected tool Important Duty cycle To prolong the life of the product...

Page 30: ...essor starts but there is no outlet pressure The non return valve has leaks Check the non return valve Replace if neces sary The seals are damaged Check the seals for damage Replace if neces sary Drai...

Page 31: ...f rupture NOTICE Risk of property damage Drain water from air tank may contain oil and rust which can cause stains 1 Switch the power OFF 2 Remove any inserted battery packs 3 Turn the regulator dial...

Page 32: ...or dial counterclockwise to set the outlet pressure to zero 4 Remove any attached accessories WARNING Risk of bodily harm and or damage to property See 14 Maintenance Drain air tank release tank press...

Page 33: ...at the end of its service life Owners of WEEE Waste from Electrical and Electronic Equipment shall dispose of it separately from unsorted municipal waste Spent batteries and accumulators which are no...

Page 34: ...ers to prevent hearing damage The value of the A weighted emission sound pressure level at the workstation the value of the associated uncer tainty shall be given in accordance with Clause 8 of EN ISO...

Page 35: ...35 19 Parts 19 1 Diagram...

Page 36: ...ut 7 1 PE drawstring 28 1 ST4x18 screw 8 1 Accessory storage cover 29 5 M5x10 screw 9 1 Silence filter 30 1 Inductor 10 4 ST4X30 screw 31 1 Bottom board 11 1 Back housing 32 3 M6 nut 12 1 Transition J...

Page 37: ...37...

Page 38: ...Publikation entspricht dem technischen Stand bei Drucklegung Copyright 2022 by Conrad Electronic SE This is a publication by Conrad Electronic SE Klaus Conrad Str 1 D 92240 Hirschau www conrad com All...

Reviews: