


This is a publication by Conrad Electronic SE, Klaus-Conrad-Str. 1, D-92240 Hirschau (www.conrad.com).
All rights including translation reserved. Reproduction by any method, e.g. photocopy, microfilming, or the capture in
electronic data processing systems require the prior written approval by the editor. Reprinting, also in part, is prohibited.
This publication represent the technical status at the time of printing.
Copyright 2016 by Conrad Electronic SE.
*1432537_v1_0716_02_mh_m_en_(1)
Operation
• Connect the camera to your computer.
a) Adjusting camera
Position the lens (11) of the camera as close as possible to the object (put the front side for
example on a newspaper).
In order to prevent damage, make sure that no material touches the optics. Also, do
not touch the optics (Lens will be soiled!).
Do not immerse the camera in liquids or touch wet material with the camera/with the
lens.
Longitudinal axis:
•
Loosen the locking screw (7) at the sleeve of the camera holder.
• Adjust the tilt and tighten the locking screw again.
Panning:
•
Loosen the lock nut and turn the pillar to the left or right side.
• Tighten the lock nut.
Height:
•
Loosen the locking screw for height (1). Warning!
While doing so, hold the camera as
otherwise its weight can make it drop automatically.
• Adjust the height by turning the height adjustment dial (2).
-
For adjusting the height finely, ensure sufficient friction remains between pillar and holder.
Therefore, loosen the locking screw only as much as necessary.
• Tighten the locking screw for height after adjusting the height.
b) Illumination
The brightness dial in the power cable (12) can be used to turn off the LED illumination in the
lens and for stepless adjustment of the brightness level.
c) Adjust sharpness
Use the camera adjustment dial (8) to adjust image sharpness.
• Do not force the adjustment dial. Turn the dial slowly.
•
When dealing with reflexive surfaces or objects, the illumination can cause overexposure or
reflections.
d) Software
• Start the software by doubleclicking at the software shortcut.
•
The magnified camera image is shown in the software interface.
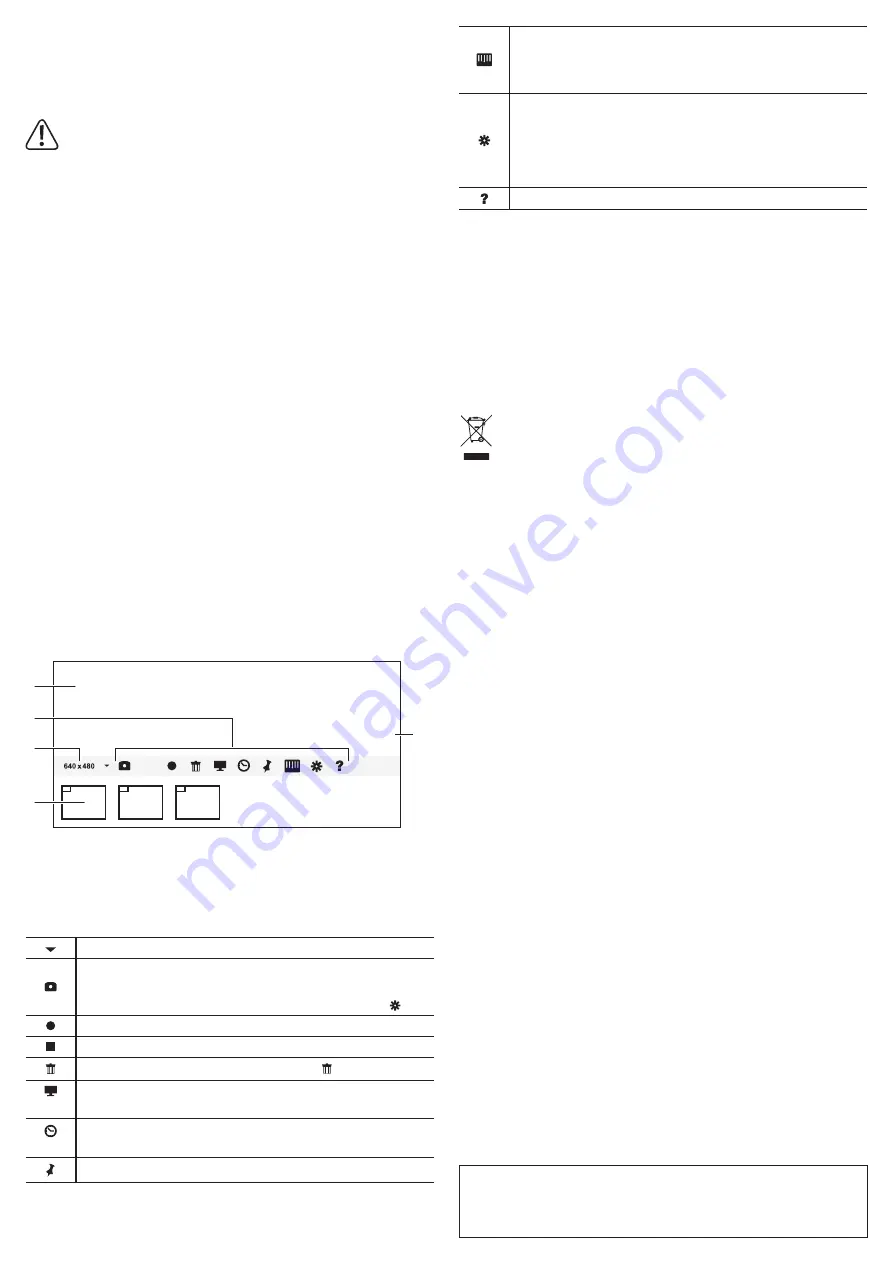
Software interface:
2016 07 18 14:33:28
A
B
C
D
E
Control panel:
Select resolution (Max. 640 x 480 pixels for videos)
Record snapshot
- Snapshots are listed below the control panel (B)
-
The path to saved snapshots/videos can be defined in the settings.
Start video recording
Stop video recording
Select
video(s) and snapshot(s) and delete by clicking on
Activate full screen mode
-
Deactivate with ‘ESC‘ key.
Show date and time in the image
- Click again to hide
Freeze/unfreeze camera image
A Date and time stamp in image
B
Snapshots/video recordings
C Selected resolution
D Control panel
E Camera image
Show/hide rulers
-
Distance:
Click on a point in the image, press the ‘Shift’ key and click on
another point in the image. The distance between the two points is displayed
in the image.
Settings
- Snapshot format
- Video format
-
Path to saved snapshots/videos
- etc.
Help menu
Maintenance and cleaning
• Always disconnect the product from power supply before cleaning.
• Check the lens of the microscope camera occasionally, clean it of dust and dirt. Use an
appropriate lens cleaning system, e. g. a clean, soft brush. Do not press too hard on the
optics/mechanics of the camera, since they may be damaged. Furthermore, you may cause
scratch marks on the lens.
•
Never use agressive cleaners, cleansing alcohol or other chemical solvents because they
can attack the housing or even affect the functions of the product.
• Use a dry, lint-free cloth to clean the product.
Disposal
Electronic devices are recyclable waste and must not be disposed of in the
household waste. At the end of its service life, dispose of the product according
to the relevant statutory regulations. You thus fulfil your statutory obligations and
contribute to the protection of the environment.
Technical data
Power supply ................................
5 V/DC, 500 mA via USB (min. USB 2.0)
Sensor ..........................................
CMOS, 1600 x 1200 pixel (2 MP)
Illumination ...................................
4 x LED
Magnification.................................. 110x, 800x at 20” (51 cm) monitor,
1600x at 40“ (102 cm) monitor
Focal distance .............................. 0 – 10 mm
Image resolution ...........................
4000 x 3000/ 3200 x 2400/ 1600 x 1200/ 1280 x 960/ 1280
x 800/ 1024 x 768/ 1024 x 600/ 640 x 480 pixel
Picture format ............................... BMP, JPG
Video resolution ............................
max. 640 x 480 pixel
Frame rate .................................... 30 fps
Video format ................................. AVI, WMV
Supported operating systems ....... Windows
®
XP, Vista (32/64 bit), 7 (32/64 bit),
8 (32/64 bit), 8.1 (32/64 bit), 10 (32/64 bit)
Operating conditions .....................
0 to +40 °C; 10 – 85 % rel. humidity
Storage conditions ........................
-5 to +50 °C; <85 % rel. humidity
Dimensions ...................................
camera: 34 x 100 mm (Ø x L)
desktop stand: 166 x 130 x 204 mm (L x W x H)
Weight ..........................................
camera: approx. 100 g
base: approx. 550 g


