options (see the “Advanced Programming”), they are NOT NECESSARY unless there are two
similar systems within wireless signal range of each other, or if you desire to change the Site
Code or Zones (see information below).
Ready-to-Go Default Site Code & Zone Settings
NOTE: The factory defaults on all of the sensors are already set up with a generic Site Code
and the most applicable Zone depending upon the sensor (Door/Window Sensors for Zone 1
and PIR Motion Detectors for Zone 2).
The Site Code is what identities the sensors as being unique or different from other wireless
radio devices that maybe in close proximity. In most cases this will not need to be changed
unless 1) The Site Code default was incorrect and does not match with the other Site Code
settings; 2) There are two similar systems within wireless range of each other; 3) Unless
specifically desired by user. The procedure for changing the Site Code and Zone Settings can be
found in the “Advanced Programming”.
If no changes are necessary or desired, continue with the easy installation process that follows.
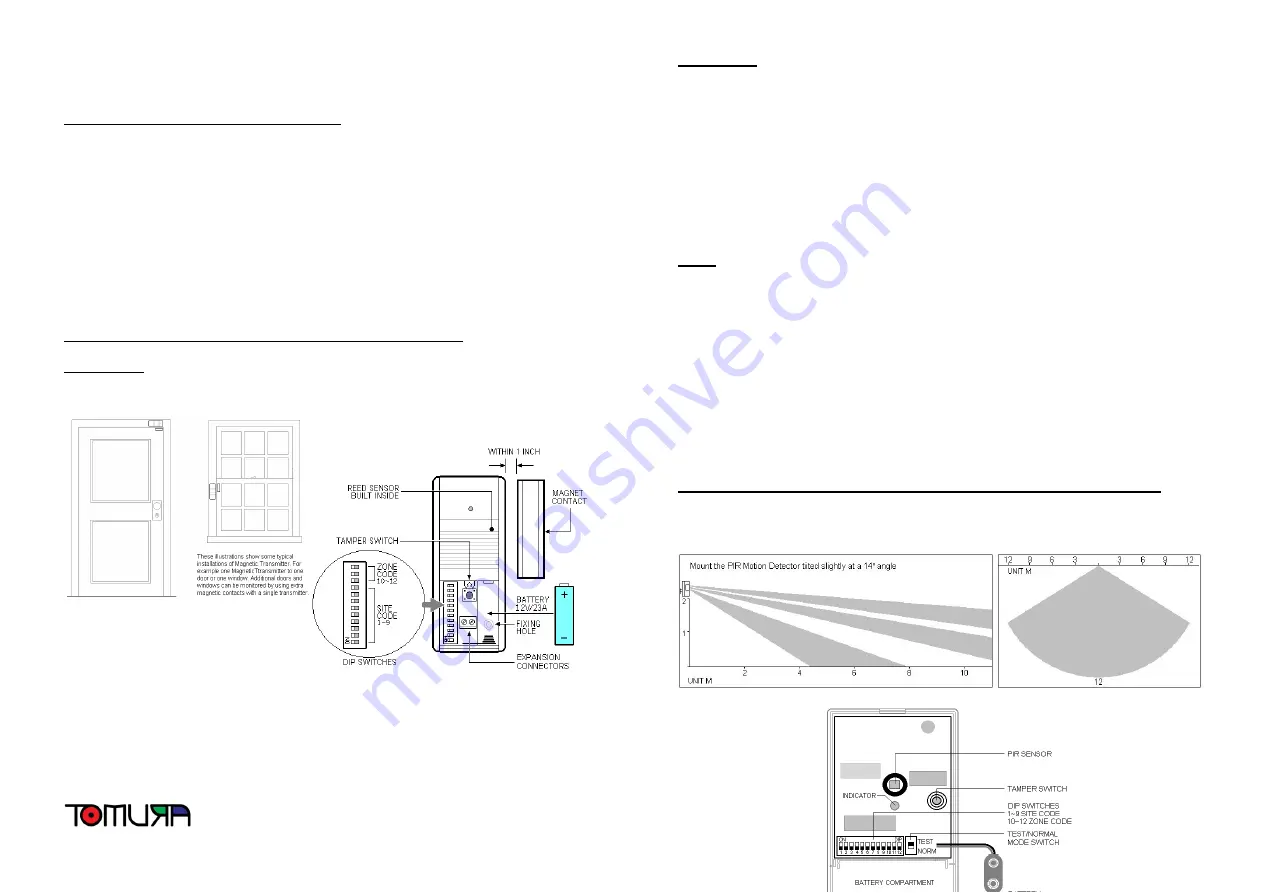
Wireless Door/Window Sensor Installation (Options MT-01 or MT-02)
Model MT-02:
Mount each
MT-02 Wireless Door/Window Sensor using the included screws or
double-sided tape
(tape not recommended for permanent mounting)
. Please follow the diagram
and details below.
•
You will need one Transmitter unit (with inbuilt Reed Sensor), one Magnetic Contact, and
the included screws or double-sided tape for each Door/Window Sensor setup
•
The Magnetic Contact and Transmitter must be line up as shown in the figure above.
Magnetic Contact should have a gap between 1 inch
•
Check the Site Code and Zone Code is correct
•
Install a 12 volt/23A Alkaline
battery
Model MT-01:
Mount each MT-01 Wireless Door/Window Sensor using the included screws or
double-sided tape
(tape not recommended for permanent mounting)
. Please follow the diagram
and details below.
•
You will need one Reed sensor pre-wired with Transmitter, one Magnetic contact, and the
included screws or double-sided tape for each Door/Window Sensor setup
•
Reed sensor and magnetic contact should have a gap within 1 inch
•
Stretch out cord for best reception
•
Check the Site Code and Zone Code is correct
•
Install a 9 volt Alkaline
battery
NOTE:
1.
Avoid installing the Transmitter unit onto a metal door frame, as doing so will reduce the
wireless range dramatically.
2.
Use the expansion connector to connect an additional wired Normal Close type (N/C) Magnetic
Contact if required
3.
The Wireless Door/Window Sensor can be used to detect the opening of cabinets.
4.
Any number of Wireless Door/Window Sensor can be used with the system providing they
have the identical Site Code and mounted within effective wireless range of the Control
Panel.
Wireless PIR Motion Detector Installation (PIR is an acronym for Passive Infra Red)
Mount the Wireless PIR Motion Detector utilizing the included mounting bracket
and screws.
Please follow the diagram and details below.


