background image

72

72

Using the DVD Player

Visual operations

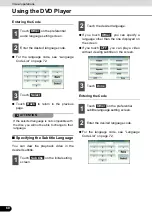
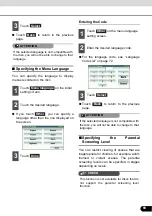
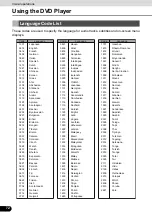
These codes are used to specify the language for audio tracks, subtitles and on-screen menu
displays.

Language Code List

Japanese

English

French

German

Italian

Spanish

Dutch

Russian

Chinese

Korean

Greek

Afar

Abkhazian

Afrikaans

Amharic

Arabic

Assamese

Aymara

Azerbaijani

Bashkir

Byelorussian

Bulgarian

Bihari

Bislama

Bengali

Tibetan

Breton

Catalan

Corsican

Czech

Welsh

Danish

Bhutani

Esperanto

Estonian

Basque

Persian

Finnish

Fiji

Faroese

Frisian

Irish

Scots-Gaelic

Galician

Guarani

Gujarati

Hausa

Hindi

Croatian

Hungarian

Armenian

Interlingua

Interlingue

Inupiak

Indonesian

Icelandic

Hebrew

Yiddish

Javanese

Georgian

Kazakh

Greenlandic

Cambodian

Kannada

Kashmiri

Kurdish

Kirghiz

Latin

Lingala

Laothian

Lithuanian

Latvian

Malagasy

Maori

Macedonian

Malayalam

Mongolian

Moldavian

Marathi

Malay

Maltese

Burmese

Nauru

Nepali

Norwegian

Occitan

Oromo

Oriya

Panjabi

Polish

Pashto

Portuguese

Quechua

Rhaeto-Romance

Kirundi

Romanian

Kinyarwanda

Sanskrit

Sindhi

Sangho

Serbo-Croatian

Sinhalese

Slovak

Slovenian

Samoan

Shona

Somali

Albanian

Serbian

Siswati

Sesotho

Sundanese

Swedish

Swahili

Tamil

Telugu

Tajik

Thai

Tigrinya

Turkmen

Tagalog

Setswana

Tonga

Turkish

Tsonga

Tatar

Twi

Ukrainian

Urdu

Uzbek

Vietnamese

Volapuk

Wolof

Xhosa

Yoruba

Zulu

Code

Language

Code

Language

Code

Language

1001

0514

0618

0405

0920

0519

1412

1821

2608

1115

0512

0101

0102

0106

0113

0118

0119

0125

0126

0201

0205

0207

0208

0209

0214

0215

0218

0301

0315

0319

0325

0401

0426

0515

0520

0521

0601

0609

0610

0615

0625

0701

0704

0712

0714

0721

0801 

0809

0818

0821

0825

0901

0905

0911

0914

0919

0923

1009

1023

1101

1111

1112

1113

1114

1119

1121

1125

1201

1214

1215

1220

1222

1307

1309

1311

1312

1314

1315

1318

1319

1320

1325

1401

1405

1415

1503

1513

1518

1601

1612

1619

1620

1721

1813

1814

1815

1823

1901

1904

1907

1908

1909

1911

1912

1913

1914

1915

1917

1918

1919

1920

1921

1922

1923

2001

2005

2007

2008

2009

2011

2012

2014

2015

2018

2019

2020

2023

2111

2118

2126

2209

2215

2315

2408

2515

2621


Summary of Contents for Eclipse AVN4429

Page 1: ...Car Audio Visual Navigation We appreciate your purchase of this receiver Please read through this manual for correct operation We suggest that after reading it you keep this manual in a safe place for...

Page 2: ...y CAUTION This sign indicates a situation in which incorrect handling through disregard of a sign might result in personal injury or may result solely in damage to property IMPORTANT Follow this advic...

Page 3: ...e PND from the Main Unit 20 Attaching the PND 20 Using the Audio Cover 21 Using the Audio Cover 21 Fitting the Audio Cover 21 How to Detach the Audio Cover from the Main Unit 21 Hands Free Microphone...

Page 4: ...quality 33 Switching Audio Control Modes 33 Adjusting the BASS 33 Adjusting the MIDDLE 33 Adjusting the TREBLE 33 Balancing the Right and Left Speakers BALANCE 33 Balancing the Front and Rear Speaker...

Page 5: ...et to ON 39 Receiving traffic information when both TP and TA are set to ON 39 EON Enhanced Other Network system 39 Reception of emergency broadcasts 39 Volume control for traffic guidance 40 Setting...

Page 6: ...ternet 51 Converting a Music CD into MP3 WMA Files 51 Writing files on a CD R RW or DVD R RW disc 52 Playing a CD R RW or DVD R RW disc having MP3 WMA or DivX files 52 5 Using the USB Music File Playe...

Page 7: ...Video 62 Stopping a Video 63 Disc Menu Operations 63 Finding a Desired Video 63 Finding by Chapter 63 Finding by Title Number 63 Finding by chapter number 64 Changing the Touch Switch Display 64 Hidin...

Page 8: ...File 77 Selecting a Folder 77 Hiding the Touch Switch 77 Changing the Subtitle Language 77 Changing the Audio Language 78 Viewing a DivX VOD Code 78 Caution indication during play of a VOD rental file...

Page 9: ...Manual setting of steering wheel switch functions 87 Compatibility with Steering Wheel Switches 88 2 Backeye Camera Operations 90 Playing a Video through the Backeye Camera 91 When the Camera Is Set...

Page 10: ...nstalling Secure wiring with non conductive tape or plastic ties so that wires do not interfere with vehicle operation including the brake pedal gear shifter and steering Position wires so that they w...

Page 11: ...unit smoke or a strange odor may be emitted If this occurs stop using the main unit immediately and contact your dealer Accidents fire or shocks may result if you continue to use the main unit under t...

Page 12: ...from disconnection and electrical shorts Install wiring in a manner in which cables will not come in contact with metal parts The wiring maybe be damaged by contact with metal parts resulting in fire...

Page 13: ...EC for Waste Electric and Electronic Equipment WEEE this product which is labeled with a crossed out wheeled bin may not be disposed of with household waste in member states of the EU WEEE Waste Elect...

Page 14: ...rect the displayed position This device is a precision engineered equipment and the information that you record on it after purchase can be lost as a result of static electricity electrical noise vibr...

Page 15: ...es or abnormal odors are noticed turn off the power immediately Immediately turn off the audio in such situations Exercise caution regarding the temperature inside the vehicle The temperature inside t...

Page 16: ...your fingers or other objects caught behind the monitor when it is being retracted into place Interference can cause an injury or damage the main unit When removing a disc from the main unit remove i...

Page 17: ...o recording VR mode and audio mode cannot be played The Dolby Digital format is supported and discs with the logo shown below can be played This product is manufactured under license from Dolby Labora...

Page 18: ...es Otherwise discs may warp and fail to play Do not apply paper based tape to either the recording side or label side of a disc Damage could result Keep cracked or warped discs out of the player to av...

Page 19: ...uch discs even with an adapter Otherwise the player may be damaged Do not use accessories stabilizers protective seals laser lens cleaners etc sold for improving sound performance or protecting CDs Th...

Page 20: ...en while in the video mode You can switch to the setting mode when PND is connected and PWR switch is OFF d VOL rotary knob Adjusts volume e SCREEN AV NAV button Short press Switches between the NAVI...

Page 21: ...panel Long press Tilts the front panel step by step or forcibly ejects the disc when the front panel is open k Release button Removes the right side of the PND from the main unit Turning the POWER ON...

Page 22: ...the main unit Press the right hand side of PND until it clicks in position Turning the PND Display ON and OFF 1 When the PND display is ON hold down the MUTE button for 1 or more seconds 2 When the PN...

Page 23: ...t The PND is equipped with a built in hands free microphone and a light sensor For details on how to use the hands free call function or configure light sensor settings refer to the operation manual o...

Page 24: ...u want to play DVD or a disc containing a DivX file if you want to play a DivX file into the drive slot Adjusting the Display Angle When adjusting its angle take care not to pinch your fingers Otherwi...

Page 25: ...omatic transmission car 1 3 5 or R in a manual transmission car or a bottle or a similar object is placed in the cup holder To open or close the display safely set the gearshift lever to N automatic t...

Page 26: ...ion shift it to the Neutral position Take care NOT to close the display when the ejected disc remains in the slot Otherwise this receiver or the disc may be scratched Do not attempt to close the displ...

Page 27: ...this device to vehicles please be sure to connect the parking brake signal If the parking brake signal is not connected this device will not operate normally Engine switch OFF LOCK ACC ON With parking...

Page 28: ...n the audio other than that of an iPod USB is operated Enable AUX Turn the AUX setting ON or OFF If it is ON you can select the AUX input It turns ON and OFF each time you touch Setup of This Receiver...

Page 29: ...ew to headlights If Enabled the PND display is switched to the night view mode when you turn on the car lighting It turns ON and OFF each time you touch DivX VOD code You can view a DivX Video On Dema...

Page 30: ...is displayed on the PND when you shift the lever to reverse position or when you long press the SCREEN AV NAV button In the manual mode camera view is displayed when you long press the SCREEN AV NAV b...

Page 31: ...image display 1 Adjust the contract of image by sliding from the left end position 0 to the right end position 100 1 Adjust the brightness of image by sliding from the left end position 0 to the right...

Page 32: ...vertical by 16 horizontal aspect ratio normal TV screen size is uniformly expanded in the left and right directions Zoom mode The screen with the 3 vertical by 4 horizontal aspect ratio normal TV scre...

Page 33: ...FM AM J 1 You cannot select it if no disc is loaded 2 Cannot be selected if the correspond ing device is not connected to the main unit 3 If the PND is not connected to the main unit you cannot select...

Page 34: ...evel appropriately according to the audio source you select For volume control see Adjusting the SVC Source Volume Control on page 34 The sound is muted Press the MUTE button again to return to the pr...

Page 35: ...speakers To the right Emphasizes right speakers To the left Emphasizes left speakers Balancing the Front and Rear Speakers FADER You can adjust the balance fading of front and rear speakers To the ri...

Page 36: ...Only allow lower frequencies low range through To the left LPF OFF Allow all frequencies through regardless if the frequencies are low or high Setting the loudness mode LOUDNESS Accentuate low and hig...

Page 37: ...repeatedly until FM or AM is displayed on the sub display Tune a Desired Station If the vehicle s battery is disconnected for repairs to the vehicle or for removing the main unit all stations in memo...

Page 38: ...saved and the preset channel number or PS name will be shown on the display To manually set additional selected stations for the remaining preset channels repeat this procedure for each channel Six s...

Page 39: ...l the stations in the preset switches to be played for five seconds each The stations of preset switches P1 to P6 will be scanned sequentially Each station is turned for five seconds To cancel the pre...

Page 40: ...rogram Each time you press the BAND button the settings will switch as shown below AF ON REG OFF J AF ON REG ON J AF OFF REG OFF J AF ON REG OFF When the AF function is ON AF lights up on the PND disp...

Page 41: ...ted until a TP station is tuned and the traffic information is displayed When the AUDIO SOURCE is something other than AM FM radio TA is displayed If there is an available TP station in the AF list th...

Page 42: ...be displayed on the unit s sub display Each time you touch the genre will be switched in the order shown below NO PTY J NEWS J SPORTS J TALK J POP J CLASSICS J When the genre is set to TALK the switc...

Page 43: ...Fast forward rewind button Song information switching button SRC Listening To a CD Do not press the OPEN EJECT button when you are inserting a CD into disc slot This may cause a personal injury and d...

Page 44: ...finger from the switch The main unit will play the first 10 seconds of each track When you touch the current track is continued to play The track repeats to play When you touch the track repeats to p...

Page 45: ...e current track number and the elapsed time can be shown on the sub display The display changes as follows each time you press the TP TEXT button Track No J Elapsed time J Track No J Random Play 1 Tou...

Page 46: ...button when you are inserting the disc into disc slot This may cause a personal injury and damage to the front panel Do not drive your car while the front panel of this receiver is kept open The pane...

Page 47: ...forwarded or rewound until you remove your finger from the switch You can return to the root directory and play its file IMPORTANT You can return to the root directory and play its file For an MP3 WM...

Page 48: ...laying a desired track or file turn the Scan function OFF The entire disc is scanned once and the normal play starts from the position where you started to scan When you select Playing the Start of Tr...

Page 49: ...apsed time J File No J If a disc contains sound data CD DA MP3 WMA music files and DivX files you can switch among them IMPORTANT The display changes as follows each time you press the BAND button CD...

Page 50: ...standards MPEG Audio Layer 3 MPEG1 Audio Layer III MPEG2 Audio Layer III MPEG2 5 Audio Layer III Supported sampling frequencies 8 11 025 12 16 22 05 24 32 44 1 48 kHz Supported bit rates 8 16 24 32 40...

Page 51: ...ingerprints or scratches on the disc may prevent playback or cause skipping during playback Sections of CD R CD RW may deteriorate if left inside a vehicle for long periods of time We recommend that y...

Page 52: ...or wma file extension it may be recognized erroneously as an MP3 WMA file When such file is played the very large noise is output and speakers may be damaged Do not save a non MP3 WMA file with the m...

Page 53: ...perated The making of MP3 WMA files by recording from sources such as broadcasts records recordings videos and live performances without permission from the copyright holder for uses other than person...

Page 54: ...correct source mode based on the disc contents and starts to play the disc If you insert a disc that contains the mixed music CD data CDDA MP3 WMA files and DivX files the source mode is switched in t...

Page 55: ...B Music Files Connect the USB cable correctly so that it does not interfere with your safe operation of vehicle After connecting the USB memory while a message Don t remove the storage device until sc...

Page 56: ...Music File 1 Press the SELECT Right or SELECT Left button Finding a Desired Music File Despite a CD ROM disc a folder selection by audio buttons is not supported in the USB mode Before disconnecting t...

Page 57: ...n externally attached HDD is not supported Playable MP3 File Standards Supported standards MPEG 1 MPEG 2 and MPEG 2 5 Supported sampling frequencies MPEG 1 32 44 1 48 MPEG 2 16 22 05 24 MPEG 2 5 8 11...

Page 58: ...aracters Total of folder name file name and 3 character file extension File name characters that you can use A to Z 0 to 9 and underscore _ Max number of files that can be stored in a single memory 20...

Page 59: ...he audio language to the desired one The user s ability to change the audio language depends on the DVD Multi Angle Function Some DVDs support the multi angle function that enables you to play the sam...

Page 60: ...intend Be sure to read the user s guide that comes with the disc to be played Region Code of Playable Disc region code which is indicated on some DVDs represents areas they can be played in This recei...

Page 61: ...s Indicates the number of subtitles Indicates the number of angles Indicates the image aspect ratio ratio between the height and width of the TV screen able to be selected 16 9 indicates a wide screen...

Page 62: ...must be used only in general households and other limited viewing environments except when expressly permitted by Macrovision Corporation Remodeling or disassembly of this machine is prohibited The se...

Page 63: ...ed DVD Cannot read disc Please check disc appears If the travel is regulated or the PND is not installed a DVD is automatically played on the rear monitor after 5 seconds has elapsed in the DVD mode I...

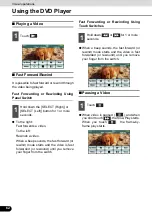
Page 64: ...video is fast forwarded or rewound until you remove your finger from the switch Fast Forwarding or Rewinding Using Touch Switches When a beep sounds the fast forward or rewind mode starts and the vide...

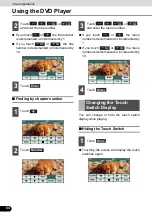
Page 65: ...search for the desired video with a title chapter or menu number number assigned for each content Finding by Chapter To the right When selecting the next chapter To the left When selecting the cue or...

Page 66: ...decremented or incremented by 1 If you touch or the menu number is decremented or incremented by 10 You can change or hide the touch switch display while playing Hiding the Touch Switch Touching the...

Page 67: ...et disc supports multiple angles you can change them to display a video CHECK While the multi angle mark is displayed on the screen you can change the currently displayed angle Each time you touch the...

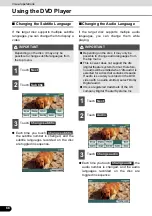
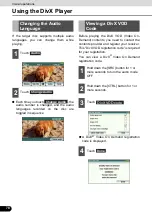
Page 68: ...s recorded on the disc are toggled in sequence Depending on the disc it may only be possible to change subtitle languages from the top menu 1 Touch 2 Touch 3 Touch Next Sub title Change subtitle Chang...

Page 69: ...D Player Setting 1 Touch 2 Touch 3 If you touch each touch switch you can configure the following setting Touch switch Function Page Specifies the audio language of a video to be played 67 Specifies t...

Page 70: ...title If you touch you can specify a language other than the one displayed on the screen If you touch you can play a video without viewing subtitle on the screen Entering the Code For the language cod...

Page 71: ...the selected language is not compatible with the disc you will not be able to change to that language Specifying the Parental Screening Level You can restrict viewing of scenes that are inappropriate...

Page 72: ...classified into the following three types Level 1 Plays only DVD software created specifically for children Prohibits playing general and adult themed DVD software Levels 2 to 7 Plays only the genera...

Page 73: ...e original ratio which fits the screen perfectly The Video Out image is usually set to the output display rate Usually use the default 16 9 ratio setting except when you use a 4 3 ratio rear monitor d...

Page 74: ...bi Polish Pashto Portuguese Quechua Rhaeto Romance Kirundi Romanian Kinyarwanda Sanskrit Sindhi Sangho Serbo Croatian Sinhalese Slovak Slovenian Samoan Shona Somali Albanian Serbian Siswati Sesotho Su...

Page 75: ...the engine switch or ACC is turned on When the source is switched to the VTR while the car is moving only the audio function becomes active Checked VTR setting is ON Not checked VTR setting is OFF To...

Page 76: ...is displayed correctly depends on the connected equipment If you have attached your iPod using the iPod cable iPC 409 this iPod connection has the priority and you cannot use the VTR mode To use the...

Page 77: ...or HD video with the DivX Certified logo attached are compliant with the DivX Profiles certification DivX DivX Certified and associated logos are trademarks of DivX Inc and are used under license fro...

Page 78: ...e right Fast forwards a video To the left Rewinds a video When a beep sounds the fast forward or rewind mode starts and the video is fast forwarded or rewound until you remove your finger from the swi...

Page 79: ...rget disc supports multiple subtitle languages you can change them to display a video Each time you touch the subtitle number is changed and the subtitle languages recorded on the disc are toggled in...

Page 80: ...you need to contact the contents provider and register your receiver This DivX VOD registration code is required for your registration You can view a DivX Video On Demand registration code A DivX Vide...

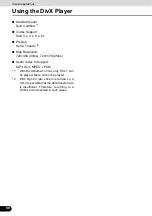
Page 81: ...purposes or to display to the public it may infringe a copyright that is protected by copyright laws Playable DivX File Standards Format of Discs CD ROM formats CD ROM MODE1 CD ROM XA MODE2 Form1 File...

Page 82: ...heater 2 Max Resolution 720 480 30fps 720 576 25fps Audio codec to Support MP3 AC3 MPEG LPCM 1 With DivX Media Format only Title 1 can be played Menu cannot be played 2 With high bit rate stream recor...

Page 83: ...s To ensure driving safety you cannot watch a video while driving You can play a music file on the iPod only when the PND is attached to this receiver Track selection Fast forward rewind button SRC Li...

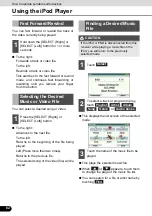
Page 84: ...ected song or the video file will be played CAUTION This displays the list screen of the selected mode This plays the selected music file When or appears touch them to change the page of the music fil...

Page 85: ...can search for a file or artist name by touching You cannot operate the and buttons when your car is running You can search for a video file by entering alphanumeric characters Setting to the iPod Vi...

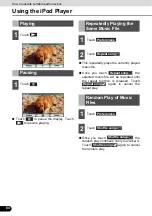
Page 86: ...repeated until the repeat function is released Touch again to cancel the repeat play Once you touch the random play continues until you cancel it Touch again to cancel the random play Playing 1 Touch...

Page 87: ...player Audio output levels will differ for the various devices that can be connected by this method Carefully adjust the volume until the output level of the connected player is known Before using a p...

Page 88: ...the portable audio player use the batteries that come with the portable audio player If you play the portable audio player while charging with the vehicle power charger or accessory socket additional...

Page 89: ...MODE Q MUTE Q PWR Q OTHERS When the function is set correctly OK is displayed ATTENTION If NG is shown on the display once again select a desired function to set Manual setting of steering wheel switc...

Page 90: ...SC CD DivX or DVD J USB J AUX J IPOD J VTR J Returns to FM AM When the power is on the mode changes each time MODE is pressed POWER Power switch Slightly press this switch to turn the power off Turns...

Page 91: ...ects the next track or previous track or beginning of the current track Press u or d briefly to select the next or previous track Press and hold u or d longer to fast forward or rewind a track Functio...

Page 92: ...acle displayed on the screen is different from the actual position or difference due to the characteristics of the camera lens Do not subject the camera unit to a strong impact for example hitting the...

Page 93: ...e camera unit is exposed to strong light such as sunlight or headlights a vertically oriented white zone may appear If the camera is used for a long period of time white scratches or vertical lines ap...

Page 94: ...t night etc The temperature near the lens is high or low When there are water drops on the camera or when humidity is high during rain showers etc Foreign substances mud etc have become attached to lo...

Page 95: ...CURRING Turn the ACC off once before turning it on once again to resume operation If this condition persists please contact your dealer NO SUPPORT PND ERR LCD NO CORRECT FILE IN CD Confirm the file DI...

Page 96: ...You tried to play a file with an unsupported resolution Wait until the error state is released Rental Expired PND LCD You tried to play a file that has exceeded the number of times permitted to be pla...

Page 97: ...ait for a brief period No songs found PND ERR LCD The iPod include no tracks Import tracks to the iPod to play them No videos found PND ERR LCD The iPod contains no video Import a video file for the i...

Page 98: ...eristic of LCD backlighting This is not a malfunction The display will stabilize after a brief period No sound comes out Volume is poorly adjusted or MUTE is functioning Check the volume by turning th...

Page 99: ...a CD DVD that is supported by the deck See page 15 Audio is output but not video The screen has been turned off with the screen OFF button Press the SCREEN AV NAV button See page 20 Audio is output bu...

Page 100: ...o 65 C Operating temperature range PND only 14 F to 131 F 10 C to 55 C PND storage guarantee temperature 4 F to 140 F 20 C to 60 C Storage temperature range audio only 20 F to 185 F 40 C to 85 C Suita...

Page 101: ...eiver due to changes in product specifications external view etc USB Interface 1 1 Frequency Response 20Hz to 20 000Hz 3dB S N Ratio A weighted 75 dB Bass Mid Treble Control 11dB at 80 Hz 11dB at 700...

Page 102: ...100 100 Reference How to Contact ECLIPSE FUJITSU TEN LIMITED Contact FUJITSU TEN EUROPE GmbH M ndelheimer Weg 39 40472 D sseldorf F R Germany...

Reviews: