


6
When more than one vehicle control module is detected by the scan tool,
you will be prompted to select the module where the result would be retrieved
from. The most common modules are the Power train Control Module (PCM)
and Transmission Control Module (TCM)
CAUTION:
Do not connect or disconnect any test equipment with ignition ON
or engine running
How to connect to vehicle
1 Switch the ignition ‘OFF’
2 Locate the vehicle’s Data link Connector (DLC) plug
3 Securely plug the OBD II cable into the vehicle
4 Switch the ignition ‘ON’ (Engine can be ‘OFF’ or ‘RUNNING’)
NOTE:
It is recommended to have the engine ‘OFF’ while scanning. This
avoids the engine from getting too hot for further diagnosis and testing and
also reduce the build up of exhaust fumes if working in a confined area.
5 Scroll through and select Diagnostics in the main screen and press the
‘Enter’ key
A sequence of messages displaying the OBDII protocols will be observed on
the display until the vehicle protocol is detected
If the scan tool fails to communicate with the vehicle’s ECU more than
three times, a “LINKING ERROR!” message will be displayed
In this event, verify that the ignition is switched ON
Check if the scan tool’s OBD II connector is securely connected to the
vehicles DLC
6 Wait a few seconds to view a summary of the system status (MIL status,
DTC counts, Monitor status)
7 If more than one module is detected, you can select the module
to be tested
Scroll through and highlight the module and press the ‘Enter’ key
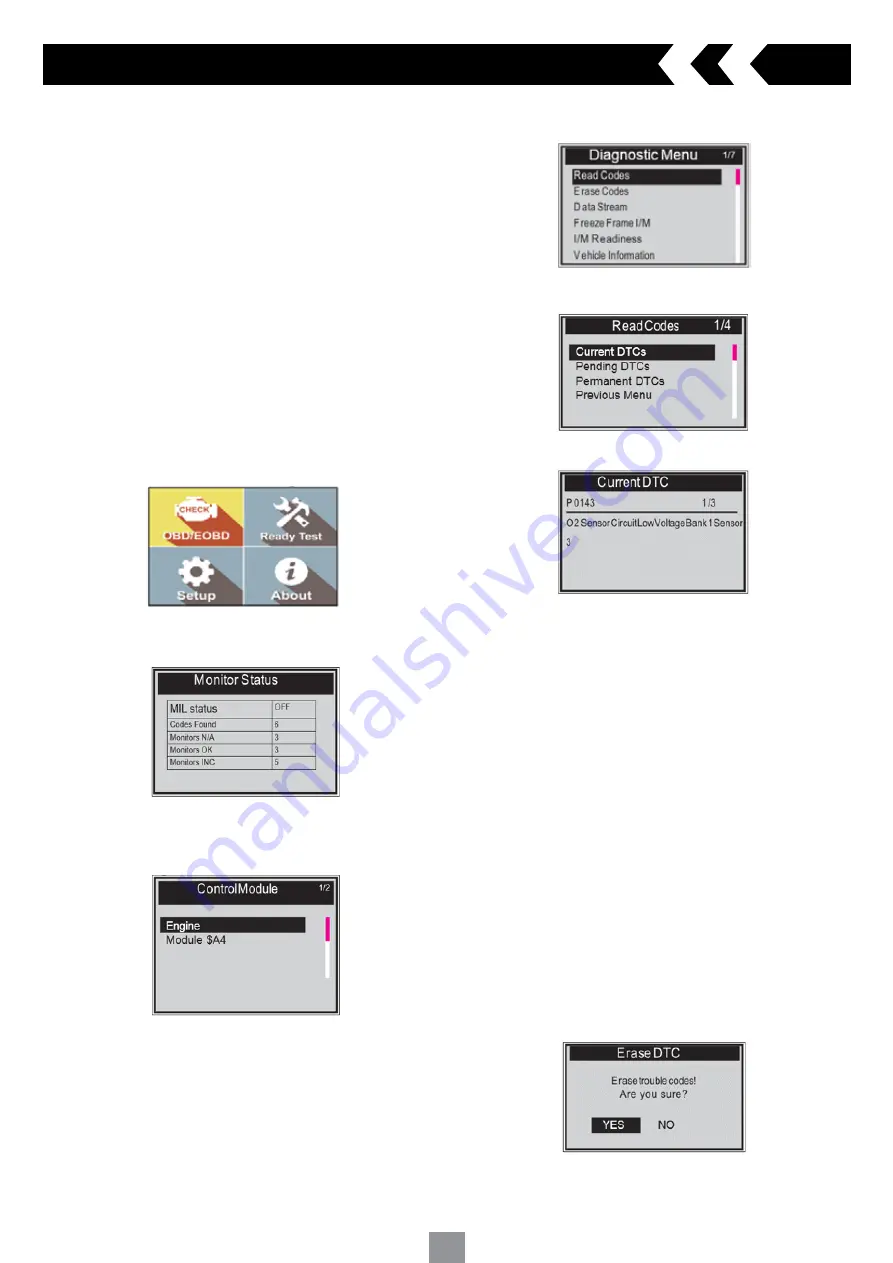
4.1 Read Codes
Stored codes will display as ‘hard codes’ or ‘permanent codes’. These codes
will cause the control module to illuminate the vehicles Malfunction Indicator
Light (MIL) when emission related faults occur
Pending codes will display as ‘maturing codes’ or ‘continues monitor codes’.
They indicate faults that the control module has detected during the current
or last driving cycle but are not considered serious. Pending Codes will
illuminate the Malfunction Indicator Lamp (MIL). If the fault does not occur
within a certain number of warm-up cycles, the code clears from memory.
4. OBD II Diagnostics
1. Highlight ‘Read Codes’ and press the ‘Enter’ key in the Diagnostic Menu. If
there are some codes, the screen will display the codes as shown below:
2. Scroll through to select Current DTCs or Pending DTCs from the read codes
menu and press the ‘Enter’ key
3. View DTC and their definitions on screen. Press the ‘ENTER’ key to
return to previous screen
If there are no DTCs it will display “No (pending) codes are stored in the
module!” Wait a few seconds or press the ‘ENTER’ key to return to the
previous menu
NOTE:
Permanent Codes function is available for merely vehicles
supporting the CAN protocols
The control module number, sequence of the DTCs total number of codes
detected and type of codes (Generic or Manufacturer specific, Stored or
Pending codes) will be observed on the upper right hand corner of the
display
4. If more than one DTC is found, scroll through to view all other codes
5. Select previous menu from the read codes screen and press the ‘Enter’
key to return to previous menu
4.2 Erase Codes
CAUTION:
Erasing the Diagnostic Trouble Codes (DTC) may not only erase
the codes from the vehicle’s ECU, but also the “Freeze Frame” data and
manufacturer specific enhanced data. Also the I/M Readiness Monitor
Status for all vehicle monitors is reset to Not Ready or Not Complete status.
Do not erase the codes before the fault has been inspected or repaired.
NOTE:
Erasing codes does not ensure that the DTC in ECU have been
eliminated completely. As long as there is a fault with the vehicle, the DTC
will keep appearing.
This function is to be performed with the ignition ‘ON’ and the engine ‘OFF’.
Do not start the engine.
1. Scroll through to highlight ‘Erase Codes’ and press the ‘Enter’ key
2. A warning message will appear to confirm your action
NOTE:
If ‘NO’ is selected. A message of ‘Command Cancelled!’ will be
displayed. Wait for a few seconds and press any key to return to menu


