26
Product functions
TTB545SSW
by TITAN
In
more
detail…
GB
IE
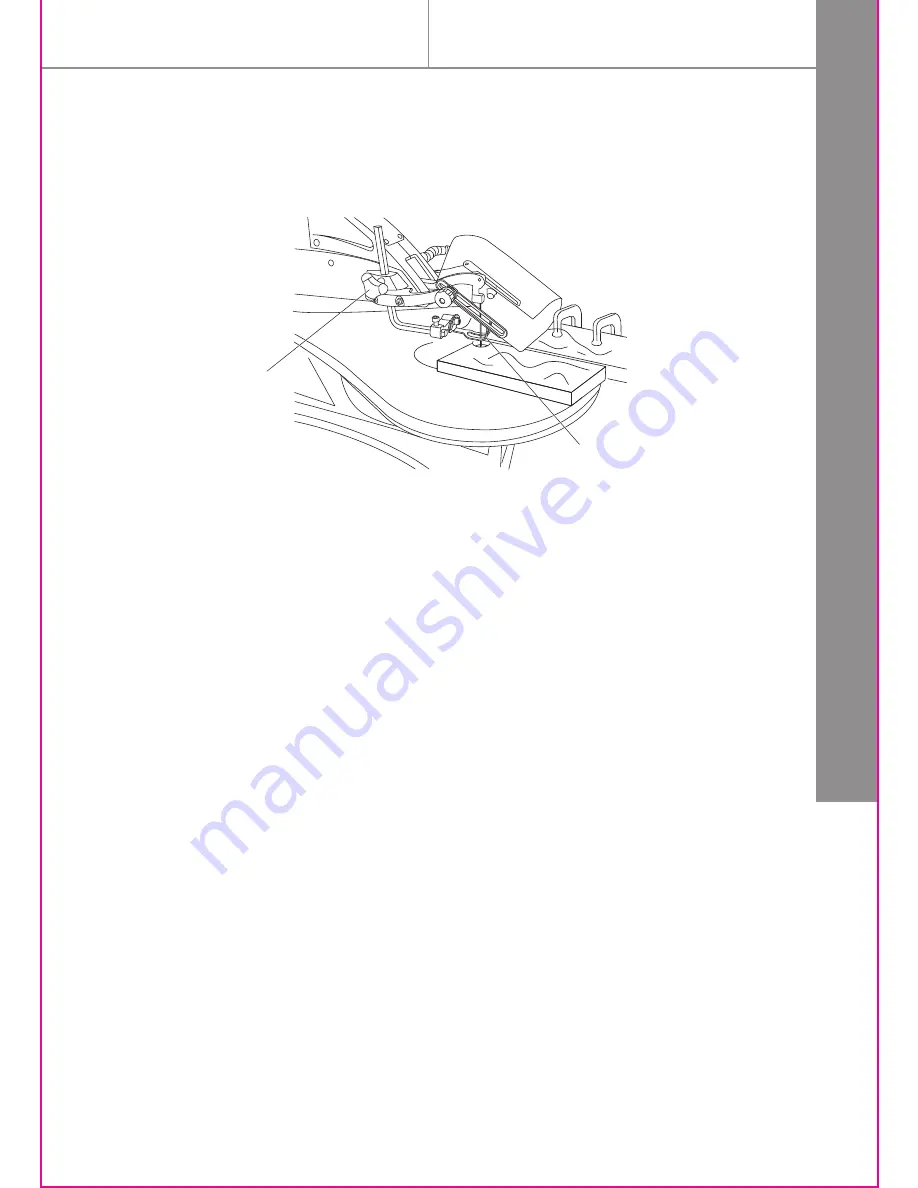
> When the cut is complete, move the trailing edge of the workpiece beyond the blade guard foot. Turn the switch OFF.
Fig. 21
6
19
Page 1: ...Original Instructions_MNL_TTB545SSW_GB_V01_130720 TTB545SSW 240W Scroll Saw Barcode 5052931253661 WARNING Read the instructions before using the product...
Page 2: ...p a fault within this period contact your retailer This TITAN product carries a 2 year guarantee If your product develops a fault within this period you should in the first instance contact the retail...
Page 3: ...uble shooting Recycling and disposal EC declaration of conformity 20 03 04 05 12 Getting started Your product Technical and legal information Before you start These instructions are for your safety Pl...
Page 4: ...1 On off switch 2 Switch for LED light 3 Protective guard 4 Knob for blade guard 5 Upper blade holder 6 Blade guard foot 7 Work table 8 Bevel lock handle 9 Sawdust port 10 Base 11 Storage compartment...
Page 5: ...power tool manufacturers and suppliers to provide indicative vibration test results to enable users to make informed decisions as to the period of time a power tool can be used safely on a daily basi...
Page 6: ...use is not adequately managed Warning identify safety measures to protect the operator that are based on an estimation of exposure in the actual conditions of use taking account of all parts of the o...
Page 7: ...r scroll saw make sure you follow basic safety principles to reduce risk of personal injury electric shock and fire Please read the following instructions prior to operating this product and keep for...
Page 8: ...and safer at the rate for which it was intended 7 Use the right tool Do not force small tools to do the job of a heavy duty tool Do not use tools for purposes not intended for example do not use circ...
Page 9: ...determine that it will operate properly and perform its intended function Check for alignment of moving parts binding of moving parts breakage of parts mounting and any other conditions that may affec...
Page 10: ...id injury caused by pieces thrown from accessories use only recommended accessories designed for this saw Follow the instructions supplied with the accessory The use of improper accessories may cause...
Page 11: ...ing downward Do not start the saw with the workpiece pressing against the blade Slowly feed the workpiece into the moving blade Use caution when cutting round or irregularly shaped work pieces Round i...
Page 12: ...ctive equipment You will need items not supplied Suitable personal protective equipment Phillips screwdriver Combination square 12mm Spanner Small C clamps 2pcs Ruler or measuring tape 12 Straight scr...
Page 13: ...is approximately at a right angle to the blade Use a combination square 36 not provided to set the table exactly 90 to the blade 25 If there is space between the square and the blade adjust the table...
Page 14: ...crew 37 holding the bevel scale pointer and position pointer to 0 Tighten the screw Attach the blade guard foot 6 and tighten the screw 24 with 5mm hex key Blade guard foot adjustment When cutting at...
Page 15: ...if installed If excessive sawdust buildup occurs inside the base use a wet dry vacuum cleaner or manually remove sawdust This will keep your saw cutting efficiently Adjusting the dust blower light Fo...
Page 16: ...hen purchasing blades refer to the back of the package for best use of blades on various materials Use this table as an example but practice and your own personal preference will be the best selection...
Page 17: ...ng the blade tension lock lever 13 To remove a blade Lift the blade 25 out by pulling forward on blade 25 then lifting the blade 25 from the upper blade holder 5 and lower blade holder 22 Slight downw...
Page 18: ...ry tool coupler 40 of the rotray tool 27 Insert the inner cable into the opening 42 at the end of the motor fitting Place the coupler 41 over the motor fitting Turn the coupler to ensure a good fit an...
Page 19: ...p Place the rotary table insert 44 in the opening on the rotary table Install rotary tools Place the chuck key 29 into the side keyhole of the chuck meshing the key with the gear teeth Turn the chuck...
Page 20: ...TTB545SSW by TITAN 20 In more detail In more detail 21 27 31 33 34 Product functions Care and maintenance Trouble shooting Recycling and disposal EC declaration of conformity GB IE...
Page 21: ...ou learn how to use the saw Best results are achieved when cutting wood one inch thick or less When cutting wood thicker than one inch guide the wood very very slowly into the blade and take extra car...
Page 22: ...light press the light switch 2 to the OFF O position LED Light switch Always wait for the saw or rotary to come to a complete stop before restarting To turn the saw or rotary on press the switch 1 to...
Page 23: ...t 6 by loosening the height adjustment knob 19 Position the workpiece against the blade and place the blade guard foot against the top surface of the workpiece Secure the blade guard foot 6 by tighten...
Page 24: ...mp adjustment Position the workpiece on the right side of the blade Lower the blade guard foot against the surface by loosening the height adjustment knob Retighten Follow steps 5 7 under Freehand cut...
Page 25: ...Clamp the straight edge to the table Recheck your measurements using the workpiece to be cut and make sure the straight edge is secure Position the workpiece against the blade and place the blade guar...
Page 26: ...26 Product functions TTB545SSW by TITAN In more detail GB IE When the cut is complete move the trailing edge of the workpiece beyond the blade guard foot Turn the switch OFF Fig 21 6 19...
Page 27: ...to ensure you can concentrate on the work and have full control over the product After use Switch the product off disconnect it from the power supply and let it fully cool down before storing Store th...
Page 28: ...brication Check the condition of the carbon brushes after 50 hours of use If the brushes are worn to1 16 2mm in length replace them Loosen and remove the two brush caps 47 using a flat blade screwdriv...
Page 29: ...reen yellow Earth Blue Neutral Brown Live As the colours of the wires in the mains lead of this appliance may not correspond with the coloured markings identifying the terminals in your plug proceed a...
Page 30: ...loth to protect it against dust Transportation Switch the product off and disconnect it from power supply before transporting it anywhere Protect the product from any heavy impact or strong vibrations...
Page 31: ...working are taken Suspected malfunctions are often due to causes that the users can fix themselves Therefore check the product using this section In most cases the problem can be solved quickly Troubl...
Page 32: ...2 Unsuitable mounting surface 3 3 Loose table 3 4 Motor mount is loose 3 1 See proper mounting instruction 3 2 Replace plywood workbench surface with solid lumber surface 3 3 Tighten table adjuster k...
Page 33: ...d disposal In more detail GB IE Recycling and disposal Waste electrical products should not be disposed of with household waste Please recycle where facilities exist Check with your Local Authority or...
Page 34: ...product Designation 240W scroll saw Model TTB545SSW Complies with the following Directives 2004 108 EC Electromagnetic Compatibility Directive 2006 42 EC Machinery Directive 2006 95 EC Low Voltage Di...
Page 35: ...Titan Power Tools UK Ltd Trade House Mead Avenue BA22 8RT GB...