background image

Español

 20 

 © Titan Tool Inc.  Todos los derechos reservados.

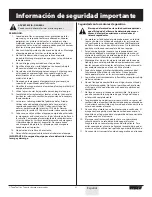
Información de seguridad importante

Lea toda la información de seguridad antes de 

operar el equipo.  Guarde estas insturcciones.

Indica una situación peligrosa que, de no evitarse, 

puede causar la muerte o lesiones graves.
Para reducir los riesgos de incendios, explosiones, 

descargas eléctricas o lesiones a las personas, lea y 

entienda todas las instrucciones incluidas en este 

manual. Familiarícese con los controles y el uso 

adecuado del equipo.

ADvERTENcIA: EXPLOSIÓN O INcENDIO  
Los vapores inflamables, como los vapores de las pinturas 

y los solventes, pueden encenderse o explotar en el área 

de trabajo.  

PREvENcIÓN:
  1.  Use el equipo solo en áreas bien ventiladas.  Mantenga un 

buen suministro de aire fresco moviéndose a través del área 

para mantener el aire al interior del área de pulverización 

libre de acumulación de vapores inflamables. Mantenga el 

conjunto de la bomba en un área bien ventilada.  No pulverice 

el conjunto de la bomba.

  2.  No llene el tanque de combustible mientras el motor esté en 

marcha o está caliente; apague el motor y deje que se enfríe.  

El combustible es inflamable y puede encenderse o explotar si 

se derrama sobre una superficie caliente.

  3.  Elimine todas las fuentes de encendido como luces de piloto, 

cigarrillos, lámparas eléctricas portátiles y cubiertas plásticas 

(potenciales arcos estáticos).  

  4.  Mantenga el área de trabajo libre de desechos, lo que incluye 

solventes, trapos y gasolina.

  5.  No conecte o desconecte cables de alimentación ni prenda o 

apague interruptores de luz o de energía cuando hay vapores 

inflamables presentes.

  6.  Conecte a tierra el equipo y los objetos conductores en el área 

de trabajo.  Asegúrese de que el cable de conexión a tierra 

(no viene equipado) está conectado desde el terminal de 

conexión a tierra a tierra verdadera.  

  7.  Use solo mangueras conectadas a tierra.

  8.  Sostenga firmemente la pistola pulverizadora en el costado de 

un cubo conectado a tierra cuando se aprieta el gatillo hacia 

un cubo.  

  9.  Si hay formación estática de chispas o si usted siente una 

descarga, detenga inmediatamente la operación.  

  10.  Conozca el contenido de la pintura y de los solventes que 

se pulverizan.  Lea todas las hojas de datos de seguridad 

de materiales (MSDS) y las etiquetas de los recipientes 

proporcionadas con las pinturas y solventes.  Siga las 

instrucciones de seguridad de los fabricantes de las pinturas y 

los solventes.

  11.  No use una pintura o un solvente que contenga hidrocarburos 

halogenados.  Tales como: cloro, fungicida, blanqueador, 

cloruro de metileno y tricloroetano.  Estos no son compatibles 

con el aluminio.  Contacte con el proveedor del recubrimiento 

para obtener información acerca de la compatibilidad del 

material con el aluminio.

  12.  Mantenga un extintor de incendios en el área.

ADvERTENcIA: LESIÓN POR INyEccIÓN
El flujo de pintura a alta presión que produce este 

equipo puede perforar la piel y los tejidos subyacentes, 

ocasionando lesiones graves y posible amputación. 

CONSULTE A UN MÉDICO INMEDIATAMENTE.

PREvENcIÓN:
  1.  No apunte con la pistola ni pulverice sobre ninguna persona ni 

animal.

  2.  Mantenga las manos y el resto del cuerpo lejos de la descarga. 

Por ejemplo, no trate de detener fugas con ninguna parte de 

su cuerpo.

  3.  Utilice siempre el protector de la boquilla. No pulverice sin el 

protector en su sitio.

  4.  Utilice solamente la boquilla especificada por el fabricante.
  5.  Tenga cuidado al limpiar y cambiar las boquillas. Si la boquilla 

se atasca durante la pulverización, 


  ponga SIEMPRE el seguro del gatillo de la pistola, apague la 

bomba y libere toda la presión antes de reparar, limpiar el 

protector o la boquilla o cambiar la boquilla. La presión no 

se libera apagando el motor. Para liberar la presión hay que 

poner la manija de la válvula PRIME/SPRAY (cebar/pulverizar) 

en PRIME. Consulte el Procedimiento para liberar presión que 

se describe en el manual de la bomba.

  6.  No deje el aparato con corriente ni con presión cuando nadie 

esté pendiente de ella. Cuando no utilice el aparato, apáguelo 

y libere la presión siguiendo las instrucciones del fabricante.

  7.  La pulverización a alta presión puede inyectar toxinas en el 

cuerpo y producir daños graves en el mismo. En caso de que 

esto ocurra, visite a un médico inmediatamente.

  8.  Compruebe las mangueras y las piezas en busca de daños; 

una fuga puede inyectar material en la piel. Inspeccione la 

manguera antes de cada uso. Sustituya las mangueras o las 

piezas dañadas.

  9.  Este sistema es capaz de producir 3300 PSI / 22.8 MPa. Utilice 

solamente piezas de repuesto o accesorios especificados por 

el fabricante y con una capacidad nominal de 3300 PSI como 

mínimo. Entre ellos se incluyen boquillas pulverizadoras, 

protectores para las boquillas, pistolas, alargadores, racores y 

mangueras.

  10.  Ponga siempre el seguro del gatillo cuando no esté 

pulverizando. Verifique que el seguro del gatillo funciona 

correctamente.

  11.  Antes de utilizar el aparato, verifique que todas las conexiones 

son seguras.

  12.  Aprenda a detener el aparato y a liberar la presión 

rápidamente. Familiarícese a conciencia con los controles. La 

presión no se libera apagando el motor. Para liberar la presión 

hay que poner la manija de la válvula PRIME/SPRAY (cebar/

pulverizar) en PRIME. Consulte el Procedimiento para liberar 

presión que se describe en el manual de la bomba.

  13.  Quite siempre la boquilla pulverizadora antes de enjuagar o 

limpiar el sistema.

NOTA PARA EL mÉDIcO: La inyección a través de la piel es una 

lesión traumática. Es importante tratar la lesión tan pronto 

sea posible. NO retrase el tratamiento para investigar la 

toxicidad. La toxicidad es un factor a considerar con ciertos 

revestimientos inyectados directamente en la corriente 

sanguínea. Puede ser aconsejable consultar con un cirujano 

plástico o un cirujano especialista en reconstrucción de las 

manos.

Summary of Contents for ADVANTAGE GPX 165

Page 1: ...nd instructions Please read and retain for reference Owner s Manual Notice d utilisation Manual del Propietario Do not use this equipment before reading this manual Model Numbers Bare 0509009 Complete...
Page 2: ...and changing nozzle tips In the case where the nozzle tip clogs while spraying ALWAYS lock gun trigger shut pump off and release all pressure before servicing cleaning tip or guard or changing tip Pr...

Page 3: ...to operate the engine without proper instructions 5 Gasoline is extremely flammable and is explosive under certain conditions 6 Refuel in a well ventilated area with the engine stopped Do not smoke o...

Page 4: ...le or contaminated gasoline or an oil gasoline mixture Avoid getting dirt dust or water in the fuel tank Gasolines Containing Alcohol If you decide to use a gasoline containing alcohol gasohol be sure...

Page 5: ...he locked position while preparing the system 1 Place the siphon tube into a container of the appropriate solvent for the material being sprayed refer to recommendations of the material manufacturer A...

Page 6: ...flushed from the spray hose and paint is flowing freely from the gun 18 Lock the gun by turning the gun trigger lock to the locked position 19 Turn the pressure control knob fully counterclockwise to...

Page 7: ...a stroke This will result in an uneven spray and splotchy coverage Proper way to trigger the spray gun Approximately 10 to 12 inches Keep stroke even Start stroke End stroke Pull trigger Release trigg...

Page 8: ...t of the hose and solvent is coming out of the gun 16 Continue to trigger the spray gun into the waste container until the solvent coming out of the gun is clean NOTE For long term or cold weather sto...

Page 9: ...50 hours of operation Change the engine oil Spark Plug Use only a NKG BP6ES plug Gap the plug 0 025 0 030 0 7 0 8 mm Make sure to use a spark plug wrench when installing and removing the plug Replaci...

Page 10: ...r screws that secure the EPC assembly to the EPC housing Tighten securely Replacing the Sprayer ON OFF Switch Electrostatic discharge ESD potential could cause damage to electronic pressure control Us...

Page 11: ...e Control EPC Assembly Electrostatic discharge ESD potential could cause damage to electronic pressure control Use Titan ESD wrist strap P N 0507958 or equivalent when working on electronic pressure c...

Page 12: ...18 Position the front cover over the pump housing Secure the front cover using the four front cover screws 19 Apply blue Loctite to the bottom 3 4 threads on the fluid section cylinder 20 Turn the flu...

Page 13: ...ut disengages the filter housing carefully remove the transducer from the filter housing 4 Locate the wire that exits the rear of the electronic pressure control EPC housing and connects to the wire h...

Page 14: ...ning compound on the faces of the bearing 3 Install the drive shaft assembly into the center bore of the gear housing keeping it square to the housing so it does not bind Once the large ball bearing o...

Page 15: ...sembly Jam Nut Cylinder 4 Remove the return hose from the clamp on the siphon tube Unscrew the siphon tube from the inlet valve housing 5 Loosen and remove the fluid hose from the fitting on the back...

Page 16: ...gainst the top of the cylinder 42 Lubricate the first several threads at the top of the cylinder with anti seize compound Remove the cylinder from vise 43 Place the splash guard over the top of the pi...

Page 17: ...move the pump filter element and clean Remove the inlet screen and clean 4 Remove the siphon tube siphon set and clean 1 Replace the spray tip following the instructions that came with the spray gun 2...

Page 18: ...usant des blessures graves pouvant entra ner l amputation MESURES PR VENTIVES 1 Ne dirigez pas le pistolet sur et ne pulv risez pas les personnes ou les animaux 2 N approchez pas les mains ni d autres...

Page 19: ...Les produits chimiques contenus dans les vapeurs d chappement de cet appareil sont reconnus par l tat de la Californie tats Unis comme tant canc rig nes Ils peuvent galement entra ner des anomalies c...

Page 20: ...POR INYECCI N El flujo de pintura a alta presi n que produce este equipo puede perforar la piel y los tejidos subyacentes ocasionando lesiones graves y posible amputaci n CONSULTE A UN M DICO INMEDIAT...

Page 21: ...trabajar en el equipo importantE No cargue el equipo por el asa del carrito durante la carga y descarga Seguridad con los motores de gasolina El escape del motor de esta unidad contiene qu micos que...

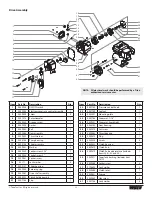
Page 22: ...el 1 8 0509552 Screw 4 9 0509520 Connecting pin 1 10 0509521 Retaining ring 1 11 0509144 Fluid section assembly 1 12 0509651 Siphon tube 1 13 0507783 Hose clip 1 Item Part No Description Qty 14 500653...

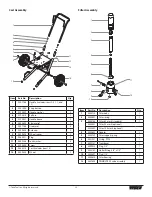
Page 23: ...p 1 Item Part No Description Qty 22 0507740 Pressure control knob 1 23 0507749 Seal nut 1 24 0509557 Mounting plate 1 25 0507784 Grommet 7 16 1 26 0509531 Grommet liquid tight 1 27 0555189 Gear housin...

Page 24: ...3 Seal washer 1 10 0509938 Piston 1 11 0509648 Outlet valve seal 1 12 0509601 Outlet cage 1 13 0509710 Outlet valve ball 1 14 0507454 Nylon washer 1 15 0509655 Outlet valve seat 1 16 0507733 Outlet va...

Page 25: ...11 0509386 Lock washer 4 12 0295608 Screw 4 13 0555218 Cart includes item 10 1 14 0509624 Wheel 2 Filter Assembly 7 10 8 9 11 12 1 2 3 4 5 6 Item Part No Description Qty 1 0508723 Filter body 1 2 0508...

Page 26: ...3 Valve stem 1 8 5006547 O ring Viton 1 9 0507747 Spring 1 10 0507742 Valve retainer 1 11 0507735 Cam base 1 12 5006543 Groove pin 1 13 0507662 Valve handle 1 5 Gallon Siphon Set optional P N 0509180...

Page 27: ...L Four Finger Airless Spray Gun with 517 reversible tip 0296260 G 10 XL Two Finger Airless Spray Gun no tip 0296236 G 10 XL Two Finger Airless Spray Gun with 517 reversible tip 0296326 G 10 XL Four Fi...

Page 28: ...nd User transportation prepaid THERE IS NO OTHER EXPRESS WARRANTY TITAN HEREBY DISCLAIMS ANY AND ALL IMPLIED WARRANTIES INCLUDING BUT NOT LIMITED TO THOSE OF MERCHANTABILITY AND FITNESS FOR A PARTICUL...

Reviews: