4
SHORT-STOP
1
2
3
4
5
6
F
See Section
6.3
L1
T1
L2
T2
MOTOR
L3
T3
SHORT-STOP
1
2
3
4
5
6
M
See Section
6.3
L1
T1
L2
T2
MOTOR
L3
T3
During braking, this interlock circuit opens up, to lock out
the motor starting contactor or contactors. If the interlock
is not connected properly, it may be possible to energize
both the run and the brake contactors at the same time, and
damage the SHORT-STOP.
WARNING
Control voltage must not exceed 240 VAC.
Never connect Terminals 3 and 4 across (in
parallel
with)
the motor starter contactor coil or across the power line!
The motor starter contactor and brake contactor must not
be manually operated when the SHORT-STOP is
connected, as this will blow fuses and damage the unit.
Terminals 3 and 4 are connected to an electronic switch,
and cannot be tested for continuity with an ohmmeter
MANDATORY INTERLOCK TEST
[ ] With Power Off, remove all wires from terminals 1 & 2
[ ] After Terminals 3 and 4 have been connected. Turn
main power ON.
[ ] Try to start motor, using ALL start buttons or controls.
[ ] MOTOR SHOULD NOT START. If it does start, your
wiring is NOT CORRECT. Turn power OFF, revise
wiring, and re-test.
6.4
Power Wiring
Only AFTER the interlock has been correctly connected
and the mandatory test has been passed successfully, the
power wiring may be done.
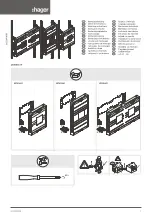
As shown in the circuit diagrams below and on the typical
wiring diagram inside the SHORT-STOP enclosure, power
conductors (capable of carrying the full motor starting and
running currents) should be connected to Terminals 1, 2, 5
and 6.
For typical power wiring arrangements, see Figures 6.4 to
6.6.
6.4.1
Single Direction, Single Speed
For single direction single speed applications follow the
"Typical Short Stop Installation Wiring" supplied inside
the Short Stop enclosure, or Figure 6.4.1.
Figure 6.4.1 Single Direction, Single Speed
6.4.2
Forward and Reverse
As can be seen from Figure 6.4.2, the power wiring for a
bi-directional system is essentially the same as for the
basic single direction installation.
Please refer back to Section 6.3, however, to insure that
the interlock is connected so as to disable BOTH the
forward and the reverse motor starters during braking.
Braking will take place when stopping from EITHER
direction.
Figure 6.4.2
Forward / Reverse System
6.4.3
Wound Rotor Motors
Wound rotor motors require no special attention, since
they are also induction motors. Any motor wired with the
SHORT-STOP must, of course, be used with a Magnetic
Starter so that the interlock can be wired correctly. Mini-
mum resistance should be connected to the rotor circuit
during braking.
R


