background image

9

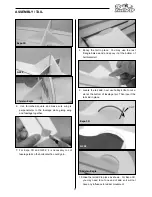
29.Secure power unit on the fuselage with the

mounting plates by four 2x8mm self-tapping

screws. Drive shaft should be in line with the

fuselage without qny thrust angle.

30.Locate M3 nut, put it in the propeller then thread

the propeller on the drive shaft. Next attach

propeller washer and another nut.  Secure it firmly

and make sure to leave at least 6mm drive shaft

for rubber spinner.

31.Install the rubber spinner on drive shaft properly

and make sure it is not transformed.

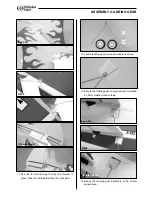
26.Locate all the parts of universal power unit.

27.Press the bearings all the way in then insert the

Spur Gear Drive Shaft. Snap on the E clip.  Try

pull the drive shaft and make sure E clip is well

positioned and drive shaft will not come off.

28.Install the motor in the power unit.  To get good

gear mesh, use a piece of thin paper and set

between the pinion and spur gear.  Then secure

the motor tightly with 3x5mm machine screw and

washer.  Remove the paper by rotating the gear.  

ASSEMBLY / MOTOR

Summary of Contents for 4316 EXPO 3D Profile EP

Page 1: ...res adult supervision Read through this book completely and become familiar with the assembly and flight of this airplane Inspect all parts for completeness and damage Contact Thunder Tiger authorized...

Page 2: ...are interested in learning 3D aerobatics or for those experienced 3D pilots looking for a relaxed practicing plane that can be used both outdoor or indoor Thunder Tiger guarantees that you should enjo...

Page 3: ...ttery instead of any other NiCd or NiMH battery pack The advantage of Lipoly battery is much lighter than the traditional Nicd or NiMH battery pack of the same capacity Thunder Tiger provide high perf...

Page 4: ...S6359 Linkage Set Expo 3D G202 AS6363 Linkage Set Christen Eagle Velcro 1 Double Side Tape 1 Horizontal Tail 1 Main Wing 1 Lower Wing 1 Upper Wing 1 Fuselage 1 Fuselage 1 Triangle Balsa Wood 2 Tail Sk...

Page 5: ...ur Gear Drive Shaft 1 Pinion 1 AS6355 Drive Shaft AS6361 Decal AS6358 Control Horn AS6357 Super 370 Motor AS6356 Motor Mount AS6336 Wheel AS6354 Spinner Landing Gear 1 2x5 mm Washer Screw 2 Mount 1 Re...

Page 6: ...e wing support and epoxy the wing support and upper wing in place as shown It will be easier if you place the airplane up side down to apply epoxy at the joints 1 Check all pre hinged aileron and elev...

Page 7: ...place You may use the rest triangle balsa wood and epoxy it at the bottom of horizontal tail 9 Locate the tail skid next use hobby knife to cut a slot at the bottom of fuselage tail Then insert the ta...

Page 8: ...od with furnished 2 x 5mm washer wood screws 14 Epoxy the landing gear assembly in the hollow square area 6 ASSEMBLY LANDING GEAR 11 Use the furnished tape to tape the Rudder in place Tape the left si...

Page 9: ...horn for best control throw 15 Install wheels by threading the wheel pant retainer in proper position 16 Epoxy the wheel pants on the retainer Make sure two wheel pants are parallel 17 Install rudder...

Page 10: ...d elevator are even with the vertical fin and horizontal tail respectively 23 Use the same way to install control horns for elevator and rudder 24 Install rudder and elevator servo note the orientatio...

Page 11: ...ner 31 Install the rubber spinner on drive shaft properly and make sure it is not transformed 26 Locate all the parts of universal power unit 27 Press the bearings all the way in then insert the Spur...

Page 12: ...TROL THROWS The following contorl throw of 3D Profile EP is merely a starting point for your radio setup and can be tailored to fit your flying syle For All three models the aileron and elevator are o...

Page 13: ...longitude balance to make hovering much more stable Try to create a small hole after the motor and on the thrust line Get music wire or string then thread the wire through the hole Make sure that mode...

Page 14: ...may say simulator is not realistic but this is not true There are some simulators available in the market and its scenery and performance are just like a real thing For example Aerofly Pro Deluxe USB...

Page 15: ...e tuned in the air Always start on low rates when launch the airplane or take off of the ground Once you fine trim the airplane in the air then tune the exponential setting you will be able to fly it...

Page 16: ...place with the other side for spectators Only personnel involved with flying the aircraft are allowed at or in the front of the flight line Intentional flying behind the flight line is prohibited 4 I...

Reviews: