THORLABS PCS-6000 Series User Manual Download Page 9

Rev B

,

January 10, 2020

Page 5

3.2.

Configurations

The PCS-6000 is a modular system. Different configurations are available for
the linear stages. Stages normally are configured with a motor and either 150 or
300

µm

piezos. Alternatives to the normal configurations are those that have

coarse motion provided by a manual adjusting screw or no coarse motion at all.
It is possible to get coarse motion only with no fine piezo motion.

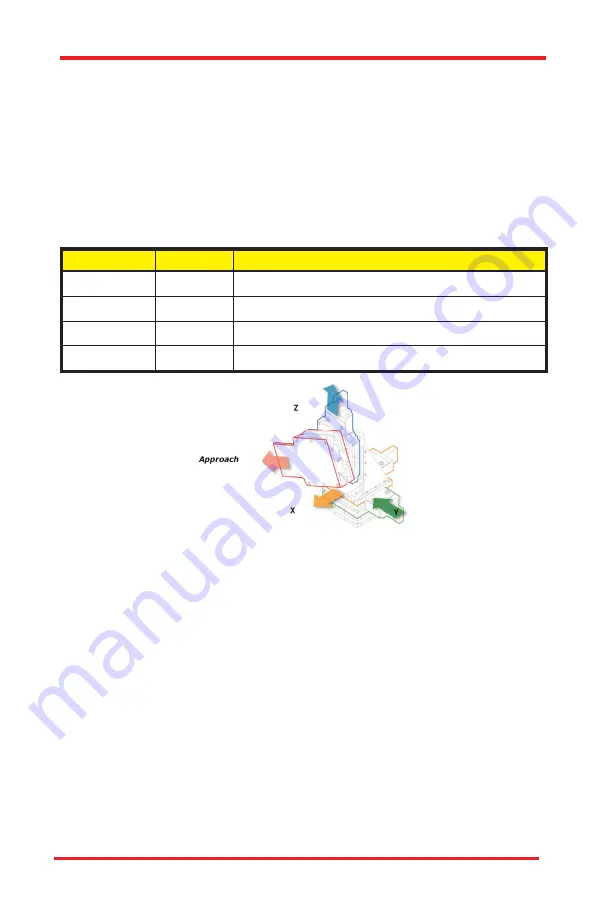
3.2.1. Axes of Motion

The four axes correspond to the following motions:

Axis Number

Axis Name

Motion Type

1

X

Front to back from operator's perspective

2

Y

Left and right from operator's perspective

3

Z

Vertical (up and down)

4

Approach

Angled (adjustable) axis that the headstage attaches to

Figure 3–2 Graphic Representation of Axes

3.2.2. Right and Left Configurations

A right-hand configuration is used when the manipulator is placed on the right of
the microscope. The manipulator is assembled such that the approach axis pro-
jects to the left and the rotary stage locking knobs are conveniently located on
the outboard (right) side of the manipulator. The left-hand configuration is essen-
tially a mirror image of the right hand.

3.2.3. Manipulator Configurations

PCS-6100

This configuration has three orthogonal axes:

Axis 1

: Front to back

Axis 2

: Left to right

Axis 3

: Vertical

PCS-6000 Series Motorized Patch-Clamp Micromanipulator

Chapter 3: Description

Summary of Contents for PCS-6000 Series

Page 1: ...PCS 6000 Series Motorized Patch Clamp Micromanipulator User Guide ...

Page 2: ...tion 4 3 1 1 Coarse Motion 4 3 1 2 Fine Motion 4 3 2 Configurations 5 3 2 1 Axes of Motion 5 3 2 2 Right and Left Configurations 5 3 2 3 Manipulator Configurations 5 Chapter 4 Orientation 10 4 1 Control Unit 10 4 1 1 Front Panel 10 4 2 Motor Control Board 10 4 2 1 Servo Motor Control Memory Options 11 4 3 Piezo Control Board 11 4 4 Rear Panel 12 4 4 1 Operating Voltage 12 4 4 2 Chassis Ground 12 P...

Page 3: ...or Motion 18 6 2 Positioning Under the Microscope and Checking for Piezo Motion 18 6 3 Adjusting the Approach Axis Angle 19 6 4 Setting the Adjustable Stop 20 6 5 Operational Hints 21 6 5 1 Joystick Control 21 6 5 2 Piezo Control 21 6 5 3 Single Stepping 21 6 5 4 Drift Problems 21 Chapter 7 Maintenance 22 7 1 Overview of Maintenance Required 22 7 1 1 Maintenance Schedule 22 7 1 2 Lubricating Motor...

Page 4: ...al Play in the Manual Adjustment Knobs 28 7 4 Troubleshooting 30 Chapter 8 Specifications 34 Chapter 9 Regulatory 36 9 1 Waste Treatment is Your Own Responsibility 36 9 2 Ecological Background 36 Chapter 10 Warranty 37 Chapter 11 Contacts 38 PCS 6000 Series Motorized Patch Clamp Micromanipulator ...

Page 5: ... manner not specified by Thorlabs Inc the protection provided by the equipment may be impaired Always follow the operating instructions as indicated IEC Class I Product Use only the 3 prong AC power cord supplied with this equipment Always insert the power cord into an electrical outlet provided with a protective earth contact Caution Indicates a potentially hazardous situation that if not avoided...

Page 6: ...ning with a travel range of about 250 mm and steps as small as 5 µm After preliminary positioning with the motors fine positioning is obtained by using piezo actuators with 150 µm or 300 µm of travel Special rotational adjustments are incorporated to allow optimum pipette working angles and easy pipette exchange The Burleigh PCS 6000 is modular and allows numerous con figurations so that it can be...

Page 7: ...avel adjustment screw or a motor 2 2 2 Axis Control Unit The Axis Control Unit ACU is a rectangular box with large rotary knobs that control the position of the piezo actuators Normally it is placed next to the microscope 2 2 3 Joystick The joystick controls the speed and direction of the servo motors The joystick assembly also includes switches to activate specific functions 2 2 4 Control Unit Th...

Page 8: ...oves the stages The direction of motion of the motor is controlled by the direction of the joystick motion It is possible to move along a diagonal line if the joystick is moved along a diagonal With practice an operator can learn to position the pipette within 15 μm of the target with the coarse motion provided by the motor 3 1 2 Fine Motion The piezo flexure stages integrated into the linear stag...

Page 9: ...and right from operator s perspective 3 Z Vertical up and down 4 Approach Angled adjustable axis that the headstage attaches to Figure 3 2 Graphic Representation of Axes 3 2 2 Right and Left Configurations A right hand configuration is used when the manipulator is placed on the right of the microscope The manipulator is assembled such that the approach axis pro jects to the left and the rotary sta...

Page 10: ...t handed configurations In addition there are two rotary stages one that rotates in the horizontal plane and one in the vertical plane Figure 3 3 PCS 6100 PCS 6200 This configuration has three axes Axis 1 Front to back Axis 3 Vertical Axis 4 Approach All three axes have motorized linear stages with 150 μm piezo elements In addi tion there are two rotary stages one that rotates in the horizontal pl...

Page 11: ...re are two rotary stages one that rotates in the horizontal plane and on in the vertical plane Figure 3 5 PCS 6300 PCS 6400 This configuration has three axes Axis 1 Front to back Axis 3 Vertical Axis 4 Approach All three axes have motorized linear stages with 300 μm piezo elements In addi tion there are two rotary stages one that rotates in the horizontal plane and one in the vertical plane PCS 60...

Page 12: ...e 3 6 PCS 6400 PCS 6500 This configuration has four axes Axis 1 Front to back Axis 2 Left to right Axis 3 Vertical Axis 4 Approach Axis 1 and Axis 2 have motorized linear stages only Axis 3 has a motor and a 150 μm piezo element Axis 4 has a 150 μm piezo element with no coarse motion Figure 3 7 PCS 6500 ...

Page 13: ... Rotary Pivot Stage Each PCS 6000 manipulator comes with two rotary pivot stages with adjustable stop mechanisms Figure 3 8 One is on the very bottom of the manipulator and allows for rotation in the X Y plane parallel to Z axis The other is mounted to the moving portion of the vertical axis and allows for rotation in the Y Z plane parallel to the X axis The rotary pivot stages enable the operator...

Page 14: ... Power light indicates that the power to the board is on and that the board has completed its power on routine The yellow Move light is lit only when one or more motors are being moved When the joystick is displaced from its rest position the microprocessor on the motor board provides the proper current drive waveforms to the motor causing it to move in the direction indicated by the joystick defl...

Page 15: ...tor 3 input on the controller front panel This is typically used on the manipulator for the Z vertical axis This controller setting can be verified by hearing three audible beeps when the controller is powered up CAUTION Never connect or disconnect the cable when the unit is on This could cause an arc and damage to the control unit 4 3 Piezo Control Board The piezo control board is the lower board...

Page 16: ...hassis of the PCS 6000 is connected to the safety ground in the line cord 4 4 3 Joystick and ACU Connections The joystick and the ACU plug into their respective connections on the back of the unit 4 5 Axis Control Unit The Axis Control Unit ACU allows you to adjust the piezo elements for fine pos itioning The ACU connects to the rear of the PCS 6000 control unit via a nine pin connector Depending ...

Page 17: ...nding receptacle If desired the cables can be interchanged when connecting them to the control unit so that a specific knob can control any stage It is also possible to adjust the resistance to turning of the large knob to enhance the tactile feedback refer to Section 7 2 Adjusting the Friction of the ACU Knobs 4 6 Joystick Figure 4 4 Joystick Servo Mode Control PCS 6000 Series Motorized Patch Cla...

Page 18: ...lished by press ing and holding down the button One beep indicates low speed has been selec ted and two beeps indicate that high speed has been selected The vertical or approach axis is controlled by rotating the large knob on the joystick to the right or left Moving the joystick results in velocity control The farther from the rest position the joystick moves the faster the motor runs There is an...

Page 19: ...vent dam age Follow the steps below to remove the clips 1 Use the 5 64 hex driver red handle to remove the screw going through the thicker portion of the clip Figure 5 1 Removing the Bottom Screw 2 Gently push the moveable portion of the stage to create a 1 mm gap between the thicker portion of the clip and the stationary stage member Figure 5 2 Creating the Gap 3 Remove the top screw and gently a...

Page 20: ...ting the Cables 1 Verify that the PCS 6000 control unit is turned off and unplugged 2 Position the control unit in the appropriate location usually on the outside of the Faraday cage and separate from the vibration isolation table Do not plug in yet 3 Plug the cables from the manipulator into the front panel of the control unit Cables are labeled with numerals that correspond to the location in th...

Page 21: ...te includes tapped holes to attach dir ectly to the plate supplied with the AXON CV 5 and CV 203B headstages in addition to holes for use with the HEKA EPC 9 headstage Additional holes may be added for other headstages 1 Make sure the mating surfaces are clean and free of debris 2 Attach the headstage using four 2 56 x 3 8 screws two extra screws are provided Use the A holes for the HEKA EPC 9 hea...

Page 22: ...on is released the number of tones indicates which axis has been selected Note Axis 4 is always selected on power up 4 If Axis 2 is selected move the joystick to the right and verify that the Move indicator comes on Verify that Axis 2 pure left right moves If it moves in the wrong direction change the position of the motor direction switch closest to the plug labeled MOTOR2 5 Move the joystick in ...

Page 23: ...bs on the ACU control to verify the piezo fine motion control works 6 3 Adjusting the Approach Axis Angle The approach axis can be set to any angle Figure 6 1 Adjusting the Angle of the Approach Axis 1 Use the joystick to adjust each of the motorized stages to the center of travel 2 Use the manual adjusting knob to center any manual stages 3 Affix the micromanipulator to the mounting surface CAUTI...

Page 24: ...s a pin and a brass block Figure 6 2 Adjustable Stop Mechanism 1 Position the headstage at the desired angle see previous procedure 2 If you have not already done so use a 050 hex wrench to loosen the set screws in the locking ring 3 On the headstage pivot stage carefully rotate the locking ring counter clockwise clockwise if mounted on the left side until the pin rests against the brass block Wit...

Page 25: ...helpful to practice by watching the Move indicator come on when the joystick is displaced enough for the motor to be given motion com mands 6 5 4 Drift Problems Stability PCS 6000 series micromanipulators have the ability to hold the position of their stages to high precision The performance specification is less than 1 µm per hour per axis When the observed stability is not at this level many tim...

Page 26: ...nth and every three months thereafter Bearing ways Inspect for rust or corrosion Looseness of mounting screws Verify nothing has loosened up Connection to electrical binding post micromanipulator and back of control unit Verify still tight General cleanliness and absence of chemical spills 18 month interval is heavy usage Lubricate motor shafts Refer to next section 24 month interval if normal usa...

Page 27: ...the top to take pressure off of the motor A convenient way to do this is to place a thumb on the base and the opposing forefinger on the moveable section and squeeze Figure 7 2 Take Pressure Off the Motor and Remove Module 4 Use a 3 32 hex driver to remove the motor module 5 Gently relax the pressure and allow the stage to move to its natural position 6 Grasp the anti rotate coupling and remove fr...

Page 28: ...ll bead of lubricant is needed along the central 1 of the shaft Figure 7 4 Apply Lubricant Along Central 1 Length of Motor Shaft 8 Apply a small amount of lubricant to the sides of the anti rotate dowel pin Figure 7 5 Apply Lubricant to Anti rotate Dowel Pin 9 Screw shift into motor Note that the shaft is screwed in all the way Figure 7 6 Anti rotate Until Fully Retracted and Angled for Assembly ...

Page 29: ...nto the stage taking care to maintain the pin in the slot 13 Loosely tighten the 4 40 screws to allow the motor module to be barely snug to the stage It is helpful to hold the stage as shown below Figure 7 8 Insert into Slot and Loosely Tighten the 4 40 Screws 14 Displace the moveable section of the stage to expose the end of the shaft Verify that the pin is in the slot Figures 7 9 and 7 10 PCS 60...

Page 30: ...he 4 40 screws that hold the motor module to the stage 7 1 3 Electronic Maintenance There is no maintenance or serviceability items inside the control unit ACU or joystick CAUTION Hazardous Voltage This unit is to be serviced by trained personnel only There are no operator servicable components inside the PCS 6000 control unit Dangerous voltages are exposed when the cover is removed Do not attempt...

Page 31: ...nnect from the power source 2 Remove the fuse holder by prying up as shown in Figure 7 11 Figure 7 11 Removing the Fuse Holder Figure 7 12 Removing and Replacing the Fuse 3 Be sure to replace fuse s with the same rating T type 4 0A 250V 7 2 Adjusting the Friction of the ACU Knobs To adjust the friction of the control knobs on the ACU follow the steps bellow 1 Place the ACU on a flat stable surface...

Page 32: ...ing the Friction and Eliminating Lateral Play in the Manual Adjustment Knobs The sleeve can be rotated to adjust the friction and lateral stability of the adjust ment knobs on the manual stages A special spanner wrench Figure 7 14 included in the toolkit can be used to easily rotate the sleeve Figure 7 14 Spanner Wrench 1 Locate the catch hole on the sleeve Figure 7 15 Position the smaller head of...

Page 33: ...kwise loosens the sleeve decreasing the friction of the adjustment knob Do not loosen the sleeve all the way It should always be snug If it is loose the adjustment knob is free to move laterally or to wiggle To increase the lateral stability simply tighten the sleeve Figure 7 16 Tightening the Sleeve vs Loosening the Sleeve PCS 6000 Series Motorized Patch Clamp Micromanipulator Chapter 7 Maintenan...

Page 34: ...tages l Check that the following screws are tight 1 Locking screws on rotary and pivot stages 2 Screws holding headstage to headstage mount 3 Screws holding linear stages to each other 4 Screws holding linear stages to mounting system l Check to see that the tension and vibrations are not coupled from the wires into the manipulator Leave a vibration loop between the vibration table and the manipul...

Page 35: ... specified for the stage when ACU knobs are adjusted Probable Causes Lack of fine motion is caused by a mechanical interference between the piezo and some part of the microscope such as the stage sample chamber or condenser The piezo cables may not be properly connected to the unit The cable to the ACU may have become disconnected at the back of the control unit What to Check Cables for linear sta...

Page 36: ...nit May be trying to move Axis 2 but only Axis 4 exists What to Check Cables for linear stages are properly plugged in Visually check for interference Check that no part of the micromanipulator is rubbing or hitting the microscope mount Verify that the orange Move light is on when the joystick is activated Using gentle finger pressure displace the axis to take pressure off the mechanism and activa...

Page 37: ... the microscope then the mounting system also may contribute to drift What to Check Check that the unit is warmed up and stabilized 30 minutes normally or 60 minutes for drift less than 1 µm per hour Check that the system PCS 6000 mount and microscope is protected from drafts Check for heat sources near the system for example power supplies heaters lamps sunlight Check for ambient temperature chan...

Page 38: ...to 100 Atmospheric Pressure 50 to 106 kPa Product Safety IEC 61010 1 2001 Safety Requirement for Electrical Equipment for Measurement Control and Laboratory Use Part I EN 61010 1 2001 Safety Requirement for Electrical Equipment for Measurement Control and Laboratory Use CAN CSA C22 2 No 61010 1 04 Safety Requirement for Electrical Equipment for Measurement Control and Laboratory Use Part I General...

Page 39: ... 240 V 50 60 Hz Fuse T4A 250 V 5 x 20 mm Electromagnetic Compatibility EN 61326 1 2001 A1 A2 Electromagnetic Compatibility Immunity Testing Measurement Control and Laboratory Equipment CE Marking Council Directive 72 23 EEC Council Directive 89 336 EEC Low Voltage Directive EMC Directive FCC Class A Digital Device or Peripheral Information to User This device complies with Part 15 of the FCC Rules...

Page 40: ...ot refer to other Thor labsproducts such as Pure OEM products that means assemblies to be built into a unit by the user e g OEM laser driver cards Components Mechanics and optics Left over parts of units disassembled by the user PCB s housings etc If you wish to return a Thorlabsunit for waste recovery please contact Thor labsor your nearest dealer for further information 9 1 Waste Treatment is Yo...

Page 41: ... the instrument has been damaged by accident mis use or as a result of modification by persons other than Thorlabs Inc per sonnel The liability of Thorlabs Inc except as to title arising out of supplying of said product or its use whether under the foregoing warranty a claim of negligence or otherwise shall not in any case exceed the cost of correcting defects in the products as herein provided Up...

Page 42: ...A Canada and South America Thorlabs Inc sales thorlabs com techsupport thorlabs com UK and Ireland Thorlabs Ltd sales uk thorlabs com techsupport uk thorlabs com Europe Thorlabs GmbH europe thorlabs com Scandinavia Thorlabs Sweden AB scandinavia thorlabs com France Thorlabs SAS sales fr thorlabs com Brazil Thorlabs Vendas de Fotônicos Ltda brasil thorlabs com Japan Thorlabs Japan Inc sales thorlab...

Page 43: ...www thorlabs com ...

Reviews: