Thor Ktchen HRD3001U User Manual Download Page 30

27

result similar to a rotisserie.

When roasting larger items like a whole turkey, use only the pan and grid for greater stability.
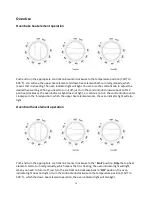
Convection Defrost

Turn on the convection fan in the rear of the oven circulatesthe air. The fan accelerates natural

defrosting of the food without heat. To avoid illness and food waste, do not allow defrost food to

remain in the oven for more than two hours without being cooked.

Defrosting

To thaw uncooked frozen food, set the oven temperature to 100-150°F . Once thawed, cook the food
immediately and do not refreeze.

To prevent liquid from thawing food dripping on the oven floor, be sure any uncooked food is tightly
wrapped in foil and/or placed in a container.

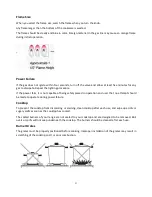
Convection Dehydrate

With the temperature control on 175

F, warm air is radiated from the bake heat element in the bottom

of the oven and is circulated by a convection fan in the rear of the oven. Over a period of time, the

water is removed from the food by evaporation. Removal of water inhibits growth of microorganisms

and retards the enzymes activity.

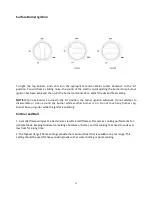
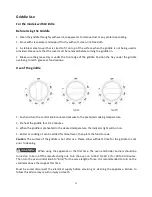
Oven top heat element operation

Note: Door must be closed during upper heat element operation

Broiling is a method of cooking tender cuts of meat directly under the broiler in the oven. Broiling in the

oven is accomplished with the oven door closed. It is normal and necessary for some smoke to be

present to give the food a broiled flavor.

If you open the oven door to check the food, have it open for as short a time as possible. This is to
prevent the control panel from overheating.

Use both the broil/roast pan and slotted grid supplied. The grid helps to reduce smoking and splatter by
letting grease drip into the bottom of the pan, away from intense heat. To prevent food sticking, spray
the grid with a light coating of non-stick cooking spray.

Preheating

Preheating is suggested when searing rare steaks (Remove the broiler pan before preheating with the

infrared broiler. Foods will stick on hard metal). To preheat, turn the “Oven” selector knob to the ‘Broil’

position. Wait for the burner to become hot, approximately 2 minutes. Preheating is not necessary

when broiling meat well-done.

To Broil

Broil one side until the food is browned; turn and cook on the second side. Season and serve. Always

pull the rack out to the “stop” position before turning or removing food.

Summary of Contents for HRD3001U

Page 1: ...Dual Fuel Convection Range User Manual Model HRD3001U HRD3002U HRD3004U HRD3031U HRD3088U HRD3604U HRD3605U HRD3606U HRD3618U HRD3620U HRD4801U HRD4802U HRD4803U HRD4804U HRD4806U HRD3031U A HRD4804U...

Page 2: ...re operating your new appliance for the first time This manual contains instructions on how to properly install and set up your new range as well as insights into the unique features that our product...

Page 3: ...ge Dimension 7 Positioning the Range 8 Important Notes to the Installer 10 Power Supply Cord Kit 12 Electrical Connection 13 Gas Supply Requirement 14 3 Range Overview 16 Cooktop Equipment 18 4 First...

Page 4: ...tell you what the potential hazard is tell you how to reduce the chance of injury and tell you what can happen if the instructions are not followed WARNING If the information in this manual is not fo...

Page 5: ...Gas leaks cannot always be detected by smell Gas suppliers recommend that you use a gas detector approved by UL or CSA For more information contact your gas supplier If a gas leak is detected follow...

Page 6: ...the range is moved Do not operate the range without the anti tip brackets in place Failure to follow the instructions in this manual can result in death or serious burns to children and adults Check...

Page 7: ...onoxide poisoning and overheating of the oven WARNING NEVER cover any slots holes or passages in the oven bottom or cover an entire rack with materials such as aluminum foil Doing so blocks air flow t...

Page 8: ...otholder contact hot heating element in oven DO NOT TOUCH HEATING ELEMENTS OR INTERIOR SURFACES OF OVEN Heating elements may be hot even though they are dark in color Interior surfaces of an oven beco...

Page 9: ...d above the surface units should be avoided If cabinet storage is to be provided the risk can be reduced by installing a range hood that projects horizontally a minimum of 5 inches beyond the bottom o...

Page 10: ...7 Range Dimension The depth of the range is 27 69 8 cm overall 30 inch dual fuel range 36 inch dual fuel range 48 inch dual fuel range...

Page 11: ...bustible materials behind the range below the counter top height DO NOT INSTALL CLOSER THAN 12 MM FROM ANY ADJACENT SURFACE The minimum vertical distance between adjacent cabinets and the cooking surf...

Page 12: ...he bottom of the hood should be 30 inch min to 36 inch above the counter top This would typically result in the bottom of the hood being 66 inch to 72 inch above the floor which provide safe and effic...

Page 13: ...rdance with local codes or in their absence with the National Electrical Code ANSI NFPA No 70 latest edition The installation of appliances designed for manufactured mobile home installation must conf...

Page 14: ...a potentially hazardous situation Never use your range for warming or heating the room Prolonged use of the range without adequate ventilation can be dangerous Donot store or use gasoline or other fla...

Page 15: ...connection may occur Access to Terminal Block Remove the screws at the lower end of the rear access cover and take it down to expose range terminal connection block a only a 4 conductor power supply c...

Page 16: ...cable clamp and pass through the four conductor wire from the bottom of the range 3 Loose the screws on the terminal block and connect the wire to terminals after then tighten the screws of cable cla...

Page 17: ...provided the risk can be reduced by installing a range hood that projects horizontally a minimum of 5 12 7cm beyond the bottom of the cabinets Connect Range to Gas Supply 1 Install a manual gas line...

Page 18: ...ting of the gas supply piping system at test pressure equal to or less than 1 2 psig 3 5kPa After installation Check ignition of cooktop burners Check ignition of oven burner Visually check tubular bu...

Page 19: ...16 Range Overview 30 inch series 4 burner dual range 36 inch series 6 burner dual range 48 inch series with griddle two oven dual range...

Page 20: ...nge sample Electric Broiler Top Heating Element 1 3 500 W Oven Electric Heating Element 1 850 W Top 3 000 W Base apply to 30 inch and 36 inch oven 1 2 500 W Base apply to 48 inch dual fuel range which...

Page 21: ...TU Griddle 1 5000 BTU HRD3001U 4 No HRD3002U 2 2 No HRD3004U 4 No HRD3031U 2 2 No HRD3088U 2 1 1 No HRD3604U 6 No HRD3605U 6 No HRD3606U 1 2 3 No HRD3618U 3 2 1 No HRD3620U 3 3 No HRD4801U 6 1 HRD4802...

Page 22: ...aners 5 Make sure you follow the instructions under First use before using your range for cooking Conditioning the oven Conditioning will burn off any manufacturing residues and ensure that you get th...

Page 23: ...the back of the oven Insert the shelves 1 Hold the front of both sides of the shelf firmly to keep it in horizontal 2 Put the shelf on the slot horizontally 3 Lift the front about 15 upward till the...

Page 24: ...t extend over the edge of the range or another burner that is on Take care when deep frying Oil or fat can overheat very quickly particularly on a high setting Make sure that all burner parts are pro...

Page 25: ...spark Do not attempt to disassemble or clean around any burner while another burner is on Do not touch any burner cap burner base or igniter while the ignitor is sparking Simmer and Boil 1 A smaller f...

Page 26: ...ils it is not capable of being safely placed in operation and user that no attempt should be made to operate during power failure Cooktop To prevent the cooktop from discoloring or staining clean cook...

Page 27: ...es not light or continue to turn the control knob counter clockwise to the broil position which the upper heat element works the oven indicator light will also light Oven broil heat element operation...

Page 28: ...after cooking or defrosting This is to avoid contamination by organisms which may cause food poisoning Take particular care during warmer weather Oven Temperature While in use the oven elements will...

Page 29: ...elf If baking on multiple shelves make sure you stagger items on the shelves so that one is never directly above another CONVECTION either reduce the temperature stated in the recipe and leave the bak...

Page 30: ...heat element operation Note Door must be closed during upper heat element operation Broiling is a method of cooking tender cuts of meat directly under the broiler in the oven Broiling in the oven is...

Page 31: ...ition directly under the broil burner If preheating the broil burner first position the broiler pan after the broil burner is preheated 3 Turn selector knob to Broil The oven indicator light will rema...

Page 32: ...the preferred cooking temperature 2 Preheat the griddle for 10 12 minutes 3 When the griddle is preheated to the desired temperature the indicator light will turn on 4 Butter or cooking oil can be ad...

Page 33: ...to ensure it doesn t stain See the pages following this chart for instructions on removing and replacing different parts of the range for cleaning or maintenance To help you identify any parts see ill...

Page 34: ...tergent and warm water Do not use abrasive cleaners or scrubbers they may permanently damage the finish Dry the components with a soft lint free cloth Side racks Pre soak any stubborn burnt on soiling...

Page 35: ...t The gasket is essential for a good seal Take care not to rub displace or damage it Stainless steel surfaces cleaning Do not use any cleaning product with chlorine bleach Do not use a steel wool pad...

Page 36: ...the door make sure there is a large enough clear protected surface in the kitchen to rest the door on Take care the oven door is heavy When replacing the burners make sure that the two locating pins...

Page 37: ...oth sides door gently close it about halfway 4 Disengage the hinges and remove the door place on a protected surface Replacing the oven door 1 Hold the door firmly in an approximately halfway open pos...

Page 38: ...on the left and right hinges as shown then close the door Replacing the oven light bulb When replace bulbs release the glass cover on the lamp holder first and then remove the bulb to replace new ligh...

Page 39: ...en Check that you are using the recommended temperatures and shelf positions The oven control settings and cooking times are intended to be used only as a guide Individual tastes may require the tempe...

Page 40: ...rized Service Agency during normal working hours For a Service Agency nearest you please call 877 288 8099 Thor Group will not pay for This limited warranty does not cover 1 Service to instruct you on...

Page 41: ...n Thor Group is not responsible for incidental or consequential damages Under no circumstances will Thorkitchen s liability exceed the cost that you paid for the product Some states do not allow the e...

Reviews: