background image

!

!

October 25

th

 2013 

www.thonk.co.uk 

12 

TouellSkouarn 
Strakal Brulu Module 

Eurorack DIY Kit 

Instructions 

Version 1.0 


33. 
 
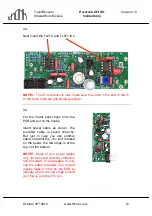
Next insert the TL072  and TL071 ICs. 


NOTE!

 – The IC orientation is vital, make sure the notch in the end of the IC 

or the circle mark are positioned as shown. 


34. 
 
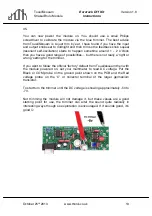
Put  the  metal  panel  back  onto  the 
PCB and put on the knobs. 
 
Insert  power  cable  as  shown.  The 
provided  cable  is  keyed  correctly. 
But  just  in  case  you  use  another 
cable, note that the -12v isn’t marked 
on the board, the red stripe is at the 
top, not the bottom. 
 

NOTE!

 – Some of your power cables 

may not be keyed correctly unlike the 
one  provided.  It  is  advisable  to  only 
use  the  cable  provided.  You  should 
maybe  make  a  mark  on  the  PCB  to 
indicate  where  the  red  stripe  should 
go if this is a concern to you. 


Summary of Contents for TouellSkouarn Strakal Brulu

Page 1: ...k co uk It also assumes no previous knowledge of electronics To learn to solder try http youtu be I_NU2ruzyc4 and the Adafruit guide to excellent soldering http bit ly 1l77tF4 Watch and understand tha...

Page 2: ...the same on both sides then stop Work out why from the soldering guides linked and don t continue until you are getting those results This isn t just OCD talking you are very likely to end up with a...

Page 3: ...emptying BAG A into a bowl or container This makes it much easier to pick parts as you need them and you re less likely to lose anything 2 The first job is to solder all the resistors 3 Start by sold...

Page 4: ...on 1 0 6 Solder the two 1M resistors in positions R7 and R8 7 Solder the single 220R resistor in position R9 8 Solder the single 390R resistor in position R17 9 Solder the single 470R resistor in posi...

Page 5: ...positions R6 R19 R20 You should now have no resistors left 15 Solder the two 8 pin IC sockets Ensure the notches in the sockets match the silkscreen 16 Solder the Vactrol Note the orientation of the t...

Page 6: ...the single red 10nF film capacitor into position C2 The orientation doesn t matter This capacitor has the marking 10nJ63 19 Solder the six red 100nF film capacitor into positions C1 C6 C7 C8 CD1 CD2...

Page 7: ...n is vital The gap in the rectangular shroud should point inwards 22 Solder the four 47uF electrolytic capacitors into positions C3 C5 C8 and C11 NOTE The orientation is vital The longer lead should g...

Page 8: ...to fit Make sure none of the legs are touching 24 Next you need to modify all four pots First snap off the little metal tab shown This is easily done with pliers or snips If you don t do this you may...

Page 9: ...the three jacks in the positions shown but DO NOT SOLDER yet Note the Fuzz CV jack is rotated 90 degrees compare to in and out jacks Put a plastic washer onto each of the pots 29 Now put the panel on...

Page 10: ...kal Brulu Module Eurorack DIY Kit Instructions Version 1 0 30 Remove the panel again 31 Next you will solder the smaller Germanium Transistor NOTE The transistor orientation is vital and is not intuit...

Page 11: ...you will solder the larger Germanium Transistor NOTE The transistor orientation is vital and is not intuitive Ignore the PCB silkscreen and follow the image on this page NOTE Later on you might need...

Page 12: ...etal panel back onto the PCB and put on the knobs Insert power cable as shown The provided cable is keyed correctly But just in case you use another cable note that the 12v isn t marked on the board t...

Page 13: ...od range of possibilities but there is not really a right or wrong setting for the trimmer If you want to follow the official factory default from Touellskouarn then with the module powered on set you...

Page 14: ...4 TouellSkouarn Strakal Brulu Module Eurorack DIY Kit Instructions Version 1 0 Suggested test points if you need to meter from the front of the board Note If you left the C leg on Q2 long then don t f...

Reviews: