background image

Remote control

19

EN

EN

Using the remote control handset to control your television
and satellite or cable receiver

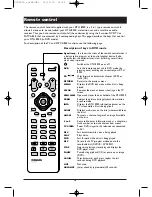
The DTH 8000 remote control handset is a 3 in 1 device that allows you to control the
operation of 3 devices: your DTH 8000, a television set, or satellite receiver.This page describes
the keys that control your television set and your satellite or cable receiver if they have the
same functions.

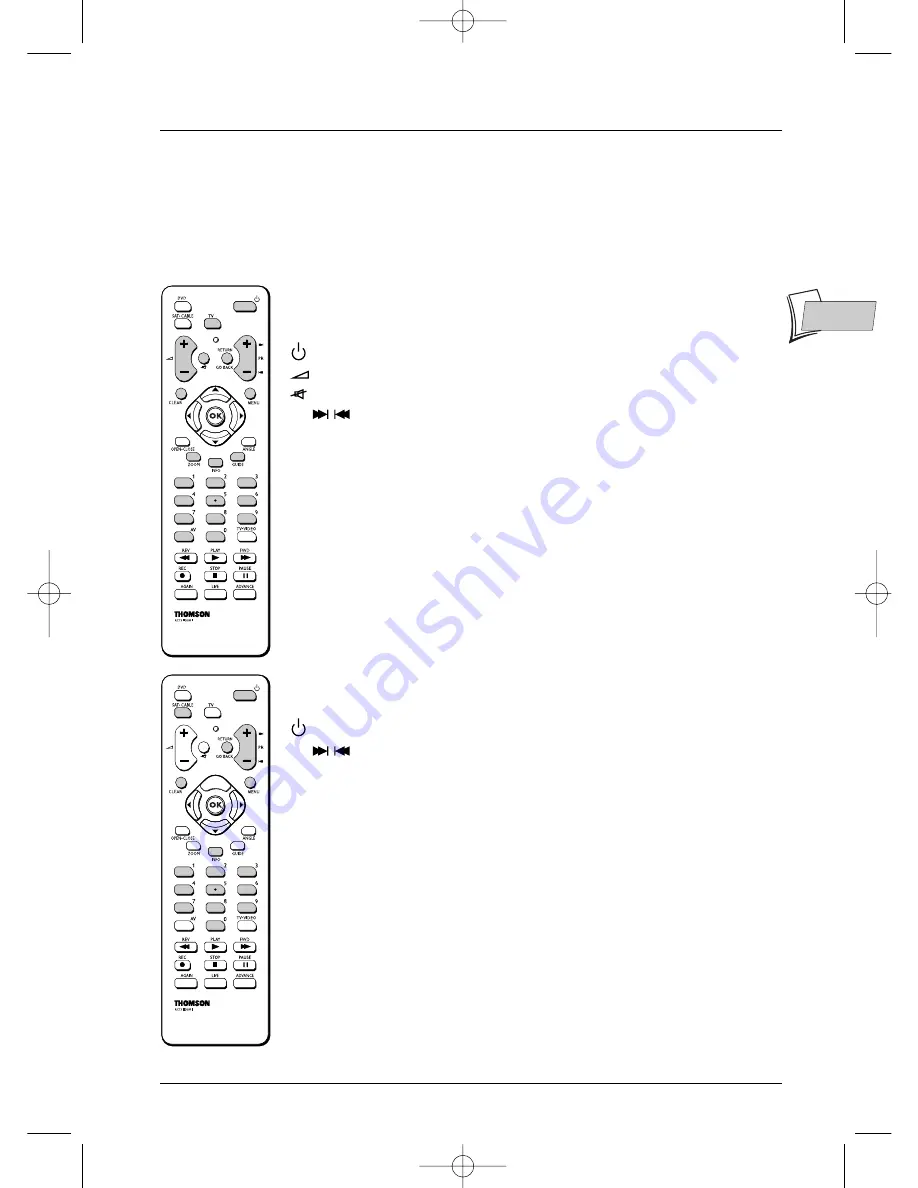
Controlling a TV set

TV

Sets the remote control unit in TV mode (by pressing once) and enables
you then to control your TV set.
Switches the TV set on or off.
Volume control.
Switches sound off or on again.

PR 

Switches channel or selects an AV socket.

AV

Selects an AV socket.

0 to 9

Keys enter digital values or change channel.

ZOOM

Enlarges (zooms in on) the picture on some TV sets.

MENU

Displays main TV set menu.

RETURN

Returns to the previous menu.

CLEAR

Removes menu or other information displayed on the screen.

GUIDE

Displays TV programme guide.

INFO

Displays information about the channel.

Note: colour keys enable one to use the teletext function on THOMSON TV sets.

Controlling a satellite or cable receiver

SAT.CABLE

Places the remote control in the SAT•CABLE mode (press once) and
then enables you to control your satellite or cable receiver.
To turn on or off the satellite or cable receiver.

PR 

Switches channel.

0 to 9

Keys enter digital values or change channel.

MENU

To display the main menu of the satellite or cable receiver.

RETURN

Returns to the previous menu.

CLEAR

Removes menu or other information displayed on the screen.

GUIDE

Displays the Naviclick page (if available).

INFO

To display the info on the channel or operation of the satellite or cable
receiver.

Remote control - Code A-B

With certain devices (combined TV/DVD or other DVD player) it may
happen that your DTH 8000 controls the DVD player of the other device.
In this case you can adjust your remote control and the DTH 8000 on
another code known as code B (adjustment shown on page 59).

DTH8000_en(EB-UB)  18/12/03  14:48  Page 19

Summary of Contents for DTH8000

Page 1: ...ating principle 33 With a DVD 33 With an audio CD 33 With aVCD Video CD 33 Loading and playing a disc 34 Search Options 34 Quick search of an image or a track 34 Still picture and frame advance 34 Slow motion in Pause mode on an image 35 Skipping a chapter or a track 35 Scene Again 35 Advance 35 Playback options 35 Enlarging an image zoom 35 Titles chapters time elapsed audio and subtitles 35 The ...

Page 2: ... unplugging the mains plug When connecting ensure that the plugs of the various cables are pushed securely into their corresponding sockets Your DTH 8000 is not intended for industrial use but for domestic purposes only Use of this product is for personal use only Copying CDs or downloading music files for sale or other business purposes is or may be a violation of copyright law Important notice P...

Page 3: ...to a mains socket by first connecting the cable to the back of the DTH 8000 Note connection to a satellite or cable receiver is detailled on page 9 Basic connections Your DTH 8000 has many connection possibilities to allow it to fit into a setup comprising several devices We recommend that you follow the connection setup on this page and then carry out the adjustments shown on the following pages ...

Page 4: ... the AV socket to which you connected your DTH 8000 The player menus as well as the dialogues and subtitles of the DVDs will always be presented in the language you ve chosen if it is available on the discs played 5 Choose a language using the keys on the remote control unit then confirm by pressing OK Displays on your DTH 8000 menus and banners Disc menus Each DVD disc offers a menu the layout an...

Page 5: ...ith the key and press OK An installation window will appear A cursor shows the progress in the set up of the channels You will need to wait a fair amount of time When all the channels that you can receive in your area have been stored 100 is indicated The number of channels found is indicated by XX channels found Press OK Automatic channel search In each region TV stations are broadcast on differe...

Page 6: ...nstallation of the channels is now complete Clock setting AutoClock If the date and time information is not correct adjust the clock as described below then check in the System Options menu that the automatic time setting is activated This menu is reached from the Setup menu see page 51 Setting the time and date on the DTH 8000 is important for the proper operation when recording programmes and fo...

Page 7: ...d in step 5 FRANCE LL for France EURO BG BGH for Western Europe DKK for Eastern Europe I for the United Kingdom 7 Select the Reception line using the or keys and use the key to choose the type of antenna Reception through external antenna select Antenna Ch Cable reception select Cable Ca 8 Select the Channel line using the or keys 9 Press PR to start the Manual search The search starts When a chan...

Page 8: ...lock setting Your DTH 8000 has an automatic time setting system which recognises the time signals put out by certain channels If your DTH 8000 is not set at the right time you can reset it by following the instructions below 1 If the Main Menu is not displayed press the MENU key 2 Select the Setup line using the or keys and press OK to validate 3 Select the Installation line using the or keys and ...

Page 9: ...ge channels Move the remote control one centimetre and try again When the channel of the satellite receiver changes locate the position on the front of the unit Then install the IR controller cell as shown on the diagram below facing the cell of the satellite receiver 1 or 2 cm away If need be use the adhesive supplied to stick the cell in place Satellite or cable receiver Your DTH 8000 is designe...

Page 10: ...hted press OK The screen which appears is a set up screen for the allocation of input terminals 8 If you connected your devices as indicated on page 9 check that AV2 SAT CABL has been allocated to Satellite Receiver or Cable Receiver otherwise change the allocation using the key Note Cable Receiver or Satellite Receiver to connect with a satellite or cable receiver terminal on the AV2 socket of yo...

Page 11: ...est The DTH 8000 sends a signal to your satellite receiver via the infrared controller cell A configuration menu will appear as the satellite receiver positions itself on channel 12 check that channel number 12 appears on the display panel of the satellite receiver sometimes fleetingly and even if no picture is visible on the TV screen If the satellite receiver is not on channel 12 select No with ...

Page 12: ...FUBA 35 37 GOODMANS 19 GRUNDIG 19 21 HIRSCHMANN 22 HITACHI 19 JOHANSSON 25 JVC 19 08 KATHREIN 26 MANHATTAN 25 MASPRO 27 MATSUI 21 MIMTECH 28 MINERVA 21 MITSUBISHI 19 MORGAN 06 NAGAI 29 NEC 30 NETWORK 31 NIKKO 32 NOKIA 23 NORDMENDE 19 33 OXFORD 08 ORBITECH 47 PACE 19 PALADIUM 21 PALCOM 35 PALSAT 29 PANASONIC 19 36 PHILIPS 20 PROSAT 19 QUADRAL 38 REDIFFUSION 39 RFT 20 21 26 SABA 02 05 40 49 SABRE 58...

Page 13: ...sockets and cables are generally identified by a colour code red for the left channel and white for the right 2 Video in Composite CVBS COMPOSITE VIDEO INPUT The yellow video socket also known as composite video or CVBS the image quality provided by this socket is less than all the other video sockets Only use this socket if all the other sockets are already in use 3 S Video input Y C S VIDEO IN T...

Page 14: ... colour C is separated from black and white Y in the video signal Note do not forget to also connect the audio cables because the S Video cable transmits images and not sound 6 Audio outputs OUTPUT L R The digital sound output from a disc being read is permanently available at the two audio sockets L and R of your DTH 8000 If you do not use the recommended Peritel Scart connection to the televisio...

Page 15: ...ce Note do not forget to connect the audio cables since the S Video socket handles only images and not sound 3 AV sockets Audio Video The AUDIO VIDEO sockets facilitate the viewing or copying of your video sequences from a Camcorder or any other AV device supplying a composite video signal and analog stereo sound PULL HERE to open flap The sockets located behind the flap on the front panel allow f...

Page 16: ... s disc tray 4 or resume viewing a program after a television pause PAUSE Pause during playback audio CD or mp3 or pause on an image DVD STOP To stop play press once or to stop recording in progress using the Channels menu press twice RECORD To start recording a TV programme the red indicator lights up and if necessary to adjust recording time by pressing repeatedly Each press on the RECORD key ex...

Page 17: ...rrently being recorded Start of disc playback DVD playback Playback of an Audio CD or VCD Pause of Audio CD or still frame DVD VCD Naviclick programmes guide displayed on the screen Indication of the selected source AV 2 or SA after installation of a satellite receiver page 9 and following pages AV 3 AUDIO VIDEO input sockets on the front AV 4 AV S VIDEO or AUDIO VIDEO input sockets at the rear Fa...

Page 18: ...ous menu MENU Displays the DVD disc menu while a disc is being played CLEAR Removes the menu or banner showing on the TV screen OPEN CLOSE Opens and closes the disc holder of the DTH 8000 ZOOM Enlarges the picture during playback slow motion or pause mode INFO Displays the DTH 8000 information banner on the TV screen while a disc is being played GUIDE Displays a sub menu on the disc where availabl...

Page 19: ...played on the screen GUIDE Displays TV programme guide INFO Displays information about the channel Note colour keys enable one to use the teletext function on THOMSON TV sets Controlling a satellite or cable receiver SAT CABLE Places the remote control in the SAT CABLE mode press once and then enables you to control your satellite or cable receiver To turn on or off the satellite or cable receiver...

Page 20: ...o standby 5 Press the STOP button and hold it down until the remote control light goes off Manual programming This method involves carrying out a manual search for the codes to be used for controlling your other appliances 1 Switch on the appliance you wish to use the remote control with 2 Press the corresponding key on the remote control while holding it pressed down enter one of the codes corres...

Page 21: ...he THOMSON logo temporarily appears it is because the screen saver has been triggered press the OK button to display the menu 3 Press the OK key of the remote control or one of the PR PR keys on the front panel The images of the last watched channel appear Encrusted within the image is information on the channel and programme This disappears after several seconds Note when the information banner i...

Page 22: ...ion The information displayed confirms the channel and programme being recorded Note after several seconds the information banner disappears You can redisplay it using the INFO key on the remote control Changing the channel during recording is not possible To watch another channel during the recording session select it directly on the television set using its own remote control handset With each r...

Page 23: ...plete select Keep Timer with and press OK 4 Channel a Enter the channel number using the digit keys of the remote control Pr must be displayed or browse the list of channels in the memory of the DTH 8000 using the PR PR key b Or select one of the Audio Video AV2 AV3 AV4 sockets to which is connected a device satellite receiver or other using the key the socket details are shown on page 16 Note sel...

Page 24: ...Timer Memorise your programming by selecting Keep Timer with the key and confirming with the OK key The Programming screen reappears Your programming is now displayed in the chronological list of programming already carried out On this screen it is only possible to display 5 programming sets from the maximum 16 If you have carried out more than 5 programmings to see the others press the or key Not...

Page 25: ...her from one channel to another or to browse through the current channel s list of programs To consult the programs of the channels at a given time choose a program from the list e g 9 o clock news and use the keys to move on to the programs of the other channels Note if the Naviclick guide does not give you satisfaction check the parameters as shown on page 56 Recording through the Naviclick TV g...

Page 26: ... OK Note Tte Memory Card line can only be accesed when you are using a recognised card 4 With the keys and OK select Play Disc to see the contents of the card Copy to transfer the image files and or sound files from the memory card to the recordable disc in your DTH 8000 With the keys and OK select the type of files to copy The contents of the card are then recorded on the recordable disc in your ...

Page 27: ... order to display AV2 in the information banner and on the display LIVE AV2 4 Record by pressing the REC key on the remote control or RECORD on the front panel 5 Stop the recording by pressing twice on the STOP key From a Camcorder or other device Your DTH 8000 has both RCA Audio Video and Ushiden sockets for the transfer of video to a recordable disc 1 Place a DVD R or DVD RW disc in the DTH 8000...

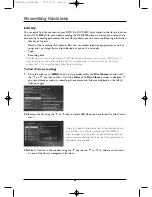
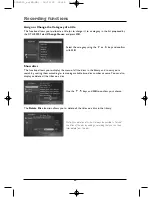
Page 28: ...sort by category etc To access the library follow these instructions To find a Title recording 1 From the main menu MENU key or in stop mode select the Disc Library function with the or key then confirm it with the OK key The Disc Library screen is displayed If you have already carried out recordings these names and titles are displayed on the left 6 titles per page 2a Browse the list using the or...

Page 29: ...ccess to the title menu This function allows you to access the menu of a particular disc displaying all the titles on the disc and displaying the selected title in a small window To display the title full screen press PLAY To display another title use the or key and the PLAY key To delete the title press the OK key and select Delete Title with the or keys Confirm with OK In the confirmation screen...

Page 30: ...e menu of all the discs in the library and to carry out a search by sorting them according to remaining available time disc number or name You can also display or delete all the titles on a disc Use the keys and OK to confirm your choice The Delete Disc function allows you to delete all the titles on a disc in the library Note if you delete a disc it will always be possible to reload the titles of...

Page 31: ...d DVD RW discs must be made in Video DVD mode Recordings on DVD RW discs must be made in accordance with the specifications for the 4 7 Gb capacity DVD RW disc format Compatibility is dependent on which DVD writer writer software and discs are used Audio CDs 8 and 12 cm audio CDs CD R CD RW Most CD R one recording only and CD RW discs rewritable Compatibility is dependent on which DVD writer write...

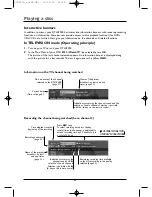
Page 32: ... by 30 minutes up to a total of 3 hours Recording under way page 22 è0h30è1h00è1h30 3h00ç2h30ç2h00ç Interactive banners In addition to menus your DTH 8000 has interactive information banners with icons representing functions or information Some banners provide access to disc playback functions for DVDs CDs VCDs etc while others give you information on the channels and related functions In TELEVISI...

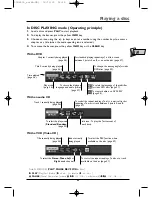
Page 33: ...eo Mono Left or Right audio channel In DISC PLAYING mode Operating principle 1 Load a disc and press PLAY to start playback 2 To display the banner press the yellow INFO key 3 Choose an icon using the keys or enter a number using the number keys to access a chapter or a title when the corresponding icon is selected 4 To remove the banner press the yellow INFO key or the CLEAR key With a DVD With a...

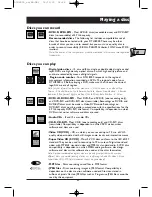
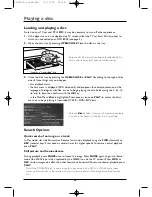
Page 34: ... Press once or twice on PLAY to access the disc s menu or to begin playing it recorded DVD R DVD RW discs Note the Disc heading is shown as transparent when there is no disc in the device or if the disc is not compatible Search Options Quick search of an image or a track In Play mode start the Forward or Reverse fast motion playback using the FWD forward or REV reverse keys Press once or several t...

Page 35: ...edly Move the zoomed image around using and to view a particular spot If this does not work try again after pressing PAUSE To resume normal playback press the key several times to return to the original format Titles chapters time elapsed audio and subtitles From the banner you can access certain functions directly using the keys Choose a title or a chapter DVD or a track CD VIDEO CD Change the la...

Page 36: ...contain one title However some discs may contain several titles each of which is itself divided into several chapters To choose a title select icon T then use the or keys to scroll the titles or tracks Use the numbered keys on the remote control unit to access a particular title or track Chapter DVD Most DVD discs contain several chapters To choose a chapter select icon C then use the or keys to s...

Page 37: ...iscs Video CDs in PBC mode Subtitle and dialogue language DVD 1 While reading a disc press the INFO key the information banner is displayed 2 Use the or keys to select the icon of the subtitles or dialogues as well as the sound format 3 If available on the disc select the language of the subtitles or dialogues using the or keys The selected language name appears beneath the banner Note selecting t...

Page 38: ...Each chapter has a duration of approximately 6 minutes These bookmarks allow you when playing a title to jump forward or backwards by measured amounts by using the Pr Pr buttons You can remove predefined bookmarks or add other bookmarks according to any particular locations that you wish to jump to Delete Chapter Marker DVD RW only If you wish to group together two consecutive chapters to form a s...

Page 39: ...he screen With the disc in playback press ANGLE on the remote control unit and choose the angle using the same key or the or keys PBC Playback control menu VCD This function enables you to make interactive selections of some scenes or information through an on screen menu Moreover high resolution scenes can be viewed if they are included on the disc During playback press INFO the information banne...

Page 40: ... list of files contained in the folder are displayed Note when an audio MP3 file is selected for more than 2 seconds the playing of the first few seconds of the file begins 4 Select a file using the or keys of the remote control then press PLAY Select Standard Play with the key and select a play option using the or keys and confirm with OK Notes play options Standard Play Play All Resume Random Ra...

Page 41: ...n rotate it through 90 using the and keys of the remote control Zooming in on an image zoom and the Pan and Scan function To see more detail press once or several times on the ZOOM key to enlarge the image and use the and keys Return to normal dimensions is carried out by pressing once on the OK key or the PLAY key in order to continue the tray show To stop the picture sequence and return to playe...

Page 42: ...ayer Menu DVD R DVD RW Display the picture titles disc menu loaded into your DTH 8000 Select Player Menu using the keys and press OK Use the same buttons to scroll and choose a picture title Note Picture menu contents your DTH 8000 creates and stores to the disc a picture menu contents each time you will eject a DVD R or DVD RW disc This menu will help you to recover the recorded titles showing tw...

Page 43: ...Note on certain DVDs the picture format cannot be changed With a letterbox format TV 16x9 select 16 x 9 widescreen Films in 16x9 will be fully displayed Films in 4x3 will have vertical black bands on each side of the picture With a 4x3 television select 4 x 3 Letterbox to take advantage of the pictures recorded in that format or 16x9 Select 4 x 3 Standard to take advantage of a 4x3 Letterbox witho...

Page 44: ... the space occupied by titles on the disc are represented by coloured bands at the bottom of the Title menu You can thus get an idea of the space occupied by the various video recordings titles and the remaining time available on the disc Closing a DVD R disc Finalize Disc When a DVD R disc is full or when you do not wish to record any more programmes on it you must close the disc so that it can b...

Page 45: ...is displayed 3 Select Yes and confirm with OK The deleting of the recording will require several seconds Wait until the Please Wait message disappears Modify the title DVD R and DVD RW 1 Select Rename Title and confirm with OK 2 In the confirmation screen that is displayed select Yes and press OK A keyboard of characters is displayed Rename recordings With the and keys Compose the name by selectin...

Page 46: ...with OK Exit the menu using the RETURN key Audio DVD disc dialogue languages Certain discs offer several different languages for the dialogues The default language is the one you selected during installation page 5 if this language is offered on the disc being played To change the language of the dialogues your DTH 8000 provides two possibilities From the menu of the DTH 8000 With the keys select ...

Page 47: ...ou selected for the dialogues see above Because of this if the default language for the dialogues is not available but subtitles are available in this language the subtitles will automatically display From the banner During playback display the information banner using INFO key and select the subtitles icon with the keys Select one of the languages proposed on the disc with the keys or de activate...

Page 48: ...rating limits exceed the limit you have allocated Unlocked you don t need the secret code the play the discs even if you have set a rating limit Your DTH 8000 is delivered in the unlocked position without any rating limit If you want to use the child lock function you have to set a rating limit and position the Lock function on On Locking 4 The Lock line is already selected Press OK to validate If...

Page 49: ...ss OK 6 To return to the DTH 8000 menu press until the menu is displayed on the screen Non categorized titles We often feel that some DVD discs ought to have a ratings limit Unfortunately few discs in Europe have one You can however restrict viewing of such discs by means of the Unrated Titles function by ticking the Password Required option and then locking the DTH 8000 as described on page 48 Wh...

Page 50: ... DTH 8000 you will need to set the DIGITAL AUDIO OUT sockets coaxial or optical so that they deliver the Dolby Digital DTS or MPEG digital signals supported by the other device Tick Dolby Digital or DTS if the amplifier or TV set has a Dolby Digital or DTS decoder or both depending on devices MPEG must be ticked to play a DVD disc on which the sound was recorded using MPEG standard SRS TruSurround...

Page 51: ...ertain TV sets If you want to watch one channel while recording programmes on another channel you must change the AV1 output connection setting by selecting Video instead of RGB in the System Options menu AV2 Input Choose the RGB S Video or Video signal depending on the device connected to the AV2 Scart socket usually a satellite receiver If you don t know which type of signal is accepted by your ...

Page 52: ...discs and the quality adjustment selected in the Recording Options menu Note all times are approximative Access to the adjustment menu is impossible if recording is underway Depending on the adjustment selected the recording time of a DVD R or DVD RW disc is as follows 1 Best 1 hour 2 High 2 hours 3 Good 3 hours 4 Normal 4 hours 5 Basic 6 hours 6 Low 8 hours SmartRecord This function allows you to...

Page 53: ...hereby cause a malfunction of your DTH 8000 The remote control of your DTH 8000 also controls another device Some DVD players made by the Thomson group Thomson Brandt Ferguson Saba Telefunken react to the same codes To avoid this inconvenience you can program your DTH 8000 and its remote control so they have a different code to those of the other devices Refer to page 59 The remote control and the...

Page 54: ... in the language you want Check that your language is available in the settings menu page 46 If not choose another language You can t access the selected menu even when you press OK If the name of the menu appears on a transparent background it means that the corresponding menu or function is not available The Disc Video Music Pictures and Card menus are contextual menus they depend on operations ...

Page 55: ...on the remote control unit down for 3 seconds The password that you chose for parental control is cancelled To reallocate a code see page 48 You can t switch channels During the recording of a TV program or video sequence from a connected device switching channels is impossible To change channels you have to stop the recording completely page 22 The TV guide NAVICLICK is not displayed Downloading ...

Page 56: ...and choose with the PR or PR keys a channel that broadcasts a programme guide Hold the key down for a rapid selection See the list of channels on the following page Updating Naviclick via Teletext Sometimes certain channels modify the organisation of their Teletext journal In this case unless there has been a total modification of the structure you must update the number of the first page of Telet...

Page 57: ...seperately Countries Todays Tomorrows Channels Programmes Programmes Austria ORF1 311 327 ORF2 321 330 Belgium TV1 601 TV2 161 Czchec Republic CT1 301 311 CT2 306 316 NOVA 301 311 PRIM 301 308 Denmark DR1 301 DR2 303 TV2D 301 France ARTE 401 421 FR2 421 FR3 FR5 502 TF1 110 TV5 302 308 NEWS 301 Germany ARD 301 305 ZDF 301 305 RTL 301 305 RTL2 301 305 Holland NED1 201 NED2 202 NED3 203 Hungary DUNA ...

Page 58: ...cs if necessary wipe from the centre to the border Always put discs back into their cases after playing and store in a vertical position Never use record cleaning sprays benzine static electricity liquids or any other solvent if the disc surface is dirty Wipe gently with a soft damp water only cloth never wipe the disc in a circular motion since circular scratches are likely to occur and could cau...

Page 59: ...ng or disassembly is prohibited Remote control Code A B Remote control setting on code B Note The remote control of your DTH 8000 is set to code A 3000 To set it to code B 3001 follow the procedure described below 1 Press and hold the DVD key 2 With the number keys press 3 0 0 1 3 Release the DVD key DTH 8000 setting on code B 1 Switch on your DTH 8000 2 Check that there is no disc in the disc tra...

Reviews: