background image

Advanced functions

16

EN

VCR

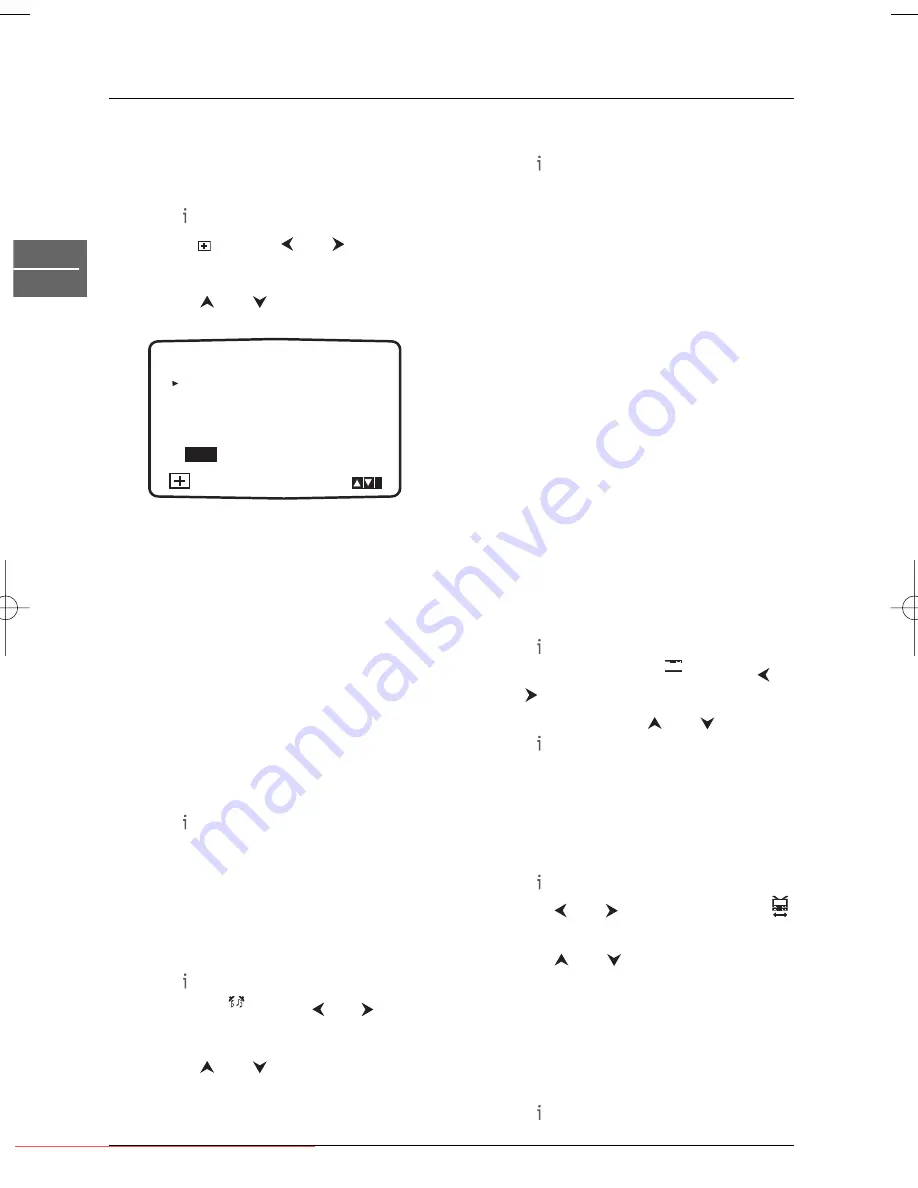
Video Doctor

The video doctor will show the status of
various features of the video recorder.

1.

Press  to access the main menu.

2.

Select 

+

with the 

and 

buttons.

3.

Press 

OK

.

4.

Use the 

and 

buttons to check the

following features:

ANTENNA CONNECT

: Checks the

antenna connection.

HEAD STATUS

PLEASE CLEAN:The tape heads need
cleaning.

TAPE STATUS

NOT RECORDABLE:The protection tab
of the tape loaded in the video recorder is
broken; insert a tape suitable for recording.

NO. OF TIMER  PROGRAMME

: Shows

the number of timer recordings programmed.

NEXT TIMER  PROGRAMME

: Shows

the date and time of the next recording.

5.

Press  to remove the menu from the
television screen.

Sound settings

The video recorder can record and play back
stereo sound.You can select the way sound is
played back.

1.

Press  to access the main menu.

2.

Select 

AUD

with the 

and 

buttons.

3.

Press 

OK

.

4.

Use the 

and 

buttons to choose

between:

STEREO/MAIN

,

STEREO/SUB

or 

MONO/MAIN

in TV mode and

STEREO

,

LEFT

,

RIGHT 

or

MONO

in

playback mode.

5.

Press  to exit the menu.

On screen display (OSD)

This function is used to display the current
time, tape counter, tape remaining, date, day of
week, channel and operational mode of your
video recorder on your television screen.

Note: If a recording is taking place, the on screen
displays will not be recorded onto tape.

1.

Press 

INFO

to show the OSD.

2.

Press 

INFO

repeatedly to scroll the

various display options.The tape counter
and amount of tape left will appear only if a
tape is loaded.

3.

After 3 seconds most parameters are
cleared leaving only the clock or the tape
counter and the amount of tape left on the
television screen.

4.

Press 

INFO

again to remove all OSD’s

from the television screen.

To turn off the on screen displays completely:

1.

Press  to enter the main menu.

2.

Select 

fOSD ON OFF

using the 

and 

buttons and then press 

OK

.

3.

Select 

OFF

using the 

and 

buttons.

Press  to save the setting.

Format

For 16:9 screen playback the video recorder
must be connected to your television using a
SCART cable.

1.

Press  to enter the main menu.

2.

Use the 

and 

buttons to select 

and press 

OK

.

3.

Use the 

and 

buttons to select one

of the available options:

AUTO

: automatically selects the format

best suited to the content,

4:3

: to play back and record in 4:3 format,

16:9

: to play back and record in 16:9 format.

4.

Press  to save your settings.

OSD

ON

OFF

OSD

f

AUD

i

OK

ANTENNA CONNECT
HEAD STATUS
TAPE STATUS
NO. OF TIMER PROGRAMME
NEXT TIMER PROGRAMME

DTH6350E_EN  4/05/05  9:11  Page 16

Downloaded from 

www.Manualslib.com


manuals search engine


Downloaded From Disc-Player.com Thomson Manuals

Summary of Contents for DTH6350E

Page 1: ...On screen display 16 Format 16 Decoder 17 OPR 17 NICAM 17 Resetting the tape counter 17 Child lock 17 Playing NTSC tapes 17 DVD mode Basic playback operations Compatible discs 18 Compatible formats 18...

Page 2: ...ailable at the end of the booklet Accessories provided Remote control 2 non rechargeable batteries typeAAA Coaxial cable Notes DVD copy protection In accordance with the DVD standard your DVD player i...

Page 3: ...l inVCR mode REC To start recording inVCR mode DVD VCR To change from DVD mode to VCR mode and vice versa Front panel controls buttons appearing left to right below Front panel display Indicates total...

Page 4: ...disc menu during play To display the player s main menu see page 27 red To access the audio function in the Info menu see page 22 green To access the subtitle function in the Info menu see page 23 IN...

Page 5: ...mute To mute and restore the sound PR PR To change channel GO BACK To return to the channel watched before last CLEAR To exit a menu MENU To access the television s main menu To use the Zoom function...

Page 6: ...onnections DVD VCR TV satellite or cable receiver 1 Connect the DVD VCR to the television set as described above 2 Connect the satellite or cable receiver scart socket to the DVD VCR s second Scart so...

Page 7: ...gital stereo PCM or to an Audio Video receiver equipped with a multi channel decoder Dolby Digital MPEG 2 or DTS using a digital coaxial cable not supplied Back panel video sockets DVD VCRVIDEO OUT so...

Page 8: ...playback tune your TV until you see a bright blue screen 5 Tune this channel until the video picture is sharp and the sound is clear 6 Store this channel on your TV You will need to look at the TV ins...

Page 9: ...utton to turn the appliance on and then press the VCR button on the remote control 3 Select the AV channel on the television set The ACMS menu screen appears Use the and buttons on the remote control...

Page 10: ...to select letters and numbers for the new channel name up to a maximum of 5 Press the and buttons to pass on to the previous or next character Press OK 11 Press to confirm 12 Press again to remove the...

Page 11: ...next to the window pointing twoards the appliance Stopping playback Press the STOP button on the remote control to stop playback Status of various features of theVCR see page 16 SYS Colour standard se...

Page 12: ...reeze frame x 3 reverse playback x 4 reverse playback 5x speed x 5 reverse playback 7x speed x 1 playback 2x speed x 2 playback 7x speed To resume normal playback press PLAY Note During slow motion no...

Page 13: ...want to record for press the RECORD button twice The television screen shows 0H30 2 Press the RECORD button again to increase the recording time by another thirty minutes to a maximum of nine hours If...

Page 14: ...have entered incorrect information Check the details on the television screen and reenter it If you want to enter more timer recordings repeat the above process from step 3 9 Press to remove the menu...

Page 15: ...e quality of the recording is poor repeatedly press the and buttons on the remote control to manually adjust the tracking until all distortions have been removed Press the 0 button on the remote contr...

Page 16: ...f week channel and operational mode of your video recorder on your television screen Note If a recording is taking place the on screen displays will not be recorded onto tape 1 Press INFO to show the...

Page 17: ...track of the video tape without any separation 1 Press to access the main menu 2 Select NIC with the and buttons to set the NICAM function and press OK 3 Select AUTO to operate the NICAM function aut...

Page 18: ...n on the remote control to display and hide the Info menu Note A function is only available if it features on the disc you have inserted For instance if you select the Subtitles function from the Info...

Page 19: ...ry the speed and direction of the slow motion Note Reverse slow motion is not possible with a VCD 3 Press PLAY to resume normal playback Changing chapter track While the disc is playing press the or b...

Page 20: ...ff in the Others menu see page 31 Press and hold PLAY MODE again to exit the Playback list mode 3 Select a track in the list using the and buttons and press OK to add the track to the playback list Re...

Page 21: ...OK button to execute the setting Press the INFO button again to exit the Info menu Note When one of the icons is not followed by a small arrow this means that the relevant function is not available on...

Page 22: ...the numeric buttons format h mm ss Note If you make a mistake press CLEAR to remove numbers and then input the correct numbers 3 Press OK to confirm Audio Some discs have several audio tracks used fo...

Page 23: ...page 27 Camera angle DVD Some discs offer different camera angles for specific scenes To change the camera angle during playback press the INFO button then select the Angle icon with the and buttons...

Page 24: ...the track Accelerated play 1 While the disc is playing press the REV or FWD button one or more times to vary the speed and direction of the accelerated play 2 Press PLAY to resume normal playback Paus...

Page 25: ...Select a folder using the and buttons on the remote control then press OK to see the folder s contents 4 Select a file using the and buttons on the remote control Note In the file list select and pre...

Page 26: ...eed to input the registration number of your DVD player on the purchase form on the site Follow the instructions below to find the registration number of your player 1 Select the Others option in the...

Page 27: ...tle Disc Menu Move Select LANGUAGE Menu language To change the language of the player menus choose the language using the and buttons and press OK to confirm Disc Audio DVD To change the dialogue lang...

Page 28: ...ct a format using the and buttons 4 3 or 16 9 depending on the type of TV connected to the player 2 Press OK to confirm Display mode DVD Note This option is available only when the TV Aspect mode is s...

Page 29: ...ter Systems Inc Dolby and the double D symbol are trademarks of Dolby Laboratories Licensing Corporation Dolby Digital is a sound compression technique developed by Dolby Laboratories for digital audi...

Page 30: ...level using the and buttons then press OK to confirm Note Select Unlock to unlock the player Password This option allows you to set or change the password To set a password Select the New option and p...

Page 31: ...ayback a DVD disc as soon as it is loaded If the Auto Play mode is set to On the DVD player automatically searches for the longest title on the DVD disc and starts playing back that title Press the an...

Page 32: ...regional code This player s regional code is 2 Clean the disc see page 33 The DVD player is locked Unlock the player or change the rating level see page 30 The picture is of poor quality with snow or...

Page 33: ...components remain connected to the electrical supply If you notice any burning or smoke disconnect the appliance immediately to avoid any risk of electrocution Do not attempt to look inside the appli...

Page 34: ...t humidity or excessive heat Do not place them next to appliances producing strong magnetic or electrical fields electro magnet motor etc Tapes may vary in quality the difference in quality not only c...

Page 35: ...It is an encoding tool specified in the MPEG4 standard Some MPEG4 encoders like DivX or XviD have this option There are different levels of GMC encoding usually called 1 point 2 point or 3 point GMC...

Reviews: