THOMSON DTH231 User Manual Download Page 2

2

Connections and initial set up

Precautions and information before connecting 

• Ensure that the mains supply in your house complies with that indicated on the identification
sticker located at the back of your player. Install your player horizontally, on a suitable base
(furniture), with enough space around it for ventilation (7-10 cm) • Ensure that the ventilation
slots, and the player itself, are not covered by objects such as a mat, newspapers, curtain, etc. o
Do not stack any other equipment on top of your DVD player. o Do not place the player on top
of an amplifier or any other equipment that gives off heat • The appliance should not be in
contact with liquids or exposed to the risk of dripping or splashing.Therefore be careful not to
place any object containing a liquid (vase, glass, bottle,...) on or near your appliance • The player
must not be near or exposed to a flame. For instance, do not place a candle on or near the player
• Protect the player from moisture and excess heat (e.g. fireplace) or equipment creating strong
magnetic or electric fields (i. e. speakers ...). Before moving the player, ensure the disc tray is
empty. Switching off the DVD player to the stand-by mode does not disconnect the electricity
supply. In order to separate the player completely from the mains, it has to be disconnected by
unplugging the mains plug.When connecting, ensure that the plugs of the various cables are
pushed securely into their corresponding sockets.Your player is not intended for industrial use
but for domestic purposes only. Use of this product is for personal use only. Copying CDs or
downloading music files for sale or other business purposes is or may be a violation of copyright
law

Important notice: Please read the recommendations given on page 31.

Accessories provided 

One Scart-Peritel cable – one remote control unit with two non rechargeable AAA batteries.

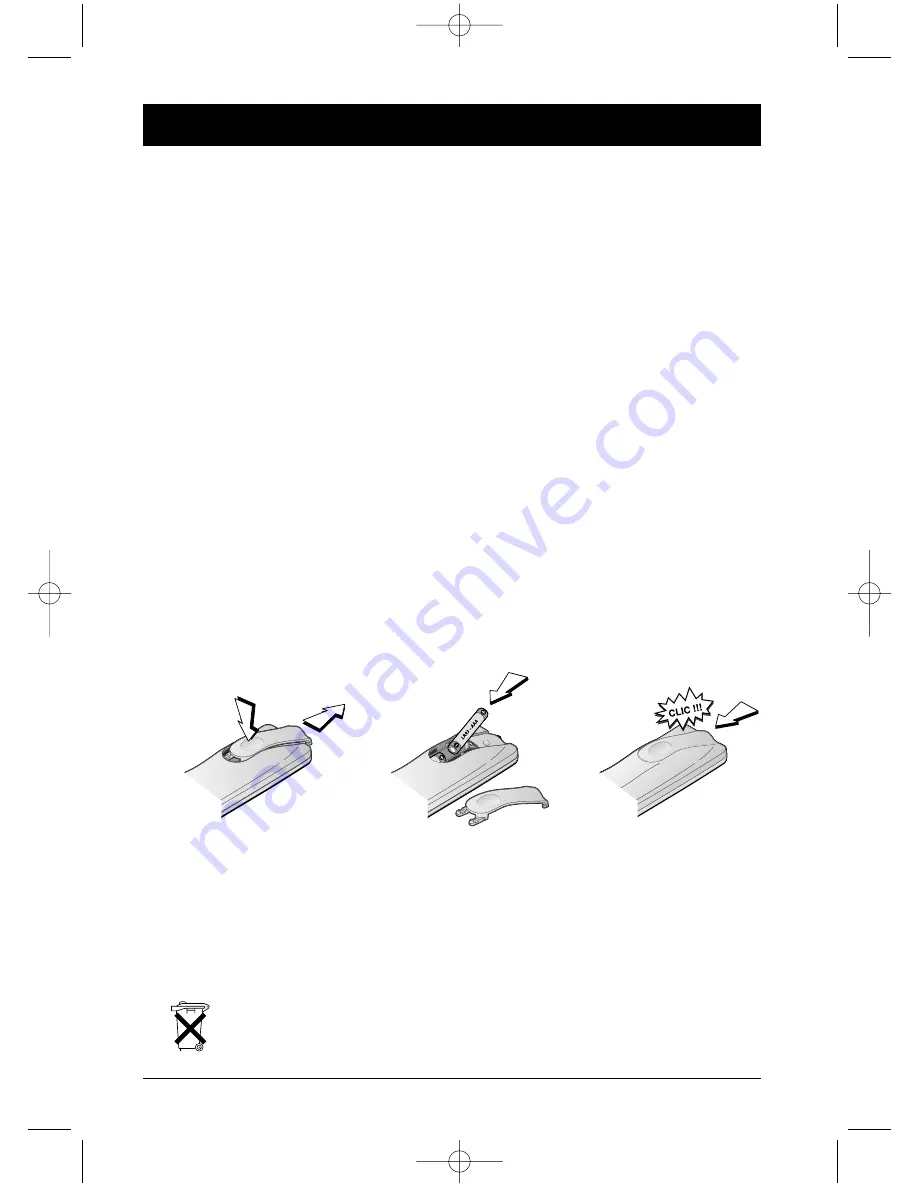
Setting up the remote control unit 

Important information regarding the batteries 

Do not mix different types of batteries or new and old batteries. Do not use rechargeable
batteries. In order to avoid any risk of explosion, observe polarities indicated inside the
battery compartment. Replace only with the type of batteries specified above. Do not throw
them into fire, do not recharge them. Remove the batteries from the remote control unit if
you are not going to use it for several weeks. Immediately remove any leaking batteries.Take
care in doing this, as leaking batteries may cause burns to the skin or other physical injury.

• Please respect the environment and prevailing regulations. Before you dispose of

batteries ask your dealer whether they are subject to special recycling and if he
accepts to take them back.

1

2

3

 2_DTH231_EN  21/08/03  15:50  Page 2

Summary of Contents for DTH231

Page 1: ...17 Adjusting the speed of the image sequence 17 Changing images 17 Rotating an image 17 Enlarging an image zoom and Pan and Scan function 17 To stop the picture sequence and return to player menu 17...

Page 2: ...m the mains it has to be disconnected by unplugging the mains plug When connecting ensure that the plugs of the various cables are pushed securely into their corresponding sockets Your player is not i...

Page 3: ...s available on the TV set check whether the set has another Video socket Components S Video or Composite that you can use to connect to your player using the corresponding socket In this case do not f...

Page 4: ...r of your TV set or amplifier to the Audio In L R sockets Note audio sockets and cables are usually identified by a colour code red for the left channel and white for the right channel 2 Optical and c...

Page 5: ...he selector on TV AUDIO VIDEO OUT enables a Composite CVBS and RGB signal to be delivered to the corresponding Scart Peritel socket If you set the selector on COMPONENT VIDEO OUT only the Composite CV...

Page 6: ...tray if it is open Front panel of the player 2 1 1 1 2 3 4 5 6 is lit up if a DVD is loaded in the player PBC PBC function activated To play Audio CD CD Video CD VCD Super Video CD SVCD Forward play o...

Page 7: ...language you ve chosen if it is available on the discs played 5 Choose a language using the keys on the remote control unit then confirm by pressing OK Displays on your player menus and banners Disc...

Page 8: ...r showing on the TV screen Audio Displays or hides the dialogue language and sound format Subtitles Displays or hides the subtitle language INFO Displays the player information banner on the TV screen...

Page 9: ...e previous menu CLEAR Removes menu or other information displayed on the screen GUIDE Displays TV programme guide INFO Displays information about the channel Note colour keys enable one to use the tel...

Page 10: ...a Mexico New Zealand 5 Russian federation Africa except Egypt and Rep of South Africa India Pakistan 6 China DVD Rewritable Loading and playing a disc Switch on your TV set and DVD player It may be be...

Page 11: ...disc Slow motion in Pause mode on an image During playback press PAUSE once to freeze the image Press FWD or REV to view images in slow motion forward or backward Press once or several times for highe...

Page 12: ...rmation banner with aVCD disc Video CD SVCD disc SuperVideo CD To choose the subtitle language where available on the disc page 15 To reframe the DVD image according to the screen format of your TV pa...

Page 13: ...or instance if you enter 01 35 12 you will access the sequence beginning 1 hour 35 minutes and 12 seconds after the start of the title Note For audio CDs and VCDs the timer refers to the track current...

Page 14: ...nd B Chapter repeat Title repeat if available on disc being played Audio CD discs Standard play Random play Disc repeat Track repeat IntroScan VCD discs Standard play Discs containing mp3 WMA music fi...

Page 15: ...ted 3 Press OK to display the marking banner To find a sequence select the half disc and press OK The half disc symbol is replaced by an arrow and a dustbin The timer shows the place marked To play a...

Page 16: ...begins with the file selected and continues with the following files Where there are sub folders in the folder these are also played Playback then moves to the next folder located at the same level i...

Page 17: ...mages use the PR or PR keys on the remote control unit To view one of the nine images on the whole screen select the image using the and keys and press OK Adjusting the speed of the image sequence Dis...

Page 18: ...name of the sub menu and press OK on the remote control unit The sub menu appears to the right of the previous menu The Sound menu is an example of a sub menu When the Sound line is highlighted press...

Page 19: ...y press PLAY Programming playback Program Play DVDs CDs mp3 WMA To program the playing of a disc you must create your playback list The player menu must be displayed If it is not displayed press STOP...

Page 20: ...cked Locking your player 1 If a disc is being played press STOP the player menu appears 2 Press to highlight Parental Control and press OK 3 Lock is highlighted press OK on the remote control unit a s...

Page 21: ...bit playback of certain discs you will have to set a ratings limit see following page for instructions Setting a ratings limit This function makes it possible to restrict viewing of certain DVD discs...

Page 22: ...escribed below then press OK 4 x 3 Letterbox Select this setting if you want to watch films in their original format height width ratio You will then view the whole image but it may fill a smaller are...

Page 23: ...on your TV screen the standard of the video signals transmitted to your TV is incorrect Change the video signal from PAL to NTSC or vice versa NTSC must be selected if the TV is connected to the play...

Page 24: ...he Sound menu appears 2 Sound Logic is already highlighted OK on the remote control unit Select On or Off using the or keys and press OK Note the performance of this function depends on the appliances...

Page 25: ...settings the digital sound present on the coaxial and optical out sockets will be a PCM digital sound for all discs played in the case of DTS discs no sound will be heard If you set the digital output...

Page 26: ...e subtitles and change the language of the subtitles using the banners The Languages menu enables you to set preferred language options for player Menus disc Menus Audio dialogues Subtitles The method...

Page 27: ...the player The DVD player and discs are area coded If the area code is different the disc will not be recognised by the player The code number for your area is 2 Play starts then stops immediately Is...

Page 28: ...use they depend on the disc playing The language of subtitles or dialogues is not the one you selected at the time of the initial setup When the language of subtitles or dialogues is not available on...

Page 29: ...s but also the following specific recommendations The format of your mp3 files should be ISO 9660 or JOLIET These files are compatible with DOS and Windows applications as well as with Mac OS Your mp3...

Page 30: ...o tracks and interactive menus to be recorded on a CD Super Video CD SVCD discs SVCD Super Video Compact Disc discs comply with standard IEC62107 making it possible to record up to 70 minutes of digit...

Page 31: ...place disc with the label facing upward in case of a single sided disc Always place the disc properly into the tray using the proper guide area Always use a soft cloth to clean discs if necessary wip...

Reviews: